2.6 Working with Shared Folders
A shared folder is like any other folder in your Cabinet, except other people have access to it and it appears in their Cabinets. You can create shared folders or share existing personal folders in your Cabinet. You choose whom to share the folder with, and what rights to grant each user. Users can then post messages to the shared folder, drag existing items into the folder, and create discussion threads. You cannot share system folders, which include the Mailbox, Unopened Items, Sent Items, Calendar, Task List, Checklist, Cabinet, Work In Progress, Junk Mail, and Trash folders.
If you place a document in a shared folder, people with rights to the shared folder don't automatically have rights to edit the document. Before they can edit the document, you must give them Edit rights on the Document Sharing tab.
You can share personal folders with other users. Recipients of the shared folder receive a notification explaining that you have shared the folder with them. They can then accept the folder or decline the folder.
This section contains the following topics:
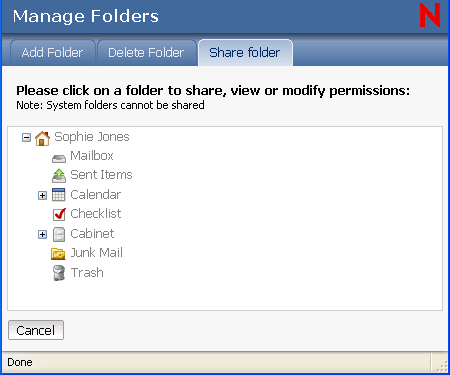
2.6.1 Sharing a Folder
-
Click then click the tab.
-
Select the folder you want to share or modify permissions for. Folders available for sharing are underlined.
-
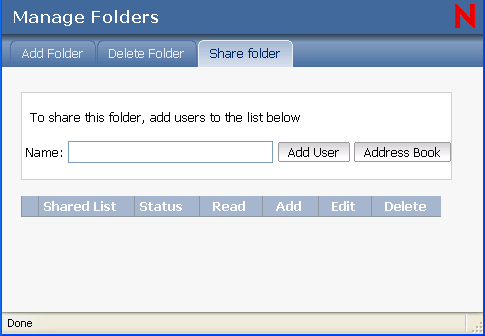
In the Name box, type the GroupWise names or GroupWise user IDs of the people with whom you want to share the folder, then click to add them to the Shared list.
or
Click to use the Address Book to add names to the Shared list.
After you add a shared folder recipient, the Status column displays Pending until the recipient accepts or declines the shared folder.
-
If desired, change the recipient’s shared folder rights.
-
Read: Lets the user read items in the folder.
-
Add: Lets the user add items to the folder.
-
Edit: Lets the user edit items in the folder.
-
Delete: Lets the user delete items from the folder.
-
-
Click if you changed any shared folder rights.
or
Click .
2.6.3 Posting an Item to a Shared Folder
-
In the Folder List, open the shared folder you want to post the item to.
-
At the top of the Item List, click to display a Message form.
-
Type a subject and message.
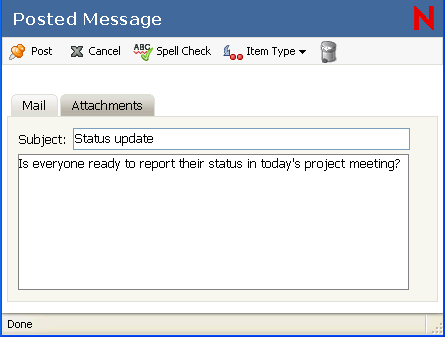
You can include Web site locations or addresses (URLs) in both the and fields.
-
(Optional) Click to spell check the message. For this feature to work, your browser must be enabled for Java.
-
(Optional) Click to attach files to the message. For this feature to work, your browser must support attachments.
-
Click to add the message to the shared folder.