6.5 Printing Calendar Items
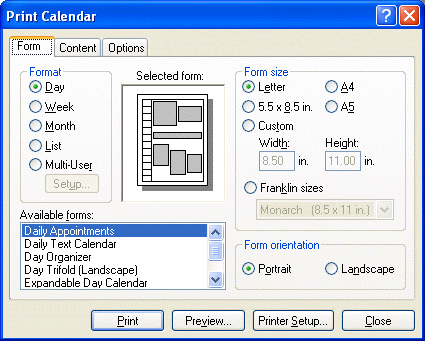
Use Print Calendar to print appointments, tasks, and reminder notes in different formats and on various page sizes. You can also print the Calendar in different page layouts including Daily Appointments, Daily Text Calendar, Day Organizer, Day Trifold, Expanded Day Calendar, and Franklin Day Calendar. When you print the Calendar on a color printer, the Calendar prints in full color. This shows which appointments belong to which calendar, and which appointments have categories.
This section contains the following topics:
6.5.1 Printing Your Calendar, Task List, or Reminder Note List
-
Click > .
-
Click a calendar format in the group box.
-
Click a paper size in the > group box.
-
Click a calendar view under Forms.
-
Click or .
-
Click the tab, type a starting date, then read and select other options.
-
Click , make selections, then click .
-
Click the tab, then read and select other options.
For help on any option, click
 , then click the option.

-
Click the button to see how the page layout looks with the selected options. If necessary, change the options.
-
Click .
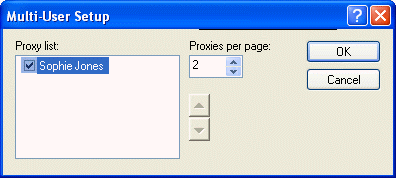
6.5.2 Printing the Calendars of Multiple Users
-
Make sure you have Proxy Read rights to the Mailboxes of all the users whose schedules you want to print.
-
Click > to make sure that all of the users whose schedules you want to print appear in your Proxy List. If they do not appear on the list, add them.
-
Click > .
-
Click Multi-User in the group box, click , then select the users whose schedules you want to print.
-
Specify the maximum number of proxy schedules to print per page in . For example, if you are going to print the schedules of nine users, but only want three schedules per page, you would specify 3.
-
Click .
-
Click a calendar view under Forms.
-
Click a paper size in the group box.
-
Click or .
-
Click the tab, then read and select other options.
-
Click the tab, then read and select other options.
For help on a dialog box option, click
, then click the option.
-
Click the button to see how the multi-user page layout looks with the selected options.
-
Click .