3.5 Downloading POP3 and IMAP4 Accounts to GroupWise
If you have multiple e-mail accounts, you know that it’s inconvenient to change locations to look at each account. You can add your POP3 and IMAP4 Internet mail accounts to GroupWise so that you can read and send messages for all your accounts from GroupWise.
3.5.1 Adding POP3 and IMAP4 Accounts to GroupWise
Before you add a POP3 or IMAP4 account to GroupWise, you need to know the type of mail server being used (POP3 or IMAP4), your account name and password, and the name of the incoming and outgoing mail servers. You can get this information from your Internet Service Provider or LAN administrator. Microsoft* Secure Password Authentication is supported for accessing Exchange servers and MSN accounts.
3.5.2 Configuring POP3 and IMAP4 Accounts
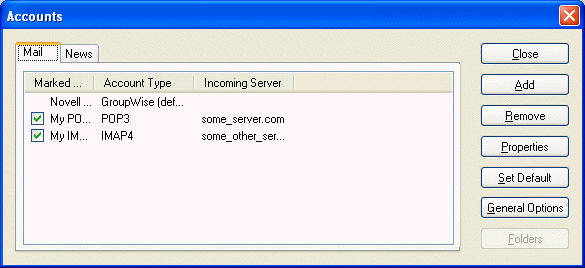
The Accounts menu in the GroupWise Main Window allows you to access account features, such as adding an account, setting account properties, and sending and retrieving items from Internet mail accounts.
3.5.3 Using POP3 and IMAP4 Accounts in Online Mode
If the Accounts menu is not available in your Online Mailbox, your system administrator has specified that POP3 and IMAP4 accounts cannot be used in Online mode.
3.5.4 Using POP3 and IMAP4 Accounts in Remote and Caching Modes
While you are using Remote mode, you can check Internet mail accounts without connecting to GroupWise.
The Accounts menu is always available in Remote mode.
If you are using GroupWise in either Remote mode or Caching mode, you have the option of not uploading a POP3 or IMAP4 account to your Online Mailbox. To make sure you don’t upload, click > , select an account, click , then deselect .
3.5.5 Storing Items on the IMAP4 or POP3 Server
Your IMAP4 account items are always stored on the IMAP4 server. You can choose to have your POP3 account items stored on the POP3 server. If you store items on the server, you can read those items from more than one computer.
3.5.6 Understanding IMAP4 Accounts
When you add an IMAP4 account, the folder you see in GroupWise represents the folder on your IMAP4 server. Any actions in the GroupWise folder, such as creating, or deleting, are performed on the IMAP4 server as well.
When you delete an item, it is marked for deletion on the IMAP4 server. To remove the item, you need to purge it. You can download only the subject (header) of an item, or you can download the entire item. You can move items from another folder into an IMAP4 folder, and the items are created on the IMAP4 server.
If you use your IMAP4 account while you are in Remote mode, any changes you make are synchronized with the GroupWise server the next time you connect to your Online Mailbox.
Querying in IMAP4 folders is not supported. Proxy for IMAP4 folders is not supported.
3.5.7 Using the GroupWise E-Mail Importer Utility
The GroupWise E-Mail Importer Utility lets you import information from supported POP3 and IMAP4 clients into GroupWise. The menu > > option lets you create new accounts. For information about importing accounts from supported e-mail clients, see Importing POP3 and IMAP4 Accounts.
3.5.8 Using POP3 and IMAP4 in GroupWise
Adding a POP3 or IMAP4 Account to GroupWise
Make sure you know the type of mail server being used (POP3 or IMAP4), your account login name and password, and the name of the incoming and outgoing mail servers.
Contact your Internet Service Provider for this information.
-
Click > .
-
Click .

-
Follow the prompts.
Modifying Properties of a POP3 or IMAP4 Account
-
Click > .
-
Click the Account you want to modify.
-
Click .
-
Click the tabs to find the properties you want to modify.
-
Modify the properties, then click .
For IMAP4 accounts, if you change the account name, the name of the IMAP4 folder is also changed.
Downloading Items from POP3 and IMAP4 Accounts
-
To download items from one account, click > , then click the account name.
or
To download items from all accounts in which is selected in the account properties, click > > .
In Remote mode, if is selected in Remote Properties, you can download items from your Online Mailbox at the same time as your Internet mail accounts.
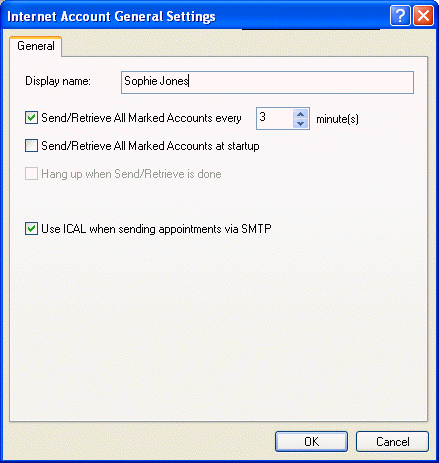
Downloading New Items from POP3 and IMAP4 Accounts Automatically
-
Click > .
-
Click .
-
To download items periodically, select . Specify how often you want items to be sent and retrieved.
-
To download items every time you start GroupWise, select .
The settings affect all accounts that have selected in the account’s properties.
If you have created new items for these accounts and have not yet sent them, they are sent at the same time new items are downloaded.
To quickly turn this option on and off, click > . It is active when a check mark is displayed.
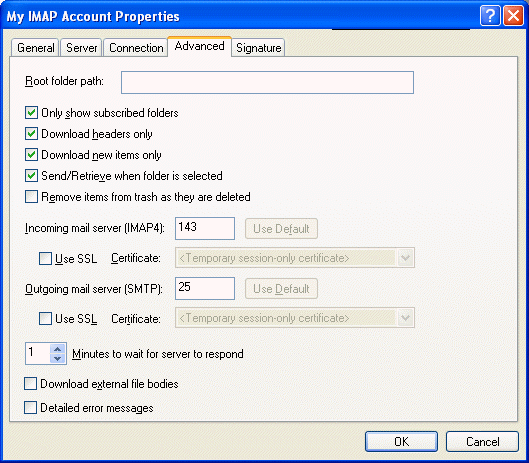
Downloading Only the Header (Subject) for IMAP4 Accounts
-
Click > .
-
Click the IMAP4 account, then click .
-
Click the tab.
-
Select .
-
Click , then click .
After downloading the headers (subjects) of items, you can download the complete item by opening the item while you are connected to the Internet.
Using GroupWise to Send POP3 and IMAP4 Mail
-
In an item you want to send, click > , then click the account from which you want to send.
or
Click
 , then click the account.
The From name associated with that account will be in the From box of this item.
To set the default account from which items are sent, click > , click an account, then click .
Deleting an Item from a POP3 or IMAP4 Account
-
To delete an item from an IMAP4 or POP3 account, click the item, then press Delete.
or
To delete an IMAP4 item from the IMAP4 server, drag the item from the IMAP4 folder and drop it in a regular GroupWise folder.
or
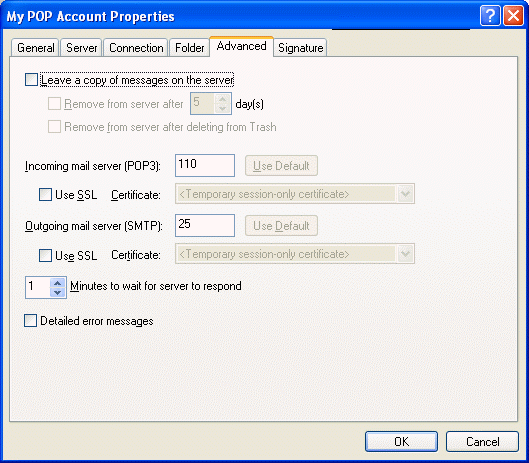
To delete POP3 items from the POP3 server as they are downloaded, click > , double-click the POP3 account, click the tab, make sure is deselected, then click .
If you select both and , the POP3 items will be deleted from the POP3 server the specified number of days after the item is downloaded.
If you select both and , the POP3 items are deleted from the POP3 server when you manually empty them from the Trash. If GroupWise automatically empties your Trash, the items are not deleted from the POP3 server.
Connecting to a POP3 or IMAP4 Server Using SSL
You can connect to your POP3 or IMAP4 mail server using SSL, which is an Internet security protocol that helps maintain the confidentiality of your messages. In order for you to use this option, your mail server must support SSL.
-
Click > .
-
Click the account, then click .
-
Click the tab.
-
Select , then specify the digital certificate you want to use.
This certificate enables GroupWise to use SSL to authenticate to the mail server you have chosen. (If no certificates are listed in the drop-down list, you need to use your Web browser to obtain a certificate from an independent Certificate Authority. For more information, see Section 12.4, Obtaining a Security Certificate from a Certificate Authority.)
-
Click , then click .
Importing POP3 and IMAP4 Accounts
Use the GroupWise E-Mail Importer Utility to import existing POP3 and IMAP4 accounts into GroupWise. In addition to importing messages from your existing POP3 and IMAP4 accounts, you save time by not retyping address book entries into the GroupWise address book.
-
Click > .
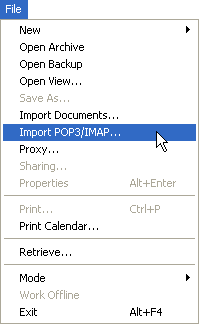
The Installed E-Mail Clients list box displays the e-mail accounts installed on your machine.
-
Select the e-mail account you want to import into GroupWise, then click .
-
Select the appropriate check boxes to import the account information into GroupWise.
You can choose e-mail messages, address books, account settings, or any combination of the three.
-
Click .
-
Click the folders that you want to import from your existing e-mail account into GroupWise.
When you import a folder, all messages and subdirectories in that folder are also imported.
-
Click .
-
Type a name for the new GroupWise folder to contain the imported messages and folders, use the , , , and buttons to position the folder in the GroupWise Cabinet, then click .
-
Type a name for the new GroupWise address book to contain the imported addresses.
The name you type displays on a new tab in the GroupWise Address Book.
-
Click .
-
Click the accounts that you want to import into GroupWise, then click .
-
Accept the default name for the new account, then click .
or
Select the account folder in the list box, click , type a new name, click , then click .
-
Review the summary information to ensure that it is correct, then click .
or
Click to change your import options.
-
Ensure that the e-mail account was successfully imported, then click .
Storing Your POP3 Items on a Mail Server
-
Click > .
-
Click the POP3 account name.
-
Click .
-
Click the tab.
-
Click .
-
Click , then click .
Changing the Length of Time for POP3 and IMAP4 Server Timeouts
-
Click > .
-
Click the account name.
-
Click .
-
Click the tab.
-
Type the number of minutes in the field.
-
Click , then click .
Subscribing and Unsubscribing to IMAP4 Folders
This feature is available if your IMAP4 server supports subscribing and unsubscribing to folders. When you unsubscribe to a folder, it no longer displays in your list of folders under the IMAP4 server, even though it is still in your IMAP4 account. This is especially useful if you are accessing an NNTP account through an IMAP4 folder.
-
Click > .
-
Click the IMAP4 account, then click .
-
Click the tab to see all the folders in this account.
or
Click the tab to see the folders you are currently subscribed to.
-
If you want to list folders containing specific text in the folder name (instead of listing all of the folders), type the text in the text box, then click .
-
Click the folder name, then click .
or
To unsubscribe to a folder, click the folder name, then click .
-
Click .
Alphabetizing the Folders in an IMAP4 Account
-
In the Full Folder List, right-click the IMAP4 account folder, then click .
This option is not available if the folders are already alphabetized. To access the Full Folder List, click the folder list header drop-down list (above the Folder List; it probably displays or to indicate what mode of GroupWise you are running in), then click .
Downloading Voice Mail Attachments through an IMAP4 Account
If you are accessing a telephony server through this IMAP4 account, GroupWise can download the external file bodies for voice mail attachments.
-
Click > .
-
Click the IMAP4 account, then click .
-
Click the tab.
-
Select .
-
Click , then click .