6.6 Creating Rules
You can automate many GroupWise actions, such as replying when you’re out of the office, deleting items, or sorting items into folders, by using Rules to define a set of conditions and actions to be performed when an item meets those conditions.
When you create a rule, you must do the following:
-
Name the rule.
-
Select an event. The event is the trigger that starts the rule.
-
Select the types of items to be affected by the rule.
-
Add an action. The action is what you want the rule to do when it is triggered.
-
Save the rule.
-
Make sure the rule is enabled.
You can specify many more options to limit which items a rule affects. For example, you can apply a rule to only accepted appointments, to items with a certain word in the Subject box, or to items with a high priority. Use Define Conditions to limit your rules further. See Limiting Items Affected by a Rule.
This section contains the following topics:
6.6.1 Actions a Rule Can Perform
Table 6-5 Rules and Actions
6.6.2 Events That Trigger a Rule
Table 6-6 Events That Trigger a Rule
6.6.3 Creating a Rule
-
Click > , then click .
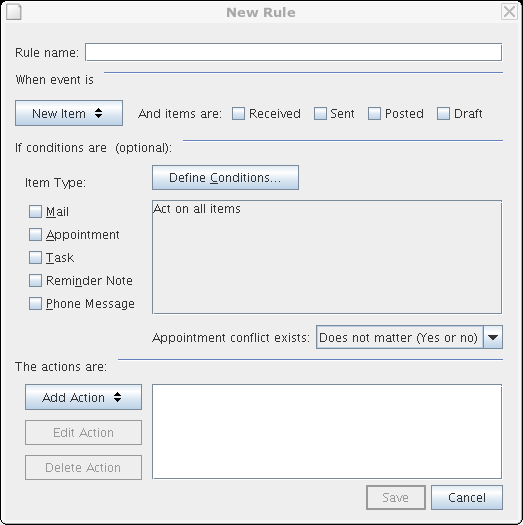
-
Type a name in the field.
-
Click the pop-up list, then click an event to trigger the rule.
-
If you clicked , , , or , click one or more sources for the item. For example, click and .
or
If you clicked , , or , click the folder icon, click a folder, then click to display the folder name.
-
Click one or more types of items you want the rule to act on in the list.
If you want to further restrict the items affected by the rule, click , click the appropriate options, then click . For more information, see Limiting Items Affected by a Rule.
-
Click , then click the action you want the rule to perform.
Some actions such as and require you to fill in additional information.
-
Click .
For a rule to function, it must be enabled. See Enabling or Disabling a Rule.
6.6.4 Creating a Vacation Rule
-
Click > , then click .
-
Type a name in the field, such as Vacation Rule.
-
Click the pop-up list, then click .
-
Next to , select . Make sure no other item source is selected.
-
Do not make any selections under .
-
Use Define Conditions to add specific information to your rule. The following are examples of using Define Conditions.
-
If you want to set up the dates during which the rule is in effect: Click , click in the first drop-down list, click in the second drop-down list, then in the date field, select the date you are leaving on vacation. Click the pop-up list, then click . On the new line, click in the first drop-down list, click in the second drop-down list, in the date field, select the date you are returning from vacation, then click .
-
If you want to make sure you reply only to items that are sent specifically to you (and not to list servers or newsgroups): Click . If you have already specified information in this dialog box, click the pop-up list, then click . On the new line, click in the first drop-down list, click in the second drop-down list, then in the next field, type your name as it displays in the To field of a mail message.
-
If you want to make sure that you do not reply to items from yourself (possible through proxies, for example): Click . If you have already specified information in this dialog box, click the pop-up list, then click . On the new line, click in the first pop-up list, click in the second drop-down list, in the next field, type your name as it displays in the From field of a mail message, then click .
-
If you want to reply to internal items only: Click . If you have already specified information in this dialog box, click the pop-up list, then click . On the new line, click in the first drop-down list, click in the second drop-down list; in the next field, type *@*, then click .
-
-
Under , click , then click .
The Reply dialog box is displayed, showing selected (you cannot select ). If you want your reply to include the sender’s original message, select . Click .
-
Type a message, for example:
I will be out of the office from September 3-September 10. If you need assistance during this time, please contact Martha Robbins at extension 1234.
-
Click .
-
Click , verify that the rule has a check mark next to it indicating that it is enabled, then click .
Rules that trigger a reply (such as this vacation rule) keep a record of who a reply has been sent to, and make sure that a reply is sent only once to that user.
6.6.5 Creating a Rule to Forward All Mail to a Private Mail Account
-
Click > , then click .
-
Type a name in the field, such as Forward Rule.
-
Click the pop-up list, then click .
-
Next to , select . Make sure no other item source is selected.
-
Select under .
-
Click , then select .
-
Type the address that you want the items forwarded to in the field.
-
Type a subject you want to use for forwarded items, for example frwd:.
-
(Optional) Type a name of a filter to use for forwarded items.
-
(Optional) Type a message for all forwarded items.
-
Click .
-
Click , verify that the rule has a check mark next to it indicating that it is enabled, then click .
6.6.6 Copying a Rule to Make a New Rule
-
Click > , then click .
-
Click the rule you want to copy, then click .
-
Type the name of the new rule.
-
Make changes to the rule.
-
Click .
6.6.7 Editing a Rule
-
Click > .
-
Click the rule you want to edit, then click .
-
Make changes to the rule.
-
Click .
6.6.8 Deleting a Rule
-
Click > .
-
Click the rule you want to delete, click , then click .
6.6.9 Limiting Items Affected by a Rule
Use Define Conditions to further limit the items affected by a rule.
-
In the Rules dialog box, click .
-
Click the first drop-down list, then click a field.
To learn about what the fields represent, see Understanding Rule Fields.
-
Click the operator drop-down list, then click an operator.
To learn how to use operators, see Using Rule Operators.
-
Type the criteria for the filter.
or
If a drop-down list is provided, click the drop-down list, then click existing criteria.
-
Click the last drop-down list, then click .
or
Click the last drop-down list, then click or to further limit the items affected by the rule.
6.6.10 Running a Rule Manually
-
Click the items or folders that you want affected by the rule.
-
Click > .
-
Click the rule you want to run.
-
Click , then click .
The rule actions occur after you close the Rules dialog box.
6.6.11 Enabling or Disabling a Rule
A rule must be enabled before it can be triggered. When you disable a rule, the rule cannot be triggered. However, the rule is still listed in the Rules dialog box so you can enable it when you need it again.
-
Click > .
-
Click the rule you want to enable or disable.
-
Click or .
An enabled rule has a check mark in the box.
6.6.12 Using Rule Operators
The available operators depend on the field you have selected in the first drop-down list.
Table 6-7 Rule Operators
6.6.13 Understanding Rule Fields
The following table explains many of the fields available to you when you’re creating a rule. Other user-defined fields might also be available.
Table 6-8 Rule Fields