2.3 Using Folders to Organize Your Mailbox
Use folders to store and organize your items. For example, you can group all items related to a particular task or subject together.
2.3.1 Understanding Folders
All folders are subfolders of your Home folder. Click and to expand and collapse folders. For information about the individual folders you might have in your Folder List, see the Section 1.5, Exploring the Folder List.
Next to any folder (except for shared folders), the number of unread items is shown in square brackets. Next to the Sent Items folder, the number in square brackets shows how many items are pending to be sent from Caching mode.
You can organize items in your folders by moving or linking them. When you move an item into a folder, it is taken from one location and placed in another. When you link an item to a folder, the item still exists in its original folder and it also appears in the new folder. When you change a linked item, it is also changed in the other folders. If an item is linked to multiple folders and you delete the original item, the copies in your other folders remain.
You can define a different set of properties for each folder in your Mailbox. For example, you can sort the items in one folder by date, and sort the items in another folder by company.
2.3.2 Displaying the Folder List
Reorganizing Your Folders
-
Click > .

Use the options in the Folders dialog box to create, delete, rename, and move folders.
Alphabetizing the Folder List
-
Mac: Control+click the Home folder or any other folder.
Linux: Right-click the Home folder or any other folder.
-
Click .
Closing the Folder List
You can also close your Folder List to leave more room for other views, such as the Calendar, in the Main Window. This is convenient when you access your folders through the Nav Bar. To hide or show the Folder List, click.
If you are not displaying your Folder List and you drag and drop an item to where the folder location is, the Folder List pops out so you can drag and drop the item to the Folder List.
2.3.3 Working with Folders
Creating a Personal Folder
-
In the Folder List, click > > .
-
Make sure is selected, then click .
-
Type a name and description for the new folder.
-
Click , , , or to position the folder where you want it in the Folder List, then click .
-
Specify the display settings for the folder, as described in Section 2.3.5, Customizing Folder Display Settings, then click .
Moving a Folder
-
Drag and drop the folder to the desired location in your folder structure.
See also Reorganizing Your Folders.
Renaming a Folder
-
Mac: Control+click the folder.
Linux: Right-click the folder.
-
Click .
-
Type a new name for the folder, then press Enter.
You cannot rename the Calendar, Documents, Mailbox, Sent Items, Tasklist, Contacts, Cabinet, Work In Progress, or Trash folders.
Deleting a Folder
-
Mac: Control+click the folder you want to delete.
Linux: Right-click the folder you want to delete.
-
Click .
-
Select or , then click .
You cannot delete the Calendar, Documents, Mailbox, Sent Items, Tasklist, Contacts, Cabinet, Work In Progress, or Trash folders. You can delete the Junk Mail folder only if Junk Mail Handling has been disabled.
2.3.4 Managing Item Lists in Folders
Enabling Group Labels
You can sort the messages in a folder into groups by using Group Labels. Group Labels group the messages according to the column that is being sorted. For example, the message list default sort is by the date, so the Group Label default is also by date. Messages are sorted by the day they are received. You can set a Group Label for each folder.
-
Mac: Control+click the folder.
Linux: Right-click the folder.
-
Click .
-
Click the tab.
-
Select .
-
Click .
To collapse or expand Group Labels, click the + or - sign next to the label.
Enabling Message Previews
You can display a message preview of the messages in the message list to show up to 2 lines of the message. When you select to display a message preview, the first few lines are displayed under the message in the message list.
-
Mac: Control+click the folder.
Linux: Right-click the folder.
-
Click .
-
Click the tab.
-
Select .
-
Click .
Using Columns
The Item List in a folder is divided into columns. Each column displays information about the items in the list. For example, different columns display the subject of items, the date they were sent, and so forth. You can customize the column display for each folder.
Moving a Column
Drag a column to a new position in the column header.
Resizing a Column
Drag the edge of the column heading to make the column wider or narrower.
Adding a Column
-
Mac: Control+click the column header.
Linux: Right-click the column header.
-
Click a column to add.
or
Click .
-
In the list, select one or more columns, then click .
-
Use and to position the new columns relative to the existing columns.
-
Click .
-
Sorting by a Column
-
Mac: Control+click the folder containing the items you want to sort.
Linux: Right-click the folder containing the items you want to sort.
-
Click > .
-
Select the item type you want to sort in the drop-down list.
-
Click the item property you want to sort by in the drop-down list.
-
In the drop-down, click to sort from A to Z.
or
Click to sort from Z to A.
-
Click .
Removing a Column
Drag the column heading off the column header bar.
Moving or Linking an Item to Another Folder
-
Drag an item from the Item List to the folder you want.
Mac:
Press Command while you drag the item to remove it from all folders it was previously linked to and place it in only that folder.
Press Option while you drag the item to link it to that folder.
Linux:
Press Alt while you drag the item to remove it from all folders it was previously linked to and place it in only that folder.
Press Ctrl while you drag the item to link it to that folder.
or
Use menu options to perform the same task:
-
Select an item, then click >
-
Select the folders you want to move or link the item to, then click or .
-
Select to remove the item from all folders it was previously linked to and place it in the selected folder.
-
If you delete the original item, the copies in your other folders remain.
Changing the Item Read Options
You can select to have the folder display either the first unread item or to the last item read. However, if the folder contains a large number of items, it could take a while for the contents of the folder to display.
To select the default read option for the folder:
-
Mac: Control+click the folder to modify.
Linux: Right-click the folder to modify.
-
Click .
-
On the tab, select .
If you deselect , the folder displays the last item read.
-
Click .
2.3.5 Customizing Folder Display Settings
Display settings determine how GroupWise displays the information in a particular folder. For example, the Home folder has a default display setting that includes the Folder List and panels. These settings are saved in the GroupWise database so they follow you from machine to machine. You can select from a list of default preconfigured display settings or customize your own display settings.
Understanding Basic Folder Display Settings
You can view the items in any folder in different ways, depending on how you want the information organized.
-
Mac: Control+click the folder to modify.
Linux: Right-click the folder to modify.
-
Click .
-
Click the tab.
-
Select the display setting from the drop-down list.
You can select from the following settings:
-
Click .
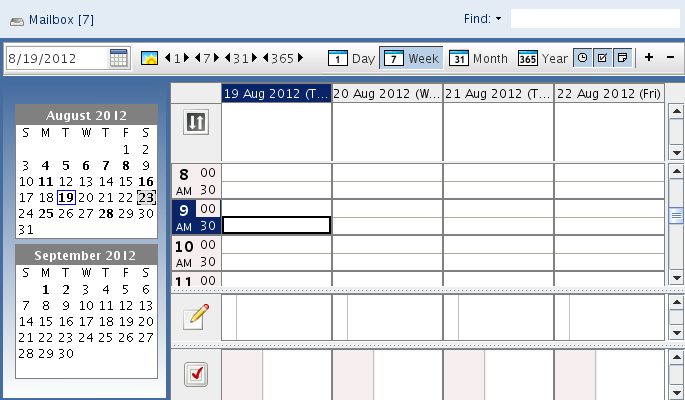
Calendar
The As Calendar view displays all scheduled items that are saved in a particular folder. This is useful if you organize all your appointments and other items for a specific project in one folder.
Figure 2-1 Calendar View
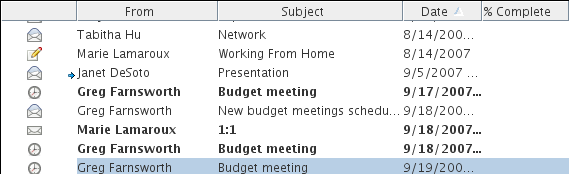
Tasklist
The As Tasklist view displays a Tasklist area at the top of your Item List where you can create a Tasklist from items in your Item List. Each item that is dragged to the Tasklist area displays with a check box so that you can mark it completed. You can assign due dates, priorities, and more to Tasklist items. Any items you move to the Tasklist area also display in the Tasklist folder in the Folder List.
For more information about creating a Tasklist, see Section 5.4, Using the Tasklist Folder.
Figure 2-2 Tasklist View
Discussion Thread
Discussion Threads shows the e-mail discussion of an original item and all its replies grouped in hierarchical order. By default, only items that are received are displayed in a discussion thread.
Figure 2-3 Discussion Threads View
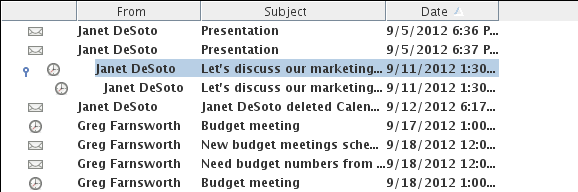
By default, only items that are in the folder are displayed in a discussion thread. You can add other types of items to the folder to be viewed in the discussion thread. For example, sent items can be added to the folder to complete the discussion thread.
To display sent items in a discussion thread:
-
Mac: Control+click the folder that is displaying discussion threads.
Linux: Right-click the folder that is displaying discussion threads.
-
Click .
-
Click the tab, then click .
-
Select under .
-
Click twice, then specify a name for the display setting.
-
Click .
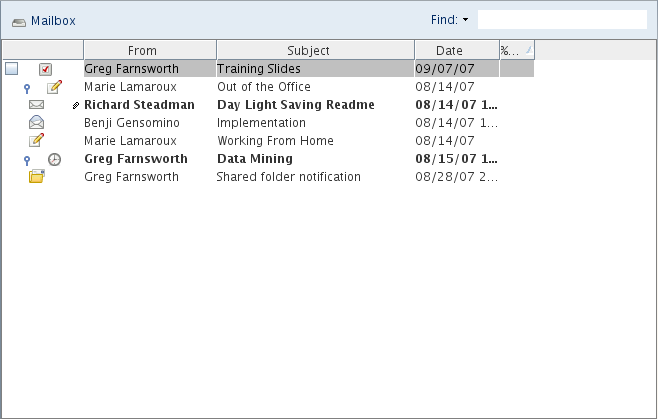
Details
Details displays a list of your items and information about them organized in columns, including , , , , , , , , and many other item properties. Details is the default view for most folders. For information about adding or rearranging columns, see Using Columns.
Figure 2-4 Details View
Panels
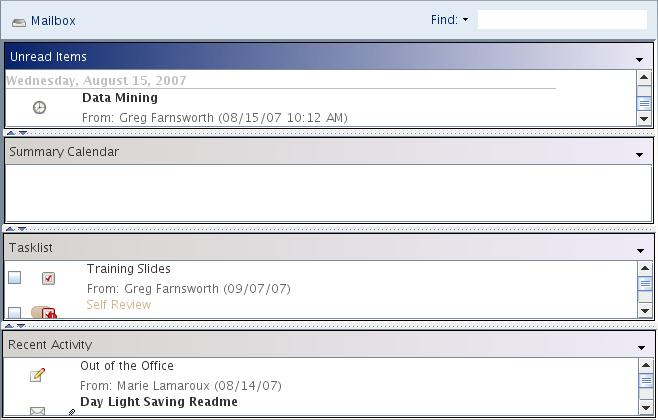
A panel displays a customized view of information in GroupWise. For example, the default Home folder includes an Unread Messages panel, which displays a list of items you have not read. The Tasklist panel is another default panel on the Home folder. The Tasklist panel displays items that are in your Tasklist folder.
Figure 2-5 Panels
Changing or Deleting Folder Display Settings
You can control the name that appears in the drop-down list, the source of the items in the folder, the column display, and the order in which items sort in the folder. The display settings are set at the folder level. If you want to use the same display settings for multiple folders, save the display settings, then use that display setting for the other folders.
-
Mac: Control+click any folder.
Linux: Right-click any folder.
-
Click .
-
Click the tab.
-
Click the display setting you want to modify in the drop-down list.
-
Make any changes to the display settings in the dialog box.
-
Click , change the display settings name as required, then click .
The new display settings name is added to the drop-down list for selection on other folders.
-
To delete a folder display setting, click the display setting, then click .
-
Click .