3.3 Receiving E-Mail
GroupWise stores all the mail messages, appointments, and other items you receive in your Mailbox.
From your Mailbox, you can read items, reply to items, and forward items you receive. You can organize items by assigning them to categories or by creating a Tasklist. You can delegate tasks and appointments to other users. You can handle unwanted Internet e-mail with Junk Mail Handling. You can even change an item, such as a mail message, to another type of item, such as an appointment.
Figure 3-1 Mailbox View

3.3.1 Reading Received E-Mail
You can read items you receive in your Mailbox or Calendar. Your Mailbox displays a list of all of the items you have received from other users. Posted appointments, tasks, and reminder notes appear in your Calendar, not in your Mailbox.
You can open and read all types of new items in your Mailbox. However, you might want to read tasks and reminder notes in your Calendar so you can view new messages while looking at your schedule.
Phone and mail messages stay in your Mailbox until you delete them. Appointments, reminder notes, and tasks stay in your Mailbox until you accept, decline, or delete them. When you accept an appointment, reminder note, or task, it is moved to your Calendar.
All Mailbox items are marked with an icon. The icons change depending on whether or not the item has been opened. See Section 1.9, Identifying Icons Appearing Next to Items for more information.
All unopened items in your Mailbox are bolded to help you easily identify which items and documents you have not yet read. This is especially useful for collapsed discussion threads because it saves you the time of expanding each thread to check if there are newly posted items.
Selecting the Default Read View
By default, GroupWise uses the HTML Read view to display items for reading. This Read view enables both HTML-formatted and plain text e-mail to display correctly.
When you read an item in GroupWise, you can select how you want the message to display. You can select whether the message is displayed in text or HTML. If the message is a text message, you can also select the default font and font size.
-
Click > , then double-click .
-
Click the tab.
-
Click .
-
Select either or .
If you select , select the font and the font size in the appropriate fields.
-
(Optional) Select if you want to force all messages to be displayed in text only.
-
Click .
Reading Items
Reading Text Items
Depending on your default view options, text messages are automatically displayed in text format.
To read a text message:
-
Double-click the message in the Message list to view the message in a new window.
or
Select the message to view the message in the QuickViewer.
Reading HTML Items
Depending on your default view options, HTML messages are automatically displayed in HTML format.
To read an HTML message:
-
Double-click the message in the Message list to view the message in a new window.
or
Select the message to view the message in the QuickViewer.
NOTE:For security reasons, images are not displayed by default in HTML messages. To view the images, click .
Setting Default Options for Images in HTML E-Mail
When you receive an HTML message from an external address, the images are blocked for security reasons. To display the images in the message, click the message that reads .
To set your default setting for displaying external HTML images:
-
Click > , then double-click .
-
Click the tab.
-
Select if you want to , , or .
If you select , images display from senders in your Frequent Contacts address book, but the warning displays for everyone else.
-
Click .
Changing the Font of Received Items
This information applies to reading an item in an item view or in the QuickViewer. This font change is only in effect while you read the item. If you close the item and re-open it, the font returns to the Windows system default font or the font that the sender composed the item in. The Windows system default font affects every program on your desktop. To change the Windows system default font, open the Control Panel and change the Display Properties.
You cannot change the font in the QuickViewer if the item was composed in HTML view.
-
Select the text you want to change.
-
Click > .
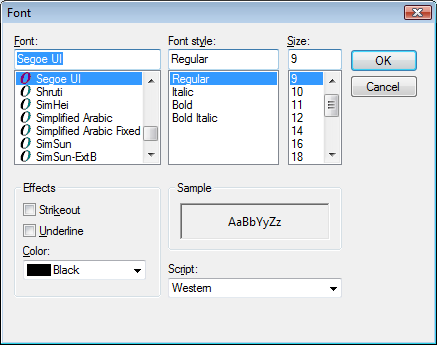
-
Click a font and a font style.
-
Click a size.
-
Click any other options you want to change, then click .
Setting the Default Viewer
When viewing a message attachment in GroupWise, you can select to use the default viewer application for the file type of the attachment. The following viewers are available for use within GroupWise:
-
Adobe Acrobat
-
Microsoft Office
-
OpenOffice.org
-
Apple QuickTime
-
Macromedia Flash
-
AutoVue
To change the default viewer:
-
Click > .
-
Click .
-
In the group box, select the viewer to use.
-
Click .
Setting the Web Browser Behavior
-
Click > .
-
Click .
-
Select if you want to or .
-
Click .
Marking an Item Read Later
If you open an item, and then decide you want to read the item later, you can mark the item read later. Marking the item read later changes the item to bold and changes the item’s icon to unopened so you know you still need to read the item.
-
In the Mailbox, click the item in the Item List.
-
Click > .
If you have opened an item, marking it read later does not change the status of the item in Properties. For example, if you have opened an item, then marked the item read later, the sender of the item still sees the item status as Opened in the Properties window.
Marking an Item Read
-
In the Mailbox, click the item in the Item List.
-
Click > .
Marking an item Read changes the status of the item in Properties. For example, if you have not opened an item, but you marked the item read, the sender of the item sees the item status as Opened in the Properties window.
3.3.2 Reading Attachments
GroupWise has the ability to send and receive attachments with items. When you receive an attachment with an item, the list of attachments is displayed in the Attachment Window or to the right of the subject.
Viewing Attached Files
When you click an attached file, the attachment is displayed in the message pane of the QuickViewer. This is usually faster than opening the attachment; however, the attachment might not be formatted properly. If the attachment type is not supported, you receive an error.
-
Open the item containing the attachment.
-
Click the attachment.
or
Right-click the attachment, then click or .
or
If you cannot see an icon representing the attachment in your view, click > > .
If you receive a message indicating that “The attachment can only be viewed with an external application,” then you must open the file. For information on opening an attachment, see Opening Attached Files.
Opening Attached Files
When you open an attached file by double-clicking it, GroupWise determines the correct application to open the file in. You can accept the suggested application, or you can type the path and filename to another application.
-
Open the item containing the attachment.
-
Double-click the attachment.
or
Right-click the attachment, then click or .
or
If you cannot see an icon representing the attachment in your view, click > > .
By default, GroupWise warns you if an attachment is larger than 1000 KB (1 MB)
To eliminate the warning message:
-
Click .
-
Click > .
-
Deselect .
You can also adjust the attachment size for when the warning message is displayed.
-
Click .
Dragging and Dropping Attachments
When you receive an item, you can drag any of its attachments into a folder or onto your desktop. A document reference attachment that you drag and drop becomes a shortcut to a document reference or to a copy of the document, depending on your rights to the document and the availability of the library.
Editing Attachments
When you receive an attachment you can edit, changes can be made to the attachment and saved to a copy in the original e-mail.
-
Open an item containing the attachment you want to edit.
-
Right-click the attachment and click .
or
If you want to select the program to edit the attachment with, right-click the attachment and click , select the program you want to use, and click .
-
Make the desired changes to the attachment and save.
The modified attachment is saved to the original item as Modified copy of filename.
Viewing an Attached vCard
vCards are electronic business cards formatted according to standards set by the Internet Mail Consortium.
To view a vCard that has been attached to an item:
-
Right-click the vCard attachment.
-
Click .
For information about importing vCard information into an address book, see Importing Contacts from a vCard.
3.3.3 Replying to E-Mail
Use Reply to respond to an item. You can reply to everyone who received the original item or to the sender only, without creating and addressing a new message. You can also include a copy of the original message in your reply. Your reply includes preceding the original subject text. You can modify the subject text if you want.
Replying to an E-Mail
-
Open the item you want to reply to.
-
Click on the toolbar to send the e-mail just to the sender.
or
Click on the toolbar to send the e-mail to the sender and all recipients.
-
Type your message, then click on the toolbar.
If the original item included BC or CC recipients and you selected to reply to all, your reply is sent to the CC recipients but not to the BC recipients.
Including the Sender’s Message or Attachments in a Reply
When replying to an e-mail, you can select to include the sender’s message and any attachments included with the message.
-
Open the e-mail you want to reply to.
-
Click > .
-
Select whether to reply to the sender or reply to all.
-
To include the sender’s message, select .
-
To include the sender’s attachments in the reply, select .
-
Click .
Setting the Default Reply Format
-
Click .
-
Click > .
-
If you use the Plain Text reply format, select from the following format options:
GroupWise classic: Provides separator characters, original sender, date, and time.
Include Headers: Allows the selection of the separator character; provides original sender, recipient, date, time, and subject.
Internet standard: Allows the selection of the separator character; allows you to choose to include original sender, e-mail address, date, time, and message identifier.
Color: Available for Internet standard only. Allows you to select a reply color. This color appears on the original text not any new text you enter.
Type my reply: Select or if you selected or above.
-
If you use the HTML reply format, select from the following format options:
GroupWise classic: Provides separator characters, original sender, date, and time.
HTML enhanced: Allows the selection of the separator character; allows you to choose to include original sender, e-mail address, date, time, and message identifier. Select Include headers to provide the original sender, recipient, date, time, and subject instead.
Type my reply: Select or if you selected above.
-
Click .
Setting Up an Automated Reply
If you are going on vacation or are out of the office for some other reason, you can create a rule to reply to messages you receive while you are away. For setup instructions, see Section 9.4.2, Creating a Vacation Rule or Auto Reply.
Replying to an E-Mail in a Shared Folder
-
Open or select an item in the shared folder.
-
Click on the toolbar.
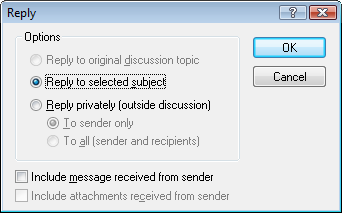
-
Click a reply option.
You can reply to the original discussion topic, rather than to the item you are reading. Or, you can reply to any item you are reading, whether it’s an original discussion topic or someone else’s reply. In both cases, these replies are posted in the shared folder and not sent to individuals.
If you reply privately to the individual who wrote the item, your reply is not posted to the shared folder.
-
Click .
-
Type your reply, then click on the toolbar.
3.3.4 Forwarding E-Mail
Use Forward to send items you receive and document references to other users. The mail message includes your name and any additional comments you have made.
If you want to automatically forward some or all messages to another e-mail account, see Section 9.4.3, Creating a Rule to Forward All Mail to Another Account.
Forwarding an E-Mail
-
Open the item you want to forward.
-
(Optional) Click the drop-down arrow on the button and select the forwarding option you wish to use.
The option you select is saved as the default for the next time you use the button.
-
Click on the toolbar.
or
Click > .
-
Add the names of the users to whom you want to forward the item.
-
(Optional) Type a message.
-
Click on the toolbar.
If you can’t accept an appointment, task, or reminder note, you can delegate the item instead of forwarding it. Delegating places a Delegated status in the item’s Properties window, letting the sender know you have transferred responsibility for the item to another person.
Forwarding Multiple E-Mails
-
In your Mailbox, select the items you want to forward by pressing Ctrl+click on each item.
-
Click > .
-
Add the names of the users to whom you want to forward the item.
-
(Optional) Type a message.
-
Click on the toolbar.