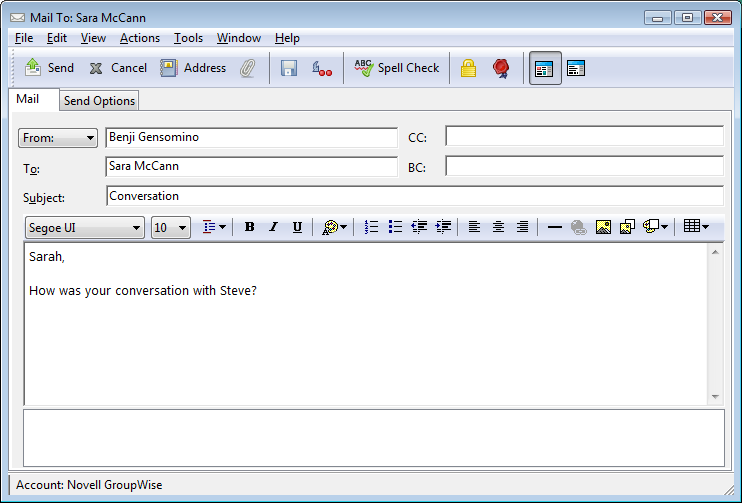
3.1 Sending E-Mail
When you send an e-mail message from GroupWise, you can send the message either as text or HTML. Additionally, you can choose to attach a file, add a signature or vCard to the message, and spell check the message before it is sent.
The address book and name completion help you to quickly and easily find the contacts you need when sending an e-mail message.
3.1.1 Selecting the Default Compose View
By default, GroupWise provides the HTML Compose view for composing items. The HTML view offers a broad selection of fonts, point sizes, and colors; text formatting options that include paragraph styles, indentation, bulleted lists, numbered lists, hyperlinked text, and horizontal lines; as well as image options for embedded images and background images.
If you prefer a simpler editing environment, you can use the Plain Text Compose view.
-
Click > .
-
Click .
-
Select either or .
-
Select the font and font size in the appropriate fields.
-
Click .
HINT:In a new item you are composing, you can change your Compose view for that one item by clicking or .
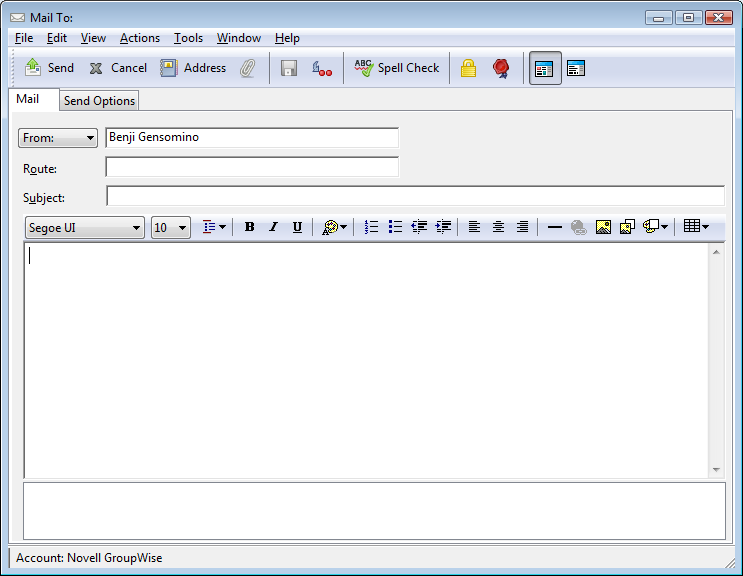
3.1.2 Composing E-Mail
-
Click on the toolbar.
You can select a different mail view by clicking the down-arrow next to .
-
In the box, type a username, then press Enter. Repeat for additional users.
or
To select usernames from a list, click on the toolbar, search for and double-click each user, then click .
-
If necessary, type usernames in the and boxes.
CC (Carbon Copy): Carbon copy recipients (CC) receive a copy of an item. CC recipients are users who would benefit from the information in an item, but are not affected by or directly responsible for it. All recipients can see that a carbon copy was sent. They can also see the names of the CC recipients.
BC (Blind Copy): Blind copy recipients (BC) receive a copy of an item. Other recipients receive no information about blind copies. Only the sender and the blind copy recipient know that a blind copy was sent. If a recipient replies and chooses , the blind copy recipient does not receive the reply.
-
To change the From name (to another account or proxy), click , then click a name.
-
Type a subject.
-
Type a message.
You can specify many options, such as making this message a high priority, requesting a reply from the recipients, and more, by clicking the tab.
When you use the Categories option, only the four default categories carry over to the recipient.
-
Include any attachments by clicking on the toolbar.
-
Click on the toolbar.
3.1.3 Formatting E-Mail
The formatting options you have when composing a message depend on the Compose View you have selected. The options described in this section apply to the message you are composing.
NOTE:If the recipient of the item is using the HTML Read view, he or she sees the e-mail as you formatted it.The recipient cannot change the font of an HTML-formatted item. If he or she is using the Plain Text Read view, HTML formatting is lost. However, the recipient can click to display the message the way you formatted it.
Selecting a Text Editor
When composing a message in GroupWise, you have a choice of using GroupWise, OpenOffice.org, or Microsoft Word as your editor to compose the message. If you choose to use OpenOffice.org or Word as your editor, the application’s functionality and formatting are available within the GroupWise compose window.
If you select Word or OpenOffice, the editor must be properly installed on your workstation in order to be available for use in GroupWise.
-
Click > , then double-click .
-
Click the tab.
-
Under , select the editor to use.
-
Under , select the editor to use.
-
Click .
If you select to use OpenOffice.org or Word as your default editor, you must refer to their documentation for formatting assistance.
Using the GroupWise Text Editor to Format HTML E-Mail
You can use the HTML tools available in GroupWise to add additional formatting to your messages. Standard text features like font, underline, and italics are all still available on the toolbar, as well as features like alignment, indentation, adding images and tables, and more.

You might need to resize the item view horizontally to see all the buttons on the HTML toolbar.
Changing the Font in an HTML Message
In an open HTML message:
-
Use the HTML toolbar to change the font, font size, and other font attributes as needed.
You can set a default font for HTML items. For information, see Setting the Default Read/Compose View and Font.
Adding a Horizontal Line in an HTML Message
In an open HTML message:
-
Select a location in the e-mail where you want the line to appear.
-
Click the Horizontal Line icon
 .
.
Adding a Bulleted or Numbered List in an HTML Message
In an open HTML message:
-
Use the HTML toolbar to insert a bulleted or numbered list.
-
Type a list item, then press Enter to create the next item in the list.
-
To turn off the list formatting, press Enter, then press Backspace after the last item.
Adding a Table in an HTML Message
In an open HTML message:
-
On the HTML toolbar, click the icon
 .
.
-
From the drop-down menu, select the size of the table, or select and specify your own dimensions.
The table is displayed in the e-mail and adjusts to fit the text.
Adding Images in an HTML Message
In an open HTML message:
-
In the area where you want the image to appear, click the icon
 .
.
-
Specify the name of the graphic you want to add, or browse to and select it, then click .
Adding a Background Image in an HTML Message
In an open HTML message:
-
Click the icon
 .
.
-
Specify the name of the graphic you want to use as a background, or browse to and select it.
-
Click .
Adding a Hyperlink in an HTML Message
Hyperlinks directly connect a specific word, phrase, or image to a specific Web site.
In an open HTML message:
-
Select the word, phrase, or image you want to use, then click the icon
 .
.
-
Specify the Web address you want to link to.
-
Select .
The text changes color and is underlined to indicate it is a link. An image does not change color, but still functions as a link.
Undoing or Redoing the Last Text Action in an HTML Message
You can undo the last text action in the or field of a message you are composing.
-
Click > .
or
To redo the action, click .
You can also use Ctrl+Z for Undo and Ctrl+Y for Redo. For information about other shortcut keys, see Section D.0, Shortcut Keys.
Using the GroupWise Text Editor to Format Plain Text E-Mail
In a plain text message, you can change the font, size, and color. You can use bold, italics, and underline. However, in the Plain Text Compose view, you cannot indent text, or insert hyperlinks or horizontal lines.
Changing the Font in a Plain Text Message
In an open item you are composing in the Plain Text view:
-
Click the field.
-
Click > , then click again.
-
Select a font and a font style.
-
Select a size.
-
Select any other options you want to change, then click .
You can also use the toolbar buttons to bold, italicize, or underline portions of text.
Formatting Lists in a Plain Text Message
In an open item you are composing in the Plain Text view:
-
Press Ctrl+Shift+L to insert a bulleted list.
-
Press Ctrl+Shift+L again to change it to a numbered list.
-
Continue to press Ctrl+Shift+L to select from the six list formats available.
-
Type a list item, then press Enter to create the next item in the list.
-
To turn off the list formatting, press Enter twice after the last list item.
Undoing the Last Text Action in a Plain Text Message
You can undo the last text action in the or field of a message you are composing.
-
Click > .
You can also use Ctrl+Z for Undo. For information about other shortcut keys, see Section D.0, Shortcut Keys.
Using Custom Views in the GroupWise Text Editor
Custom views make it possible to create an e-mail template, then save that template to use again. This is helpful when you want to frequently send an e-mail that has certain text or certain appearance. You can create an e-mail message with your desired look and feel, then save that e-mail message as a custom view.
NOTE:Some HTML formatting might not be preserved if you save an HTML message as a view. Using a Plain Text message for a custom view is recommended.
Saving a Custom View
-
Click
 to create a new e-mail message.
-
(Optional) Type the subject of the e-mail message in the field.
-
Type the message of the e-mail in the field.
-
Click > .
By default, a custom view is saved in the C:\Novell\Groupwise directory. Custom view files have a .vew file extension.
-
Type a name for the view, then click .
Opening a Custom View
-
Click the down-arrow next to the icon.
-
Select the custom view file you saved earlier.
The custom view opens, displaying the information you entered when you saved the custom view file.
-
Add any additional information as needed, then click .
Defining the Location Where Custom Views are Saved
-
Click > > , then open the tab.
-
In the field, type the location where custom views are stored, or browse to and select the location.
-
Click .
3.1.4 Spell-Checking Messages
There are two ways to spell-check the items you send. Both features check for misspelled words, duplicate words, and irregular capitalization in items you are creating. Each feature has advantages in different situations.
Using Quick Speller
Quick Speller checks the spelling as you type, and underlines the words that are spelled incorrectly. When Quick Speller finds a misspelled word, you can replace it with a word that Quick Speller suggests or skip the word whenever it appears in that message. You can also add the word to a user word list.
Enabling Quick Speller by Default
-
Click .
-
Click > .
-
Select , then click .
Deselect this option to disable Quick Speller.
Spell-Checking with Quick Speller
-
Right-click the misspelled word in the or field.
-
Click the correctly spelled word.
or
Click to skip the word in the rest of the message.
or
Click to add the word to your word list.
Disabling Quick Speller as You Compose an E-Mail
-
Right-click in the or field.
-
Click .
To re-enable Quick Speller, right-click in the or field, then click .
Using Spell Checker
You run Spell Checker separately, either manually or by selecting to have it run when you click . When Spell Checker finds a misspelled word, you can replace it with a word Spell Checker suggests, edit the word manually, or skip the word. You can also define an automatic replacement for the word, or add the word to a user word list. You use Environment Options to set up Spell Checker to automatically spell-check your messages before you send them.
Spell-Checking an Item with Spell Checker
If you are using an editor other then GroupWise, spell-checking is performed by the editor’s spell-checker. See the application’s help for additional information on spell-checking.
-
Click the or field.
or
Select the text to spell-check.
-
Click > .

-
To specify a user word list to add words to, click the drop-down list and select an option.
-
To specify a range of text to check, click the drop-down list and select an option.
-
When Spell Checker stops on a word, click any of the available options, or edit the word manually.
You can choose from the following options:
Replace: Replaces a misspelled word with a word Spell Checker suggests. To replace a misspelled word, double-click the word or select the word and click . To make your own corrections, edit the word in the field, then click .
Skip Once: Skips the word one time. Spell Checker stops the next time it encounters the word.
Skip Always: Skips every occurrence of the word throughout the document. Spell Checker ignores the word until the next time you spell-check.
Add: Adds the word to the current user word list, which stores supplemental words so that Spell Checker can recognize the word in future spell-checks.
QuickCorrect: Defines an automatic replacement for a word or phrase. When Spell Checker stops on a word, click to replace the word with the text in the field and add the replacement to the user word list QuickCorrect uses. Next time you type the word, QuickCorrect automatically replaces it.
Suggest: Displays additional words or phrases in the list box.
-
Click when spell-checking is complete.
Spell-Checking Items Automatically with Spell Checker
You can set GroupWise to automatically spell-check items every time you click .
-
Click > .
-
Click .
-
Select the check box for and , then click .
Configuring Spell Checker
You can modify the types of words the Spell Checker considers misspelled.
-
When the Spell Checker stops on a misspelled word, click .
-
Select or deselect the following options:
-
Check words with numbers
-
Check duplicate words
-
Check irregular capitalization
-
Prompt before auto replacement
-
Show phonetic suggestions
-
-
Continue with spell checking as usual.
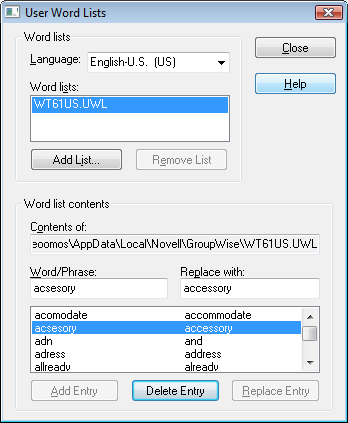
Editing Your User Word List
Changes you make in a user word list are effective only if you have QuickCorrect turned on. In the box of an item you are creating, click > , then make sure the check box has a check mark.
For more information about user word lists, click > in an item you have created. In the Writing Tools dialog box, click , click , then click .
To make changes in your user word list:
-
In the Spell Checker, click > , then click the list you want to modify.
If you haven’t added lists of your own, the default word list is the only list available.
-
To add a new entry, type it in the field, then click .
or
To delete an entry, select it, then click .
or
To change an entry, select it, make the changes, then click .
-
Click when you have finished making changes.
Selecting the Spell Checker Language
-
Click the field or the field.
or
Select the text to spell-check.
-
Click > .
-
Click > .
-
Select the language to use, then click .
-
Click .
3.1.5 Attaching Files
Use to send one or more files to other users. You can attach files that exist on your hard disk, diskette, or network drive to an item you are sending. The recipients can open the attached file, save it, view it, or print it. If you change the attached file after you have sent it, the recipients do not see the changes.
If you attach a file that is password-protected, the recipient cannot open or view the attachment without entering the password.
For information about attaching documents that are in a GroupWise Library, see Attaching a Document Reference to an Item.
Attaching a File to an Item
-
Open a new item.
-
Fill in the , , and fields.
-
Click the
 icon on the toolbar, then browse to and select the file or files you want to send.
To attach more then one file in a folder, Ctrl+click each file you want to attach. The Attach File dialog box defaults to the previous location you used to attach a file.

-
Click .
-
Click on the toolbar.
HINT:You can also attach a file or an item by dragging the file or item into the attachment window. In addition, you can right-click a file in Windows, then click > . A new item is created with the attachment in the attachment window.
To remove an attachment before you send the item:
-
Right-click the attachment, then click .
If you delete an attached file, it is not erased from disk or network drive; it is simply removed from the attachment list.
Moving or deleting a file on a disk or network drive does not affect a file you attached to an item and sent.
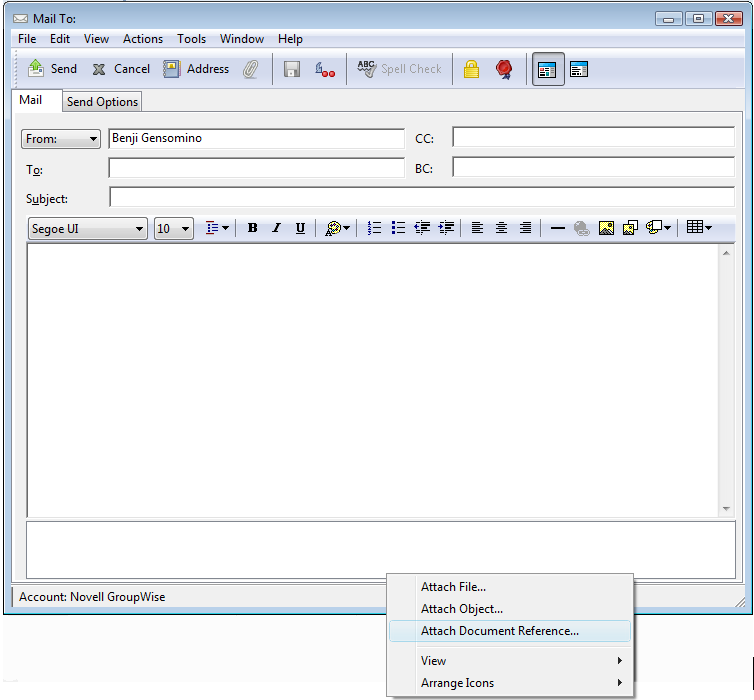
Attaching a Document Reference to an Item
If the file you want to attach is a document stored in GroupWise Library, you can attach a document reference. When a recipient opens the attachment, the document in the library opens if the recipient has rights to open or view the document and if the library is available.
If any recipients do not have sufficient document rights, or if they are not using an e-mail product that supports GroupWise Library, or if the library is unavailable, only a copy of the document opens. If the recipient edits the copy, the changes do not affect the actual document in the library. For more information about document rights, see Section 15.5, Sharing Documents.
To attach a document reference to an item:
-
Open a new item.
-
Fill in the , , and fields.
-
Right-click in the window, then click .
-
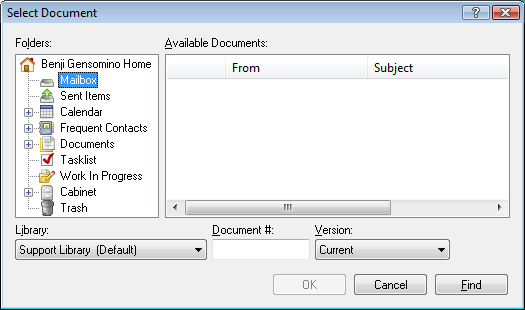
The Select Document dialog box displays.
-
In the drop-down list, click the library that contains the document you want to attach.
-
In the field, type the document number.
If you don’t know the number of the document, click to locate the document in the library. To attach a document displayed in the Find Results dialog box, click the document, then click .
-
In the drop-down list, click which version you want to attach. If you select , type the version number in the field.
-
Click .
-
Click on the toolbar.
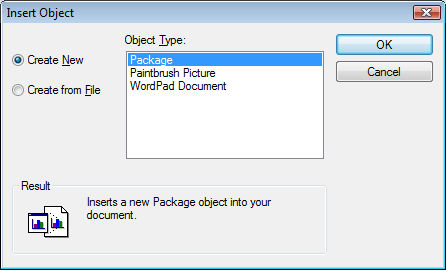
Embedding an OLE Object in an Item
In order for a recipient of an item to view or edit embedded OLE objects, the recipient must be using GroupWise for Windows.
-
Open and address an item.
-
Click > > .
-
To embed an existing object, click , type the path and filename, then click . Skip to Step 8.
or
To create a new object and embed it, follow Step 4 through Step 8.
-
Click , then select a type of object.
-
Click to open the application.
-
Create the object you want to embed.
-
Click the application’s menu, then click .
This step might differ depending on the application.
-
Complete the item if necessary, then click on the toolbar.
If the recipients open the object and edit it, they must save it under a new filename. Otherwise, when they try to close the mail message, they receive an error.
If you have copied an OLE object to the clipboard, you can embed it in an open item by using on the menu.
3.1.6 Adding a Signature or vCard
Use Signatures to insert a signature or tag line at the end of items you send. For example, you can have GroupWise automatically list your name, phone number, and e-mail address at the bottom of every item you send.
If you have a number of different accounts, including POP3, IMAP4, and NNTP newsgroup accounts, you can create a different signature for each account. You can also create multiple signatures for the same account.
Signatures are created in HTML, which allows you to add graphics and formatting to your signature. When you send a text message, the HTML signature is converted to text.
You can also have GroupWise automatically add a vCard, or virtual business card, to the end of messages.
Creating a Signature
-
Click > , then double-click .
-
Click the tab.
-
Select , then click .
-
Type a name for the signature, then click .
-
Create your signature in the HTML editor that is provided.
-
Select if you want this signature to be your default signature.
-
Select whether you want to be prompted to add a signature for each item you send.
-
Click .
Setting Up a vCard
vCards are electronic business cards formatted according to standards set by the Internet Mail Consortium. A vCard file has a .vcf extension, and you can add the file to your outgoing e-mail items. Third-party companies create software you can use to create vCards that include text, graphics, and sound. When you use GroupWise to generate your vCard, it uses the information from the fields in your Address Book listing.
-
Click .
-
Click .
-
Select to automatically add a vCard to every e-mail you send.
-
Select the source of the vCard information.
Generate from system address book: Composes a vCard based on your personal information in the GroupWise Address Book.
Select from personal address book: Allows you to select any user in a personal address book and create a vCard from their personal information. This is useful when you send e-mail on behalf of other users.
Select a vCard file: Enables you to select a custom vCard .vcf file provided by a third-party company.
-
Select whether you want to be prompted to add a vCard for each item you send.
-
Click .
Adding the Signature or vCard to an E-Mail
If you selected , you’re prompted for a signature or vCard each time you send an e-mail. If you selected , your default signature is automatically added to all e-mails. If you set up a vCard, your vCard is added automatically to all e-mails as well. You can have both a signature and a vCard at the same time.
Understanding Global Signatures
In addition to personal signatures, your system administrator can create a global signature for everyone to use on external Internet messages. If the system administrator requires the global signature, it is automatically appended to all items that are sent. If a global signature is available but not required, it is appended to your signature if you already use a personal signature. If you don’t have a personal signature, the global signature is added only if required. When you resend an item, the global signature is not automatically added to the message.
3.1.7 Routing Mail to Multiple Recipients Consecutively
Use Routing Slip to send a mail message or task to several users consecutively. You determine the order of the route. When a user marks the routed item Completed, it is sent to the next user on the route.
If there are attachments to the routed item, each user on the route can view and add comments to them. When comments are added to an attachment, all subsequent users on the route see the comments. The final user on the route sees all the comments that were added.
You can track the status of a routed item you have sent by checking the item’s Properties. When you send a routed item to an external address, the item is automatically marked Completed (because the external recipient cannot mark it) and sent to the next user on the route.
If you want to prevent a proxy from marking routed items Completed, you can require a password to complete a routed item.
This section contains the following topics:
Creating a Routed Message
-
Open a mail message or task.
-
Click > .
-
In the box, type a username, then press Enter. Repeat for each user included in the route.
or
Click on the toolbar to select usernames from the Address Selector dialog box.
You can also specify personal groups as recipients of a routed item. When you use the Address Selector dialog box, the group is expanded into its members so that you can specify the order of the users in the route.
-
Type a subject and message.
-
If you want to prevent a proxy from marking routed items Completed, you can require the recipient’s GroupWise password to mark the item Completed. Click the tab, click , then select .
-
Click on the toolbar.
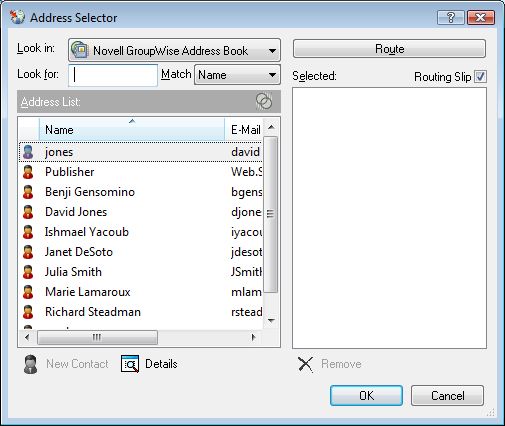
Addressing a Routed Item with an Address Book
-
In a mail message or task, click on the toolbar.
-
Select the check box.
-
Ctrl+click names in the order you want to route the item, then click .
or
Double-click names in the order you want to route the item.
Use drag and drop to change the order of names in the list of addresses.
-
Click .
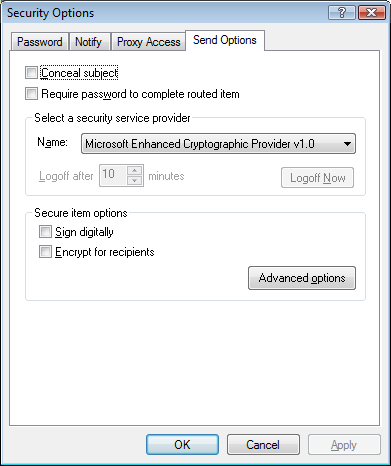
Requiring a Password before Marking a Routed Item Completed
To require a password for all routed items you create:
-
Click > .
-
Double-click , then click the tab.
-
Select .
-
Click .
For information on GroupWise passwords, see Section 1.3, Assigning a Password to Your Mailbox.
Completing a Routed Item
-
When you are finished with the assignment or instructions in the routed item, open the item.
-
If you need to view and edit an attachment to the routed item, open the attachment in its associated application, make your changes, then save the file.
The file is saved to your computer’s temporary files directory. Do not change the path, or your changes are not included when the routed item is sent to the next recipient. Close the application.
IMPORTANT:To be able to edit attachments in a routed item, you must have the GroupWise 5.5 Enhancement Pack or higher installed.
-
In the item, select > , then click .
You can also select the check box in the item header.
-
If the sender has required a password to complete the item, type your GroupWise password, then click .
The item is sent to the next user on the route.
-
Click .
3.1.8 Sending S/MIME Secure Messages
GroupWise works with security software you have installed to send secure items.
Understanding Secure Message Concepts
The security features described in this section are available only if you have installed one of the following security providers:
-
Entrust 4.0 or Higher: You must install an Entrust client from Entrust Technologies Inc. You must also have an Entrust security certificate issued by your administrator.
-
Microsoft Base Crytographic Provider Version 1.0 or Higher: On Windows XP or later, it is installed by default. You must also obtain a security certificate from an independent certificate authority.
-
Microsoft Enhanced Crytographic Provider Version 1.0 or Higher: On Windows XP or later, it installed by default.
Adding Security
You can add security to the items you send by digitally signing them and/or encrypting them. When you digitally sign an item, the recipient is able to verify that the item was not modified en route and that it originated from you. When you encrypt an item, you are able to ensure that the intended recipient is the only one who can read it.
When you sign or encrypt items using GroupWise, the recipients can read the items with any other S/MIME-enabled e-mail product.
Understanding Security Certificates
A security certificate is a file that identifies an individual or organization. Before you can send secure items, you must obtain a security certificate. If you are using Entrust, you must use an Entrust certificate. If you are using a Microsoft security provider, use your Web browser to obtain a certificate from an independent certificate authority. See the GroupWise Digital Certificate Web page for a list of certificate authorities and detailed instructions for obtaining a certificate.
You can also use LDAP to search for a security certificate.
You use your security certificate to digitally sign items you send. You use other users’ public security certificates to verify digitally signed items they send to you.
To encrypt an item and have the recipient user decrypt it, you must have already received the user’s public security certificate. An element of this security certificate, called the public key, is used to encrypt the item. When the recipient opens the encrypted item, it is decrypted with another element from the security certificate, called the private key.
There are two ways to obtain a user’s public security certificate:
-
The user can send you a digitally signed item. When you open the item, you are prompted to add and trust the security certificate.
-
The user can export his or her public certificate, save it to a diskette, and deliver it to you. You then import the public certificate.
Receiving a Secure Item
Secure items are marked in your Item List with the following icons:
|
Icon |
Description |
|---|---|
|
|
Signed item |
|
|
Encrypted item |
|
|
Signed and Encrypted item |


Using Security Service Providers
Depending on the security software you have installed, you can select different security service providers for the items you send. For example, your organization might require you to use one security service provider for work items because of a preferred encryption method, but you might want a different security service provider for sending personal items. The security options available depend on the security service provider you select.
See Selecting a Security Service Provider for more information.
Advanced Information
GroupWise is compatible with the S/MIME version 2 and 3 specification. The security service providers that GroupWise supports have common encryption algorithms such as RC2 and RC4. When digitally signing an item, GroupWise hashes the item into a message digest using the standard SHA-1 algorithm. The message digest is distributed with the item being sent.
See Selecting a Security Service Provider for more information.
Digitally Signing or Encrypting a Message
To encrypt an item and have the recipient decrypt it, you must have received the recipient’s public security certificate.
-
Make sure you have a security certificate and that you have selected the security service provider you want to use.
-
Open an item view.
-
Click the field, type a username, then press Enter. Repeat for additional users.
-
Click
 to digitally sign the item.
-
Click
 to encrypt the item.
-
Type a subject and message.
-
Click on the toolbar.
If you receive a Recipient Certificate Not Found message when you attempt to send the item, one of the following is true: 1) You are trying to encrypt an item for a recipient and don’t have his or her public certificate; 2) The e-mail address in the public certificate does not match the recipient’s e-mail address; or 3) There is no e-mail address in the recipient’s public certificate and the recipient’s e-mail address cannot be verified.
If 1) is true, you need to obtain the recipient’s public security certificate. If 2) or 3) is true, click to locate the recipient’s certificate.
Digitally Signing or Encrypting All Messages
-
Click > .
-
Double-click , then click the tab.
-
Select or .
-
Click , then make selections.
-
Click twice, then click .
Obtaining a Security Certificate from a Certificate Authority
If you are using Entrust, you obtain an Entrust certificate from the system administrator. These instructions apply to other security providers.
-
Click > .
-
Double-click .
-
Click .
Your Web browser launches and displays the Novell GroupWise Web page, which contains a list of certificate authorities. This is only a partial list; GroupWise supports a wide variety of certificate authorities.
-
Select the certificate authority you want to use, then follow the instructions on the Web site.
-
If you used Internet Explorer to obtain the certificate, the certificate is available in GroupWise. If you used Netscape to obtain the certificate, you need to export or back up the certificate from Netscape (see the Netscape documentation for how to do this), then import the certificate to GroupWise. For more information, see Importing or Exporting Security Certificates.
-
In GroupWise, click > , double-click , then click the tab.
-
Select or from the drop-down list under .
Select the appropriate security service provider based on the encryption strength of the certificate you are using. The encryption strength of a certificate depends on the encryption strength of the browser used to obtain the certificate. For example, if you have Internet Explorer with 128-bit encryption installed, the encryption is high, and only works with Microsoft Enhanced Cryptographic Provider.
-
Click .
-
Double-click , click the certificate you want to use, then click .
-
Click , then click .
Selecting a Security Service Provider
-
In the Main window, click > .
-
Double-click , then click the tab.
-
Select a security service provider from the drop-down list.
-
Click , then click .
The security service provider you select takes effect as soon as you log in to the provider (if login is required). The options and encryption methods available depend on the security service provider you have selected.
The ability to select security service provider options in an item is disabled. You must do it from the Main Window.
Selecting a Security Certificate for Digitally Signing Items
If you are using Entrust, there is only one security certificate. These instructions apply to other security providers.
-
Click > .
-
Double-click .
-
Click the certificate name.
-
Click .
-
Click , then click .
Using LDAP to Search for Recipient Encryption Certificates
Before you can use an LDAP directory service to search for security certificates, you must add the LDAP directory service to your GroupWise Address Book. For more information, see Adding a Directory Service to an Address Book.
-
Click > , then double-click .
-
Click the tab.
-
Click .
-
Select .
-
Click twice, then click .
Selecting the Method Used for Encrypting Items
-
Click > .
-
Double-click , then click the tab.
-
Click .
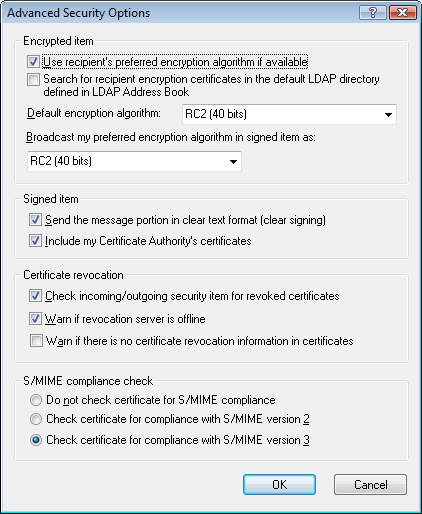
Use recipient’s preferred encryption algorithm if available: GroupWise attempts to use the recipient’s preferred encryption algorithm, if it is available.
Search for Recipient encryption certificates in the default LDAP directory defined in LDAP Address Book: GroupWise uses the defined LDAP Address Book to attempt to find encryption certificates for the recipient.
Default encryption algorithm: In the box, the encryption algorithm drop-down lists are scrollable and include all encryption algorithms that are supported by the version of the Web browser installed on the workstation where you are running the GroupWise client. The following list is a sample:
-
3DES (168 bits)
-
DES (56 bits)
-
RC2 (128 bits)
-
RC2 (40 bits)
-
RC2 (56 bits)
-
RC2 (64 bits)
-
RC4 (128 bits)
Broadcast my preferred encryption algorithm in signed item as: When you send an encrypted item, you can specify your preferred encryption algorithm to use.
Send the message portion in clear text format (clear signing): Sends the message in clear text; otherwise, it is sent as a PKCS7 encoded message.
Include my Certificate Authority’s certificates: Your Certificate Authority’s certificate is included in the message you send.
Check incoming/outgoing security item for revoked certificates: Checks the incoming and outgoing security item against the Certificate Revocation List.
Warn if revocation server is offline: You receive a warning if the revocation server is offline when GroupWise checks for it.
Warn if there is no certificate revocation information in certificates: You receive a warning if there is no certificate revocation information inside the certificate.
Do not check certificate for S/MIME compliance: The certificate is not checked for compliance with S/MIME.
Check certificate for Compliance with S/MIME version 2: The certificate is checked for compliance with the S/MIME version 2 standard.
Check certificate for Compliance with S/MIME version 3: The certificate is checked for compliance with the S/MIME version 3 standard.
-
-
Make selections in the group box.
-
Click twice, then click .
The available encryption methods depend on the security service provider you have selected.
Checking Whether the Digital Signature of an Item Was Verified
-
Open a digitally signed item that you received.
-
Click > .
-
Click the tabs to view information about the security certificate that was used.
The digital signature is verified when you open the item. If there are any concerns about the certificates that sign the item, a warning or an error displays immediately and the status bar of the item displays “Untrusted.”
If the digital signature was not verified, the security certificate might be invalid or the message text has been changed since the item was sent.
Viewing Received Security Certificates and Changing the Trust
-
Click in the Full Folder List.
To access the Full Folder List, click the folder list header drop-down list (above the Folder List; it probably displays Online or Caching to indicate what mode of GroupWise you are running in), then click .
or
Open the Address Book.
-
Double-click a contact, then click the tab.
-
Click .
-
Click a certificate, then click .
If you initially did not trust a recipient’s security certificate and want to trust it, open a digitally signed item from the recipient, click the security certificate, click , click a trust option, then click .
If you no longer want to trust a recipient’s security certificate, click the security certificate, click , then click .
When you remove a recipient’s security certificate from the list, it is removed from your certificate database. If you receive an item using that security certificate in the future, it is considered unknown.
Viewing Your Own Security Certificates
-
Click > .
-
Double-click .
-
Click a certificate, then click .
If you have multiple security certificates, the default security certificate is indicated by a check mark. To change the default, click a certificate, then click .
You can change the name of your security certificate by clicking , then editing the text in the field. The certificate name is reflected in the list and is not stored in the actual certificate. (This is not available when using Entrust.)
Importing or Exporting Security Certificates
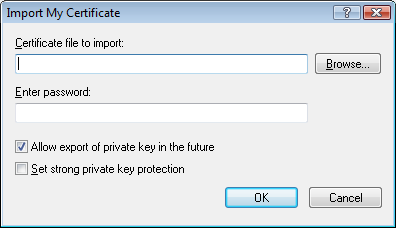
When you export your security certificate with the private key to a file, a password is required to protect the exported file. You can use the exported file as a backup copy, or you can import the file on another workstation. If another user obtains the file and its associated password, he or she can digitally sign items in your name, and can read encrypted items you receive.
When you export your public certificate, you can send it to another user. The other user can then import your public certificate and send you encrypted items.
-
Click > .
-
Double-click .
-
Click or .
or
Click , then click or .
-
Type a filename, including the path.
You can also click to find the certificate file, click the filename, then click or .
-
If required, type your certificate password.
-
Click .
3.1.9 Saving Unfinished E-Mail
Understanding Auto-Save
When you compose a new message in GroupWise, items are automatically saved for you. This prevents the loss of any messages you are authoring if GroupWise unexpectedly shuts down. When GroupWise restarts, you have the option to recover these messages to finish composing them.
When you are composing a new message in GroupWise, by default the message is automatically saved to disk every thirty seconds. The message is saved as a MIME file to c:\Documents and Settings\user\Local Settings\Application Data\Novell\GroupWise\GWItemSave.eml. The filename increments if you are composing multiple messages simultaneously. When you save the message to your Work in Progress folder or close the item, the auto-saved message is deleted.
When GroupWise starts, if there are auto-saved messages in the c:\Documents and Settings\user\Local Settings\Application Data\Novell\GroupWise directory, a window is displayed letting you know you have auto-saved messages.
You have the following options to deal with auto-saved messages:
Retrieve all saved messages into GroupWise: Recovers the auto-saved messages in GroupWise so that you can finish composing the messages later.
Delete all saved messages: Deletes the auto-saved messages from disk. The information in them is permanently lost.
Ask again next time GroupWise is started: Retains the saved messages on disk but does not recover them in GroupWise. The next time that GroupWise is started, the same window reappears.
Enabling or Disabling Auto-Save
By default, Auto-Save is enabled.
-
Click > , then double-click .
-
Click the tab, then select to disable Auto-Save.
or
Deselect to enable Auto-Save.
-
Click .
Saving an Unfinished E-Mail
-
In an open item, click > .
-
Click the folder you want to save the item to, then click .
The draft message is placed in the folder you chose in Step 2. The default folder for unfinished messages is the Work In Progress folder  .
.
3.1.10 Selecting Send Options
Changing the Priority of E-Mail You Send
-
To change the priority of one item, open an item, click .
or
To change the priority of all items you send, click > .
-
Select , , or .
The small icon next to an item in the Mailbox is red when the priority is high, white when the priority is standard, and gray when the priority is low.
-
Return to the item you are composing.
or
Click , then click to save the setting for all items.
Concealing the Subject of E-Mail You Send
For sensitive information, you can conceal the subject line. The subject is visible only when the recipient opens the item.
-
To conceal the subject for one item, open an item view, click .
or
To conceal the subject for all items you send, click > .
-
Select .
-
Return to the item you are composing.
or
Click , then click to save the setting for all items.
Delaying Delivery of an Item
When you delay delivery of an item, the item is delivered on the day and time that you specify. You can modify or retract the item before it is delivered, as described in Section 3.2, Managing Sent E-Mail.
-
To delay the delivery of one item, open an item view, then click .
or
To delay delivery of all items you send, click > .
-
Click .
-
In the text box, specify how many days later you want the item delivered.
or
Select a date and time under .
-
Return to the item you are composing.
or
Click , then click to save the setting for all items.
Setting an Expiration Date for E-Mail You Send
If you set an expiration date for an e-mail or phone message you send to another GroupWise user, the message is retracted from the recipient’s GroupWise Mailbox when the message expires.
-
To set an expiration date for one mail or phone message you sent to GroupWise users, open an item, then click the tab.
or
To set an expiration date for all mail and phone messages you send to GroupWise users, click >
-
Select .
-
Specify how long you want the message to remain in the recipient's Mailbox.
-
Return to the item you are composing.
or
Click , then click to save the setting for all items.
Changing the Security Setting (Classification) of All Items You Send
A classification is a security setting that lets the recipient know if the item is confidential, top secret, and so forth. This information appears at the top of the item. A classification does not provide any encryption or additional security. It is meant to alert the recipient to the relative sensitivity of the item.
-
In the Main Window, click > .
-
Click .
-
Select a security setting from the drop-down list.
-
Normal
-
Proprietary
-
Confidential
-
Secret
-
Top secret
-
For your eyes only
-
-
Click .
Changing the MIME Encoding for E-Mail You Send
Many languages require different character encodings to display certain characters properly. In GroupWise you can change the encoding for items that you send if this is necessary for the recipient to view the item correctly.
-
To change the MIME encoding for one item, open an item view, then click .
or
To change the MIME encoding for all items you send, click .
-
Select your MIME encoding from the drop-down list.
-
Return to the item you are composing.
or
Click , then click to save the setting for all items.
3.1.11 Posting a Discussion Note
A discussion note is a message that is posted to your mailbox only. Discussion notes are a way of creating personal notes for yourself.
-
Click > > .
-
Type a subject.
-
Type a message.
-
Include any attachments by clicking on the toolbar.
-
Click on the toolbar.
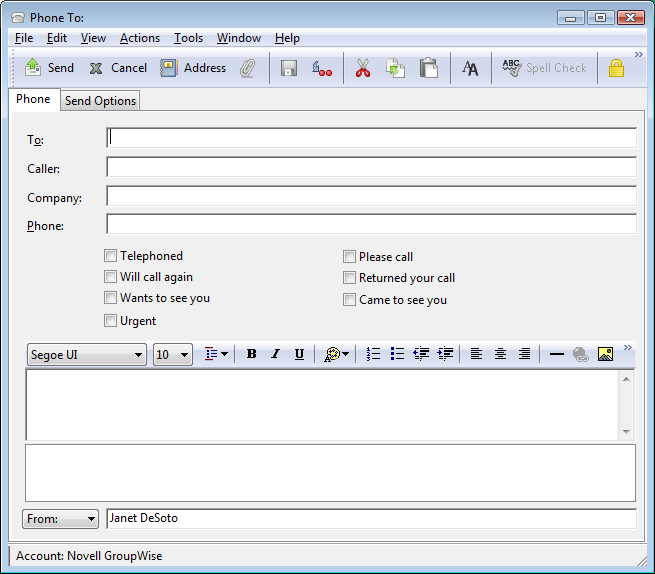
3.1.12 Sending Phone Messages
A phone message is a note you can send to notify other GroupWise users of calls they received while they were out of the office or unavailable. Phone messages are stored in the recipient’s Mailbox. You cannot answer your phone from a phone message.
You can change the phone messages you receive into tasks, reminder notes, or other posted item views. This way, you can leave a record of the conversation on the date it was held (reminder note) or create a to-do item to complete at a later date (task). See Changing E-Mail to Another Item Type.
-
Click > > .
You can place a button on the toolbar. See Customizing the Main Toolbar.
-
In the field, type a username, then press Enter. Repeat for additional users.
or
To select usernames from a list, click on the toolbar, double-click each user, then click .
-
Type the caller, company, and phone number of the caller.
-
Select the check boxes that apply to this phone message.
-
Type the message in the field.
-
To change the name (to another account or proxy), click
 , then click a name.
-
Click on the toolbar.