6.3 Planning Your GroupWise System
-
On the Stage 2: Planning page, review the decisions you need to make in order to complete Stage 2, then click if you are ready to proceed.
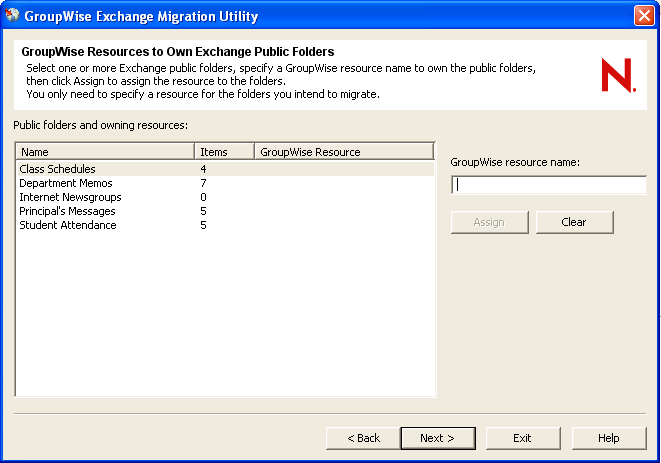
In the first migration session for an Exchange server, all public folders on the server are listed. If there are additional migration sessions for the server, public folders that have already been migrated are not listed.
-
Set up the resources and resource owners for the public folders you want to migrate (server worksheet item 5).
-
Select the public folders that you want to be owned by the same resource.
Use Ctrl+A to select all the public folders.
-
Specify a unique resource name.
-
Click .
-
Repeat Step 2.a through Step 2.c until you have assigned all the public folders to GroupWise resources for the current migration session.
-
Specify the user ID of the user who you want to own the resources.
-
-
Click to display the Post Office Planning page.
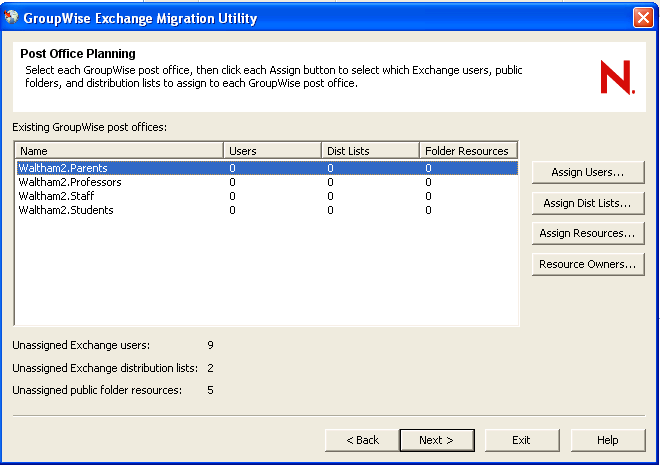
All of the post offices in your GroupWise system are listed.
-
Set up the Exchange users, distribution lists/groups, and public folders that you want to assign to each GroupWise post office (server worksheet item 6).
-
Select a post office.
-
Click , select the users you want to assign to this post office, click , then click .
-
Click , select the Exchange distribution lists/groups you want to assign to this post office, click , then click .
-
Click , select the public folder resources you want to assign to this post office, click , then click .
-
Click , select one or more public folder resources, select a user to own the resources, then click ; repeat this step as needed for additional users to own resources.
Public folder resources that do not have assigned owners are not migrated. You can migrate them during a subsequent migration session as long as the owner has already been migrated or is being migrated along with the folder resource.
-
Repeat Step 4.a through Step 4.e until you have assigned all Exchange users, distribution lists/groups, and public folders on the Exchange server to GroupWise post offices.
IMPORTANT:It is not necessary to migrate all Exchange users, distribution lists/groups, and public folders during the current migration session, but it is important to have a plan in place for all Exchange items.
-
-
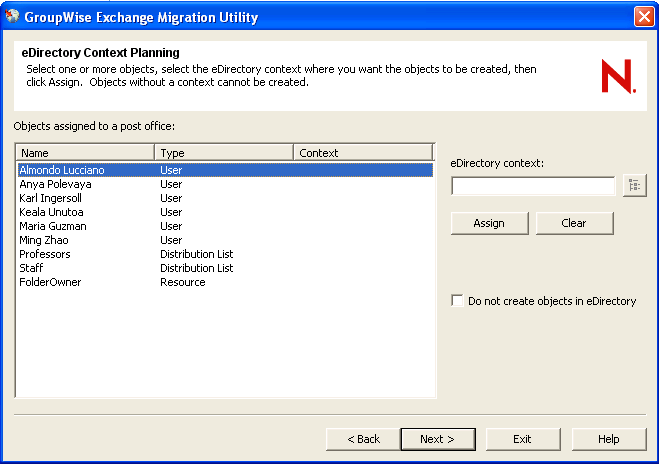
Click to display the eDirectory Context Planning page.
-
Set up the eDirectory contexts that you want to assign to each GroupWise User object, Distribution List object, and Resource object. (server worksheet item 7).
-
Select all the users, distribution lists/groups, and public folders whose objects you want to create in the same context.
Use Ctrl+A to select all.
-
Browse to and select the context where you want to create the objects, then click to fill in the eDirectory context field.
-
Click to assign to selected objects to the selected eDirectory context.
-
Repeat Step 6.a through Step 6.c until you have assigned all users, distribution lists/groups, and public folders on the Exchange server to eDirectory contexts in your GroupWise system.
-
If you want to have User objects and Resource objects created only in GroupWise databases and not in eDirectory, select .
Such User objects and Resource objects can be viewed in ConsoleOne in the GroupWise View, but not in the standard eDirectory view
-
-
Click to display the Plan Summary page.
-
Review the Plan Summary page to see how many items and how much data you are planning to migrate.
The number of items listed on the Plan Summary page represents the number of actual items that will be migrated. For users, it is the number of items in their mailboxes. For distribution lists/groups, it is the number of names on each list. For public folders, it is the number of items in each folder. The size of the data planned for migration to each post office is also listed to help you gauge migration time, at least in comparative terms.
-
Select each post office, then click to make sure you have organized your GroupWise system as intended.
Each post office plan lists all the users, distribution lists/groups, and public folders that will be migrated to the post office. It also includes items and data size for each. You can adjust the migration plan for any post office as needed.
-
When you are satisfied with the organization of your planned GroupWise system, continue with Migrating to GroupWise.