

| |
iChain User Services is a collection of four Java* servlets that provide a lightweight and easy-to-manage user self-provisioning environment that is based on open standards (LDAP). No Novell client is needed. iChain User Services is designed to replace the legacy (and no longer supported) iChain Community Services. The user self-provisioning services include:
The services in iChain User Services are provided by the following four Java servlets:
The following components are required for using iChain User Services:
This servlet enables Web-based user self-registration, as shown in Figure 7 and Figure 8.
Figure 7
Web-Based User Self-Registration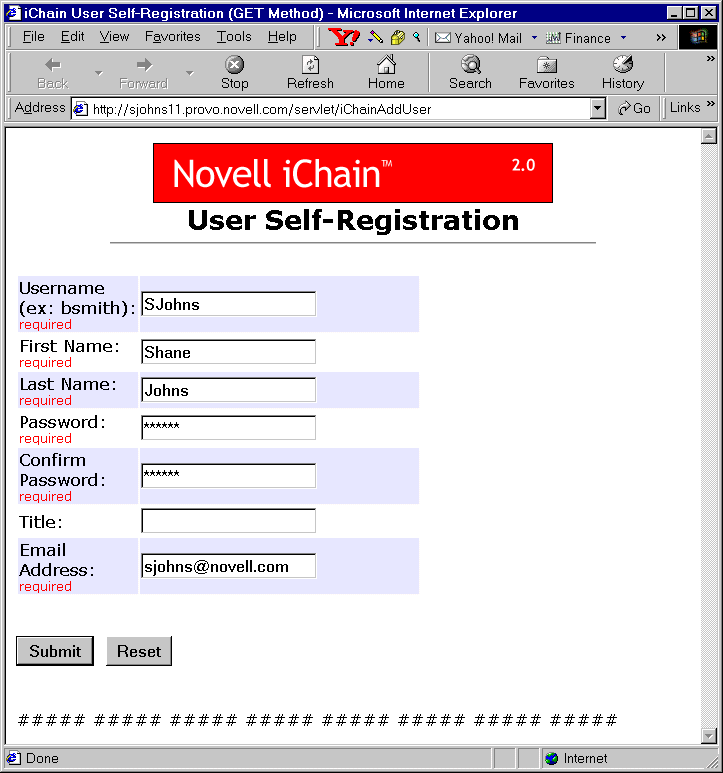
Figure 8
User Self-Registration Results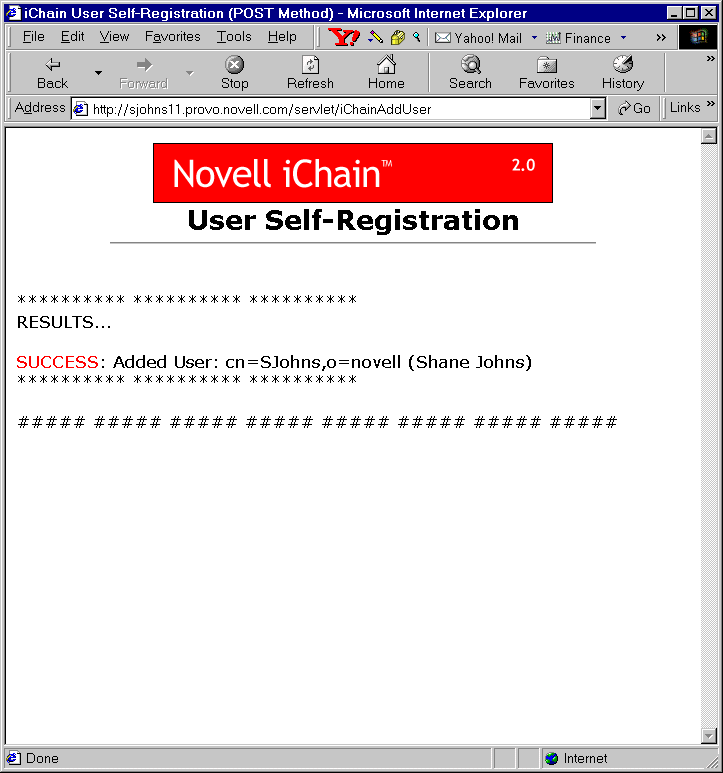
This servlet enables Web-based user account modification, as shown in Figure 9 and Figure 10:
Figure 9
Web-Based User Account Modification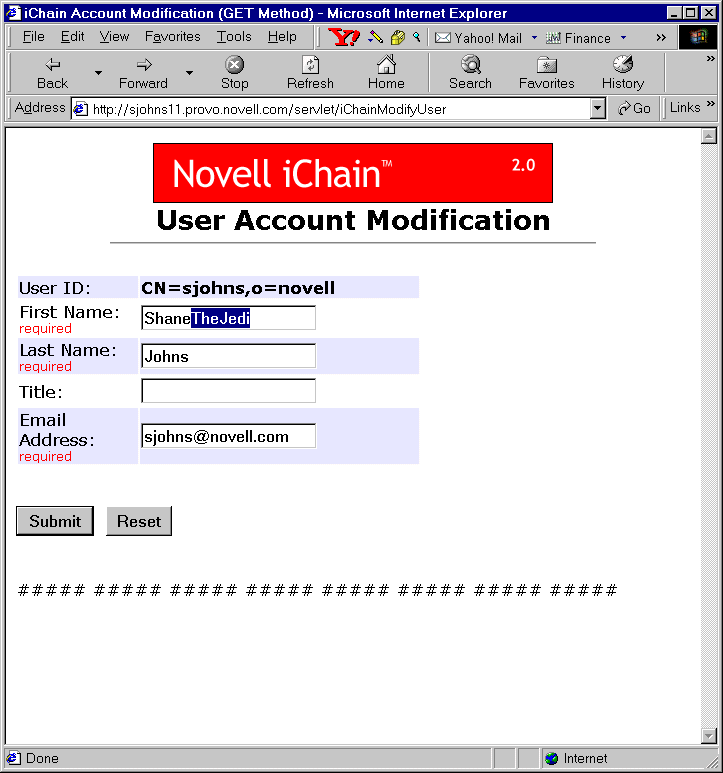
Figure 10
User Account Modification Results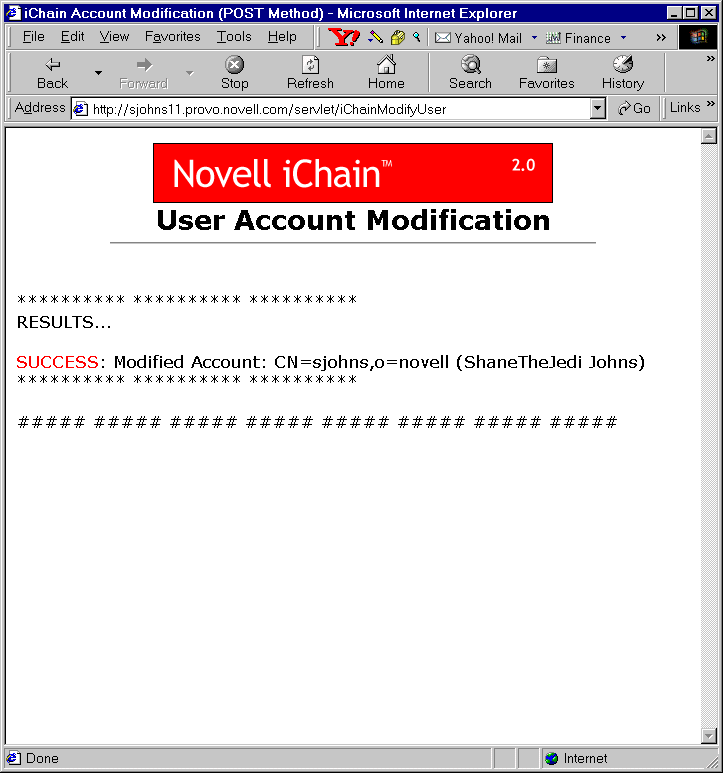
This servlet enables users to change their own passwords, as shown in Figure 11:
Figure 11
Password Change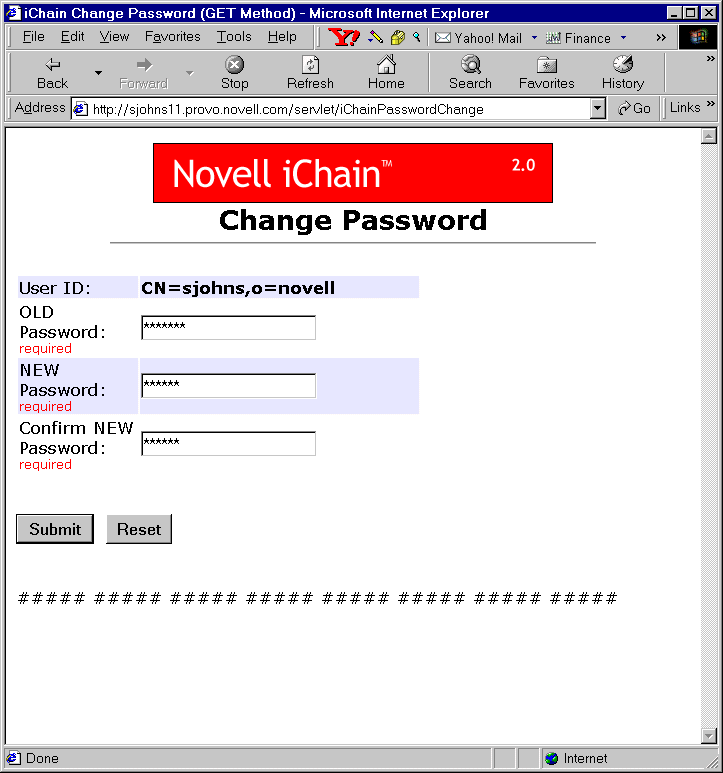
This servlet enables a Password Manager that will give users a way of changing their passwords after their passwords expire, while they still have grace logins remaining. The Password Manager will check (and display to the user) the number of grace logins remaining and will provide an automatic destination redirection once a password has been successfully changed. See Figure 12.
Figure 12
Password Manager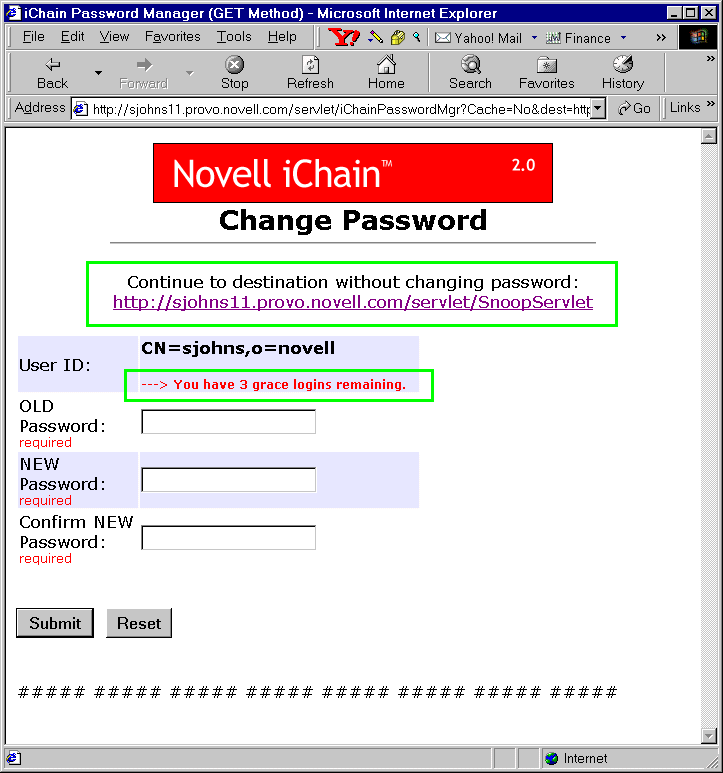
If the grace logins are greater than 1, the user will have the option to bypass the password change screen. If the grace login equals 1, the user will be forced to change his or her password before continuing on. See Figure 13.
Figure 13
Password Grace Logins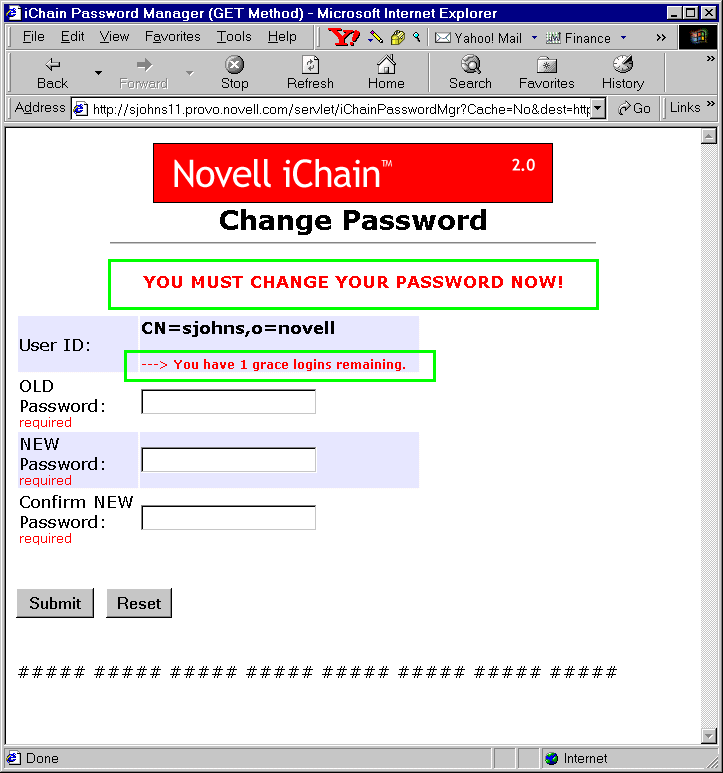
To set up the iChainPasswordMgr servlet:
From the proxy server Web administration GUI, select Configure > Access Control tab.
Enter the servlet information in the Password Management Servlet URL field.
Use the full http URL (for example, http://ichain.provo.novell.com/servlet/iChainPasswordMgr).
The servlets use a configuration file that they read upon initialization to customize their functionality to your environment and to easily provide localization (or modification) of all message and error strings. This configuration file also allows you to make any LDAP directory attributes available to the user for user account creation or modification. The name of this required configuration file is ICHAINAPPCONFIG.TXT.
NOTE: The servlets expect the ICHAINAPPCONFIG.TXT file to reside in the same directory as the servlets themselves (where you place the *.class servlet files).
The settings that can be modified/customized via this configuration are:
The following is an example of the format and syntax of how to make the LDAP attributes of "title" (Job Title) and "mail" (E-mail Address) available to the user during account creation or modification:
---------- ---------- ---------- ---------- ----------
# ATTRIBUTES for User Creation or Modification # Format: <LDAP name>, <"HTML display">, <Required: yes/no> # Example: givenName, "First Name", yes # NOTE: "cn", "givenName," "surname", & "UserPassword" are # automatically provided and required by default # (do NOT list these 4 attributes in this file) NumberOfAttributes=2 attrl=title, "JobTitle", no attr2=mail, "Email Address", yes
---------- ---------- ---------- ---------- ----------
The attributes can also be designed as "required" or "not required" when they are presented to the user during account creation or modification.
The ICHAINAPPCONFIG.TXT configuration file does support auxiliary class attributes. If the attributes that you want to list in the above attributes section are attributes in an auxiliary class, you will need to add an extra entry at the end of the attrX line as shown in the following example:
attr3=commerceAccountID, "Commerce ID", no, commerceAcct
In this example, commerceAccountID is the LDAP attribute name and commerceAcct is the auxiliary class that this attribute is a member of.
There are seven files that need to be placed in the proper locations for the iChain User Services to work correctly:
Place the four servlets (iChainAddUser.class, iChainModifyUser.class, iChainPasswordChange.class, and iChainPasswordMgr.class) in the servlet directory of your servlet engine.
Place the iChainAddUser$ISOPasswordTemplate.class class file in the same directory as the servlets (the servlet directory of your servlet engine).
Place the ICHAINAPPCONFIG.TXT configuration file in the same directory where you placed the servlets.
Place the TOP.GIF image file at the root documents directory of your Web server. (For example: for IIS, place the image file in C:\INETPUB\WWWROOT. For Netscape/Novonyx, place the image file in NOVONYX\SUITESPOT\DOCS.)
To set up the iChain User Services, modify the iChainAppConfig.txt configuration file to match your environment. Make sure this configuration file resides in the same file system directory as the servlets.
In order for the servlets to get the user identity and credential information (via the Authorization section of the HTTP header), you must enable the Forward Authentication Information to Web Server authentication option on the iChain Proxy Server for the Web server running these servlets at Configuration > Web Server Accelerator > Modify > Authentication Options.
The servlets in the iChain User Services are optimized for use with iChain 2.0. This means that the work of user authentication is offloaded to the iChain Proxy Server rather than having the servlets themselves perform user authentication. Of the four servlets, iChainAddUser is designed to be configured as an iChain public resource, while the other three servlets (iChainModifyUser, iChainPasswordChange, and iChainPassowordMgr) are designed to be configured as private (restricted or secure) resources.
The three restricted or secure iChain servlets extract the user's identity from the base64-encoded Authorization section of the HTTP header (which is populated by the iChain Proxy Server after the user authenticates).
IMPORTANT: Make sure that the directory path where these *.class files reside on your server are in the runtime CLASSPATH of your servlet engine's JVM. If they are not, the servlets will fail upon initialization because of the getClass().getResourceAsStream(configFileName) method call that they make when attempting to read the configuration text file (that should be in the same directory as the servlet *.class files) when the servlets initialize.
To configure the iChainAddUser servlet as a Public resource while also configuring the other servlets in the same directory as Restricted resources, you will need two Protected Resource entries on the ISO object.
For example, on the ISO object's Protected Resource tab, enter the following:
| URL Prefix | Access |
|---|---|
http://ichain.novell.com/servlet/iChainAddUser |
Public |
http://ichain.novell.com/servlet/* |
Restricted |
This makes the iChainAddUser servlet a Public resource, and all other servlets in that directory are restricted (login/authentication is required before access is given).
To enable support for a Password Dictionary file (which lists passwords that users are not allowed to use):
Select the ISO object > Password Policy tab.
Select the Check Password Dictionary check box.
In the Password Dictionary File field, list the full HTTP URL where the Dictionary file resides. For example, http://137.65.215.225/Dictionary.txt.
The Dictionary file must be a text file, and each word must be on its own line. For example, the contents of your text file might look like the following:
Because there are many different OS and servlet engine environments, it would be virtually impossible to document the installation for every environment. Here are a few examples:
In this example, the Novell Servlet Gateway is previously installed. See the Novell Developer site to download this gateway.
Verify the functionality of the Novell Servlet Gateway by running a servlet such as SnoopServlet.
Verify the server has the current support pack.
Check the version of java.nlm at the Novell NDK site. If it is less than 1.22, it will need to be updated to Novell JVM for NetWare v1.X.X (1.2.2. or higher).
Install the LDAP Class Libraries for Java on the NetWare server. This will place the ldap-novell.jar file in the sys:/java/lib directory.
Follow the installation instructions to add a classpath to the sys:\etc\java.cfg file:
SERVLETCLASSPATH=$SERVLETCLASSPATH;\java\lib\rt.jar;sys:\java\lib\i18n.jar
SERVLETCLASSPATH=$SERVLETCLASSPATH;\java\lib\ldap-novell.jar
SERVLETCLASSPATH=$ SERVLETCLASSPATH;\java\lib\servgate.jar
SERVLETCLASSPATH=$ SERVLETCLASSPATH;\java\lib\jsdk.jar
SERVLETCLASSPATH=$SERVLETCLASSPATH;\java\lib\njgwap.jar
Place the four servlets (iChainAddUser.class, iChainModifyUser.class, iChainPasswordChange.class, iChainPasswordMgr.class) in the SYS:\JAVA\SERVLETS directory.
Place the ICHAINAPPCONFIG.TXT configuration file in the same directory. Modify it as described in Servlet Configuration File.
Place the top.gif image file at the root documents directory (SYS:NOVONYX\SUITESPOT\DOCS).
Verify that Tomcat is functioning properly. This can be done by accessing a servlet in the SYS:\TOMCAT\33\WEBAPPS\ROOT\WEB-INF\CLASSES directory, such as SnoopServlet.
Install the LDAP Class Libraries for Java on the NetWare server. This will place the ldap-novell.jar file in the sys:/java/lib directory. Follow the install instructions to add a classpath to the SYS:TOMCAT\33\BIN\TOMCAT33.NCF file:
envset TOMCAT_CLASSPATH=sys:\java\lib\classes.zip
envset TOMCAT_CLASSPATH=$TOMCAT_CLASSPATH;$TOMCAT_HOME\lib\tomcat.jar
envset TOMCAT_CLASSPATH=$TOMCAT_CLASSPATH;SYS:\java\njclv2\lib\jndi.jar
envset TOMCAT_CLASSPATH=$TOMCAT_CLASSPATH;SYS:\java\njclv2\lib\njclv2.jar
envset TOMCAT_CLASSPATH=$TOMCAT_CLASSPATH;SYS:\java\lib\ldap-novell.jar
Place the four servlets (iChainAddUser.class, iChainModifyUser.class, iChainPasswordChange.class, iChainPasswordMgr.class) in the SYS:\TOMCAT\33\WEBAPPS\ROOT\WEB-INF\CLASSES directory.
Place the ICHAINAPPCONFIG.TXT configuration file in the same directory. Modify it as described above.
Place the TOP.GIF image file at the root documents directory (SYS:APACHE\HTDOCS).
Copy servlets and .txt files to OnDemand/WAS server SYS:\WEBSPHERE\APPSERVER\SERVLETS
Edit ICHAINAPPCONFIG.TXT to add proper LDAP server address, contexts, usernames, and passwords.
Copy TOP.GIF to SYS:\NOVONYX\SUITESPOT\DOCS
Expand LDAP class libraries (this puts the ldap-novell.jar file in SYS:/JAVA/LIB directory).
Edit STARTWEBSPHERESERVLETENGINE.NCF. Add the line:
envset WAS_CP=WAS_CP;$JAVA_HOME\lib\ldap-novell.jar
Access the servlets with a URL similar to http://<hostname>/servlet/iChainAddUser.
Although the iChain User Servlets are functional and usable right out of the box, the full source code to these servlets is included for those who require more functionality or more customization than is normally provided with these core user services.
| |