5.1 Setting Up Mutual SSL
SSL provides:
-
Authentication and nonrepudiation of the server, using digital signatures
-
Data confidentiality through the use of encryption
-
Data integrity through the use of authentication codes
Mutual SSL provides the same things as SSL, with the addition of authentication and nonrepudiation of the client, using digital signatures.
IMPORTANT:There is a security guideline that you should be aware of when setting up iChain in a production environment. For more information about this guideline, see TID 10096315.
5.1.1 Mutual SSL Configuration
There are many different certificate authority vendors and varying methods to configure Mutual SSL. Although it is not possible to cover all the possibilities, the following is an example using the Novell Certificate Authority:
iChain Server Certificate Setup: Certificate Signing Request
-
In the proxy server administration tool, click Home, click Certificate Maintenance, then click Create.
-
Specify an appropriate name for the certificate and subject name.
-
Click the Signature Algorithm drop-down list, then select the algorithm you want to use (SHA-1 or MD-5).
-
Click the RSA Key Size drop-down list, then select the RSA key size that you want to use.
You cannot select a key size larger than the maximum key size on the appliance.
-
Click Use External Certificate Authority.
-
If desired, specify a name for your organizational unit or division.
This is commonly referred to as the Organizational Unit and is used to differentiate between organizational divisions or to describe departments or divisions.
-
If desired, specify a name for your organization.
-
Specify the city or town where your organization does business.
-
Specify the non-abbreviated name of the state or province where the organization does business.
This is commonly referred to as the state.
-
Specify the International Standards Organization country code for the country where the organization does business.
This is commonly referred to as the country and must be a valid, two-character country code.
-
Click OK.
Examine the Action and Status fields. The Action field should have red arrows on the left and the word Request displayed on a green background. The Status should be Building. The red arrows and green background indicate that you need to click Apply.
-
Click Apply.
If any errors occur during the certificate request process, they are displayed in the Error field on a red background.
If an error occurs:
-
Click Modify.
-
In the Modify Certificate dialog box, make the changes necessary to resolve the errors, then click OK.
-
Click Apply.
Repeat the modification process until the Status field displays the words CSR in Progress on a yellow background.
-
Extracting the CSR from the iChain Proxy Server to Send the CSR
-
Click View CSR to open a new browser window that displays the CSR contents.
-
Select and copy the complete CSR text into your computer's Clipboard.
-
Paste the CSR text from the Clipboard to the e-mail message or HTML form as required by your CA. The method for sending the CSR varies depending on the authority. VeriSign, for example, uses a Web page interface.
IMPORTANT:The header and trailer must be on lines separate from the body of the CSR. The header line is similar to the following:
----- BEGIN NEW CERTIFICATE REQUEST -----
The trailer line is similar to the following:
----- END NEW CERTIFICATE REQUEST -----
If required, you must use hard returns to separate these two lines from the body of the CSR.
Using Novell as the External Certificate Authority
-
In ConsoleOne, click Tools > Issue Certificate, then paste the CSR and follow the prompts to sign the certificate.
-
Click Finish and save the file in a .b64 format.
-
In ConsoleOne, go to the Organization CA object's properties page (in the Security container). Go to the Certificates > Self Signed Certificate page, then export the Self Signed Certificate in .b64 format.
Storing the Certificate in the iChain Proxy Server
After the external CA responds with the certificate:
-
In the proxy server administration tool, click Home, click Certificate Maintenance, then click the name of the certificate you want to store, then click Store Certificate.
-
In the Store Certificates dialog box, paste the CA certificate into the CA Certificate Contents box. If you are using Novell CA, this is where the Self Signed Certificate should be placed.
If the CA Certificate Contents and the Server Certificate Contents are in the same Base-64 encoded file, select the No Trusted Root Certificate Available check box. This will dim the CA Certificate Contents box and allow the single Base-64 encoded file containing the entire certificate chain to be pasted into the Server Certificate Contents box.
-
Paste your newly issued certificate in the Server Certificate Contents box.
-
Click Create.
Examine the Action and Status fields. The Action field should have red arrows on the left and the word Create displayed on a green background. The Status should be CSR in Process. The red arrows and green background indicate that you need to click Apply.
-
Click Apply.
If no error occurs during the certificate creation process, the status changes to Active.
If an error occurs during the certificate creation process, it is displayed in the Error field on a red background.
If an error occurs:
-
Click Store Certificate.
-
In the Store Certificate dialog box, verify that the correct certificates are pasted in the boxes, then click OK.
-
Click Apply. Repeat this process until the Status field displays the words Active on a green background.
-
Create a New Authentication Profile Via the Proxy Server Administration Tool
-
In the proxy server administration tool, click Configure, click Authentication, then click Insert, then specify a name for the profile (for example, “mutual”).
-
Select SSL Certificate Mutual Authentication, click OK, then click Apply.
NOTE:Before you click OK, you can select Mutual Options to configure certificate mapping, if it is required. See Using Certificate Mapping.
-
Add the new profile to the Web Server Accelerator by clicking Configure, then click Web Server Accelerator.
-
Highlight the appropriate accelerator, then click Modify.
-
Click enable Authentication, click Authentication Options, then select the newly created profile.
-
Click Add, then click OK.
-
On the Accelerator page, in the Certificate drop-down selection box, select the name of the certificate you created, click OK, then click Apply.
iChain Server: Secure Exchange Between the Browser and iChain
NOTE:When using Mutual Authentication, it is recommended that Secure Exchange also be enabled between the browser and iChain as follows:
-
In the proxy server administration tool, click Configure, then click Web Server Accelerator.
-
Select the appropriate Web accelerator, click Modify, then click Enable Secure Exchange.
Leave the SSL Listening Port as the default (443).
NOTE:Secure Exchange can also be set up between iChain and the Web server. See Section 4.6, Setting Up Secure Exchange.
Creating a User Certificate From a Novell Certificate Authority
-
In ConsoleOne as an administrator, go to the user object's properties on the Security page, click Certificates, then click Create.
-
Select the default options (for example, with the private key). Change only what you need to change (for example, the expiration).
Do not change the subject name if it is shown in reverse (for example, o=novell,ou=stress,cn=user1020).
-
Save the file in .pfx format with a password.
You must be logged in as the user (not as an admin) to save this file in .pfx format.
Importing the .pfx Certificate to the Browser
The following instructions assume you are using Internet Explorer as your browser.
-
In the browser, click Tools, then click Internet Options.
-
Click Content, then click Certificates.
-
Import a Personal Certificate that has been signed by the Certificate Authority.
Follow the prompts to import the certificate. You will be prompted to enter a password.
5.1.2 Using Certificate Mapping
When using SSL Mutual Authentication, there must be a user in the iChain LDAP Authentication tree that corresponds with the user certificate. Certificate Mapping gives four different ways to map the user certificate to a user in the iChain LDAP Authentication tree. The four mapping types are Directory Name Mapping, Email Mapping, Subject Name Mapping, and Serial Number & Issuer Name Mapping. The proxy server can be configured to use any combination of the four mapping types. When searching for a user with the configured mappings, the first user found is the user that is used for authentication and access control, even if the other users maps to the same certificate.
Configuring a Certificate Mapping Search Base
The search base is the location in the iChain LDAP Authentication tree to search for user objects that the certificate can map to. More than one search base can be configured. The search looks for matches starting at the search base. All containers below the search base are included in the search.
At least one search base needs to be configured for Certificate Mapping. The certificate that authenticates the user must be mapped to a user in the LDAP directory. To do this, create an LDAP authentication profile named ldapcert. Configure the LDAP profile to search on a single attribute, and insert one or more search bases.
Configuring Certificate Mapping Types
Certificate Mapping gives four different ways to map the user certificate to a user in the iChain LDAP Authentication tree. The four mapping types are Directory Name Mapping, Email Mapping, Subject Name Mapping, and Serial Number & Issuer Name Mapping. The proxy server can be configured to use any combination of the four mapping types. The certificate mapping types are configured from the iChain Proxy Server utility.
-
In the proxy server administration tool, click Configure, then click Authentication.
-
Select an authentication profile of type Mutual.
-
Click Modify, then click Mutual Options.
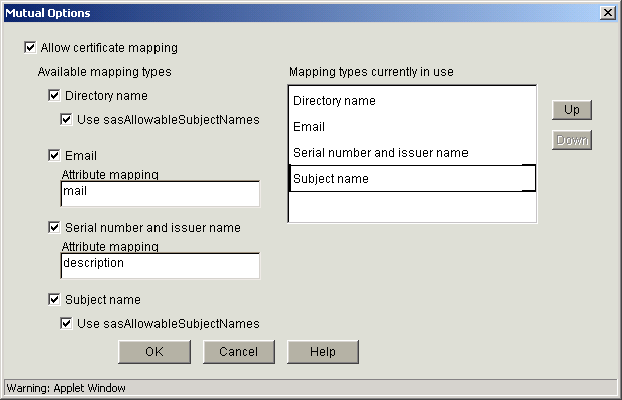
Directory Name Mapping
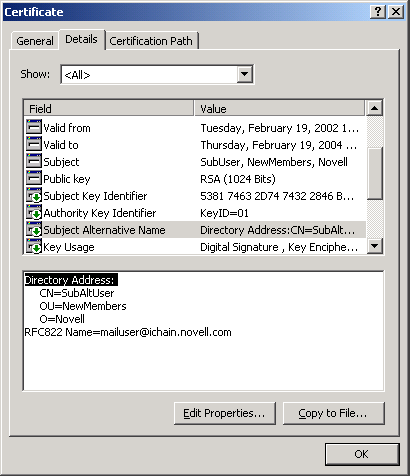
With directory name mapping, the Subject Alternative Name field in the user certificate, with a name type of Directory Name, is used to identify the certificate portion of the user (see Figure 5-1). The name in the certificate can be from root to leaf or from leaf to root.
Figure 5-1 Subject Alternative Name
A user in the LDAP Authentication Tree matching the Directory Name in the Subject Alternative Name field of the certificate is checked first. If a user is not found and Use sasAllowableSubjectName is also enabled for directory mapping, the LDAP Authentication Tree is searched for a user containing an sasAllowableSubjectName attribute matching the Directory Name in the Subject Alternative Name field of the certificate. If sasAllowableSubjectName is enabled, the LDAP Authentication tree should be configured so that there is no duplication of allowed names between users in the sasAllowableSubjectName attribute.
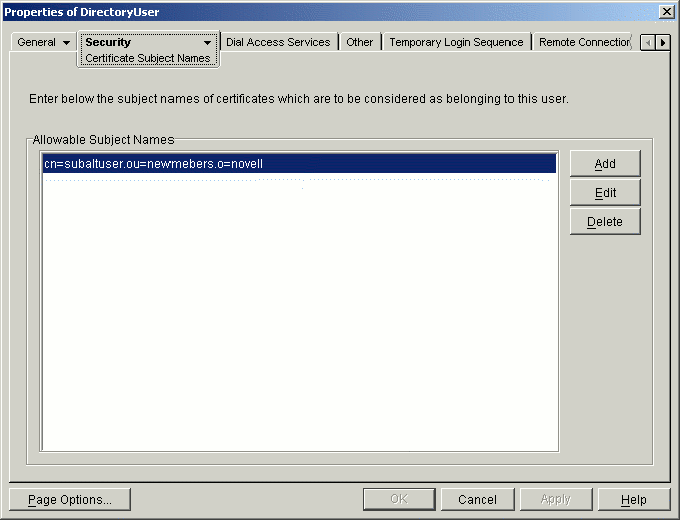
The sasAllowableSubjectName attribute is the same attribute currently used by NMAS for certificate mapping. The ConsoleOne snap-ins and schema updates are part of the NMAS installation on the Authorization Server CD. Figure 5-2 shows the sasAllowableSubjectName attribute in ConsoleOne.
Figure 5-2 sasAllowableSubjectName Attribute
Email Mapping
With Email mapping, there are two possible fields in the user certificate that can be used to identify the certificate portion of the user. The first is the Subject Alternative Name field in the user certificate, with a name type of RFC822 (see Figure 5-1). The second is when an e-mail name is embedded in the Subject field of the certificate (see Figure 5-3). If both the Subject field and the Subject Alternative Name field contain an e-mail address, the Subject Alternative Name is the only field used.
Figure 5-3 Email Name Embedded in Certificate Subject Field
The LDAP attribute configured in the Email attribute mapping is used to match the Email address from the certificate when searching for a user in the LDAP Authentication tree. The default LDAP attribute is mail, which is the attribute currently used by GroupWise and Novell Certificate Server. The LDAP Authentication tree should be configured so that there is no duplication of Email addresses between users in the configured e-mail attribute mapping.
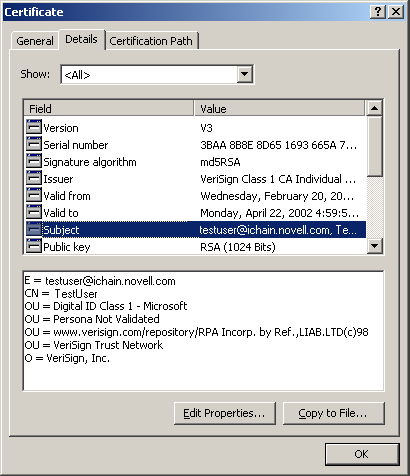
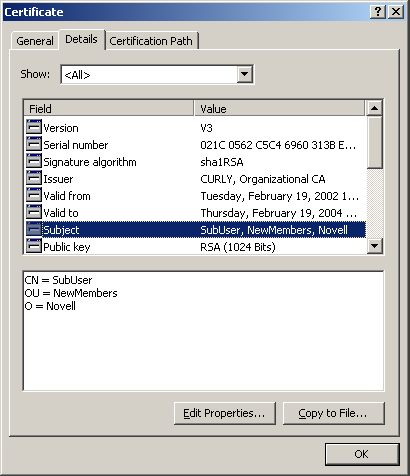
Subject Name Mapping
With directory name mapping, the Subject field in the user certificate is used to identify the certificate portion of the user (see Figure 5-4). The Subject name in the certificate can be from root to leaf or from leaf to root.
Figure 5-4 Subject Field in the User Certificate
A user in the LDAP Authentication tree matching the Subject Name field of the certificate is checked first. If a user is not found and the Use sasAllowableSubjectName is also enabled for directory name mapping, the LDAP Authentication tree is searched for a user containing a sasAllowableSubjectName attribute matching the Subject Name field of the certificate. If the sasAllowableSubjectName attribute is enabled, the LDAP Authentication tree should be configured so that there is no duplication of allowed names between users in the sasAllowableSubjectName attribute.
The sasAllowableSubjectName is the same attribute currently used by NMAS for certificate mapping. The ConsoleOne snap-ins and schema updates are part of the NMAS installation on the Authorization Server CD. Figure 5-2 shows the sasAllowableSubjectName in ConsoleOne.
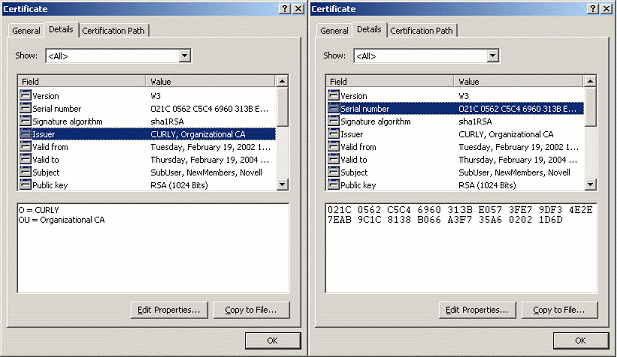
Serial Number & Issuer Name Mapping
With Serial Number & Issuer Name mapping, both the serial number and the issuer name fields from the certificate is used together to identify the certificate portion of the user (see Figure 5-5).
Figure 5-5 Serial Number & Issue Name Mapping
Both the issuer name and the serial number need to be put into the same LDAP attribute of the user. The LDAP attribute that is used is specified in the Serial number and issuer name Attribute mapping field of the iChain Proxy Server utility. The LDAP attribute can be any Case Ignore List or Case Ignore String attribute of the user. If you are configuring your own attribute, make sure the attribute is added to the Person class.
When using a Case Ignore List attribute, both the issuer name and the serial number need to be in the same list. The issuer name needs to be the first item in the list, with the serial number being the second and last item in the list.
When using a Case Ignore String attribute, both the issuer name and the serial number need to be in the same attribute separated by a dollar sign ($) character. The issuer name needs to be in front of the $ character, with the serial number following the $ character. Do not use any spaces in front of or behind the $ character. (For example, O=CURLY.OU=Organization CA$021C0562C5C4... could be used for the certificate displayed in Figure 5-5).
The issuer name can be from root to leaf or from leaf to root. The issuer name is dot-delimited without a preceding dot. (For example, O=CURLY.OU=Organization CA or OU=Organization CA.O=CURLY could be used for the certificate displayed in Figure 5-5.
NOTE:The certificate number is displayed in Internet Explorer with a space after every fourth digit. The certificate number needs to be entered without spaces. For example, the certificate number displayed in Figure 5-5 is shown with spaces, but should be entered as: 021C0562C5C46960313BE0573FE79DF34E2E7EAB9C1C8138B066A3F735A602021D6D.