5.3 Audit Server Options
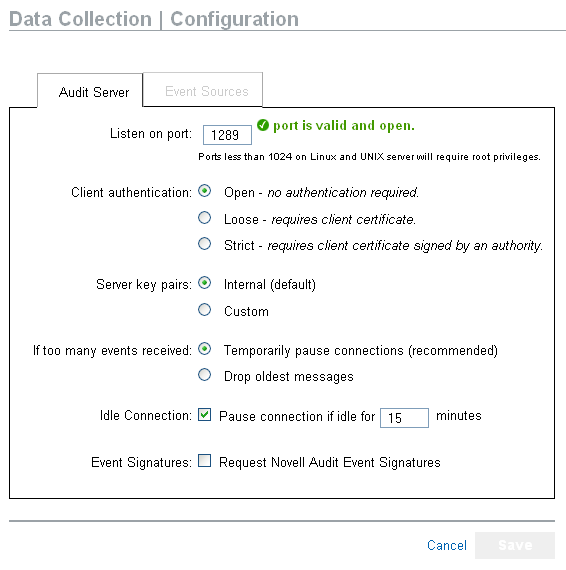
Administrators can change some settings regarding how Identity Audit listens for data from the event source applications, including the port on which Identity Audit listens and the type of authentication between the event source and Identity Audit.
-
Log into Identity Audit as an administrator.
-
Click the link at the top of the screen.
-
Click the link on the right side of the screen.
-
Make sure that the tab is selected.
-
Specify the port on which the Identity Audit server will listen for messages from the event sources. For more information, see Section 5.3.1, Port Configuration and Port Forwarding.
-
Set the appropriate client authentication and server key pairs settings. For more information, see Section 5.3.2, Client Authentication.
-
Select the Identity Audit server behavior when the buffer fills with too many events.
Temporarily pause connections: Drops the existing connections and stops accepting new connections until the buffer has space for the new messages. In the meantime, messages are cached by the event sources.
Drop oldest messages: Drops the oldest messages in order to accept new messages.
WARNING:There is no supported method for recovering dropped messages if you select .
-
Select to disconnect event sources that have not sent data for a certain period of time.
The event source connections are automatically re-created when they start sending data again.
-
Specify the number of minutes before an idle connection is disconnected.
-
Select to receive a signature with the event.
To receive a signature, the Platform Agent on the event source must be configured properly. For more information, see Section 5.2, Managing Event Sources.
-
Click .
5.3.1 Port Configuration and Port Forwarding
The default port on which Identity Audit listens for messages from the s is port 1289. When the port is set, the system checks whether the port is valid and open.
Binding to ports less than 1024 requires root privileges. Instead, Novell recommends that you use a port greater than 1024. You can change the source devices to send to a higher port or use port forwarding on the Identity Audit server.
To change the event source to send to a different port:
-
Log into the event source machine.
-
Open the logevent file for editing. The file is in a different location depending on the operating system:
-
Linux: /etc/logevent.conf
-
Windows: C:\WINDOWS\logevent.cfg
-
NetWare: SYS:\etc\logevent.cfg
-
Solaris: /etc/logevent.conf
-
-
Set the LogEnginePort parameter to the desired port.
-
Save the file.
-
Restart the Platform Agent. The method varies by operating system and application. Reboot the machine or refer to the application-specific documentation on the Novell Documentation Web Site for more instructions.
To configure port forwarding on the Identity Audit server:
-
Log into the Identity Audit server operating system as root (or su to root).
-
Open the file /etc/init.d/boot.local for editing.
-
Add the following command near the end of the bootup process:
iptables -A PREROUTING -t nat -p protocol --dport incoming port -j DNAT --to-destination IP:rerouted port
where protocol is tcp or udp, incoming port is the port on which the messages are arriving, and IP:rerouted port are the IP address of the local machine and an available port above 1024
-
Save the changes.
-
Reboot. If you cannot reboot immediately, run the iptables command above from a command line.
5.3.2 Client Authentication
Event sources send their data over an SSL connection, and the setting for the Identity Audit server determines what kind of authentication is performed for the certificates from the s on the event sources.
Open: No authentication is required. Identity Audit does not request, require, or validate a certificate from the event source.
Loose: A valid X.509 certificate is required from the event source, but the certificate is not validated. It does not have to be signed by a Certificate Authority.
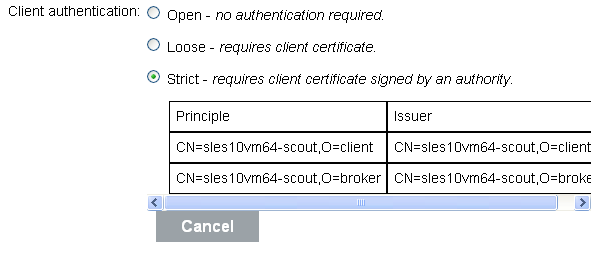
Strict: A valid X.509 certificate is required from the event source, and it must be signed by a trusted Certificate Authority. If the event source does not present a valid certificate, Identity Audit does not accept its event data.
Creating a Truststore
For strict authentication, you must have a truststore that contains either the event source’s certificate or the certificate for the Certificate Authority (CA) that signed the event source’s certificate. After you have a DER or PEM certificate, you can create the truststore by using the CreateTruststore utility that comes with Identity Audit.
-
Log in to the Identity Audit server as novell.
-
Go to /opt/novell/identity_audit_1.0_x86/data/updates/done.
-
Unzip the file audit_connector.zip.
unzip audit_connector.zip
-
Either copy TruststoreCreator.sh or TruststoreCreator.bat to the machine with the certificates or copy the certificates to the machine with the TruststoreCreator utility.
-
Run the TruststoreCreator.sh utility.
TruststoreCreator.sh -keystore /tmp/my.keystore -password password1 -certs /tmp/cert1.pem,/tmp/cert2.pem
In this example, the TruststoreCreator utility creates a keystore file called my.keystore that contains two certificates (cert1.pem and cert2.pem) in it. It is protected by the password password1.
Importing a Truststore
For strict authentication, the administrator can import a truststore by using the button. This helps ensure that only authorized event sources are sending data to Identity Audit. The truststore must include either the event source’s certificate or the certificate of the Certificate Authority that signed it.
The following procedure must be run on the machine that has the truststore on it. You can open a Web browser on the machine with the truststore or move the truststore to any machine with a Web browser.
To import a truststore:
-
Log into Identity Audit as an administrator.
-
Click the link at the top of the screen.
-
Click the link on the right side of the screen.
-
Make sure that the tab is selected.
-
Select the option under .
-
Click and browse to the truststore file (for example, my.keystore)
-
Enter the password for the truststore file.
-
Click .
-
If desired, click to see more information about the truststore.
-
Click .
After the truststore is imported successfully, you can click to see the certificates included in the truststore.
Server Key Pair
Identity Audit is installed with a built-in certificate, used to authenticate the Identity Audit server to the event sources. This certificate can be overridden with a certificate signed by a public certificate authority (CA).
To replace the built-in certificate:
-
Log into Identity Audit as an administrator.
-
Click the link at the top of the screen.
-
Click the link on the right side of the screen.
-
Make sure that is selected.
-
Under, select .
-
Click and browse to the truststore file.
-
Enter the password for the truststore file.
-
Click .
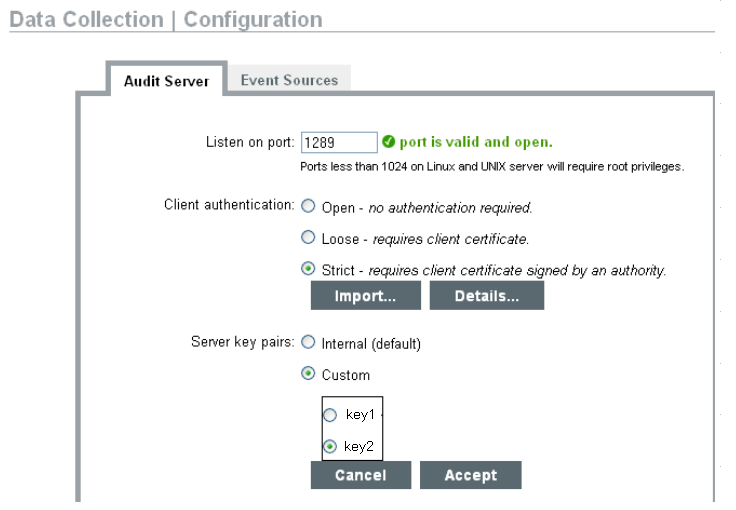
If there is more than one public-private key pair in the file, select the desired key pair and click .
-
Click to see more information about the server key pair.
-
Click .