3.4 Configuring the Identity Manager Drivers for Use with Remote Loaders
You can configure a new driver or enable an existing driver to communicate with the Remote Loader. This section provides general information on configuring drivers so that they communicate with the Remote Loader. For additional and driver-specific information, refer to the relevant driver implementation guide.
3.4.1 Importing and Configuring a New Driver
-
In Novell iManager, import or create and configure a new driver.
-
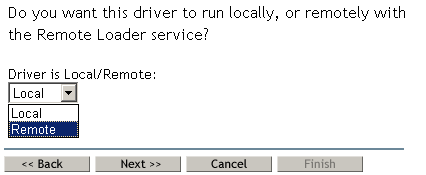
Scroll to the bottom of the configuration options, select Remote from the drop-down list, then click .
-
Enter a remote hostname and port.

-
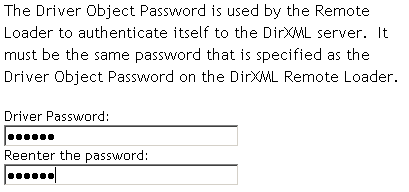
Type and re-enter a password for the Driver object.
-
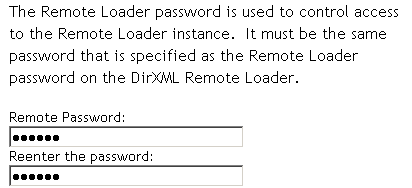
Enter and re-enter the Remote Loader password, then click .
-
Define a security-equivalent user, click , then click .
3.4.2 Configuring an Existing Driver
Specify parameters on the Driver object for connecting to the Remote Loader.
-
In Novell iManager, click .
-
Browse to and select the driver that you want to modify.
-
Click the driver status icon, then click .
-
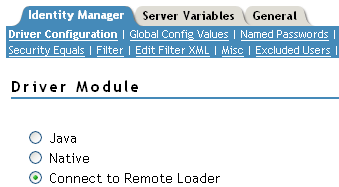
In the Driver Module section, select Connect to Remote Loader.
-
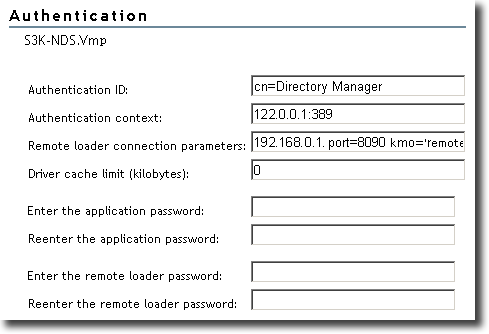
In the Authentication section, enter parameters for the Remote Loader.
-
Remote Loader Connection Parameters
Earlier, you exported the self-signed certificate. (See Section 3.2.2, Exporting a Self-Signed Certificate.) For SSL, you need the nickname of the self-signed certificate.
In the Remote Loader Connection Parameters edit box, type parameters in key-value pairs. For example, type
hostname=192.168.0.1 port=8090 kmo=remotecert
hostname=192.168.0.1 port=8090 kmo=’remote cert’
-
hostname
The host name or IP address (for example, 190.162.0.1). Specifies the address or name of the computer that the Remote Loader runs on. If you don’t specify the IP address or server name, this value defaults to localhost.
-
port
Where the Remote Loader accepts connections from the remote interface shim. If you don’t specify this communication parameter, this value defaults to 8090.
-
kmo
Specifies the Key Name (for example, kmo=remotecert) of the Key Material Object (KMO) containing the keys and certificate used for SSL.
If you used spaces in the certificate name, you need to enclose the KMO object nickname in single quotation marks.
HINT:The KMO object name is the nickname value you specified in Step 2 of Section 3.2.1, Creating a Server Certificate.
-
-
Enter the Application Password
Specify the password of the application user ID. Typically, the driver shim needs this password so that the driver can connect to the application.
-
Enter the Remote Loader Password
Specify the password for the Remote Loader. The remote interface shim uses this password to authenticate itself to the Remote Loader.
NOTE:Set or reset both the application password and the Remote Loader password at the same time.
-
-
Click .
3.4.3 Creating a Keystore
A keystore is a Java file that contains encryption keys and, optionally, certificates. If you want to use SSL between the Remote Loader and the Metadirectory engine, and you are using a Java shim, you need to create a keystore file.
Keystore on Windows
On Windows, run the Keytool utility, typically found in the c:\novell\remoteloader\jre\bin directory.
Keystore on Solaris, Linux, or AIX
On Solaris, Linux, or AIX environments, use the create_keystore file. Create_keystore is installed with rdxml and is also included in the dirxml_jremote.tar.gz file, found in the \ dirxml\java_remoteloader directory. The create_keystore file is a shell script that calls the Keytool utility.
On UNIX, when the self-signed certificate is used to create the keystore, the certificate can be exported in Base64 or binary .der format.
Enter the following at the command line:
create_keystore self-signed_certificate_name keystorename
For example, type one of the following
create_keystore tree-root.b64 mystore
create_keystore tree-root.der mystore
The create_keystore script specifies a hard-coded password of “dirxml” for the keystore password. This is not a security risk because only a public certificate and public key are stored in the keystore.
Keystore on All Platforms
To create a keystore on any platform, you can enter the following at the command line:
keytool‑import ‑alias trustedroot ‑file self-signed_certificate_name‑keystore filename‑storepass
Filename can be any name (for example, rdev_keystore).