4.4 Working with lists
The lists node lets you define the contents of global lists. Global lists are used by the Identity Manager user application to:
-
Provide a list of values for an attribute. When the attribute is displayed for editing in the user interface, the possible values are displayed as a dropdown list.
-
Used to define the categories available to the Provisioning Request Configuration plug-in to iManager. This is a special list. For details, see Section 4.4.2, About the Provisioning Category list.
To create a new global list:
-
Launch the New List Wizard in one of these ways:
From the Provisioning View:
-
Select File>New>Provisioning. Choose Directory Abstraction Layer List. Click Next.
-
Select the Lists node, right-mouse click and choose New.
From the directory abstraction layer editor:
-
Click the New List button.
-
Select the Lists node, right-mouse click and choose Add List.
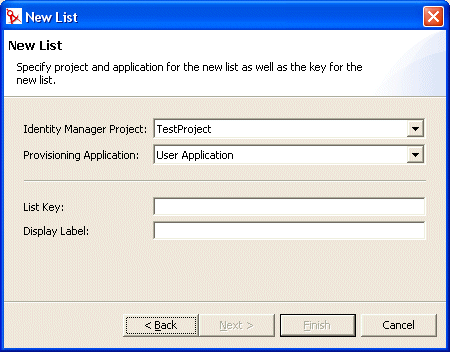
The New List dialog displays.
NOTE:If launched from the File menu, the dialog contains fields not displayed when launched in either of the other ways.
-
-
Complete the panel as follows:
-
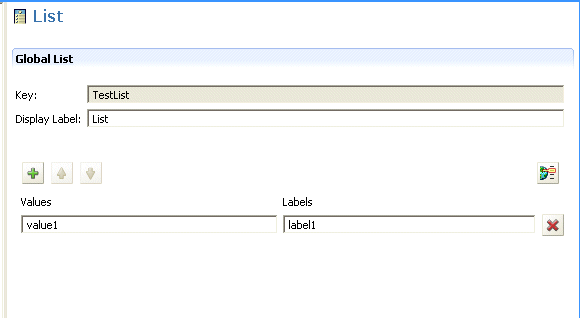
Click Finish. The Global Lists property sheet displays.
-
Complete these fields:
The list is now available in the design environment.
-
Save the project.
NOTE:To make the list available to the runtime environment, you must deploy it.
4.4.1 About the Preferred Locale list
The Preferred Locale list represents the default language that will be used in the event that the browser language is not one of the supported languages. The contents of this list are displayed by the default configuration of the Edit User action in the user application.
4.4.2 About the Provisioning Category list
The Provisioning Category list defines the set of categories that help you organize Provisioned Resources (Entitlements) and Provisioning Requests. The categories in this list display in:
-
iManager—Provisioning Request Configuration plug-in
-
user application—Requests and Approvals tab
You cannot change the Provisioning Request list key, but you can add more items to the list or change the existing category values and labels.
To modify the contents of the Provisioning Category List:
-
Make sure the correct project is open in the editor.
-
Click the Lists Node.
-
Select Provisioning Category.
-
Use the global list property pane to make your modifications.
NOTE:The Values field is used to populate the category key. The Values field restricts you to lowercase letters, numbers and underscore (_)characters because these are the only valid characters in the category key. The category key is used internally as an identifier for the category.
-
Save then deploy your changes. Remember to update the application server’s cache.
Once your changes are deployed, they are reflected in the user application and the iManager plug-in.