4.1 About the Provisioning Request Definition Editor
The provisioning request definition editor allows you to create custom provisioning request definitions by using a rich set of Eclipse-based design tools. The provisioning request definition editor lets you define the basic characteristics of the provisioning request, design the associated workflow, and model the initial request and approval forms.
Identity Manager ships with a set of provisioning request templates that you can use to create your definitions. The templates model some common workflow design patterns. However, if you want complete control over the behavior of your workflows, you can create your provisioning request definitions from scratch.
NOTE:For details on using the templates, see Section 4.4, Working with the Installed Templates.
4.1.1 How the Provisioning Request Definition Editor Fits into the Identity Manager Architecture
A key feature of Identity Manager is workflow-based provisioning, which is the process of managing user access to secure resources in an organization. These resources can include digital entities such as user accounts, computers, and databases. Provisioned resources are mapped to Identity Manager entitlements or to entities in the directory abstraction layer.
Identity Manager can service a wide range of provisioning requests. Provisioning requests are user or system actions intended to grant or revoke access to organizational resources. They can be initiated directly by the end user through the Identity Manager User Application, or indirectly in response to events occurring in the Identity Vault (eDirectory™).
When a provisioning request requires permission from one or more individuals in an organization, the request starts a workflow. The workflow coordinates the approvals needed to fulfill the request. Some provisioning requests require approval from a single individual; others require approval from several individuals. In some instances, a request can be fulfilled without any approvals.
Some workflows require that processing proceed in a sequential fashion, with each approval step being performed sequentially. Other workflows provide support for parallel processing. When you define a provisioning request, you specify whether you want the workflow to support sequential or parallel processing.
To configure a provisioning request, you create a provisioning request definition, which binds a resource to a workflow. Identity Manager provides the provisioning request definition editor to give you complete control over the behavior of a provisioning request and its associated workflow. Identity Manager also includes a set of iManager plug-ins that you can use to customize provisioning request definitions that have already been deployed. The iManager tools let you make minor changes to the behavior of a provisioning request definition and also manage workflows that are in process.
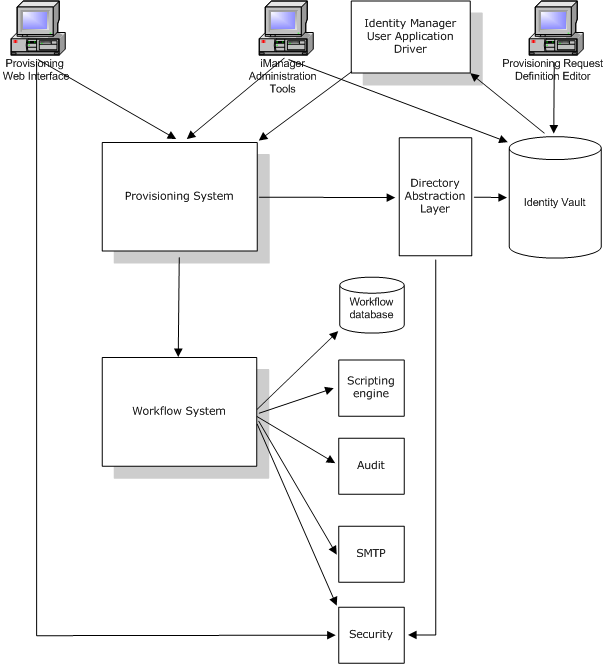
The following figure shows how the provisioning request definition editor fits into the workflow-based provisioning system included with Identity Manager:
Figure 4-1 Provisioning Request Definition Editor and the Workflow Architecture
4.1.2 Provisioning and Workflow Example
Suppose a user needs an account on an IT system. To set up the account, the user initiates a request through the Identity Manager User Application. This request starts a workflow, which coordinates an approval process. When the necessary approvals have been granted, the request is fulfilled. The process includes four basic steps:
Step 1: Initiating the Request
In the Identity Manager User Application, the user browses a list of resources by category and selects one to provision. In the Identity Vault, the provisioned resource selected is associated with a provisioning request definition. The provisioning request definition is the most prominent object in a provisioning system. It binds a provisioned resource to a workflow and acts as the means by which the workflow process is exposed to the end user. The provisioning request definition provides all the information required to display the initial request form to the user and to start the flow that follows the initial request.
In this example, the user selects the New Account resource. When the user initiates the request, the Web application retrieves the initial request form and the description of the associated initial request data from the Provisioning System, which gets these objects from the provisioning request definition.
When a provisioning request is initiated, the Provisioning System tracks the initiator and the recipient. The initiator is the person who made the request. The recipient is the person for whom the request was made. In some situations, the initiator and the recipient can be the same individual.
Each provisioning request has an operation associated with it. The operation specifies whether the user wants to grant or revoke the resource.
Step 2: Approving the Request
After the user has initiated the request, the Provisioning System starts the workflow process. The workflow process coordinates the approvals. In this example, two levels of approvals are required, one from the user’s manager and a second from the manager’s supervisor. If approval is denied by any user in a workflow, the flow terminates and the request is denied.
Workflows can process approvals sequentially or in parallel. In a sequential workflow, as shown in the following figure, each approval task must be processed before the next approval task begins.
Figure 4-2 Sequential Workflow with Two Approvals

In a parallel workflow, as shown in the following figure, users can work on the approval tasks simultaneously.
Figure 4-3 Parallel Workflow with Two Approvals
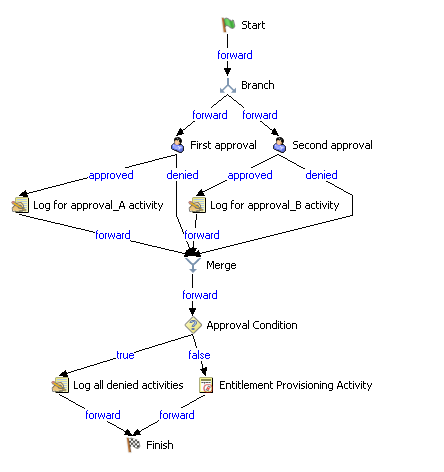
NOTE:The display labels (First approval, Second approval, and so on) can easily be changed to suit your application requirements. For parallel flows, you might want to specify labels that do not imply sequential processing. For example, you might want to assign labels such as One of Three Parallel Approvals, Two of Three Parallel Approvals, and so on.
The workflow definition is made up of the components shown in the following table:
Table 4-1 Workflow Definition Components
Start activity: The workflow process begins with the execution of the Start activity. This activity displays the initial request form to the user. After the user has provided the initial request data, it initializes a work document using this data. The Start activity also binds several system values, such as the initiator and recipient, so that these can be used in script expressions.
Approval activities: After the Start activity finishes, the Workflow System forwards processing to the first Approval activity in the flow. The Approval activity sends an e-mail to the approver, notifying this user that his or her attention is needed. When the user claims the task, the Approval activity displays an approval form, which gives the user the ability to act on the request. In the workflow examples shown in Step 2: Approving the Request, “First approval” and “Second approval” are examples of Approval activities. The display labels for Approval activities can be localized to satisfy international requirements.
An Approval activity has five possible outcomes, each represented by a different flow path exiting the activity:
-
Approved
-
Denied
-
Refused
-
Error
-
Timeout
NOTE:The Error and Timeout outcomes can occur without any action being taken by the user.
If the user approves the request, the workflow follows the approved flow path to the next activity in the flow. If no further approvals are needed, the resource can be provisioned. If the user denies the request, the workflow follows the denied flow path to the next activity in the flow. Alternatively, the user can reassign the task (if he or she is an Organizational Manager or User Application Administrator), which puts the task in another user’s queue.
The user to whom an Approval activity has been assigned is referred to as the addressee. The addressee for an activity can be notified of the assigned task via e-mail. To perform the work associated with the activity, the addressee can click the URL in the e-mail, find the task in the work list (queue), and claim the task.
The addressee must respond to an Approval activity within a specified amount of time; otherwise, the activity times out. Typically the timeout interval is expressed in hours or days to allow the user sufficient time to respond.
When an activity times out, the workflow process might try to complete the activity again, depending on the retry count specified for the activity. In some situations, the workflow process might be configured to escalate an activity that has timed out. In this case, the activity is reassigned to a new addressee (the user’s manager, for example) to give this user an opportunity to finish the work of the activity. If the last retry times out, the activity might be marked as approved or denied, depending on how the workflow was configured.
Log activity: The Log activity is a system activity that writes messages to a log. To log information about the state of a workflow process, the Workflow System interacts with Novell® Audit. During the course of its processing, a workflow might log information about various events that have occurred. Users can use the Novell Audit reporting tools to look at logging data.
Branch and Merge activities: In a workflow that supports parallel processing, the Branch activity allows two users to act on different areas of the work item in parallel. After the users have completed their work, the Merge activity synchronizes the incoming branches in the flow.
Condition activity: During the course of execution, a workflow process might perform a test and check the outcome to see what to do next. The Condition activity provides this capability. Condition activities use a scripting expression to define the condition to evaluate. In the workflow examples shown in Step 2: Approving the Request, “Approval Condition” is an example of a Condition activity.
The Condition activity supports three possible outcomes or exit paths:
-
True
-
False
-
Error
Step 3: Fulfilling the Request
When a provisioning request has been approved, the Workflow System can begin the provisioning step. At this point, control passes back to the Provisioning System.
To fulfill the provisioning request, the Provisioning System can execute an Identity Manager entitlement or directly manipulate an eDirectory object and its attributes. These actions are performed by either the Entitlement activity or the Entity activity.
Entitlement activity: The Entitlement activity fulfills the provisioning request by granting or revoking an entitlement. This activity is not usually executed unless all of the necessary approvals are given.
Entity activity: The Entity activity fulfills the provisioning request by directly manipulating an eDirectory object and its attributes. This activity is not normally executed unless all of the necessary approvals are given.
Step 4: Completing the Workflow
When all other activities have terminated, the workflow executes the Finish activity.
Finish activity: The Finish activity is the final activity in a workflow. When all the activities in a flow have been completed and the final result of the flow is available, the Finish activity is executed. The Finish activity sends a final e-mail notification to inform participants of the completion of the workflow.