5.2 Using the Wizard to Create a Provisioning Request Definition
You can create a provisioning request definition with a template or from concept to finished product. We recommend that you use an existing template to create new provisioning request definitions. This saves time and allows you to make targeted changes to an existing provisioning request definition. However, if no existing provisioning request definition resembles new work that you want to do, you can create a new provisioning request from concept to finished product.
See the following topics:
5.2.1 Using a Template
To create a provisioning request definition by using a template:
-
Create the basic information for a new provisioning request definition (see Section 5.1, About the Wizard and the Overview Tab). In step Step 4, select , then select the desired template. When you are finished, the tab for the new provisioning request is displayed.
-
Click the tab. The Workflow view is displayed.
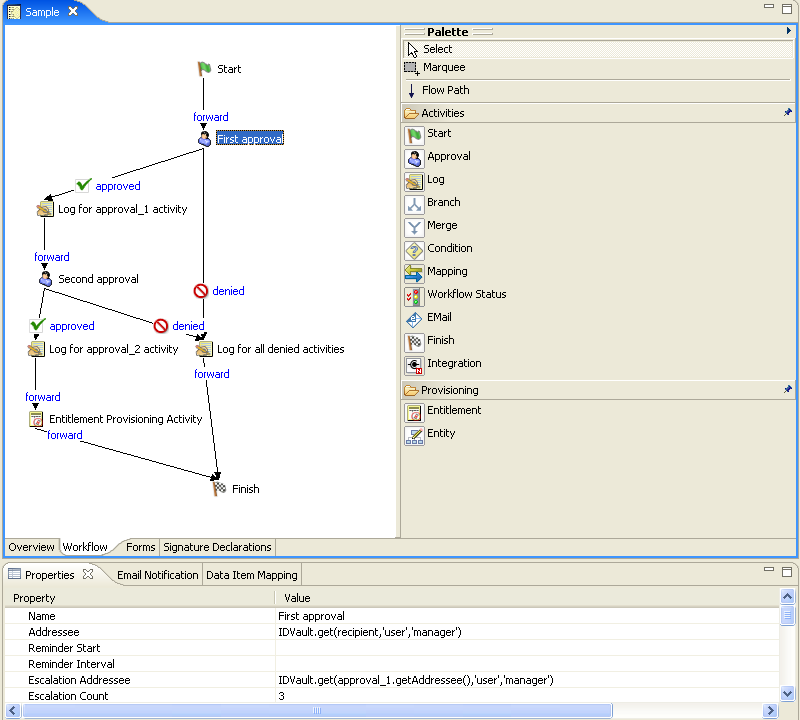
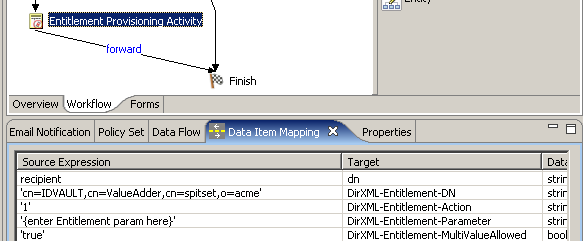
The provisioning request definition template includes some default values that you must customize for your environment. For example, the Entitlement Provisioning Activity contains placeholder values for several data item mapping properties. You need to replace the placeholder values with the actual values for your provisioning request.
-
Click the Entitlement Provisioning activity, then click the tab.
-
Double-click in the field for the target field, then click the button that appears in the field to display the ECMA expression builder.
See Section 10.0, Working with ECMA Expressions for information about the ECMA expression builder.
-
Use the ECMA expression builder to replace the placeholder expression with an expression that specifies the entitlement that you want to provision with this provisioning request.
-
Replace the placeholder expression in the field for the .
-
Click the tab and customize the forms for the provisioning request to your needs.
See Section 6.0, Creating Forms for a Provisioning Request Definition.The template includes predefined request and approval forms. You might want to add additional forms, or add or remove form controls.
-
Click the tab and customize the properties of the workflow to your needs.
See Section 7.0, Creating the Workflow for a Provisioning Request Definition and Section 8.0, Workflow Activity Reference.
Templates and Flow Strategy
By default, provisioning request definition templates use the flow strategy. The templates assume the recipient is a user DN. If you change the flow strategy you must modify the template. If you change the flow strategy to:
-
: Remove the recipient reference from the request form.
-
: Remove the recipient from the request form and add logic to determine the addressee for the first approval activity. The templates assume the recipient is a user DN so you must determine if the recipient is a user or group DN. You can use the IDVault isGroup(String dn) method to determine if the DN is a group. If the recipient is a group DN, you must provide logic for assigning the approval activity addressee.
5.2.2 From Concept to Finished Product
Whenever possible, use an existing template (or save an existing provisioning request definition under a new name) to create new provisioning request definitions. This saves you time and allows you to make targeted changes to an existing provisioning request definition. However, if no existing provisioning request definition resembles the new work that you want to do, then you need to build a provisioning request definition from concept to finished product. You can still save time and effort by re-using forms from other workflows.
To create a provisioning request definition:
-
Create the basic information for a new provisioning request definition (see Section 5.1, About the Wizard and the Overview Tab). In step Step 4, do not select , and do not select a template. When you are finished, the tab for the new provisioning request is displayed.
-
Create the forms for the provisioning request definition. After you have created the basic provisioning request definition, the next step is to create the forms that are presented to the provisioning request users. It’s important to define forms before you create the workflow topology. This ensures that data bindings can be set up automatically for each activity when you create activities.
There are two types of forms:
request: Used by the person requesting the resource to specify the item or capability that is being requested. One request form can be defined for a workflow. The request form is always associated with the Start activity.
approval: Used by the person receiving the provisioning request to approve, refuse, or comment on the provisioning request. One or more approval forms can be defined. You must associate each form with an Approval activity. You associate an approval form with an Approval activity by using the properties for the activity.
To create the forms, see Section 6.3, Creating Forms.
-
Click the tab and create the workflow topology.
You create the topology of a workflow by creating and linking activities into the desired workflow pattern, and by assigning rules to the flowpaths between activities. For information about creating a workflow topology, see Section 7.0, Creating the Workflow for a Provisioning Request Definition.
-
Specify the details (properties, data item mappings, e-mail notification) for each workflow activity.
To specify workflow activity details, see Section 8.0, Workflow Activity Reference.
-
Configure the flowpaths between workflow activities.
To configure flowpaths, see Section 7.4, Configuring Flow Paths.