A.1 Interactive Mode
The interactive mode provides a text interface to control and use the DirXML Command Line utility.
-
At the console, enter dxcmd.
-
Enter the name of a user with sufficient rights to the Identity Manager objects, such as admin.novell.
-
Enter the user’s password.
-
Enter the number of the command that you want to perform.
Table A-1 contains the list of options and what functionality is available.
-
To quit the utility, enter 99.
NOTE:If you are running eDirectory™ 8.8 on UNIX or Linux‘‘, you must specify the -host and -port parameters. For example, dxcmd -host 10.0.0.1 -port 524. If the parameters are not specified, a jclient error occurs.
novell.jclient.JCException: connect (to address) 111 UNKNOWN ERROR
By default, eDirectory 8.8 is not listening to localhost. The DirXML Command Line utility needs to resolve the server IP address or hostname and the port to be able to authenticate.
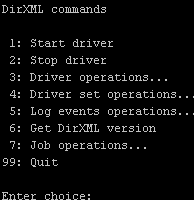
Table A-1 Interactive Mode Options
|
Option |
Description |
|---|---|
|
1: |
Starts the driver. If more than one driver exists, each driver is listed with a number. Enter the number of the driver to start the driver. |
|
2: |
Stops the driver. If more than one driver exists, each driver is listed with a number. Enter the number of the driver to stop the driver. |
|
3: |
Lists the operations available for the driver. If more than one driver exists, each driver is listed with a number. Enter the number of the driver to see the operations available. See Table A-2 for a list of operations. |
|
4: |
Lists the operations available for the driver set.
|
|
5: |
Lists the operations available for logging events through Novell® Audit. See Table A-5 for a description of these options. |
|
6: |
Lists the installed version of Identity Manager. |
|
7: |
Manages jobs created for Identity Manager. |
|
99: |
Exits the DirXML Command Line utility |
Figure A-1 Driver Options
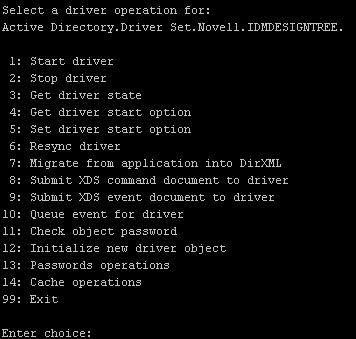
Table A-2 Driver Options
|
Options |
Description |
|---|---|
|
1: |
Starts the driver. |
|
2: |
Stops the driver. |
|
3: |
Lists the state of the driver.
|
|
4: |
Lists the current driver start option.
|
|
5: |
Changes the start option of the driver.
|
|
6: |
Forces a resynchronization of the driver. It prompts for a time delay: If you enter Yes, specify the date and time you want the resynchronization to occur: . If you enter No, the resynchronization occurs immediately. |
|
7: |
Processes an XML document that contains a query command: Create the XML document that contains a query command by using the Novell nds.dtd. Examples: NetWare: sys:\files\query.xml Windows: c:\files\query.xml Linux: /files/query.xml |
|
8: |
Processes an XDS command document:
Examples: NetWare: sys:\files\user.xml Windows: c:\files\user.xml Linux: /files/user.xml
Examples: NetWare: sys:\files\user.log Windows: c:\files\user.log Linux: /files/user.log |
|
|
Processes an XDS event document:
Examples: NetWare: sys:\files\add.xml Windows: c:\files\add.xml Linux: /files/add.xml |
|
|
Adds an event to the driver queue
Examples: NetWare: sys:\files\add.xml Windows: c:\files\add.xml Linux: /files/add.xml |
|
11: |
Validates that an object’s password in the connected system is associated with a driver. It matches the object’s eDirectory password (Distribution Password, used with Universal Password). : |
|
12: |
Performs an internal initialization of data on a new Driver object. This is only for testing purposes. |
|
13: |
Nine Password options are available. See Table A-3 for a description of these options. |
|
14: |
Five Cache operations exist. See Table A-4 for a descriptions of these options. |
|
99: |
Exits the driver options. |
Figure A-2 Password Operations
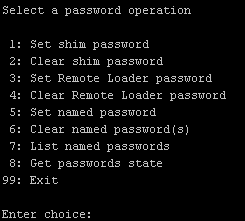
Table A-3 Password Operations
|
Operation |
Description |
|---|---|
|
1: |
Sets the application password. This is the password of the user account you are using to authenticate into the connected system with. |
|
2: |
Clears the application password. |
|
3: |
The Remote Loader password is used to control access to the Remote Loader instance. Enter the Remote Loader password, then confirm the password by typing it again. |
|
4: |
Clears the Remote Loader password so no Remote Loader password is set on the Driver object. |
|
5: |
Allows you to store a password or other pieces of security information on the driver. See Section 7.7, Storing Driver Passwords Securely with Named Passwords for more information. Lists four prompts: |
|
6: |
Clears a specified named password or all named passwords that are stored on the Driver object: If you enter Yes, all Named Passwords are cleared. If you enter No, you are prompted to specify the password name that you want to clear. |
|
7: |
Lists all named passwords that are stored on the Driver object. It lists the password name and the password description. |
|
8: |
Lists if a password is set for:
The dxcmd utility enables you to set the Application password and the Remote Loader password. You cannot set the Driver Object password with this utility. It displays whether the password has been set. |
|
99: |
Exits the current menu and takes you back to the Driver options. |
Figure A-3 Cache Operations
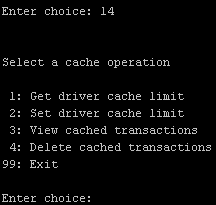
Table A-4 Cache Operations
Figure A-4 Log Event Operations
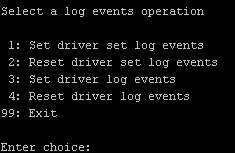
Table A-5 Log Events Operations
|
Operation |
Description |
|---|---|
|
1: |
Allows you to log driver set events through Novell Audit. You can select 49 items to log. See Table A-6 for a list of these options. Type the number of the item you want to log. After the items are selected, enter 99 to accept the selections. |
|
2: |
Resets all log event options. |
|
3: |
Allows you to log driver events through Novell Audit. You can select 49 items to log. See Table A-6 for a list of these options. Type the number of the item you want to log. After the items are selected, enter 99 to accept the selections. |
|
4: |
Resets all of the log event options. |
|
99: |
Exits the log events operations menu. |
Table A-6 Driver Set and Driver Log Events