6.4 Setting GroupWise Client Options with the Driver
The GroupWise driver allows you to use Identity Manager policies to set some of the GroupWise client options on users and external entities. Normally, the client options are set by the administrator through the GroupWise snap-ins in ConsoleOne, and if you want to set these options for objects other than users and external entities, you must use the GroupWise snap-ins.
6.4.1 Using Policies to Set Client Options
The Identity Manager policies use XML attributes and fields to set the GroupWise client options. The XML attribute and field names are different from the field names in ConsoleOne. However, you can access the client options in ConsoleOne, to see how the options are related and to decide which ones you want to edit, then use this documentation to fined the corresponding XML attribute and field name to edit the in the policy.
Considerations
As you edit the policy, keep the following considerations in mind:
-
There are many fields for the client options and they are divided into attributes.
-
The structure for all attributes is the same. The policy specifies the attribute, identifies the correct field, sets the value for the field, and allows you to lock the field.
<attr attr-name=""> <value type="structured"> <component name="lock-level"></component> <component name="value"></component> <component name="field"></component> </value> </attr> -
The value and field components must be present. The lock level is optional. If the lock level is specified, it must also have a value specified. The absence of the lock level is the same as setting the lock level to 0.
-
The lock level locks the ability to modify the field. The lock level is normally set through ConsoleOne snap-ins. It can be set at the user, post office, or domain level. If the field is locked at the post office, the field cannot be modified on users or external entities. The following lock levels are available in ConsoleOne:
-
0: Not locked. Default
-
2: Set on the user, but not locked.
-
3: Set on the post office, but not locked.
-
4: Set on the domain, but not locked.
-
5: Locked on the user.
-
6: Locked on the post office.
-
7: Locked on the domain.
-
-
You should set the lock levels through the GroupWise snap-ins in ConsoleOne. If you decide to use policies to set the lock levels, the GroupWise driver has the following restrictions:
-
The driver sets lock levels only on users and external entities.
-
Some fields should not be locked at the user level, but only at the Domain and Post Office levels. The driver cannot set these lock levels, so they must be set through ConsoleOne.
-
The driver can set the lock level values to either 0 or to 5. It cannot set any other value.
-
The policies must check to see what the current lock level is set to. If the value is greater than 5, the policies must not change the current lock level.
-
-
Lock levels can be shared by a group of fields. If you want to lock one field in the group, you must lock all fields. A value must be set (even if it is the default value) for the lock to function.
Example Procedure
There are many different ways of adding the attributes to the policies. The following procedure shows how to add the AdvancedSetting attribute when an Add operation occurs.
-
In Designer, double-click the default Create policy in the Subscriber channel of the GroupWise driver.
For more information, see Accessing the Policy Builder.
-
Right-click the last rule.
-
Select .
-
Specify a name for the new rule, then click .
-
Select , then click .
-
Select for the condition.
-
Select , then set the mode to .
-
Select the value of , then click .
-
Select , then click .
-
Select the action of.

-
Specify an attribute value of AdvancedSettings in the field.
-
Specify a class name of User in the field.
-
Select the mode.
-
Select to decide where to place the value.
-
Specify the value type of .
-
Click the icon to specify the values of the attribute.
-
Specify lock-level in the field, then specify 0 for the value.
-
Click the icon.
-
Specify value in the field, then specify 0 for the value.
-
Click the icon.
-
Specify field in the field, then specify autoSpellCheck for the value.
-
Click to save the values.

-
Click .
-
Select , the click .
-
Review the summary, then click.
-
Press Ctrl+S to save the new rule.
6.4.2 Client Options
To view the client options in ConsoleOne:
-
Select a Domain, Post Office, or User object, then click .

Use the following information to create policies to set the GroupWise client options on user objects.
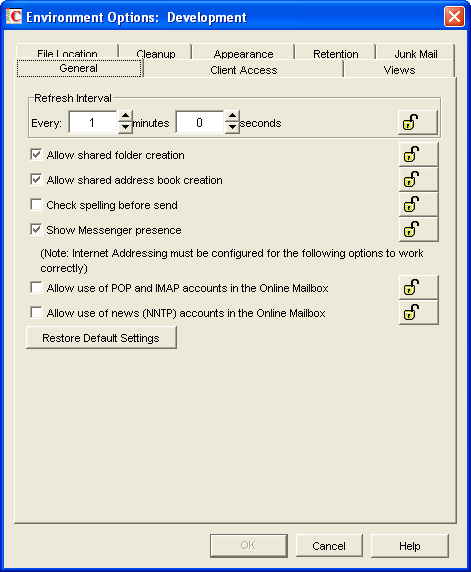
6.4.3 Environment > General
The options determine such settings as the refresh interval for new messages, whether users can create shared folders and address books, and which types of accounts can be used while in Online mode. The options are found in ConsoleOne through the GroupWise client options under.
Figure 6-7 Environment Options Dialog Box with the General Tab Open
There are two attributes that store this information; AdvancedSettings and EnvironmentSettings.
<attr attr-name="AdvancedSettings">
        <value type="structured">
          <component name="lock-level">0</component>
          <component name="value">0</component>
          <component name="field">autoSpellCheck</component>
  </value>
</attr>
Check Spelling Before Send
The autoSpellCheck field spell-checks the message text of each item before the item is sent. To enable this option, set the value to 1. To disable this option, set the value to 0. By default, this option is disabled.
<attr attr-name="EnvironmentSettings">
        <value type="structured">
          <component name="lock-level">0</component>
          <component name="value">1</component>
          <component name="field">allowSharedFolders</component>
        </value>
        <value type="structured">
          <component name="lock-level">0</component>
          <component name="value">1</component>
          <component name="field">allowSharedAddressBooks</component>
        </value>
        <value type="structured">
          <component name="lock-level">0</component>
          <component name="value">0</component>
          <component name="field">allowPOP_IMAPAccounts</component>
        </value>
        <value type="structured">
          <component name="lock-level">0</component>
          <component name="value">0</component>
          <component name="field">allowNNTPAccounts</component>
        </value>
        <value type="structured">
          <component name="lock-level">0</component>
          <component name="value">1</component>
          <component name="field">showIMPresence</component>
        </value>
</attr>
Allow Shared Folder Creation
The allowSharedFolders field enables users to share folders with other users. To enable this option, set the value to 1. To disable this option, set the value to 0. By default, this option is enabled.
Allow Shared Address Book Creation
The allowSharedAddressBooks field enables users to share address books with other users. To enable this option, set the value to 1. To disable this option, set the value to 0. By default, this option is enabled.
Allow Use of POP and IMAP Accounts in the Online Mailbox
The allowPOP_IMAPAccounts field enables users to access POP and IMAP accounts while using the GroupWise client in Online mode. To enable this option, set the value to 1. To disable this option, set the value to 0. By default, this option is disabled.
If you enable this option, an menu is added to the GroupWise client, allowing users to add POP and IMAP accounts to GroupWise, set account properties, and send and retrieve items from their POP and IMAP accounts. In addition, users are allowed to upload POP and IMAP items from the Remote mailbox to the Online mailbox.
IMPORTANT:If you lock this field, the lock level must be set on a Domain or Post Office, not on users or external entities.
Allow Use of News (NNTP) Accounts in the Online Mailbox
The allowNNTPAccounts field enables users to set up newsgroup (NNTP) accounts while using the GroupWise client in Online mode. To enable this option, set the value to 1. To disable this option, set the value to 0. By default, this option is disabled.
IMPORTANT:If you lock this field, the lock level must be set on a Domain or Post Office, not on users or external entities.
Show Messenger Presence
The showIMPresence field displays the Messenger presence information in the GroupWise Windows client. Messenger presence enables users to easily choose instant messaging as an alternative to e-mail. Messenger presence icons appear in the field of a received message, in the Quick Info for users specified in the To, CC, and BC fields of a new message, and in the Quick Info for users in the Address Book. To enable this option, set the value to 1. To disable this option, set the value to 0. By default, this option is enabled.
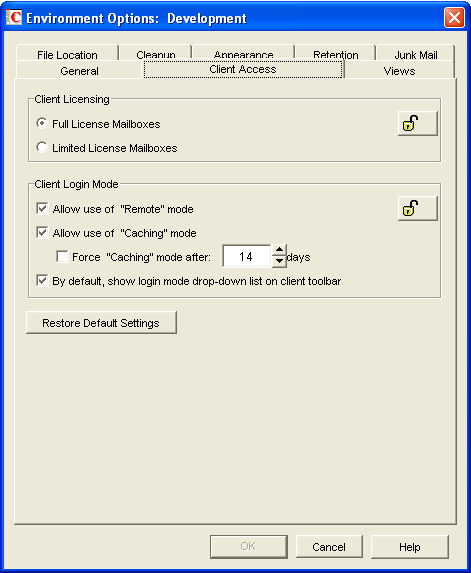
6.4.4 Environment > Client Access
The options allow you to apply a license type (full or limited) to users’ mailboxes and to enable or disable the Remote and Caching modes in the GroupWise client for Windows. The options are found in ConsoleOne through the GroupWise client options under.
Figure 6-8 Environment Options Dialog Box with the Client Access Tab Open
The EnvironmentSettings attribute stores this information.
<attr attr-name="EnvironmentSettings">
  <value type="structured">
            <component name="lock-level">0</component>
            <component name="value">Full</component>
            <component name="field">clientLicense</component>
        </value>
</attr>
Client Licensing
The clientLicense field defines whether a: full client mailbox license or a limited client mailbox license is used. To enable full client mailbox licenses, set the value to Full. To enable limited client mailbox licenses, set the value to Limited.
A full client mailbox license has no mailbox access restrictions; the mailbox can be accessed by any GroupWise client (Windows or WebAccess) as well as any third-party plug-in or POP/IMAP client.
A limited client mailbox license restricts mailbox access to the following:
-
The GroupWise WebAccess client (including wireless devices)
-
A GroupWise client (Windows or WebAccess) via the Proxy feature
-
A GroupWise client (Windows or WebAccess) via the Busy Search feature
-
A POP or IMAP client
You can use this option to specify the type of client license that you want applied to users’ mailboxes. This enables you to support the type of GroupWise mailbox licenses you purchase. For example, if you only purchased limited client license mailboxes for users on a specific post office, you can mark all mailboxes on that post office as being limited client license mailboxes.
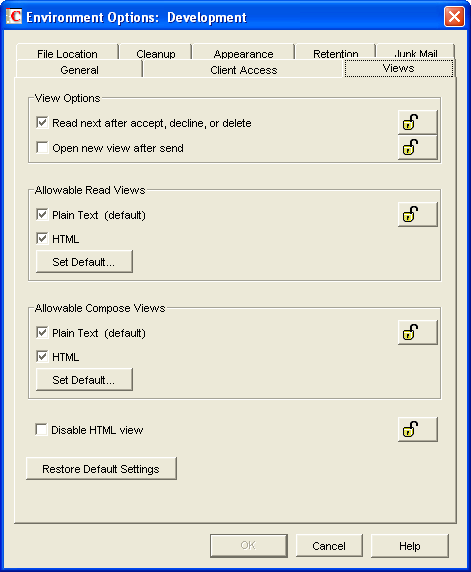
6.4.5 Environment > Views
The Environment options determine when items open, and whether or not users can read and compose messages in HTML.
Figure 6-9 Environment Options Dialog Box with the Views Tab Open
The EnvironmentSettings attribute stores this information.
<attr attr-name="EnvironmentSettings">
        <value type="structured">
          <component name="lock-level">0</component>
          <component name="value">Text, HTML</component>
          <component name="field">allowableViewRead</component>
        </value>
        <value type="structured">
          <component name="lock-level">0</component>
          <component name="value">Text, HTML</component>
          <component name="field">allowableViewCompose</component>
        </value>
        <value type="structured">
          <component name="lock-level">0</component>
          <component name="value">HTML</component>
          <component name="field">defaultViewRead</component>
        </value>
        <value type="structured">
          <component name="lock-level">0</component>
          <component name="value">HTML</component>
          <component name="field">defaultViewCompose</component>
        </value>
      </attr>
Allowable Read Views
The allowableViewRead field determines what read views you allow the clients to use. There are two read views:
-
Plain Text: Set the value to Text to allow users to read the items in plain text.
-
HTML: Set the value to HTML to allow users to read the items in HTML.
You can specify both types of read views so users can choose which read view they want to use. The entries are comma-separated. If you want to limit the user’s choice of read views, specify only one.
IMPORTANT:If you lock this field, the lock level must be set on a Domain or Post Office, not on users or external entities.
Set Default
The defaultViewRead field allows you to specify which read view is the default read view the client uses. There are two read views available:
-
Plain Text: Set the value to Text to allow users to read the items in plain text.
-
HTML: Set the value to HTML to allow users to read the items in HTML.
For this field, you can specify only one value, unlike the allowableViewRead field. The default view must be specified in the defaultViewRead field.
Allowable Compose Views
The allowableViewCompose field allows you to determine what compose views you allow the clients to use. There are two compose views:
-
Plain Text: Setting the value to Text allows users to compose items in plain text.
-
HTML: Setting the value to HTML allows users to compose items in HTML.
You can specify both values so users can choose which view they want to use. The entries are comma-separated. If you want to limit the user’s choice of compose views, specify only one.
IMPORTANT:If you lock this field, the lock level must be set on a Domain or Post Office, not on users or external entities.
Set Default
The defaultViewCompose field allows you to specify which compose view is the default compose view the client uses. There are two compose views available:
-
Plain Text: Setting the value to Text allows users to compose items in plain text.
-
HTML: Setting the value to HTML allows users to compose items in HTML.
For this field, you can specify only one value, unlike the allowableViewCompose field. The default view must be specified in the defaultViewCompose field.
6.4.6 Environment > File Location > Archive Directory
The archive directory settings are found in ConsoleOne through the GroupWise client options under . sets the directory to be used for archiving items.
Figure 6-10 Environment Options Dialog Box with the File Location Tab Open
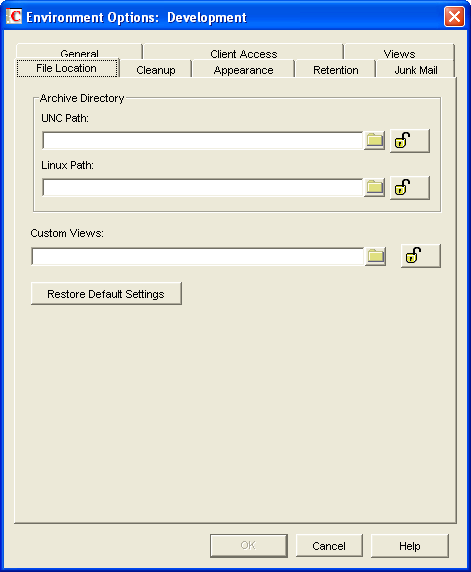
Each user must have his or her own archive directory. It can be a local directory (for example, c:\novell\groupwise) or a personal user directory on a network server. If you set a local drive, make sure the users have the directories created. If you select a network drive, make sure users have the necessary rights to access the directories.
The LocationsSetting attribute stores this information.
<attr attr-name="LocationsSettings">
  <value type="structured">
    <component name="lock-level">0</component>
    <component name="value">c:\grpwise</component>
    <component name="field">archiveLocation</component>
  </value>
  <value type="structured">
    <component name="lock-level">0</component>
    <component name="value"></component>
    <component name="field">archiveLocationLinux</component>
  </value>
</attr>
Archive Directory UNC Path
The archiveLocation field is the UNC Path or Windows local path of the personal directory where archived messages are stored for Windows clients.
Archive Directory Linux Path
The archiveLocationLinux field is the Linux path of a local or personal directory where archived messages are stored for Linux/Mac clients.
Include the field type for the user workstations. If it’s for a Windows workstation, use the option. If it’s for a Linux or Mac workstation, use the option.
6.4.7 Environment > Cleanup
The options determine the delete and archive settings for GroupWise items. These options help control the disk space usage for the users, along with the options. The cleanup settings are found in ConsoleOne through the GroupWise client options under .
Figure 6-11 Environment Options Dialog Box with the Cleanup Tab Open
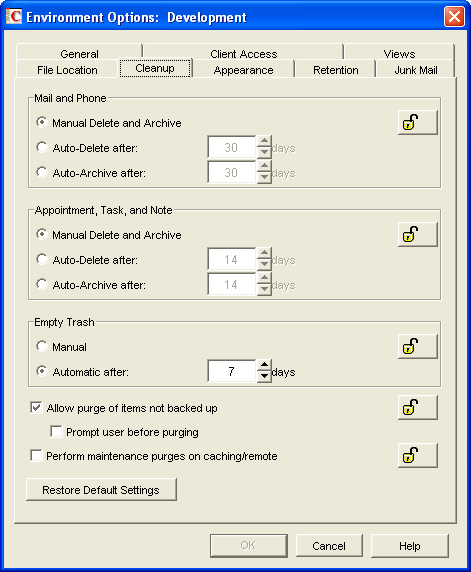
The DiscardSettings attribute is used for the options as well as the options. For more information, see Section 6.4.14, Send > Disk Space Management.
<attr attr-name="DiscardSettings">
        <value type="structured">
          <component name="lock-level">0</component>
          <component name="value">ManualDeleteArchive</component>
          <component name="field">mailDelete</component>
        </value>
        <value type="structured">
          <component name="lock-level">0</component>
          <component name="value">ManualDeleteArchive</component>
          <component name="field">appointmentDelete</component>
        </value>
        <value type="structured">
          <component name="lock-level">0</component>
          <component name="value">AutoPurgeAfterTrashDays</component>
          <component name="field">trashPurge</component>
        </value>
</attr>
Mail and Phone
These options are not supported in this release of the driver.
Appointment, Task, and Note
These options are not supported in this release of the driver.
Empty Trash
The trashPurge field purges deleted items from the Trash folder. The items can be retrieved from the Trash until it is purged. Items in the Trash still take up disk space. Setting the following values for the trashPurge field determines how the Trash folder is emptied:
-
ManualPurge: Setting the ManualPurge value requires the user to manually empty the Trash.
-
AutoPurgeAfterTrashDays: Setting the AutoPurgeAfterTrashDays value allows GroupWise to automatically empty items from the trash after they have been in it for the specified number of days.
Days
If you use the AutoPurgeAfterTrashDays value in the trashPurge field, you must define a trashDays field to specify the number of days to wait to purge the items from the Trash. For example:
<attr attr-name="DiscardSettings">
  <value type="structured">
        <component name="lock-level">0</component>
        <component name="value">AutoPurgeAfterTrashDays</component>
        <component name="field">trashPurge</component>
   </value>
   <value type="structured">
        <component name="value">7</component>
        <component name="field">trashDays</component>
   </value>
</attr>
The valid range for the trashDays field is 1-9999. If you set the lock level for the trashPurge field, it is inherited by the trashDays field.
6.4.8 Send > Send Options
The Send options determine general settings that apply to all GroupWise item types (mail messages, appointments, tasks, and notes). The Send options are accessed in ConsoleOne through the GroupWise client options under .
Figure 6-12 Send Options Dialog Box with the Send Options Tab Open
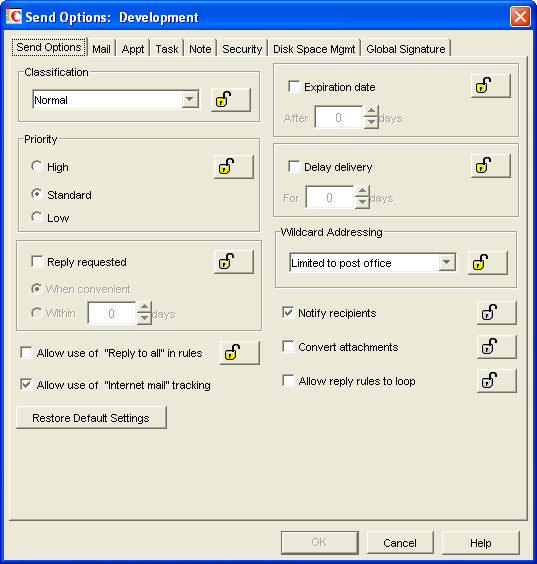
There are two attributes that store this information: the AdvancedSettings attribute and the MailMessageSettings attribute. The MailMessage Attribute also stores information specific to mail message items. For more information, see Section 6.4.9, Send > Mail.
<attr attr-name="AdvancedSettings">
  <value type="structured">
          <component name="lock-level">0</component>
          <component name="value">Normal</component>
          <component name="field">sendSecurity</component>
        </value>
        <value type="structured">
          <component name="lock-level">0</component>
          <component name="value">-1</component>
          <component name="field">delayDelivery</component>
        </value>
        <value type="structured">
          <component name="lock-level">0</component>
          <component name="value">0</component>
          <component name="field">itemConversions</component>
        </value>
        <value type="structured">
          <component name="lock-level">0</component>
          <component name="value">PostOffice</component>
          <component name="field">asteriskSendRestriction</component>
        <value type="structured">
          <component name="lock-level">0</component>
          <component name="value">0</component>
          <component name="field">allowRuleReplyMoreThanOnce</component>
        </value>
        <value type="structured">
          <component name="lock-level">0</component>
          <component name="value">true</component>
          <component name="field">internetStatusTracking</component>
        </value>
</attr>
Classification
The sendSecurity field allows you to set the default value for the security classification label at the top of the message box. The classifications do not provide any encryption or additional security. They are meant to alert the recipient to the relative sensitivity of the item. The values for sendSecurity field are:
-
Proprietary
-
Confidential
-
Secret
-
TopSecret
-
ForYourEyesOnly
-
Normal
Delay Delivery
The delayDelivery field allows you delay to the delivery of messages for the specified number of days. For example, if you specify 3 days, a message is not delivered until 3 days after the day it is sent. Messages are delivered at 12:01 a.m. of the appropriate day. To disable this option set the value to -1. To enable delayed delivery set the value from 0 to 999.
Convert Attachments
The itemConversions field allows you to convert attachments in items sent to non-GroupWise e-mail systems through a GroupWise gateway. To enable this option, set the value to 1. To disable this option, set the value to 0.
Wildcard Addressing
The asteriskSendRestriction field allows you to enable wildcard addressing. Wildcard addressing lets a user send an item to all users in a post office, domain, GroupWise system, or connected GroupWise system by inserting asterisks (*) as wildcards in e-mail addresses. There are five different values to set:
-
System: Setting the value to System limits wildcard addressing to the user’s GroupWise system. This means that a user can send an item to all users in the GroupWise system by entering *.*.* in the item’s address field. A user can also send an item to all users in another domain by entering *.domain_name or to all users in another post office by entering *.post_office_name.
-
PostOffice: Setting the value to PostOffice limits wildcard addressing to the user’s post office. This means that a user can send an item to all users on the same post office by entering * in the item’s address field.
-
Domain: Setting the value to Domain limits wildcard addressing to the user’s domain. This means that a user can send an item to all users in the domain by entering *.* in the item’s address field. A user can also send an item to all users on another post office in the domain by entering *.post_office_name in the item’s address field.
-
NoLimit: Setting the value to NoLimit allows unlimited use of wildcard addressing. This means that a user can send an item to all users in another GroupWise system by entering *.post_office_name.domain_name or *.domain_name in the item’s address field.
-
NotAllowed: Setting the value to NotAllowed disables wildcard addressing.
Allow Reply Rules to Loop
By default, GroupWise does not allow a rule-generated reply to be replied to by another rule-generated reply. This situation, referred to as looping, can quickly increase message traffic. To allow reply rules to loop, set the value to 1 for the allowRuleReplyMoreThanOnce field. To disable this option, set the value to 0.
Allow Use of Internet
The internetStatusTracking field allows users’ GroupWise clients to automatically embed information in Internet-bound items. The embedded information instructs the receiving system to send back a delivery notification message (if it is supported). To enable the option, set the value to true. To disable this option, set the value to false. If you set the value to false, the lock level is automatically set.
IMPORTANT:The lock level must not be set on this field. This means you should never set the value to false.
<attr attr-name="MailMessageSettings">
        <value type="structured">
          <component name="lock-level">0</component>
          <component name="value">Standard</component>
          <component name="field">mailPriority</component>
        </value>
        <value type="structured">
          <component name="lock-level">0</component>
          <component name="value">None</component>
          <component name="field">mailReplyRequested</component>
        </value>
        <value type="structured">
          <component name="lock-level">0</component>
          <component name="value">0</component>
          <component name="field">mailExpireDays</component>
        </value>
        <value type="structured">
          <component name="lock-level">0</component>
          <component name="value">1</component>
          <component name="field">notifyRecipient</component>
        </value>
</attr>
Priority
The mailPriority field determines the default priority of the item. This, in turn, determines how quickly items are delivered. High priority items are queued ahead of normal or low priority items. There are three values you can specify in the mailPriority field:
-
High: The High value queues an item ahead of normal and low priority items.
-
Standard: The Standard value is the default value set for the delivery of an item.
-
Low: The Low value places an item at the end of the queue.
Reply Requested
The mailReplyRequested field allows items to always include a reply request. By default, this option is disabled. You can specify three values for the mailReplyRequested field:
-
None: The None value disables this option for all items.
-
When Convenient: The WhenConvenient value requires a reply, but there is no time limit set.
-
Within: The value is the number of days a recipient is given to reply. Specify the number of days in the value of the mailReplyRequested field. The value range is 0-253.
Expiration Date
The mailExpireDays field expires unopened messages after the specified number of days. If the value is set to 0, this option is disabled. If you want to enable this option, specify the number of days to wait before expiring unopened messages. The value range for this field is 1-999. If a message expires, it is deleted.
Notify Recipients
The notifyRecipient field notifies recipients when they receive an item, if they are using GroupWise Notify. To enable this option, set the value to 1. To disable this option, set the value to 0.
6.4.9 Send > Mail
The options apply to mail messages only. The options are found in ConsoleOne through the GroupWise client options under . However, enabling certain options in the tab enables these same options on the , , and tabs.
Figure 6-13 Send Options Dialog Box with the Mail Tab Open
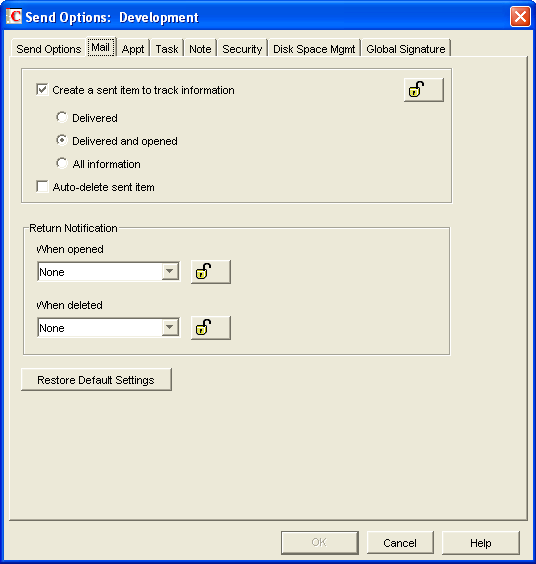
There are two attributes that store this information: the AdvancedSettings attribute and the MailMessageSettings attribute.
<attr attr-name="AdvancedSettings">
  <value type="structured">
          <component name="lock-level">0</component>
          <component name="value">1</component>
          <component name="field">outboxInsert</component>
        </value>
</attr>
Create a Sent Item to Track Information
The outboxInsert field allows you to insert items in the user’s Sent Items folder when a user sends an item. Disable this option if you do not want the items placed there. If items are not placed in the Sent Items folder, users cannot check the delivery status of the item. To enable this option, set the value to 1. To disable this option, set the value to 0.
The lock level for the outboxInsert field affects mail, appointment, note, and task items.
Create a Sent Item to Track Information
If you have enabled the outboxInsert field, you must use the MailMessageSettings attribute to set the status value.
<attr attr-name="MailMessageSettings">
  <value type="structured">
       <component name="value">DeliveredAndOpened</component>
       <component name="field">mailStatusInfo</component>
        </value>
</attr>
There are three values you can use to track the status of the mail messages:
-
DeliveredAndOpened: Setting the value to DeliveredAndOpened tracks the delivered and opened status only. The user can open the Properties window of the sent message to view the status.
-
Full: Setting the value to Full tracks all status information (delivered, opened, deleted). The user can open the Properties window of the message to view the status.
-
Delivered: Setting the value to Delivered tracks only the delivered status. The user can open the Properties window of the message to view the status.
<attr attr-name="MailMessageSettings">
        <value type="structured">
          <component name="value">0</component>
          <component name="field">mailAutoDelete</component>
        </value>
        <value type="structured">
          <component name="lock-level">0</component>
          <component name="value">0</component>
          <component name="field">mailReturnOpen</component>
        </value>
        <value type="structured">
          <component name="lock-level">0</component>
          <component name="value">0</component>
          <component name="field">mailReturnDelete</component>
        </value>
</attr>
Auto-Delete Sent Item
The mailAutoDelete field automatically deletes messages from the user’s Mailbox after all the recipients have deleted the messages and emptied them from the Trash. To enable this option, set the value to 1. To disable this option, set the value to 0. The mailAutoDelete field inherits the lock level setting from the outboxInsert field.
Return Notification
In addition to status tracking information, the user can receive notification when a mail message is opened or deleted. Choose from the following notification options:
When Opened
The mailReturnOpen field allows users to be notified when a mail message is opened. There are four different notification options:
-
None: Set the value to 0 for the user to not receive a notification when the mail message is opened.
-
Mail Receipt: Set the value to 1 for the user to receive a mail message stating that the recipient opened the mail message.
-
Notify: Set the value to 2 for the user to receive notification through GroupWise Notify when the recipient opens the mail message.
-
Notify and Mail: Set the value to 3 for the user to receive notification through GroupWise Notify and a mail message when the recipient opens the mail message.
When Deleted
The mailReturnDelete field allows users to be notified when a mail message is deleted. There are four different notification options:
-
None: Set the value to 0 for the user to not receive a notification when the mail message is deleted.
-
Mail Receipt: Set the value to 1 for the user to receive a mail message stating that the recipient deleted the mail message.
-
Notify: Set the value to 2 for the user to receive notification through GroupWise Notify when the recipient deletes the mail message.
-
Notify and Mail: Set the value to 3 for the user to receive notification through GroupWise Notify and a mail message when the recipient deletes the mail message.
6.4.10 Send > Appt
The option applies to appointment messages only. The appointment options are found in ConsoleOne through the GroupWise client options under .
Figure 6-14 Send Options Dialog Box with the Appt Tab Open

The AppointmentMessageSettings attribute stores this information.
<attr attr-name="AppointmentMessageSettings">
  <value type="structured">
       <component name="value">Full</component>
       <component name="field">appointmentStatusInfo</component>
        </value>
        <value type="structured">
          <component name="lock-level">0</component>
          <component name="value">0</component>
          <component name="field">appointmentReturnOpen</component>
        </value>
        <value type="structured">
          <component name="lock-level">0</component>
          <component name="value">0</component>
          <component name="field">appointmentReturnAccept</component>
        </value>
        <value type="structured">
          <component name="lock-level">0</component>
          <component name="value">0</component>
          <component name="field">appointmentReturnDelete</component>
        </value>
</attr>
Create a Sent Item to Track Information
The outboxInsert field allows you to insert items in the user’s Sent Items folder when a user sends an item. This option is set through the AdvancedSettings attribute. For more information, see Send > Mail.
If you have enabled this option, you must use the appointmentStatusInfo field to set the desired status value. The lock level is inherited from the outboxInsert field. There are three values you can use to track the status of the appointments:
-
DeliveredAndOpened: Setting the value to DeliveredAndOpened only tracks the delivered and opened status. The user can open the Properties window of the sent appointment to view the status.
-
Full: Setting the value to Full tracks all status information (delivered, opened, deleted, emptied). The user can open the Properties window of the appointment to view the status.
-
Delivered: Setting the value to Delivered tracks only the delivered status. The user can open the Properties window of the appointment to view the status.
Return Notification
In addition to status tracking information, the user can receive notification when an appointment is opened, accepted, or deleted. Choose from the following notification options:
When Opened
The appointmentReturnOpen field allows users to be notified when an appointment is opened. There are four different notification options:
-
None: Set the value to 0 for the user to not receive a notification when the appointment is opened.
-
Mail Receipt: Set the value to 1 for the user to receive a mail message stating that the recipient opened the appointment.
-
Notify: Set the value to 2 for the user to receive notification through GroupWise Notify when the recipient opens the appointment.
-
Notify and Mail: Set the value to 3 for the user to receive notification through GroupWise Notify and a mail message when the recipient opens the appointment.
When Deleted
The appointmentReturnDelete field allows users to be notified when an appointment is deleted. There are four different notification options:
-
None: Set the value to 0 for the user to not receive a notification when the appointment is deleted.
-
Mail Receipt: Set the value to 1 for the user to receive a mail message stating that the recipient deleted the appointment.
-
Notify: Set the value to 2 for the user to receive notification through GroupWise Notify when the recipient deletes the appointment.
-
Notify and Mail: Set the value to 3 for the user to receive notification through GroupWise Notify and a mail message when the recipient deletes the appointment.
When Accepted
The appointmentReturnAccept field allows users to be notified when an appointment is accepted. There are four different notification options:
-
None: Set the value to 0 for the user to not receive a notification when the appointment is accepted.
-
Mail Receipt: Set the value to 1 for the user to receive a mail message stating that the recipient accepted the appointment.
-
Notify: Set the value to 2 for the user to receive notification through GroupWise Notify when the recipient accepts the appointment.
-
Notify and Mail: Set the value to 3 for the user to receive notification through GroupWise Notify and a mail message when the recipient accepts the appointment.
6.4.11 Send > Task
The option applies to task messages only. The options are found in ConsoleOne through the GroupWise client options under .
Figure 6-15 Send Options Dialog Box with the Task Tab Open

The TaskMessageSettings attribute stores this information.
<attr attr-name="TaskMessageSettings">
  <value type="structured">
       <component name="value">Full</component>
       <component name="field">taskStatusInfo</component>
        </value>
        <value type="structured">
          <component name="lock-level">0</component>
          <component name="value">0</component>
          <component name="field">taskReturnOpen</component>
        </value>
        <value type="structured">
          <component name="lock-level">0</component>
          <component name="value">0</component>
          <component name="field">taskReturnAccept</component>
        </value>
        <value type="structured">
          <component name="lock-level">0</component>
          <component name="value">0</component>
          <component name="field">taskReturnDelete</component>
        </value>
        <value type="structured">
          <component name="lock-level">0</component>
          <component name="value">0</component>
          <component name="field">taskReturnCompleted</component>
        </value>
</attr>
Create a Sent Item to Track Information
The outboxInsert field allows you to insert items in the user’s Sent Items folder when a user sends an item. This option is set through the AdvancedSettings attribute. For more information, see Section 6.4.9, Send > Mail.
If you have enabled this option, you must use the taskStatusInfo field to set the desire status value. The lock level is inherited from the outboxInsert field. There are three values you can use to track the status of the tasks:
-
DeliveredAndOpened: Setting the value to DeliveredAndOpened tracks only the delivered and opened status. The user can open the Properties window of the sent task to view the status.
-
Full: Setting the value to Full tracks all status information (delivered, opened, deleted, emptied). The user can open the Properties window of the task to view the status.
-
Delivered: Setting the value to Delivered tracks only the delivered status. The user can open the Properties window of the task to view the status.
Return Notification
In addition to status tracking information, the user can receive notification when a task is opened, accepted, completed, or deleted. Choose from the following notification options:
When Opened
The taskReturnOpen field allows users to be notified when a task is opened. There are four different notification options:
-
None: Set the value to 0 for the user to not receive a notification when the task is opened.
-
Mail Receipt: Set the value to 1 for the user to receive a mail message stating that the recipient opened the task.
-
Notify: Set the value to 2 for the user to receive notification through GroupWise Notify when the recipient opens the task.
-
Notify and Mail: Set the value to 3 for the user to receive notification through GroupWise Notify and a mail message when the recipient opens the task.
When Deleted
The taskReturnDelete field allows users to be notified when a task is deleted. There are four different notification options:
-
None: Set the value to 0 for the user to not receive a notification when the task is deleted.
-
Mail Receipt: Set the value to 1 for the user to receive a mail message stating that the recipient deleted the task.
-
Notify: Set the value to 2 for the user to receive notification through GroupWise Notify when the recipient deletes the task.
-
Notify and Mail: Set the value to 3 for the user to receive notification through GroupWise Notify and a mail message when the recipient deletes the task.
When Accepted
The taskReturnAccept field allows users to be notified when a task is accepted. There are four different notification options:
-
None: Set the value to 0 for the user to not receive a notification when the task is accepted.
-
Mail Receipt: Set the value to 1 for the user to receive a mail message stating that the recipient accepted the task.
-
Notify: Set the value to 2 for the user to receive notification through GroupWise Notify when the recipient accepted the task.
-
Notify and Mail: Set the value to 3 for the user to receive notification through GroupWise Notify and a mail message when the recipient accepts the task.
When Completed
The taskReturnCompleted field allows users to be notified when a task is completed. There are four different notification options:
-
None: Set the value to 0 for the user to not receive a notification when the task in completed.
-
Mail Receipt: Set the value to 1 for the user to receive a mail message stating that the recipient completed the task.
-
Notify: Set the value to 2 for the user to receive notification through GroupWise Notify when the recipient completed the task.
-
Notify and Mail: Set the value to 3 for the user to receive notification through GroupWise Notify and a mail message when the recipient completes the task.
6.4.12 Send > Note
The option applies to note messages only. The options are found in ConsoleOne through the GroupWise client options under .
Figure 6-16 Send Options Dialog Box with the Note Tab Open
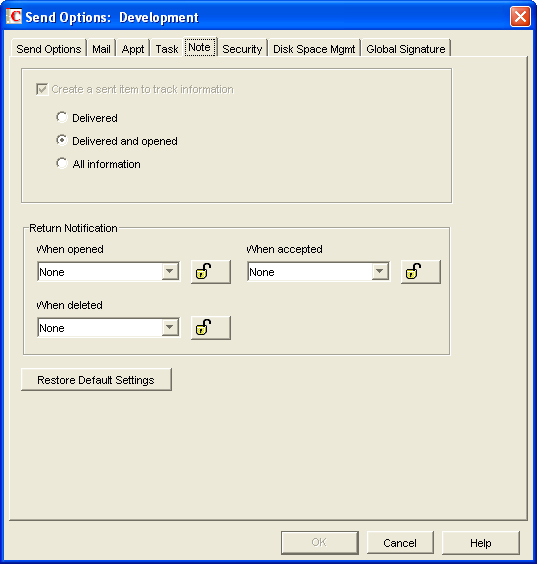
The NoteMessageSettings attribute stores this information.
<attr attr-name="NoteMessageSettings">
  <value type="structured">
    <component name="value">DeliveredAndOpened</component>
    <component name="field">noteStatusInfo</component>
  </value>
        <value type="structured">
          <component name="lock-level">0</component>
          <component name="value">0</component>
          <component name="field">noteReturnOpen</component>
        </value>
        <value type="structured">
          <component name="lock-level">0</component>
          <component name="value">0</component>
          <component name="field">noteReturnDelete</component>
        </value>
        <value type="structured">
          <component name="lock-level">0</component>
          <component name="value">0</component>
          <component name="field">noteReturnAccept</component>
        </value>
</attr>
Create a Sent Item to Track Information
The outboxInsert field allows you to insert items in the user’s Sent Items folder when a user sends an item. This option is set through the AdvancedSettings attribute. For more information, see Section 6.4.9, Send > Mail.
If you have enabled this option, you must use the noteStatusInfo field to set the desire status value. The lock level is inherited from the outboxInsert field. There are three values you can use to track the status of the notes:
-
DeliveredAndOpened: Setting the value to DeliveredAndOpened only tracks the delivered and opened status. The user can open the Properties window of the sent note to view the status.
-
Full: Setting the value to Full tracks all status information (delivered, opened, deleted, emptied). The user can open the Properties window of the note to view the status.
-
Delivered: Setting the value to Delivered tracks only the delivered status. The user can open the Properties window of the note to view the status.
Return Notification
In addition to status tracking information, the user can receive notification when a note is opened, accepted, or deleted. Choose from the following notification options:
When Opened
The noteReturnOpen field allows users to be notified when a note is opened. There are four different notification options:
-
None: Set the value to 0 for the user to not receive a notification when the note is opened.
-
Mail Receipt: Set the value to 1 for the user to receive a mail message stating that the recipient opened the note.
-
Notify: Set the value to 2 for the user to receive notification through GroupWise Notify when the recipient opens the note.
-
Notify and Mail: Set the value to 3 for the user to receive notification through GroupWise Notify and a mail message when the recipient opens the note.
When Deleted
The noteReturnDelete field allows users to be notified when a note is deleted. There are four different notification options:
-
None: Set the value to 0 for the user to not receive a notification when the note is deleted.
-
Mail Receipt: Set the value to 1 for the user to receive a mail message stating that the recipient deleted the note.
-
Notify: Set the value to 2 for the user to receive notification through GroupWise Notify when the recipient deletes the note.
-
Notify and Mail: Set the value to 3 for the user to receive notification through GroupWise Notify and a mail message when the recipient deletes the note.
When Accepted
The noteReturnAccept field allows users to be notified when a note is accepted. There are four different notification options:
-
None: Set the value to 0 for the user to not receive a notification when the note is accepted.
-
Mail Receipt: Set the value to 1 for the user to receive a mail message stating that the recipient accepted the note.
-
Notify: Set the value to 2 for the user to receive notification through GroupWise Notify when the recipient accepted the note.
-
Notify and Mail: Set the value to 3 for the user to receive notification through GroupWise Notify and a mail message when the recipient accepts the note.
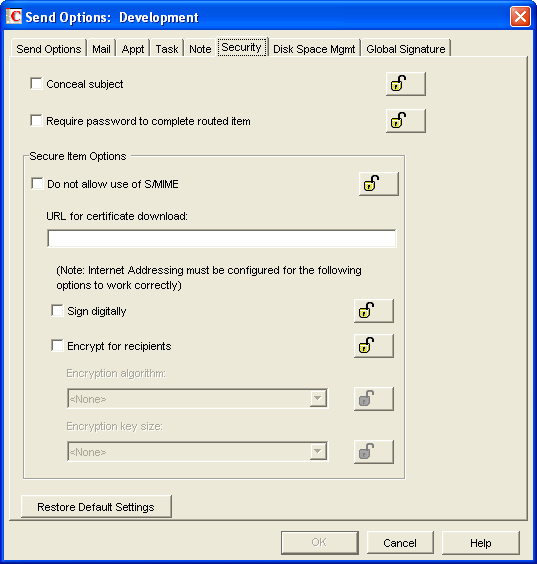
6.4.13 Send > Security
The security settings are found in ConsoleOne through the GroupWise client options under . Security options apply to all GroupWise items types (mail messages, appointments, tasks, and notes).
Figure 6-17 Send Options Dialog Box with the Security Tab Open
<attr attr-name="AdvancedSettings">
        <value type="structured">
          <component name="lock-level">0</component>
          <component name="value">0</component>
          <component name="field">disallowSMIME</component>
        </value>
        <value type="structured">
          <component name="lock-level">0</component>
          <component name="value">0</component>
          <component name="field">encryptMessages</component>
        </value>
        <value type="structured">
          <component name="lock-level">0</component>
          <component name="value">0</component>
          <component name="field">concealedSubject</component>
        </value>
        <value type="structured">
          <component name="lock-level">0</component>
          <component name="value">0</component>
          <component name="field">routePasswordRequired</component>
        </value>
</attr>
Conceal Subject
The concealedSubject field allows you to conceal the item’s subject so the notification that appears on the recipient’s screen does not include the subject. The subject of the item is also concealed in the recipient’s mailbox and the sender’s Sent Items folder. It is visible only when the item is being read. To disable this option, set the value to 0. To enable this option, set the value to 1.
Require Password to Complete Routed Item
The routePasswordRequired field allows you to require a user to enter a password before completing a routed item. To disable this option, set the value to 0. To enable this option, set the value to 1.
Secure Item Options
If the users have installed security providers on their workstations, you can set the options you want the users to use.
Do Not Allow Use of S/MIME
Setting the disallowSMIME field disables S/MIME functionality. This disables the Encrypt and Digitally Sign buttons (and other related S/MIME functionality) in the GroupWise client. To allow the use of S/MIME, set the value to 0. To disallow the use of S/MIME, set the value to 1.
IMPORTANT:If you lock this field, the lock level must be set on a Domain or Post Office, not on users or external entities.
Encrypt for Recipients
The encryptMessages field allows you to enable users to encrypt an outgoing item so they can ensure that the intended recipients who have an S/MIME-enabled e-mail product are the only individuals who can read the item. This setting is not a useful security measure unless you lock it as the default. To disable this option, set the value to 0. To enable this option, set the value to 1.
6.4.14 Send > Disk Space Management
The disk space management settings are found in ConsoleOne through the GroupWise client options under . enforces disk space limitations for users on a post office. There are multiple settings for customizing how the disk space is limited for the user.
Figure 6-18 Send Options Dialog Box with the Disk Space Mgmt Tab Open

You can also use the options to help control the use of disk space by users. The options and the options use the DiscardSettings attribute. For more information, see Section 6.4.7, Environment > Cleanup.
<attr attr-name="DiscardSettings">
        <value type="structured">
          <component name="lock-level">0</component>
          <component name="value">0</component>
          <component name="field">userLimitSet</component>
        </value>
        <value type="structured">
          <component name="value">0</component>
          <component name="field">boxSizeLimit</component>
        </value>
        <value type="structured">
          <component name="value">0</component>
          <component name="field">boxThresholdLimit</component>
        </value>
        <value type="structured">
          <component name="value">0</component>
          <component name="field">messageSendLimit</component>
        </value>
        <value type="structured">
          <component name="lock-level">0</component>
          <component name="value">0</component>
          <component name="field">boxLimitAppliesToCache</component>
        </value>
        <value type="structured">
          <component name="lock-level">0</component>
          <component name="value">0</component>
          <component name="field">enableBoxThresholdNotificaion</component>
        </value>
        <value type="structured">
          <component name="lock-level">0</component>
          <component name="value">0</component>
          <component name="field">enableBoxSizeNotificaion</component>
        </value>
      </attr>
User Limits
The userLimitSet field disables or enables the other settings. By default, this option is disabled. To disable this option, set the value to 0. To enable this option, set the value to 1.
If you enable it, you can modify the following options; otherwise, they are ignored. If you set the lock level on the userLimitSet field, the lock level is inherited by the boxSizeLimit, boxThresholdLimit, and messageSendLimit fields.
IMPORTANT:If you lock this field, the lock level must be set on a Domain or Post Office, not on users or external entities.
Mailbox Size Limit
The boxSizeLimit field controls the maximum logical amount of disk space available to users for storing messages and attachment files. The setting uses logical disk space because attachment storage space is shared by all users on the same post office. Messages in shared folders are counted as disk space only for the owner of the shared folder.
The boxSizeLimit field is set in bytes. If the value is set to 0, there is no limit on the box size. If you want to set the limit to 10 MB, enter 10485760. The maximum value is 4 GB (4,294,967,295).
Threshold for Warning Users
The boxThresholdLimit field sets a percentage value of the user’s mailbox size (specified in the Mailbox Size Limit). When this value is reached, GroupWise triggers a warning to users that the space in their mailboxes is reaching its limit. If users continue to send messages until the limit is met, they are not able to send more until they delete or archive items. The userLimitSet field must be set to 1 for this to function.
The boxThresholdLimit field is set as a percentage. Set the value to 0 or 100 if you do not want GroupWise to send a warning.
Maximum Send Message Size
The messageSendLimit field specifies the maximum size of a message that a user can send. If the user sends an item that exceeds this size, a message notifies the user that the item is too large to send.
The messageSendLimit field is set in bytes. If the value is set to 0, there is no limit on the message size. If you want to set the limit to 10 KB, enter 10240. The maximum value is 4 GB (4,294,967,295).
Limits Apply to Cache
The boxLimitAppliesToCache field uses the same disk space limits for users’ Caching mailboxes on local workstations as you are using for their Online mailboxes in the post office. If you impose this limit on users who have existing Caching mailboxes, their Caching mailboxes might be reduced in size in order to meet the new disk space limit. Such users should be warned in advance so that they can back up their Caching mailboxes before the size reduction takes place. Otherwise, users could lose messages that they want to keep.
The boxLimitAppliesToCache field is set to 0 or 1. 0 is No and 1 is Yes.
IMPORTANT:If you lock this field, the lock level must be set on a Domain or Post Office, not on users or external entities.
Notify the Administrator When Threshold Limit is Exceeded
The enableBoxThresholdNotification field notifies both the administrator and the user when the user’s mailbox exceeds the size established in the Threshold for Warning Users field. The administrator who receives the notification must be defined on the Identification page of the Domain object in ConsoleOne. The administrator cannot be set through the driver.
The enableBoxThresholdNotification field is set to 0 or 1. 0 is No and 1 is Yes.
IMPORTANT:If you lock this field, the lock level must be set on a Domain or Post Office, not on users or external entities.
Notify the Administrator When Size Limit is Exceeded
The enableBoxSizeNotification field notifies the administrator when the user’s mailbox exceeds the size established in the Mailbox Size Limit field. The administrator who receives the notification must be defined on the Identification page of the Domain object in ConsoleOne. The administrator cannot be defined through the driver.
The enableBoxSizeNotification field is set to 0 or 1. 0 is No and 1 is Yes.
IMPORTANT:If you lock this field, the lock level must be set on a Domain or Post Office, not on users or external entities.
6.4.15 Date and Time > Calendar
The options determine basic settings for the GroupWise Calendar. The options are found in ConsoleOne through the GroupWise client options under .
Figure 6-19 Date and Time Options with the Calendar Tab Open

The CalendarViewSettings attribute stores this information.
 <attr attr-name="CalendarViewSettings">
         <value type="structured">
           <component name="lock-level">0</component>
           <component name="value">Sunday</component>
           <component name="field">firstDay</component>
         </value>
         <value type="structured">
           <component name="lock-level">0</component>
           <component name="value">Sunday, Saturday</component>
           <component name="field">hilightDaysOfWeek</component>
         </value>
         <value type="structured">
           <component name="lock-level">0</component>
           <component name="value">0</component>
           <component name="field">showWeekNumber</component>
         </value>
         <value type="structured">
           <component name="lock-level">0</component>
           <component name="value">1</component>
           <component name="field">appointmentIncludeSelf</component>
         </value>
         <value type="structured">
           <component name="lock-level">0</component>
           <component name="value">08:00</component>
           <component name="field">startOfWorkday</component>
         </value>
         <value type="structured">
           <component name="lock-level">0</component>
           <component name="value">17:00</component>
           <component name="field">endOfWorkday</component>
         </value>
         <value type="structured">
           <component name="lock-level">0</component>
           <component name="value">Monday, Tuesday, Wednesday, Thursday, Friday</component>
           <component name="field">workdays</component>
         </value>
</attr>
Month Display Option > First of Week
The firstDay field stores the day of the week that you want to display as the first day on the calendar. Specify the day in the value field. The options are the days of the week, with the first letter of the day capitalized. The value field can store only one day.
Month Display Option > Highlight Day
The hilightDaysOfWeek field stores any days you want highlighted, such as weekends and holidays. Specify the day or days in the value field. It can store more than one day. If you list more than one day, separate the days with a comma. For example: Saturday, Sunday.
Month Display Option > Show Week Number
The showWeekNumber field displays the week number (1 through 52) at the beginning of the calendar week. To disable this option, set the value to 0. To enable this option, set the value to 1.
Appointment Options > Include Myself on New Appointments
The appointmentIncludeSelf field allows the sender to be automatically included in the appointment’s To: list. To disable this option, set the value to 0. To enable this option, set the value to 1.
Appointment Options > Default Length
The appointmentDefaultLength field is part of the AppointmentMessageSettings attribute. It sets the default length of the appointments. The value in the example below is for one hour. To set the value for 45 minutes, specify 00:45. The value for the field is HH:MM, where HH is hours and the range is 0-60. MM is minutes and the range is 0-59.
<attr attr-name="AppointmentMessageSettings">
     <value type="structured">
                <component name="lock-level">0</component>
                <component name="value">01:00</component>
                <component name="field">appointmentDefaultLength</component>
      </value>
</attr>
Work Schedule > Start Time
The startOfWorkday field allows you to specify the time that displays as the daily start time of the user’s work day. The value is specified using the 24-hour clock. For example, 8:00. The value for the field is HH:MM, where HH is hours and the range is 0-23. MM is minutes and the range is 0-59.
Work Schedule > End Time
The endOfWorkday field allows you to specify the time that displays as the daily end time of the user’s work day. The value is specified using the 24-hour clock. For example, 17:00. The value for the field is HH:MM, where HH is hours and the range is 0-23. MM is minutes and the range is 0-59.
Work Schedule > Work Days
The workdays field applies the start time and end time to each work day. Specify the desired work days in the value field. For example, Monday, Tuesday, Wednesday, Thursday, Friday. The value is the days of the week in English, separated by a comma.
6.4.16 Date and Time > Calendar > Alarm Options
The allow you to set how a user is notified prior to an appointment time. The options are found in ConsoleOne through the GroupWise client options under .
Figure 6-20 Date and Time Options with the Alarm Options Highlighted
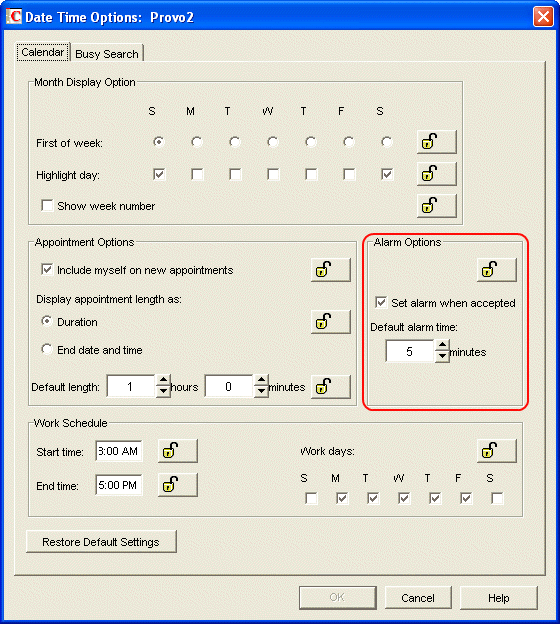
The AppointmentViewSettings attribute stores the information.
<attr attr-name="AppointmentViewSettings">
        <value type="structured">
          <component name="lock-level">0</component>
          <component name="value">1</component>
          <component name="field">appointmentAlarmSet</component>
        </value>
        <value type="structured">
          <component name="value">5</component>
          <component name="field">appointmentAlarmMinutes</component>
        </value>
</attr>
Set Alarm When Accepted
The appointmentAlarmSet field sets an alarm when the user accepts an appointment. By default, this option is enabled. To enable the option, the value field is set to 1. To disable this options, set the value field to 0.
Default Alarm Time
The appointmentAlarmMinutes field sets the number of minutes before an appointment to notify the user. The default is 5 minutes. The valid range is 0-999. The appointmentAlarmMinutes field inherits the lock level from the appointmentAlarmSet field.
6.4.17 Date and Time > Busy Search
The options determine the amount of free time required for the appointment and the range of dates to search. The options are found in ConsoleOne through the GroupWise client options under .
Figure 6-21 Date and Time Options with the Busy Search Tab Open
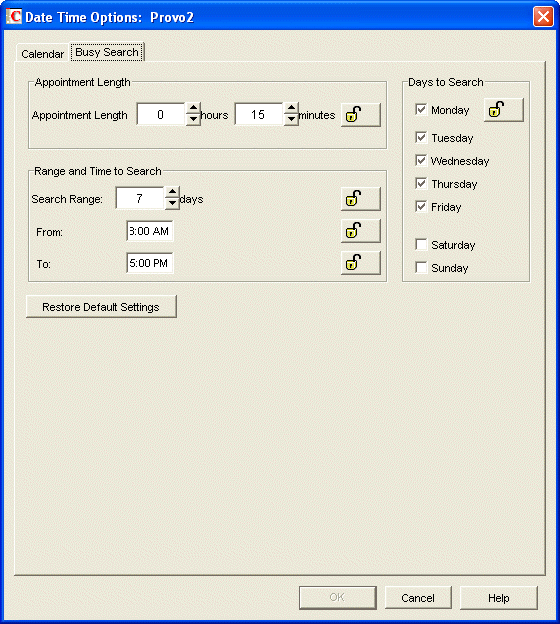
The BusySettings attribute stores this information.
<attr attr-name="BusySettings">
       <value type="structured">
         <component name="lock-level">0</component>
         <component name="value">08:00</component>
         <component name="field">busyStartTime</component>
       </value>
       <value type="structured">
         <component name="lock-level">0</component>
         <component name="value">17:00</component>
         <component name="field">busyEndTime</component>
       </value>
       <value type="structured">
         <component name="lock-level">0</component>
         <component name="value">15</component>
         <component name="field">busyInterval</component>
       </value>
       <value type="structured">
         <component name="lock-level">0</component>
         <component name="value">Monday, Tuesday, Wednesday, Thursday, Friday</component>
         <component name="field">busyDays</component>
       </value>
       <value type="structured">
         <component name="lock-level">0</component>
         <component name="value">7</component>
         <component name="field">busySearchRange</component>
       </value>
</attr>
Range and Time to Search > From
The busyStartTime field stores the time when you want to start the busy search. The value is specified by using the 24-hour clock. For example, 8:00. The value for the field is HH:MM, where HH is hours and the range is 0-23. MM is minutes and the range is 0-59.
Range and Time to Search > To
The busyEndTime field stores the time when you want to end the busy search. The value is specified by using the 24-hour clock. For example, 17:00. The value for the field is HH:MM, where HH is hours and the range is 0-23. MM is minutes and the range is 0-59.
Range and Time to Each > Search Range
The busySearchRange field stores the number of days it searches. The value is set as a number of days. For example, if you want to do a busy search for 7 days, specify 7. The range is 7-99 days.
Appointment Length
The busyInterval field sets the default appointment length to search. The value for the field is HH:MM, where HH is hours and the range is 0-8. MM is minutes and the range is 0-55.
This setting is used only when the user does a busy search through the Busy Search option on the Tools menu. Otherwise, the default appointment length defined on the Calendar tab is used (see Section 6.4.15, Date and Time > Calendar).
Days to Search
The busyDays field sets the days to search. You usually specify the work days for your organization. For example, Monday, Tuesday, Wednesday, Thursday, Friday. The value is the days of the week in English, separated by a comma.