7.16 Storing Driver Passwords Securely with Named Passwords
Identity Manager allows you to store multiple passwords securely for a particular driver. This functionality is referred to as Named Passwords. Each different password is accessed by a key, or name.
You can also use the Named Passwords feature to store other pieces of information securely, such as a user name.
To use a Named Password in a driver policy, you refer to it by the name of the password, instead of using the actual password, and the Metadirectory engine sends the password to the driver. The method described in this section for storing and retrieving Named Passwords can be used with any driver without making changes to the driver shim.
7.16.1 Using Designer to Configure Named Passwords
-
Right-click the driver object, then select .
-
Select , then click .

-
Specify the of the Named Password.
-
Specify the of the Named Password.
-
Specify the Named Password, then re-enter the password.
-
Click twice.
7.16.2 Using iManager to Configure Named Passwords
-
Click , then click to search for the driver set that is associated with the driver.
-
In the Identity Manager Overview, click the upper right corner of the driver icon, then click .
-
On the Modify Object page on the Identity Manager tab, click .
The Named Passwords page appears, listing the current Named Passwords for this driver. If you have not set up any Named Passwords, the list is empty.

-
To add a Named Password, click , complete the fields, then click .

-
Specify a name, display name and a password, then click twice.
You can use this feature to store other kinds of information securely, such as a username.
-
Click to restart the driver and have the changes take effect.
-
To remove a Named Password, select the password name, then click .
The password is removed without prompting you to confirm the action.
7.16.3 Using Named Passwords in Driver Policies
Using the Policy Builder
Policy Builder allows you to make a call to a Named Password. Create a new rule and select Named Password as the condition, then set an action depending upon if the Named Password is available or not available.
-
In Designer, launch Policy Builder, right-click, then click .
-
Specify the name of the rule, then click .
-
Select the condition structure, then click .
-
Select for the .
-
Browse to and select the Named Password that is stored on the driver.
In this example, it is .
-
Select whether the Operator is available or not available.
-
Select an action for the field.
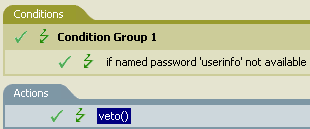
In this example, the action is .
The example indicates that if the userinfo Named Password is not available, then the event is vetoed.
Figure 7-1 A Policy Using Named Passwords
Using XSLT
The following example shows how a Named Password can be referenced in a driver policy on the Subscriber channel in XSLT:
<xsl:value-of select=”query:getNamedPassword($srcQueryProcessor,'mynamedpassword')”
xmlns:query=”http://www.novell.com/java/com.novell.nds.dirxml.driver.XdsQueryProcessor/>
7.16.4 Using the DirXML Command Line Utility to Configure Named Passwords
Creating a Named Password in the DirXML Command Line Utility
-
Run the DirXML Command Line utility.
For information, see Section B.0, DirXML Command Line Utility.
-
Enter your username and password.
The following list of options appears.
DirXML commands
 1: Start driver
 2: Stop driver
 3: Driver operations...
 4: Driver set operations...
 5: Log events operations...
 6: Get DirXML version
 7: Job operations...
99: Quit
Enter choice:
-
Enter 3 for driver operations.
A numbered list of drivers appears.
-
Enter the number for the driver you want to add a Named Password to.
The following list of options appears.
Select a driver operation for:
driver_name
1: Start driver 2: Stop driver 3: Get driver state 4: Get driver start option 5: Set driver start option 6: Resync driver 7: Migrate from application into DirXML 8: Submit XDS command document to driver
9: Submit XDS event document to driver
10: Queue event for driver
11: Check object password
12: Initialize new driver object
13: Passwords operations
14: Cache operations
99: Exit
Enter choice:
-
Enter 13 for password operations.
The following list of options appears.
Select a password operation
 1: Set shim password
 2: Reset shim password
3: Set Remote Loader password
 4: Clear Remote Loader password
 5: Set named password
 6: Clear named password(s)
 7: List named passwords
 8: Get passwords state
99: Exit
Enter choice:
-
Enter 5 to set a new Named Password.
The following prompt appears:
Enter password name:
-
Enter the name by which you want to refer to the Named Password.
-
Enter the actual password that you want to secure at the following prompt:
Enter password:
The characters you type for the password are not displayed.
-
Confirm the password by entering it again at the following prompt:
Confirm password:
-
After you enter and confirm the password, you are returned to the password operations menu.
-
After completing this procedure, you can use the 99 option twice to exit the menu and quit the DirXML Command Line Utility.
Using the DirXML Command Line Utility to Remove a Named Password
This option is useful if you no longer need Named Passwords that you previously created.
-
Run the DirXML Command Line utility.
For information, see Section B.0, DirXML Command Line Utility.
-
Enter your username and password.
The following list of options appears.
DirXML commands
 1: Start driver
 2: Stop driver
 3: Driver operations...
 4: Driver set operations...
 5: Log events operations...
 6: Get DirXML version
 7: Job operations
99: Quit
Enter choice:
-
Enter 3 for driver operations.
A numbered list of drivers appears.
-
Enter the number for the driver you want to remove Named Passwords from.
The following list of options appears.
Select a driver operation for:
driver_name
1: Start driver 2: Stop driver 3: Get driver state 4: Get driver start option 5: Set driver start option 6: Resync driver 7: Migrate from application into DirXML 8: Submit XDS command document to driver
9: Submit XDS event document to driver
10: Queue event for driver
11: Check object password
12: Initialize new driver object
13: Passwords operations
14: Cache operations
99: Exit
Enter choice:
-
Enter 13 for password operations.
The following list of options appears.
Select a password operation
 1: Set shim password
 2: Reset shim password
3: Set Remote Loader password
 4: Clear Remote Loader passwor
 5: Set named password
 6: Clear named password(s)
 7: List named passwords
 8: Get passwords state
99: Exit
Enter choice:
-
(Optional) Enter 7 to see the list of existing Named Passwords.
The list of existing Named Passwords is displayed.
This step can help you make sure you are removing the correct password.
-
Enter 6 to remove one or more Named Passwords.
-
Enter No to remove a single Named Password at the following prompt:
Do you want to clear all named passwords? (yes/no):
-
Enter the name of the Named Password you want to remove at the following prompt:
Enter password name:
After you enter the name of the Named Password you want to remove, you are returned to the password operations menu:
Select a password operation
 1: Set shim password
 2: Reset shim password
3: Set Remote Loader password
 4: Clear Remote Loader password
 5: Set named password
 6: Clear named password(s)
 7: List named passwords
 8: Get passwords state
99: Exit
Enter choice:
-
(Optional) Enter 7 to see the list of existing Named Passwords.
This step lets you verify that you have removed the correct password.
-
After completing this procedure, you can use the 99 option twice to exit the menu and quit the DirXML Command Line utility.