2.2 Creating Your Tree Structure
In this planning step, you review your tree and add or update the containers you want to use to hold student and users, add containers for incomplete or disabled user objects, and make sure you have the eDirectory™ template objects you need.
2.2.1 Creating the Hierarchy of Containers for Students and Staff
We recommend that your eDirectory tree have a hierarchal structure for holding User objects.
This part of the tree should begin at least one level down from the root container, so that the root container can contain the Admin user and other objects you don’t want the driver to manage. We recommend that students and staff be kept in separate eDirectory containers.
As part of your planning, you need to decide how you want to group your student users.
The container names don’t need to be identical to the school code or grade code used in the student information system.
In this section:
Creating Containers for Students
The tree structure can be created according to your needs; the only thing required by the driver is that you specify which containers students and staff are placed in. In the examples in this manual, separate school containers are shown, and sometimes grade or graduation year containers as well, but this is not required.
One example tree structure would be to create a single district container below the root container. Below the district container you could create containers representing each school. Below each school container could be containers representing the grade levels or graduation years in the school.
Figure 2-1 illustrates this example hierarchy, with the District container, the Highland High school container, and the 12th grade container.
Figure 2-1 Example Tree Structure, with Grade Level Containers
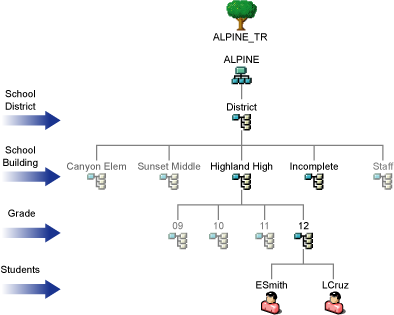
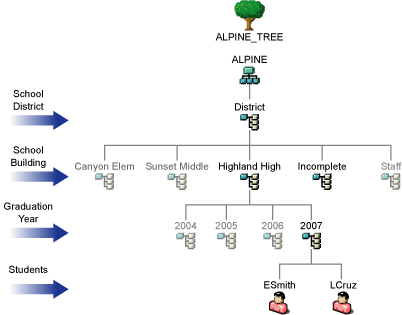
Figure 2-2 illustrates using the same kind of structure with graduation year containers instead of grade level containers.
Figure 2-2 Example Tree Structure, with Graduation Year Containers
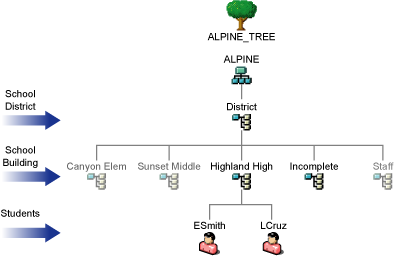
Another way you could organize the tree is to eliminate the optional grade or graduation year level, and use only school containers, as shown in Figure 2-3.
Figure 2-3 Example Tree Structure, without Grade Level Containers
Creating One or More Containers for Staff Users
In this planning step, you review your tree and identify or create the container you want to use to hold staff users.
This container should be at least one level down from the root container, so that the root container can contain the Admin user and other objects you don’t want the driver to change.
Each Zone that you configure specifies a Staff container.
For this part of your planning, it’s helpful to know how many Zones you have, as discussed in Section 2.3, Planning Driver and Replica Placement on Your Servers.
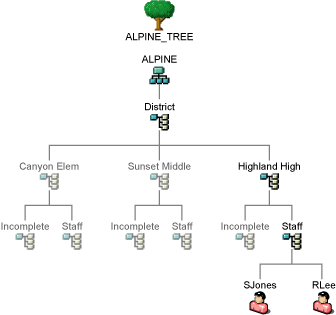
If you have a single Zone, you could place your staff users in a container below the district-level container, as illustrated in the following figure.
Figure 2-4 Example Tree Structure for Staff for Single Zone

If you have multiple zones, you have two choices for placing staff users:
-
You could specify the same container for all your staff Driver objects, so all staff users are created in the same container regardless of which Zone they are represented in. This would be like the scenario illustrated in the previous figure.
-
You could create one container for staff for each Zone, as illustrated in the following figure.
Figure 2-5 Example Tree Structure for Staff for Multiple Zones
2.2.2 Identifying “Incomplete” Containers
You need to identify a container to be used as the Incomplete container, so the driver has a place to hold information for students that it can’t place correctly in the tree. This container is needed when a student’s information is incomplete. If desired, you can specify an existing container to be used for this purpose instead of creating a new one.
If you have only one Zone, we recommend that you create one Incomplete container below the district container, as illustrated in Figure 2-6.
If you have multiple Zones, we recommend that you create an Incomplete container below each school container, as illustrated in Figure 2-8. This way, the users who are not yet placed correctly or who require administrator intervention are grouped by school.
Here are two examples of situations in which the driver would place students in the Incomplete container:
-
A student has been entered into the student information system but the grade level or graduation year has not yet been entered.
When the grade level or graduation year is entered into the student information system, Identity Manager automatically creates the user in the correct container, using the correct template.
-
A student has a school and grade level for which no container has been specified in the rules, the container specified does not exist, or there is a syntax problem with a rule.
For example, if the driver were set up for students in grades K-6 at Canyon Elementary, but the eDirectory administrator setting up the driver mistakenly left out a rule for the 5th grade, then Identity Manager would not know where to place students with the school of Canyon Elementary and the grade level of 05. Identity Manager would place them in the Incomplete container awaiting intervention by the eDirectory administrator.
The administrator needs to fix the rules and then place the students in the right container using the right template. If no template is desired, the User objects could simply be manually moved to the correct container. If the User objects need to be created by using a template, the administrator needs to first delete them from the Incomplete container. Then, they need to be re-created with the correct template in the correct container either manually or by using the Migrate into the Identity Vault command to cause the driver to re-create them. (See Using Migrate into Identity Vault to Populate or Update the Identity Vault.)
You need to specify the DN of the Incomplete container when you configure the Driver object.
2.2.3 Identifying the “Search” Container
The search container is the point in the Identity Vault below which User IDs must be unique. When creating a new User object, the driver searches the Identity Vault to verify that the new User ID is not already in use. The search container and all subcontainers are searched. Choose the district container or a container that is high enough in the tree that user IDs are unique for all students and staff. For example, for the environment shown in Figure 2-6, Example Tree for One Zone, Showing Partitioning, you would specify the District container. A single search container is used for all zones.
If you specify Yes in the Send New Users to SIF field, only users created in this container and its subcontainers are sent to SIF.
2.2.4 Identifying “Disabled” Containers (Optional)
The driver configuration gives you the option to automatically move a student user to a different container if the user’s login is disabled. This option makes it easy for the administrator to identify all disabled accounts.
If you want to use this option, you must specify which container or containers you want the user objects to be placed in. If desired, you can use an existing container for this purpose instead of creating a new one.
If you have only one Zone, we recommend that you create one Disabled container below the district container, as illustrated in Figure 2-6.
If you have multiple Zones, we recommend that you create a Disabled container below each school container, as illustrated in Figure 2-7. This way, the users who have login disabled are grouped by school.
A student account is disabled when an exit date is set in the student information system. For example, this could happen when a student withdraws from school. If the student returns to school, a new entry date is set in the student information system. The student’s account is then enabled and moved to the appropriate student container.
2.2.5 Identifying eDirectory Templates
Decide which eDirectory User Template objects you want the Identity Manager Driver for SIF to use when creating new users. An eDirectory User Template object is not required for the driver, but it helps automate User object creation by allowing you to specify standard properties that can then be applied to new User objects.
For example, you might decide to have one Template object corresponding to each container where student users are grouped, such as one per school or grade, and a different Template object for staff users.
To prepare for configuring the driver, review the Template objects you have and update or add new ones if necessary. The Template objects that the driver needs access to must be on the server where the driver is running.