5.0 Creating Entitlement Policies
The Entitlements Service driver implements entitlements through the use of entitlement policies. An entitlement policy contains the following:
-
Membership: The list of users assigned to the policy. A user can be dynamically assigned to the policy when he or she meets the criteria for the policy, or the user can be statically (manually) assigned to the policy.
-
Entitlements: The list of entitlements associated with the policy. Users assigned to the policy receive all of the entitlements associated with the policy. If the user is removed from the policy, he or she loses all entitlements associated with the policy.
To create an entitlement policy:
-
In iManager, click
 to display the Identity Manager Administration page.
-
In the Feature list, click .
-
In the field, click
 to browse for and select the driver set where you want to create the entitlement policy, then click to display the Entitlement Policy List.
This list displays all entitlement policies that have been created for the driver set. If you are using Role-Based Entitlements for the first time, no policies are listed.

-
Click to launch the Entitlement Policy Wizard.
-
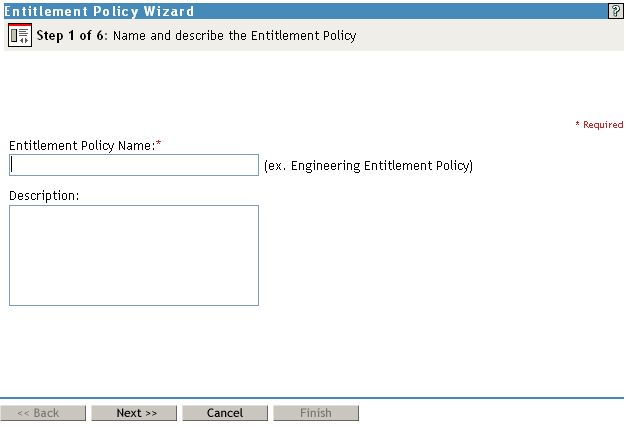
On the page, fill in the fields:
Entitlement Policy Name: Provide a name that indicates the purpose of the entitlement. The name must be unique within the driver set and cannot include more than 64 characters.
Description: Provide any additional information you want to identity the policy.
-
On the page, fill in the fields:
Dynamic membership lets you define which users should be members of the entitlement policy by specifying criteria and specifying where in the tree to search for users that meet the criteria. If a user meets the criteria you specify, the policy’s entitlements are automatically applied to the user. If the user’s information changes and no longer meets the criteria, the entitlements are revoked without any manual intervention.
Search Identity: Specify an object that has the rights that you want to be used when querying for Dynamic Membership. This field defaults to the object you logged in as, but you can change it to an object with the appropriate rights.
For example, if you log in as the administrator, there might be parts of the tree that you have rights to that you don't want included in the query for the dynamic list of members.
You could use this field to specify the Driver Set object, making sure that the Driver Set has the appropriate rights. Or, you could create a User object specifically for use with Entitlement Policies, and assign it the rights you want the query to use.
Begin Search at (Base DN): Specify the base container where you want the user search to begin.
Scope of Search: Specify whether you want to search the base container and all of its subcontainers () or only the base container ().
For the entitlement policy to evaluate users in the containers you specify, the users must be in a read/write or master replica on the Metadirectory server that is running the Entitlements Service driver.
Criteria: Specify the criteria that determine which users are members of the policy. The criteria are organized into criteria groups. Each group can contain one or more criterion. You click the
 icon to add criterion to a group. You can also click to create additional groups.
By default, the criteria include all User class objects (and objects of classes derived from the User class) within the search scope.
If you create a new object class derived from User, an existing entitlement policy does not recognize that class until you make a modification to the entitlement policy. This prevents users of a new class from being granted entitlements unintentionally. When any modification is made to the entitlement policy, the list of user-derived classes for that policy is updated.
-
After you have added the criteria you want, click to view the list or users who meet the criteria.
-
On the page, fill in the fields:
Static membership lets you include users who don’t meet the dynamic membership criteria or exclude users who meet the criteria but should not be members of the policy.
Include Members: Type the DN of a user you want to include, or click
to browse for and select the user, then press Enter to add the user to the inclusion list. To remove a user from the inclusion list, select the user and press Delete. To edit a user name, double-click the user.
Exclude Members: Type the DN of a user you want to exclude, or click
to browse for and select the user, then press Enter to add the user to the exclusion list. To remove a user from the exclusion list, select the user and press Delete. To edit a user name, double-click the user.
-
On the page, add the entitlements you want associated with the policy. To do so:
-
Click to display a list of drivers with entitlements.
-
Select the driver with the entitlement you want to add, then click to display a list of the driver’s entitlements.
-
Select the entitlement you want to add, then click .
-
If the entitlement requires you to set a value, click
 to add the value.
or
If the entitlement requires a query to display the appropriate values (for example, a query for the groups in the connected system), run the query and select the appropriate value.
You can choose an external query, which runs a new query of the connected system, or you can choose a cached query, which simply displays the results of the last query that ran.
-
To add another entitlement from the same driver, click the
icon located on the same line as the driver name.
-
To add an entitlement from another driver, repeat Step 9.a through Step 9.d.
-
-
On the page, add the Identity Vault objects for which you want the entitlement policy to be a trustee.
Each member of the policy becomes a trustee of the objects you add. There are several reasons why you might want to make the policy a trustee of an object:
-
One of the policy’s entitlements requires the policy’s members to have rights to an object.
-
You want to use the policy to assign users as trustees of an object even though rights to the object are not required for an entitlement. In this case, you are using the entitlement policy to grant and revoke trustee rights for members of the policy.
Trustee rights are assigned to the policy’s members as soon as you click to leave this page.
Use the following options to manage the trustee assignments:
Add Object: Use this option to browse for and select the objects that you want to make the policy a trustee of.
Rights to Selected Objects: Click an object in the Object Name list to view the policy’s rights to the object. You can add or remove rights by selecting or deselecting the desired rights. The Inherit check box determines whether the rights flow down in the tree. For example, if you are assigning rights to a container object, and you want the entitlement policy to have the same rights to the objects and subcontainers that are below that container, select the check box.
Add Property: In addition to doing a global assignment of rights to all properties ([All Attributes Rights]), you can assign rights to specific properties. This lets you limit rights to some properties and expand rights to others. To add a property, click to browse for and select the desired property. After the property is added to the Rights to Selected Objects list, make the assigned rights modifications that you want.
Remove Object or Property: Click the
 button to remove an object from the Object Name list or a property from the Rights to Selected Object list.
-
-
On the page, review the policy information, then click to create the policy and add it to the Entitlement Policy List.
-
Click to start the Entitlements Service driver.
After the driver starts, it evaluates the new policy (and all other policies in the list) and grants the appropriate entitlements to the policy members.