3.3 Creating the Driver in iManager
You create the GroupWise driver by importing the driver’s basic configuration file and then modifying the configuration to suit your environment. After you’ve created and configured the driver, you need to start it.
3.3.1 Importing the Driver Configuration File
-
In iManager, click
 to display the Identity Manager Administration page.
-
In the Administration list, click to launch the Import Configuration wizard.
-
Follow the wizard prompts, filling in the requested information (described below) until you reach the Summary page.
Prompt
Description
Where do you want to place the new driver?
You can add the driver to an existing driver set, or you can create a new driver set and add the driver to the new set. If you choose to create a new driver set, you are prompted to specify the name, context, and server for the driver set.
Import a configuration into this driver set
Use the default option, .
In the field, select .
In the field, select the GroupWise file.
Driver name
Type a name for the driver. The name must be unique within the driver set.
User Container
Select the Identity Vault container where any new users created from GroupWise information will be placed. This value becomes the default for all drivers in the driver set. If you don’t want to change this value for all drivers, leave this field unchanged and change the value on the driver’s Global Configuration Values page after you’ve finished importing the driver.
Driver is Local/Remote
Select if this driver will run on the Metadirectory server without using the Remote Loader service. Select if you want the driver to use the Remote Loader service, either locally on the Metadirectory server or remotely on another server.
Remote Host Name and Port
This applies only if the driver is running remotely.
Specify the host name or IP address of the server where the driver’s Remote Loader service is running.
Driver Password
This applies only if the driver is running remotely.
Specify the driver object password that is defined in the Remote Loader service. The Remote Loader requires this password to authenticate to the Metadirectory server.
Remote Password
This applies only if the driver is running remotely.
Specify the Remote Loader’s password (as defined on the Remote Loader service). The Metadirectory engine (or Remote Loader shim) requires this password to authenticate to the Remote Loader
Define Security Equivalences
The driver requires rights to objects within the Identity Vault and to the input and output directories on the server. The Admin user object is most often used to supply these rights. However, you might want to create a DriversUser (for example) and assign security equivalence to that user. Whatever rights that the driver needs to have on the server, the DriversUser object must have the same security rights.
Exclude Administrative Roles
You should exclude any administrative User objects (for example, Admin and DriversUser) from synchronization.
When you finish providing the information required by the wizard, a Summary page similar to the following is displayed.
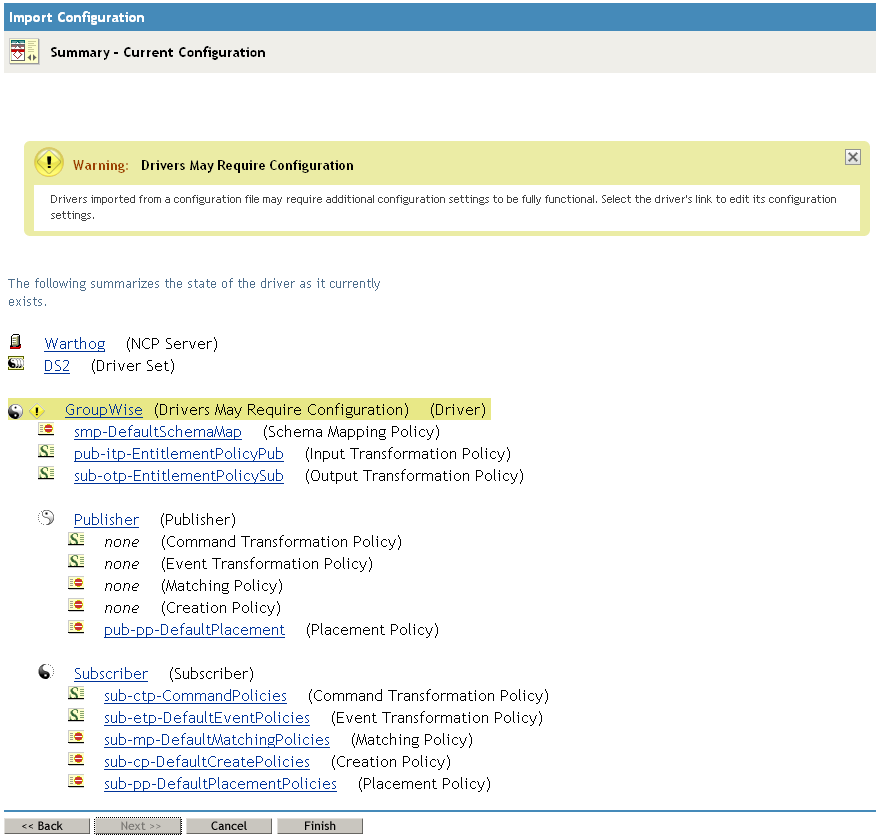
At this point, the driver is created from the basic configuration file. To ensure that the driver works the way you want it to for your environment, you must review and modify the driver’s default configuration settings.
-
To modify the default configuration settings, click the linked driver name, then continue with the next section, Configuring the Driver.
or
To skip the configuration settings at this time, click . When you are ready to configure the settings, continue with Configuring the Driver.
3.3.2 Configuring the Driver
After importing the driver configuration file, you need to configure the driver before it can run. Complete the following tasks to configure the driver:
-
Configure the driver parameters: There are many settings that can help you customize and optimize the driver. The settings are divided into categories such as Driver Configuration, Engine Control Values, and Global Configuration Values (GCVs). Although it is important for you to understand all of the settings, your first priority should be to review the Driver Parameters located on the Driver Configuration page. The Driver Parameters let you configure the LDAP directory type, publication method, and other parameters associated with the Publisher channel.
-
Customize the driver policies and filter: The driver policies and filter control data flow between the Identity Vault and GroupWise. You should ensure that the policies and filters reflect your business needs. For instructions, see Section 5.0, Customizing the Driver by Using Policies and Filters.
After completing the configuration tasks, continue with the next section, Starting the Driver.
3.3.3 Starting the Driver
When a driver is created, it is stopped by default. To make the driver work, you must start the driver and cause events to occur. Identity Manager is an event-driven system, so after the driver is started, it won’t do anything until an event occurs.
To start the driver:
-
In iManager, click
to display the Identity Manager Administration page.
-
Click .
-
Browse to and select the driver set object that contains the driver you want to start.
-
Click the driver set name to access the Driver Set Overview page.
-
Click the upper right corner of the driver, then click .
-
Continue with the next section, Testing the Driver.
3.3.4 Testing the Driver
After you start the driver, you should test it to ensure that it is working properly. Use the following steps to verify that the driver is working properly. When properly installed and configured, the driver synchronizes the changes to GroupWise.
-
Make sure the driver is started. See Section 3.3.3, Starting the Driver.
-
Add a new user to the Identity Vault.
You need to specify only the Name and Surname attributes for this user.
-
Open ConsoleOne with the GroupWise snap-ins.
-
Verify that a new GroupWise account was created in the correct post office.
-
Using Novell iManager, delete the user from the Identity Vault.
The default driver import file converts Identity Vault deletes to GroupWise Disable events. This results in a disabled external user in GroupWise. This can be changed through the global configuration values.
-
Using ConsoleOne with the GroupWise snap-ins, verify that the GroupWise account is external and disabled (assuming you are using the default configuration).
-
Use ConsoleOne with the GroupWise snap-ins to verify that the changes have been synchronized with GroupWise.