2.4 Configuring the Drivers
The following drivers are required by the reporting module:
-
Identity Manager Managed System Gateway Driver
-
Identity Manager Driver for Data Collection Service
These drivers are installed automatically by the Integrated Installer for Identity Manager, so the steps provided below are only necessary if you are running the stand-alone versions of the install programs.
If you are running the stand-alone versions of the install programs, you can use the new package management tools provided with Designer for Identity Manager to install and configure the drivers.
2.4.1 Installing the Packages
Before you attempt to configure the drivers, you need to be sure you have all of the necessary packages in the Package Catalog. When you create a new Identity Manager project, the user interface automatically prompts you to import several packages into the new project. If you choose not to import the packages at the time you create your project, you need to install them later, as described below.
-
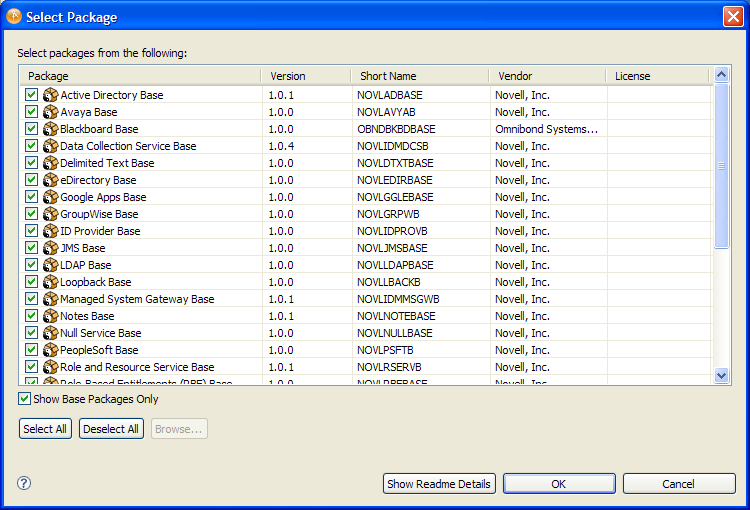
After you create a new Identity Manager project in Designer, select the and click .

Designer displays the Select Package dialog box.
-
Click , then click .
Designer adds several new package folders under the . These package folders correspond to the objects in the palette on the right side of the Modeler view in Designer.
-
Click to save your project.
Configuring Drivers for the Roles Based Provisioning Module: At this point, you would typically want to configure the User Application Driver and the Roles and Resources Driver in Designer, which are required for the Roles Based Provisioning Module. The procedure for configuring these drivers is described in the Roles Based Provisioning Module Installation Guide. The sections that follow describe the steps you would take to configure the Managed System Gateway Driver and the Data Collection Service Driver.
2.4.2 Configuring the Managed System Gateway Driver
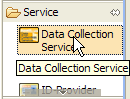
-
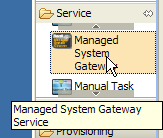
Select in the palette in the Modeler view.
-
Drag the icon for onto the Modeler view.
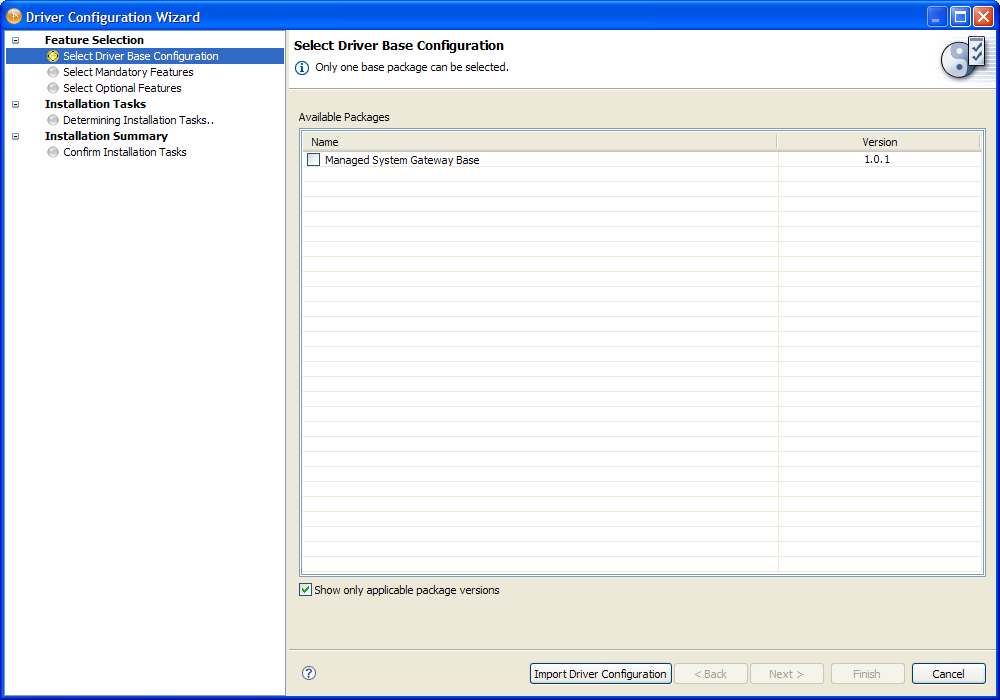
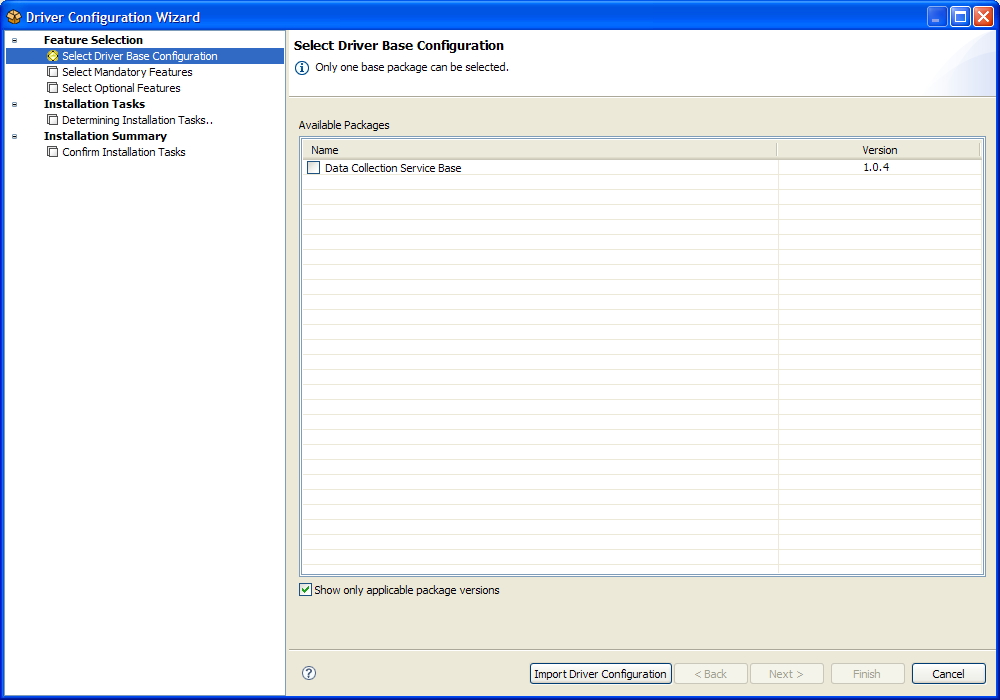
Designer displays the Driver Configuration Wizard:
-
Select and click :
If you have multiple versions of the package, you need to select the particular version you want to install. In this example, only one version is available.
The Driver Configuration Wizard now shows the Select Mandatory Features screen.
-
Make sure the mandatory features listed are selected and click .
The interface displays a dialog box to inform you that need an additional package called .
-
Click to install the required package.
The wizard displays a screen that allows you to specify a name for the driver.
-
Accept the default driver name, or change it if you like, then click .
The wizard now displays a screen that allows you to specify the connection parameters for the driver.
-
Specify the IP address and port the driver should listen on, as well as the protocol you want to use:

The reporting module requests data from the Managed System Gateway Driver. Therefore, it needs to know which IP address, port, and protocol to use (http or https).
-
Click .
The wizard now displays a screen that asks whether you plan to connect to a remote loader.
-
Select or to indicate whether you will using a remote loader, then click .
The wizard now shows the Confirm Installation Tasks screen.
-
If everything looks correct, click .
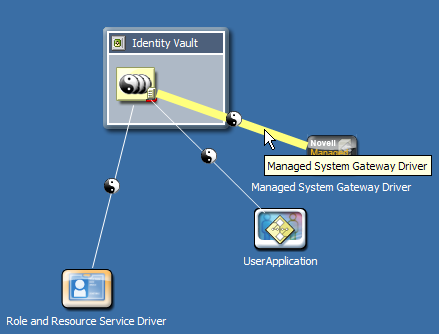
Designer adds the Managed System Gateway Driver to the Modeler view:

-
To configure additional settings for the driver, right-click the line connecting the Managed System Gateway Driver to the driver set and select .
-
Designer displays the Properties for Managed System Gateway Driver dialog box:

-
Select in the left menu and click the tab. Select for the startup setting:

-
Click the tab and select under to show the settings you provided to the wizard:
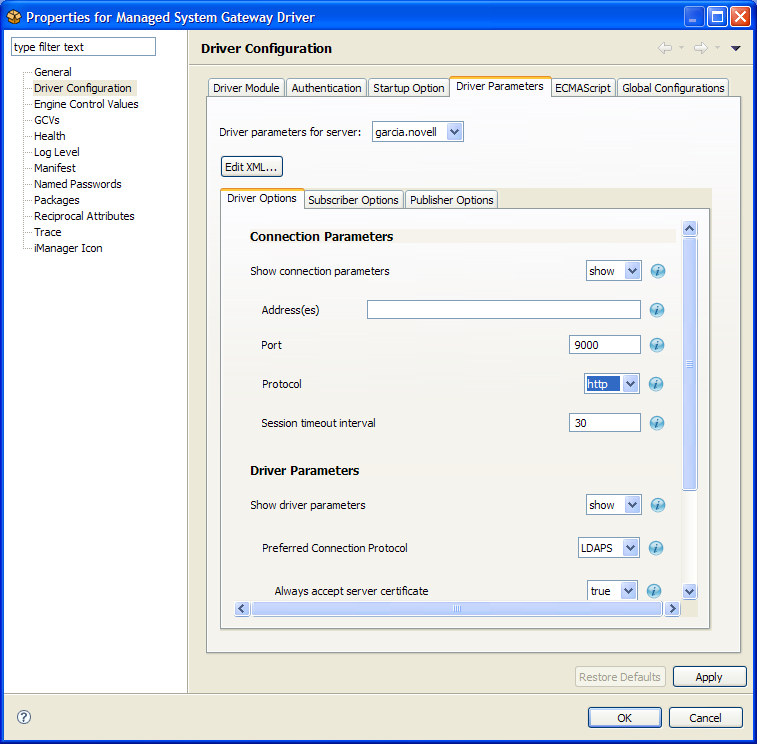
-
Select under .
You can optionally make changes to the Connection Parameter, Driver Parameter, and Publisher Options settings. The settings that you might want to modify are described below:
Parameter Type
Parameter
Description
Connection Parameter
Address(es)
IP address on which the driver should listen. If you want the driver to listen on more than one interface, you can provide a comma-separated list of addresses.
Port
The port on which the driver accepts requests. If multiple addresses are specified, the same port number is used to listen on all the interfaces. For example, if the address is set to 164.99.88.30,127.0.0.1, and the port is set to 9000, then the driver listens on the following:
164.99.88.30:9000
127.0.0.1:9000
Protocol
Protocol for accessing the driver. The choices are HTTP and HTTPS. If you select HTTPS, you need to provide the KMO name.
Session timeout interval
Defines a timer for the session that controls how long (in minutes) the session can be inactive before it is terminated.
Driver Parameter
Duration result is kept
Specifies the duration (in minutes) for which query results are available before they are marked for purging. All results that exceed this duration are purged in the next purge cycle.
Purge interval
Specifies the duration (in hours) between purge cycles. A new purge cycle is executed when this interval is reached. The purge cycle cleans up all results that have been marked for purging.
Publisher Options
Publisher heartbeat interval
Specifies the duration (in minutes) between heartbeats. Whenever this interval is reached and there has been no traffic on the Publisher channel, a new heartbeat is sent.
-
Open the other tabs associated with Driver Configuration to review the settings.
You can make changes to the settings, if you like, but you do not need to in order to get the driver up and running.
-
Select the option in the left menu to see which packages have been installed.
You do not need to change the settings unless you want to uninstall a particular package.
-
Click when you are satisfied with all of the settings.
2.4.3 Configuring the Identity Manager Driver for Data Collection Service
-
Select in the palette in the Modeler view.
-
Drag the icon for onto the Modeler view.
Designer displays the Driver Configuration Wizard:
-
Select and click .
-
Make sure the optional features listed are selected and click .
The interface displays a dialog box to inform you that need an additional package called LDAP Library.
-
Click to install the required package.
The wizard displays a screen that allows you to specify a name for the driver.
-
Accept the default driver name, or change it if you like, then click
The wizard now displays a screen that allows you to specify the connection parameters for the driver.
-
Specify the IP address and port of the reporting module, as well as the protocol you want to use. Also, specify the user and password of the Reporting Administrator for authentication:
-
Click .
The wizard now displays a screen that allows you to specify settings for the Identity Vault Registration and Managed System Gateway Registration.
-
For the Identity Vault Registration, provide a name and description, as well as the IP address for the Identity Vault.
Be sure to select for . For the , provide the DN for the driver, as well as the user and password for the LDAP administrator. Because the driver has not yet been deployed, the browse function does not show the Managed System Gateway driver you just configured, so you might need to type the DN for the driver.
-
Click .
The wizard now displays the Confirm Installation Tasks screen.
-
If everything looks correct, click .
Designer adds the Managed System Gateway Driver to the Modeler view:

-
To configure additional settings for the driver, right-click the line connecting the Data Collection Service Driver to the driver set and select .
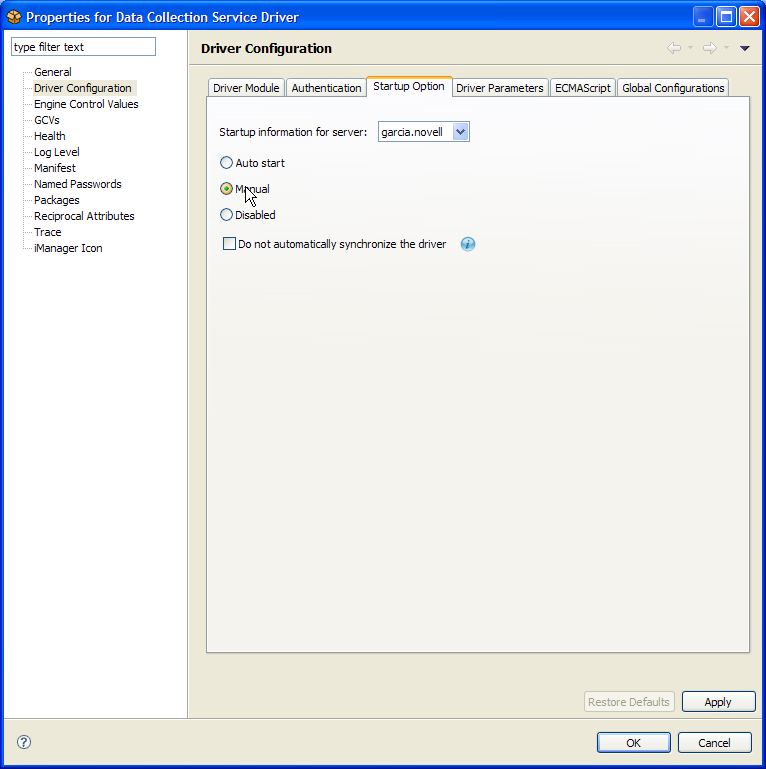
Designer now displays the dialog.
-
Select in the left menu and click the tab. Select for the startup setting:
-
Select in the left menu and click the tab. Select under . Also, select under .
-
Scroll down to the settings shown in the section.
You might want to change the values for some of these settings. In a test environment, you might want to use low numbers to be sure your events are being processed correctly. However, in a production environment, you probably want to use higher numbers so that the system does not process events unnecessarily:

You can optionally make changes to the Connection Parameter, Identity Vault Registration, Managed System Gateway Registration, and Driver Parameters settings. The settings that you might want to modify are described below:
Parameter Type
Parameter
Description
Connection Parameters
IP Address
IP address where the reporting module is installed and running.
Port
Port number for the reporting module (for REST connections).
Protocol
Protocol for accessing the reporting module. The choices are HTTP and HTTPS. If you select HTTPS, you need to indicate whether you always trust the server’s certificate.
Identity Vault Registration
Name
Provides the name you want to use to refer to your Identity Vault within the reporting module.
Description
A short description of the Identity Vault.
Address
IP address of the Identity Vault.
164.99.130.127
164.99.130.127
Managed System Gateway Registration
Register Managed System Gateway
Indicates whether you want to register the Managed System Gateway Driver.
Managed System Gateway Driver DN (slash)
Specifies the DN of the Managed System Gateway Driver in slash format.
User DN (LDAP)
Specifies the LDAP DN of the user that the driver should use to authenticate to the Managed System Gateway Driver. This DN must exist in the Identity Vault.
Password
Specifies the password for the user.
Driver Parameters
Time interval between submitting events
The maximum amount of time that an event can remain in the persistence layer before being submitted to the DCS (and to the database for the reporting module).
Number of events to be sent in batch
Specifies the number of events that can be gathered by the persistence layer before it sends them over to the DCS (without waiting for the timeout to occur).
Maximum number of batches in the file
Defines an upper limit for the storage capacity of the persistence layer.
-
Select in the left menu.
For the setting, be sure that is selected so that DNs are configured properly.
-
Open the other tabs associated with Driver Configuration to review the settings.
You can make changes to the settings, if you like, but you do not need to in order to get the driver up and running.
-
Select in the left menu, then select for .
-
(Optional) Provide new values that override the global configuration values.
-
Click .
Designer returns you to the Modeler view.
2.4.4 Deploying the Drivers
To deploy the drivers you just configured:
-
Select the driver set (either in the Modeler view or in the Outline view).
-
Choose > .
Designer displays a progress window that shows which objects are being deployed:
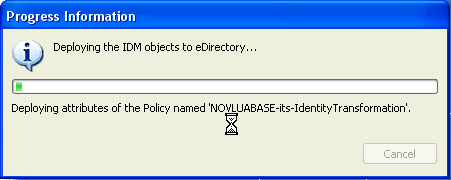
For each driver deployed, you see a dialog box prompting you for the security equivalent. You need to provide the LDAP Administrator for each driver.
2.4.5 Runtime Configuration and Troubleshooting
This section provides some additional configuration steps you should take to ensure that the runtime environment is operating correctly. It also provides troubleshooting techniques, as well as some information about database tables that are of particular interest.
Verifying That the Managed Systems Are Working
Before you start the Managed System Gateway Driver and the Data Collection Service Driver, you should confirm that the underlying managed systems are properly configured. By doing this, you can isolate problems with your environment that do not relate to the configuration of the reporting drivers.
To troubleshoot your Active Directory environment, for example, you might want to test an Active Directory entitlement by assigning a resource in the User Application.
NOTE:Details on configuring the Active Directory driver are provided in the Driver for Active Directory Implementation Guide.
The following steps demonstrate one way to confirm that Active Directory is properly configured:
-
Make sure that the User Application and the Identity Reporting Module are both running on the same server.
-
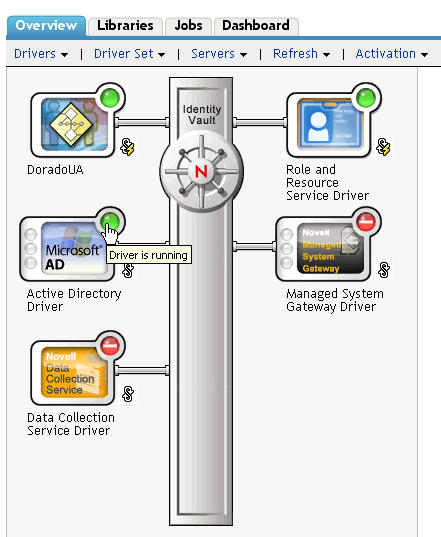
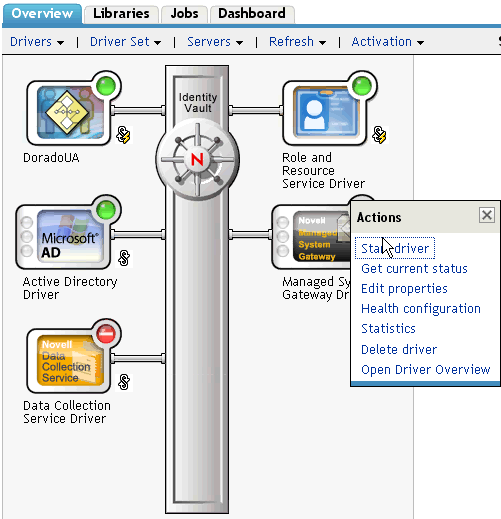
In iManager, verify that the User Application Driver and the Role and Resource Service Driver are running, and make sure that the driver for the managed system is running:
-
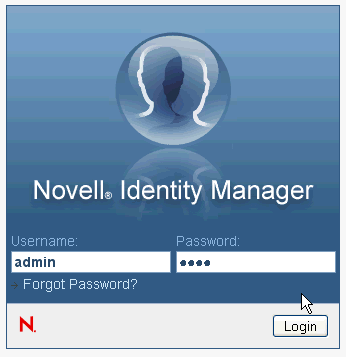
To verify that the User Application can retrieve information from Active Directory, first log into the User Application as a User Application Administrator:
-
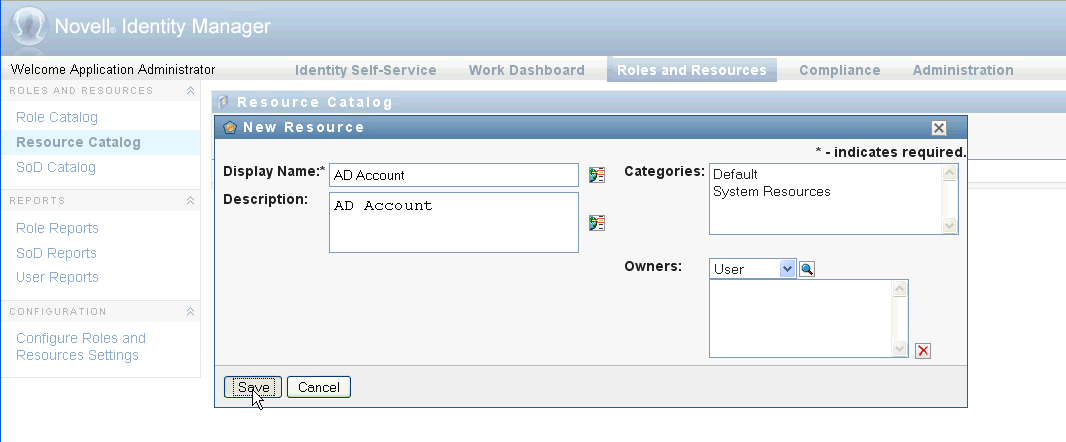
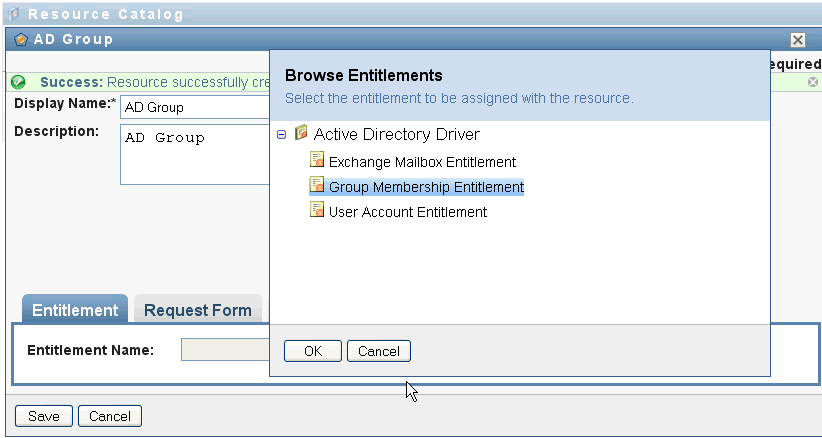
In the Resource Catalog, create a new resource for Active Directory accounts:
-
Bind the resource to an entitlement within the Active Directory Driver, such as :
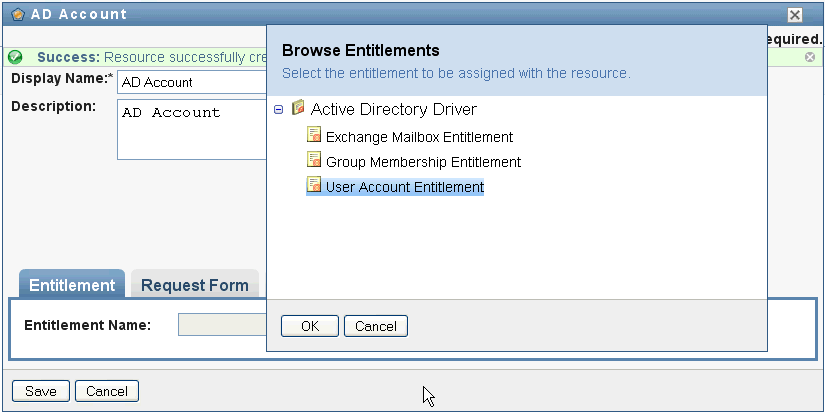
Notice that the User Application is able to retrieve the entitlement from the driver.
-
Because this particular resource pertains to accounts, configure the resource to assign an account value:
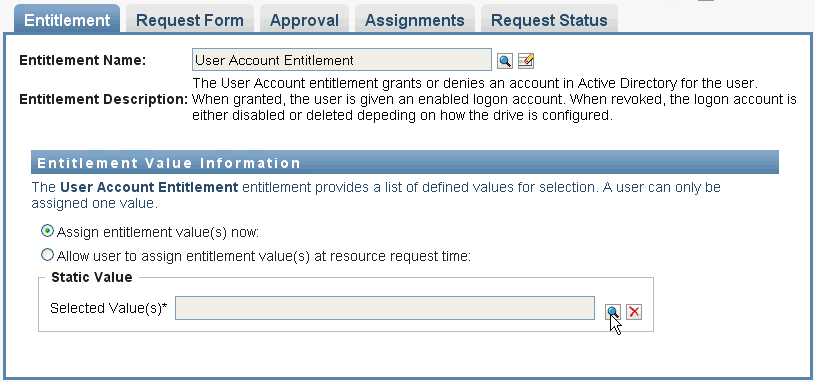
-
Select the account value and click :
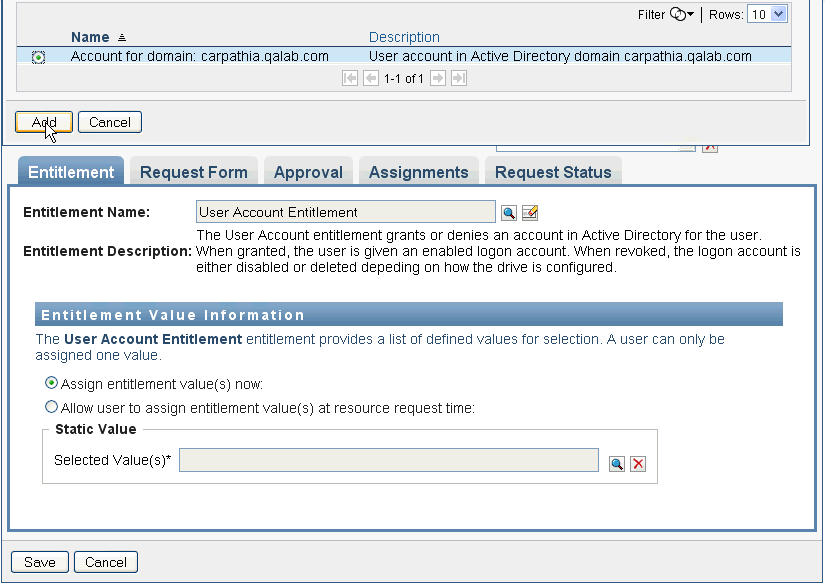
This release supports two entitlement parameter formats, one for legacy values, and one for Identity Manager 4.0.1. When you create a new driver, the policy format used is the new format for Identity Manager 4.0.1.
-
Now create another resource that assigns groups:
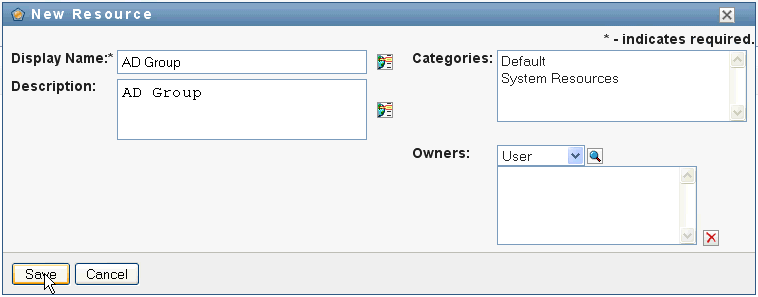
-
Bind the resource to an entitlement that is suitable for groups. For this particular resource, map to the :
-
Configure this resource so that the entitlement value is assigned by the user at request time, and allow the user to select multiple values for a single assignment request:

-
Verify that the entitlements were created successfully:

At this point, you can see that the underlying architecture for the managed system (in this case, Active Directory) is functioning properly. This can help you to troubleshoot any problems that might arise later on.
Starting the Drivers
This section provides instructions for starting the Managed System Gateway Driver and the Data Collection Service Driver.
-
In iManager, first start the Managed System Gateway Driver:
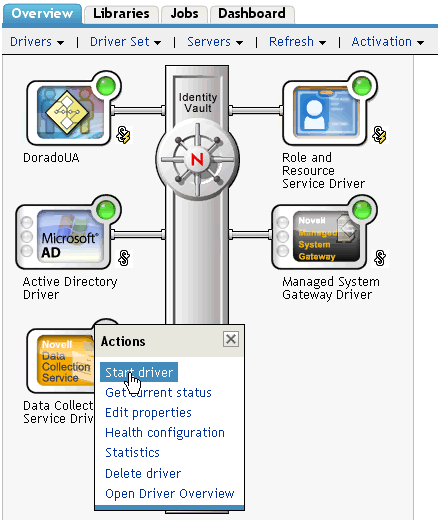
-
Now start the Data Collection Service Driver:
-
Verify that both drivers started successfully:

-
After the drivers have started, you should see some additional information in the server console:

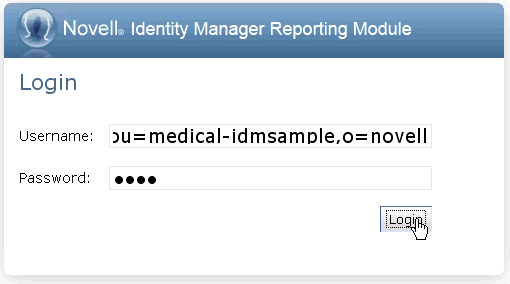
-
Now log in to the reporting module as a Reporting Administrator:
-
On the Overview page, verify that one Identity Vault has been configured:

-
Look at the Identity Vaults page to see details about the Data Collection Service Driver and the Managed System Gateway Driver. The Managed System Gateway Driver status should indicate that the driver has been initialized:
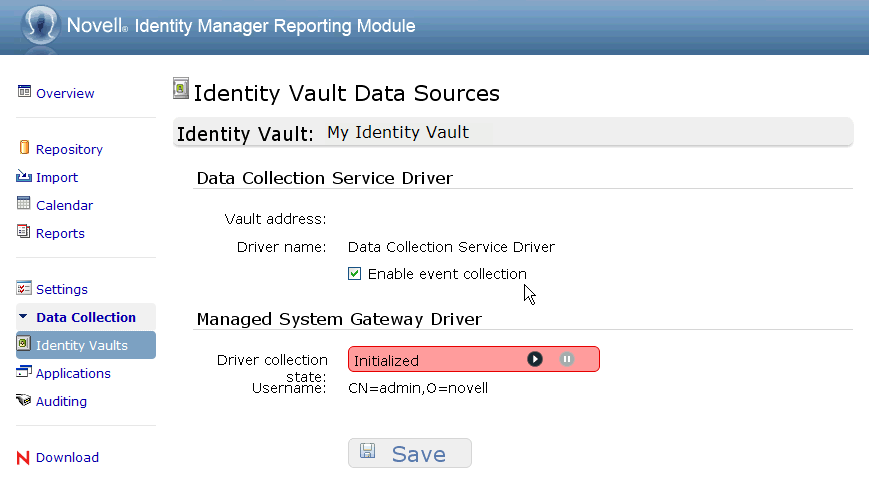
At this point, you can look at the contents of the Identity Information Warehouse to learn more about the rich data that is stored about the Identity Vault, as well as the managed systems in your enterprise.
-
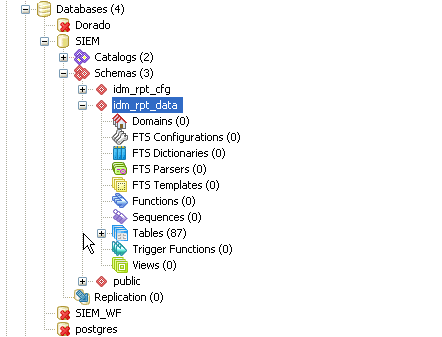
To see the data in the Identity Information Warehouse, use a database administration tool such as PGAdmin for PostgreSQL to look at the contents of the SIEM database. When you look at the SIEM database, you should see three schemas:
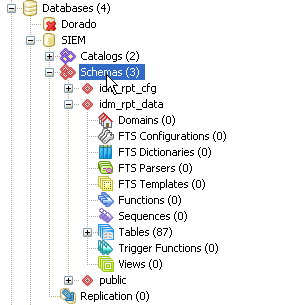
The SIEM database is installed by the EAS installer. The public schema includes information about events captured by EAS. The other two schemas, idm_rpt_cfg and idm_rpt_data, are added by the installer for the Identity Reporting Module. The idm_rpt_cfg schema contains reporting configuration data, such as report definitions and schedules. The idm_rpt_data schema contains information collected by the Managed System Gateway Driver and the Data Collection Service Driver.
-
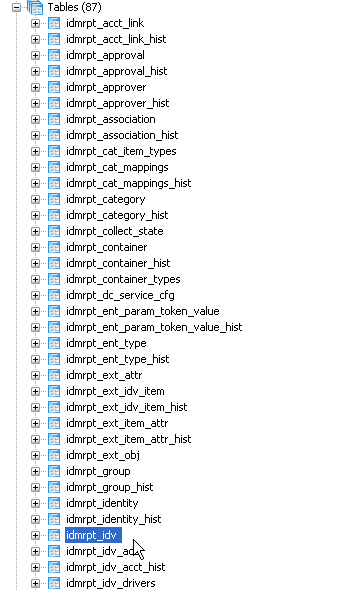
To see data collected by the Managed System Gateway Driver and the Data Collection Service Driver, look at the idm_rpt_data schema:
-
First, look at the idmrpt_idv table:
-
Check to see if a single row was added to this table for the new Data Collection Service Driver that was registered:

-
Check to see if the data for this table shows the name of the Identity Vault:

If you see the new row in this table, the driver registration process was successful.
Migrating the Data Collection Service Driver
-
In iManager, go to the panel for the Data Collection Service Driver, and select :

-
Select the organizations that contain relevant data, and click :
Depending on the amount of data you have, the migration process could take several minutes.
IMPORTANT:Be sure to wait until the migration process is complete before you proceed.
-
Look at the following tables, which provide information about the identities and accounts in the Identity Vault:
-
idmrpt_identity
-
idmrpt_acct
After the migration, the idmrpt_identity table, for example, contains the following types of information:
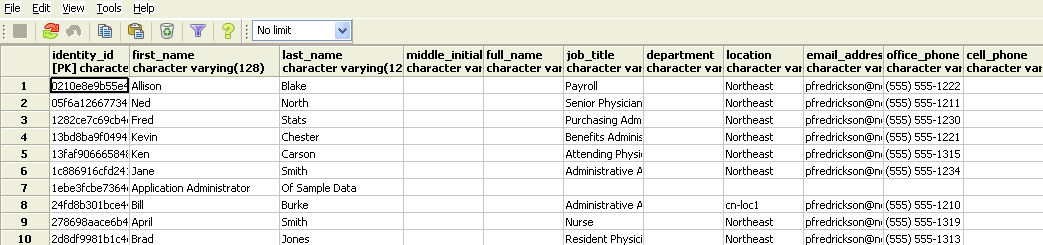
-
-
Look at an LDAP browser to verify that the migration process also adds a DirXML-Associations reference for each user:

-
Verify that the migration process adds a DirXML-Associations reference for each group, as well:
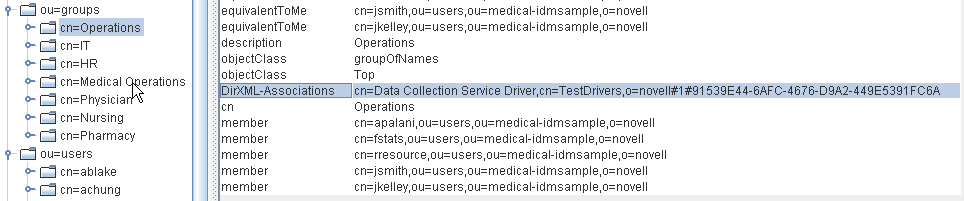
-
Look at data in the idmrpt_group table:

This table shows the name for each group, as well as flags indicating whether the group is dynamic or nested. It also shows whether the group has been migrated. The synchronization status (idmrpt_syn_state) could possibly be set to 0 if an object had been modified in the User Application but not yet migrated. For example, if a user were added to a group, and the driver had not been migrated yet, this value might be set to 0.
-
(Optional) Look at the following tables:
-
idmrpt_approver
-
idmrpt_association
-
idmrpt_category
-
idmrpt_container
-
idmrpt_idv_drivers
-
idmrpt_idv_prd
-
idmrpt_role
-
idmrpt_resource
-
idmrpt_sod
-
-
(Optional) Look at the idmrpt_collect_state table, which is of particular importance:

This table shows information about the data collection state for the Managed System Gateway Driver, which includes data about which REST endpoints for managed systems have been executed. At this point, the table has no rows, because the collection process has not yet been started for this driver.
Starting the Collection Process for the Managed System Gateway Driver
This section provides instructions for starting the data collection process for the Managed System Gateway Driver.
IMPORTANT:Before activating the data collection process for the first time, you need to be sure you have performed all of the configuration steps in the correct order.
-
Start the Data Collection Service Driver and the Managed System Gateway Driver.
-
Verify that the Data Collection Service Driver has registered properly with the DCS services.
-
Migrate the Data Collection Service Driver and wait until the migration process is complete.
If you do not follow these steps in order, some data might be in a transitional state, and you might see two rows for the same managed system. Because there is no way to determine programmatically whether the migration process is complete, you need to wait until the migration process is complete before you activate the data collection process.
After the configuration steps have been performed in order, you can proceed with the initial data collection.
-
In the user interface for the Identity Reporting Module, navigate to the Identity Vault Data Sources page. Then, click for the driver and click :

-
Now look at the idmrpt_ms table:

This table contains information about the Managed System Gateway Driver.
-
In the data for this table, verify that there is a single row representing the Managed System Gateway Driver registration:

At this point, some of the information in this table is still blank, because the Data Collection Service Driver has not yet been migrated from the Identity Vault.
-
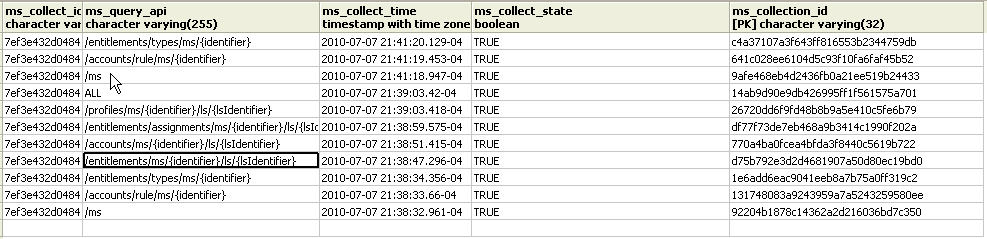
Verify that the idmrpt_collect_state table contains several rows of data showing which endpoints have been executed:

-
(Optional) Sort the list by ms_collect_time to see the order in which they were executed:
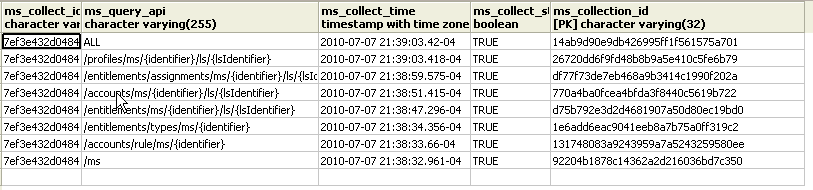
If any of the endpoints fails to execute properly, the value for ms_collect_state is FALSE. If the driver is not configured properly, the ms_collect_state for the endpoint is FALSE, and the other endpoints are not not executed. If this happens, you should enable tracing on the driver to determine the underlying cause of the problem.
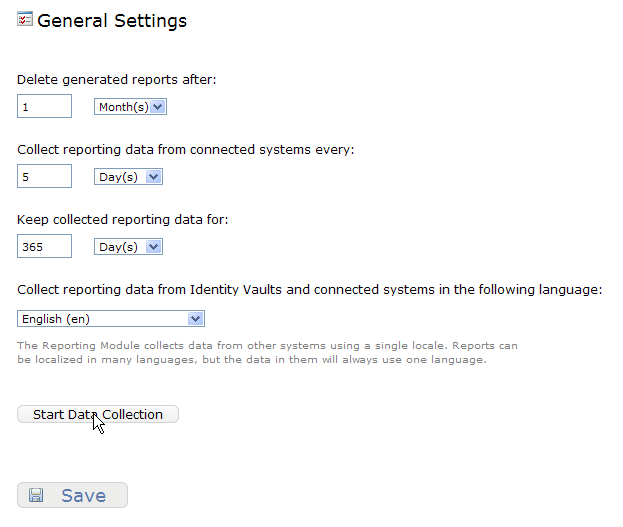
To initiate a subsequent data collection process for the Managed System Gateway Driver:
-
In the user interface for the Identity Reporting Module, click on the General Settings page:
-
Look at the idmrpt_collect_state table to verify that several additional rows have been added to show the execution of additional REST endpoints:
-
Look at the following tables to see the kinds of information that has been collected about the managed systems:
-
idmrpt_ms_acct
-
idmrpt_ms_ent_trust
-
idmrpt_ms_identity
The idmrpt_ms_acct table, for example, provides useful information about the accounts for each of the managed systems.
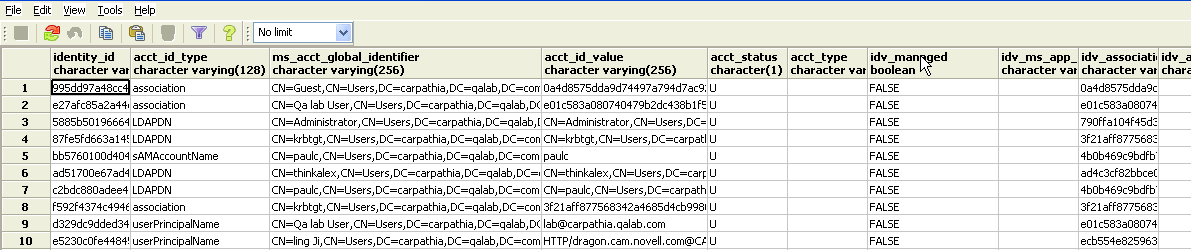
The acct_id_type column shows the type for each account in the managed system (in this case, Active Directory). In addition, the idv_managed column indicates whether the account is currently being managed. In this particular situation, the user accounts in the Identity Vault are not actively being managed within Active Directory, so the column value is FALSE.
In this table, you might also want to look at the idv_sync column, which indicates whether the account has been migrated, as well as the idmrpt_valid_from and idmrpt_valid_to columns. The timestamps for the idmrpt_valid_from and idmrpt_valid_to columns are updated whenever data is modified, and a corresponding row is added to a history table.
-
-
Look at the idmrpt_ms_ent_trust table to see information about the entitlements that have been assigned to trustees within the managed system:
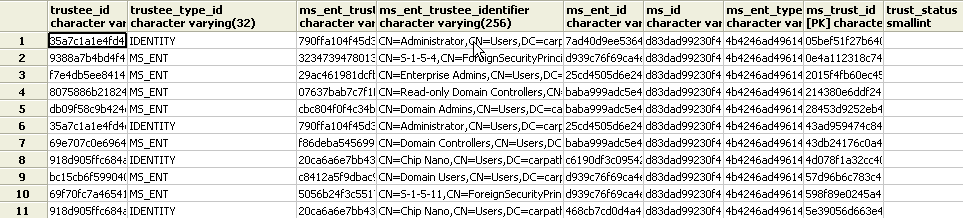
The trustee_type_id column indicates whether the trustee is an identity or a group.
-
Look at the idmrpt_ms_identity table to see the identities in the managed system:

Notice that the first name is available for users, but not groups. This particular example shows data for a test system, so not all of the values are available.
Adding Support for Custom Attributes and Objects
You can configure the Data Collection Service driver to gather and persist data for custom attributes and objects that are not part of the default data collection scheme. To do this, you need to modify the Data Collection Service driver filter. Modifying the filter does not trigger object synchronization immediately. Instead, the newly added attributes and objects are sent to the data collection services when add, modify, or delete events occur in the Identity Vault.
When you add support for custom attributes and objects, you need to modify the reports in order to include the extended attribute and object information. The following views provide current and historic data on the extended objects and attributes:
-
idm_rpt_cfg.idmrpt_ext_idv_item_v
-
idm_rpt_cfg.idmrpt_ext_item_attr_v
Configuring the Driver to Use Extended Objects
You can add any object or attribute to the Data Collection Service filter policy. When you add a new object or attribute, you need to make sure you map the GUID (with subscriber sync) and the Object Class (with subscriber notify), as shown in the following example:
<filter-class class-name="Device" publisher="ignore" publisher-create-homedir="true" publisher-track-template-member="false" subscriber="sync">
<filter-attr attr-name="CN" merge-authority="default" publisher="ignore" publisher-optimize-modify="true" subscriber="sync"/>
<filter-attr attr-name="Description" merge-authority="default" publisher="ignore" publisher-optimize-modify="true" subscriber="sync"/>
<filter-attr attr-name="GUID" merge-authority="default" publisher="ignore" publisher-optimize-modify="true" subscriber="sync"/>
<filter-attr attr-name="Object Class" merge-authority="default" publisher="ignore" publisher-optimize-modify="true" subscriber="notify"/>
<filter-attr attr-name="Owner" merge-authority="default" publisher="ignore" publisher-optimize-modify="true" subscriber="sync"/>
<filter-attr attr-name="Serial Number" merge-authority="default" publisher="ignore" publisher-optimize-modify="true" subscriber="sync"/>
<filter-attr attr-name="sampleDeviceModel" from-all-classes="true" merge-authority="default" publisher="ignore" publisher-optimize-modify="true" subscriber="sync"/>
<filter-attr attr-name="sampleDeviceType" from-all-classes="true" merge-authority="default" publisher="ignore" publisher-optimize-modify="true" subscriber="sync"/>
</filter-class>
Including a Name and Description in the Database
If you want the object to have a name and description in the database, you need to add a schema mapping policy for _dcsName and _dcsDescription. The schema mapping policy maps the attribute values on the object instance to the columns idmrpt_ext_idv_item.item_name and idmrpt_ext_idv_item.item_desc, respectively. If you do not add a schema mapping policy, the attributes will be populated in the child table idmrpt_ext_item_attr.
Here’s an example:
<attr-name class-name="Device">
<nds-name>CN</nds-name>
<app-name>_dcsName</app-name>
</attr-name>
<attr-name class-name="Device">
<nds-name>Description</nds-name>
<app-name>_dcsDescription</app-name>
</attr-name>
Here is some sample SQL that allows you to show these object and attribute values in the database:
SELECT
    item.item_dn,
    item.item_name,
    item.item_desc,
    attr.attribute_name,
    itemAttr.attribute_value,
    item.idmrpt_deleted as item_deleted,
    itemAttr.idmrpt_deleted as attr_deleted,
    item.item_desc,
    obj.object_class
FROM
    idm_rpt_data.idmrpt_ext_idv_item as item, idm_rpt_data.idmrpt_ext_item_attr itemAttr, idm_rpt_data.idmrpt_ext_attr as attr, idm_rpt_data.idmrpt_ext_obj as obj
WHERE
    item.object_id = obj.object_id and itemAttr.attribute_id = attr.attribute_id and itemAttr.cat_item_id = item.item_id
ORDER BY
    item.item_dn, item.item_name
Adding Extended Attributes to Known Object Types
If an attribute is added to the filter policy on the Data Collection Service driver and not explicitly mapped to the reporting database in the XML reference file (IdmrptIdentity.xml), the value is populated and maintained in the idmrpt_ext_item_attr table, with an attribute reference in the idmrpt_ext_attr table.
Here is some sample SQL that shows these extended attributes:
SELECT
    acct.idv_acct_dn,
    attrDef.attribute_name,
    attribute_value,
    attrVal.idmrpt_valid_from,
    cat_item_attr_id,
    attrVal.idmrpt_deleted,
    attrVal.idmrpt_syn_state
FROM
    idm_rpt_data.idmrpt_ext_item_attr as attrVal, idm_rpt_data.idmrpt_ext_attr as attrDef, idm_rpt_data.idmrpt_identity as idd, idm_rpt_data.idmrpt_idv_acct as acct
WHERE attrVal.attribute_id = attrDef.attribute_id and idd.identity_id = acct.identity_id and attrVal.cat_item_id = acct.identity_id and cat_item_type_id = 'IDENTITY'
In addition to the User object, you can add extended attributes to the filter policy on the following objects and populate the database with these attributes:
-
nrfRole
-
nrfResource
-
Containers
NOTE:The installed product provides support for organizationUnit, Organization, and Domain. The container types are maintained in the idmrpt_container_types table.
-
Group
-
nrfSod
You can see the association of the extended attributes to the parent table or object by looking at the idmrpt_cat_item_types.idmrpt_table_name column. This column describes how to join the idm_rpt_data.idmrpt_ext_item_attr.cat_item_id column to the primary key of the parent table.
Adding Support for Multiple Driversets
The new Data Collection Service Scoping package (NOVLDCSSCPNG) provides static and dynamic scoping capabilities for enterprise environments with multiple driversets and multiple pairs of Data Collection Service Drivers and Managed System Gateway Drivers.
During or after installation, you need to determine the role for the Data Collection Service Driver that the package is being installed on. You need to select one of the following roles:
-
Primary The driver synchronizes everything except subtrees of other driver sets. A primary Data Collection Service Driver may well service a whole Identity Vault or it may work in conjunction with one or multiple secondary drivers.
-
Secondary The driver synchronizes only its own driver set, but nothing else. A secondary Data Collection Service Driver usually requires a primary driver to run in a different driverset or no data outside the local driver set is sent to the Data Collection Service.
-
Custom Allows the administrator to define custom scoping rules. The only implicit scope is the local driver set, everything else is considered out-of-scope, unless it is explicitly added to the list of custom scopes. A custom scope is the distinguished name in slash format of a container in the Identity Vault whose subordinates or subtree should be synchronized.
The scoping package is only required in some configuration scenarios, as described below:
-
Single server with a single driver set Identity Vault For this scenario, you do not need scoping, and, therefore, you do not need to install the scoping package.
-
Multiple servers with a single driver set Identity Vault For this scenario, you need to follow these guidelines:
-
Make sure the Identity Manager server holds replicas of all partitions from which data should be collected.
-
For this scenario, no scoping is required, so do not install the scoping package
-
-
Multiple servers with a multiple driver set Identity Vault In this scenario, there are two basic configurations:
-
All servers hold a replica of all partitions from which data should be collected.
For this configuration, you need to follow these guidelines:
-
Scoping is required to avoid the same change being processed by multiple DCS drivers.
-
You need to install the scoping package on all DCS drivers.
-
You need to select one DCS driver to be the Primary driver.
-
You need to configure all other DCS drivers to be Secondary drivers.
-
-
All servers do not hold a replica of all partitions from which data should be collected.
Within this configuration, there are two possible situations:
-
All partitions from which data should be collected are being held by only one Identity Manager server
In this case, you need to follow these guidelines:
-
Scoping is required to avoid the same change being processed by multiple DCS drivers.
-
You need to install the scoping package on all DCS drivers.
-
You need to configure all DCS drivers to be Primary drivers.
-
-
All partitions from which data should be collected are not being held by only one Identity Manager server (some partitions are held by more than one Identity Manager server).
In this case, you need to follow these guidelines:
-
Scoping is required to avoid the same change being processed by multiple DCS drivers.
-
You need to install the scoping package on all DCS drivers.
-
You need to configure all DCS drivers to be Custom drivers.
You need to define custom scoping rules for each driver and be sure not to create any overlapping scopes.
-
-
-
Configuring the Drivers to Run in Remote Mode with SSL
When running in remote mode, you can configure the Data Collection Service and Managed System Gateway drivers to use SSL. This section provides steps for configuring the drivers to run in remote mode with SSL.
To configure SSL using a Keystore for the Managed System Gateway Driver:
-
Create a server certificate in iManager.
-
In the view, click > .
-
Browse to and select the server object where the Managed System Gateway Driver is installed.
-
Specify a certificate nickname.
-
Select as the creation method, then click .
-
Click , then click .
-
-
Export the server certificate using iManager.
-
In the view, click > .
-
Select the certificate created in Step 1 and click .
-
Select your certificate name from the drop-down.
-
Ensure that the option is checked.
-
Enter a password and click .
-
Click , and save the exported pfx certificate.
-
-
Import the pfx certificate exported in Step 2 into the java key-store.
-
Use the keytool available with Java. You must use JDK 6 or later.
-
Enter the following command at a command prompt:
keytool -importkeystore -srckeystore <pfx certificate> -srcstoretype
PKCS12 -destkeystore <Keystore Name>
For example:
keytool -importkeystore -srckeystore cert.pfx -srcstoretype PKCS12
-destkeystore msgw.jks
-
Enter the password when prompted to do so.
-
-
Modify the Managed System Gateway Driver configuration to use the keystore using iManager.
-
From , click the driverset containing the Managed System Gateway Driver.
-
Click on the driver state icon and select > .
-
Set to true and set the to remote.
-
Enter the complete path of the keystore file and the password.
-
Save and restart the driver.
-
-
Modify the Data Collection Service Driver configuration to use the keystore using iManager.
-
From , click the driverset containing the Managed System Gateway Driver.
-
Click on the driver state icon and select > .
-
Under the header, set to remote.
-
Enter the complete path of the keystore, password and the alias enter in Step 1.c.
-
Save and restart the driver.
-
Troubleshooting the Drivers
If you have problems with one or more of the drivers that are difficult to understand, see Section 14.0, Troubleshooting the Drivers.
2.4.6 Recommended Auditing Flags for the Drivers
This section outlines the recommended auditing settings for the Managed System Gateway Driver and the Data Collection Service Driver.
Recommended Identity Manager Auditing Flags
The following Identity Manager auditing flags should be enabled for the drivers:
Table 2-3 Identity Manager Auditing Flags
|
Category |
Recommended Flags |
|---|---|
|
Metadirectory Engine Events |
|
|
Status Events |
|
|
Operation Events |
|
|
Transformation Events |
|
|
Credential Provisioning Events |
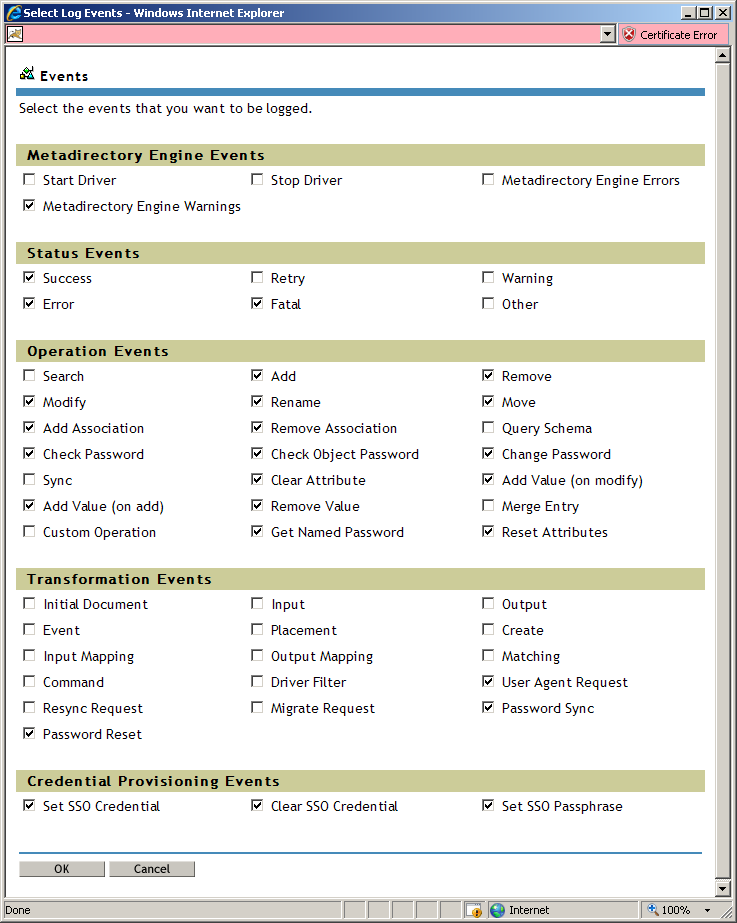
|
These flags are for Novell Auditing (not XDAS) and are set under > > in iManager, as shown below:
Figure 2-1 Events Selected in iManager
Recommended eDirectory Auditing Flags
The following eDirectory auditing flags should be enabled for the drivers:
Table 2-4 eDirectory Auditing Flags
|
Category |
Recommended Flags |
|---|---|
|
Global |
|
|
Meta |
|
|
Objects |
|
|
Attributes |
|
|
Agent |
|
|
Miscellaneous |
|
|
LDAP |
|
These flags need to be set under the > > plug-in in iManager.