7.5 Setting Up Password Synchronization Filters
The driver needs to be configured to run on only one Windows machine.
However, after you install and configure the driver, do the following on each of the other domain controllers:
-
Install a password filter (pwfilter.dll file).
-
Configure the registry to capture passwords so that passwords can be sent to Identity Manager.
The password filter is automatically started when the domain controller is started. The filter captures password changes that users make by using Windows clients, encrypts the changes, and sends them to the driver to update the Identity Manager data store.
NOTE:For information about configuring Password Synchronization,
see Implementing
Password Synchronization
in the Novell
Identity Manager 3.0.1 Administration Guide.
To simplify your setup and administration of password filters, a Identity Manager PassSync utility is added to the Control Panel when the driver is installed. This utility gives you two choices for setting up the password filters, depending on whether you are willing to allow remote access to the registry on your domain controllers:
-
If you allow remote access to the registry: From the single machine where you plan to run the driver, configure the password filter for all the domain controllers, using the Identity Manager PassSync utility.
This method lets you configure all the domain controllers from one place.
If you configure all the domain controllers from one machine, the Identity Manager PassSync utility provides the following features to help you during setup:
- Lets you specify which domain you want to participate in password synchronization.
- Automatically discovers all the domain controllers for the domain.
- Lets you remotely install the pwfilter.dll on each domain controller.
- Automatically updates the registry on the machine where the driver is running and on each domain controller.
- Lets you view the status of the filter on each domain controller.
- Lets you reboot a domain controller remotely.
This is necessary when you first add a domain for password synchronization, because the filter that captures password changes is a DLL file that starts when the domain controller is started.
See Section 7.5.1, Configuring Password Filters for All Domain Controllers from One Machine.
-
If you don’t allow remote access to the registry: Set up the password filters on each domain controller separately. To do this, go to each domain controller, install the driver files so you have the Identity Manager PassSync utility, and use the utility on each machine to install the password filter and update the registry.
See Section 7.5.2, Separately Configuring Password Filters on Each Domain Controller.
7.5.1 Configuring Password Filters for All Domain Controllers from One Machine
This procedure explains how to install and configure the password filter on each domain controller, all from the same machine where you are running the driver.
Use this method if you allow remote access to the registry.
Because setting up the filter requires rebooting the domain controller, you might want to perform this procedure after hours, or reboot only one domain controller at a time. If the domain has more than one domain controller, keep in mind that each domain controller where you want Password Synchronization to function must have the filter installed and must be rebooted.
-
Confirm that port 135 (the RPC endpoint mapper) is accessible on the domain controllers and on the machine where the Identity Manager Driver for Active Directory is configured to run.
If you are using NetBIOS over TCP, you also need these ports:
- 137: NetBIOS name service
- 138: NetBIOS datagram service
- 139: NetBIOS session service
A firewall could prevent the ports from being accessible remotely.
-
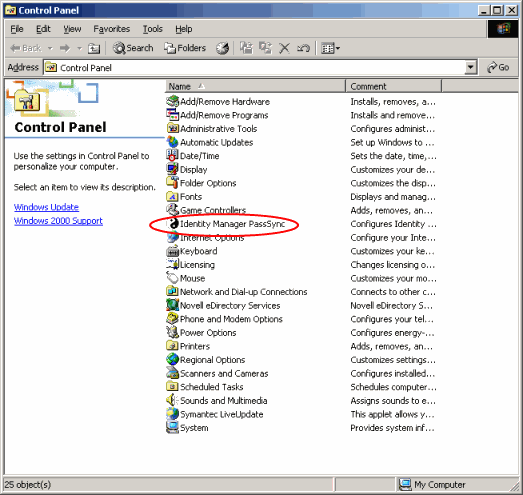
At the computer where the driver is installed, click l.
-
Double-click .
The first time you open the utility, it asks whether this is the machine where the Identity Manager driver is installed.
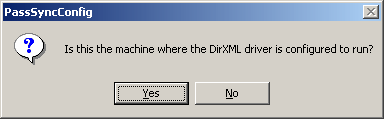
After you complete the configuration, you are not shown this prompt again unless you remove this domain from the list.
-
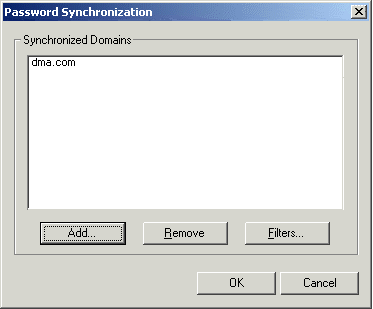
Click .
A list appears, labeled Synchronized Domains.
-
To add a domain that you want to participate in password synchronization, click .
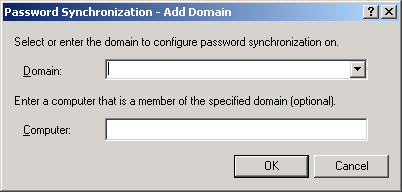
The Add Domain dialog box appears.
-
Specify or select the domain name that you want to add.
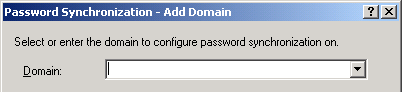
The drop-down list displays known domains.
-
(Optional) Specify a computer in the domain.
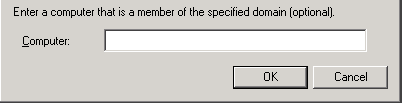
If you leave the Computer edit box blank, PassSync queries the local machine. Therefore, if you are running PassSync on a domain controller, you don’t need to enter a name. PassSync queries the local machine (in this case, a domain controller) and gets (from the database) the list of all domain controllers in the domain.
If you aren’t installing on a domain controller, enter the name of a computer that is in the domain and that can get to a domain controller.
If you receive an error message indicating that PassSync can’t locate a domain, enter a different name.
-
Decide whether to use the domain’s DNS name.
The DNS name provides more advanced authentication and the ability to more reliably discover domains in bigger installations. However, the choice depends on your environment.
-
Log in with administrator rights.
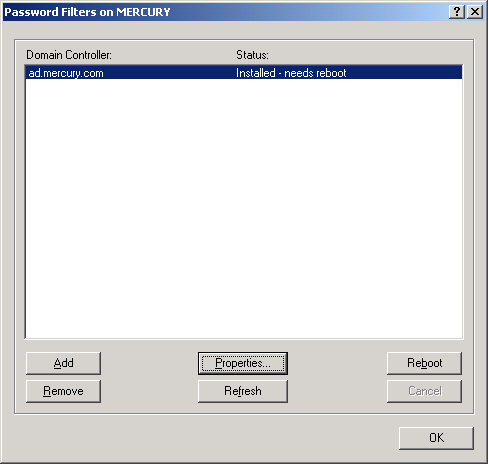
The Identity Manager PassSync utility discovers all the domain controllers for that domain, and installs pwfilter.dll on each domain controller. It also updates the registry on the computer where you are running the drivers, and on each domain controller. This might take a few minutes.
The pwfilter.dll doesn’t capture password changes until the domain controller has been rebooted. The Identity Manager PassSync utility lets you see a list of all the domain controllers and the status of the filter on them. It also lets you reboot the domain controller from inside the utility.
-
Click the name of the domain in the list, then click .
The utility displays the names of all the domain controllers and the status of the filter on each of them.
The status for each domain controller should indicate that it needs rebooting. However, it might take a few minutes for the utility to complete its automated task, and in the meantime the status might say Unknown.
-
Reboot each domain controller.
You can choose to reboot them at a time that makes sense for your environment. Just keep in mind that password synchronization won’t be fully functional until every domain controller has been rebooted.
-
When the status for all domain controllers says Running, test password synchronization to confirm that it is working.
-
To add more domains, click to return to the list of domains, and repeat Step 6 through Step 12.
7.5.2 Separately Configuring Password Filters on Each Domain Controller
The procedure described in this section explains how to install and configure the password filter on each domain controller, one at a time.
Use this method if you don’t want to allow remote access to the registry.
In this procedure, you install the driver so that you have the Identity Manager PassSync utility. Then you use the utility to install the pwfilter.dll file, specify the port to use, and specify which host machine is running the Identity Manager Driver for Active Directory.
Because setting up the filter requires rebooting the domain controller, you might want to perform this procedure after hours, or reboot only one domain controller at a time. If a domain has more than one domain controller, keep in mind that each domain controller where you want Password Synchronization to function must have the filter installed and must be rebooted.
-
Confirm that these ports are available on both the domain controller and the machine where the Identity Manager Driver for Active Directory is configured to run:
- 135: The RPC endpoint mapper
- 137: NetBIOS name service
- 138: NetBIOS datagram service
- 139: NetBIOS session service
-
On the domain controller, use the Identity Manager Installation to install only the Identity Manager Driver for Active Directory.
Installing the driver installs the Identity Manager PassSync utility.
-
Click , then locate the Identity Manager PassSync utility.
-
Double-click .
The first time you open the utility, it asks whether this is the machine where the Identity Manager driver is installed.
-
Click .
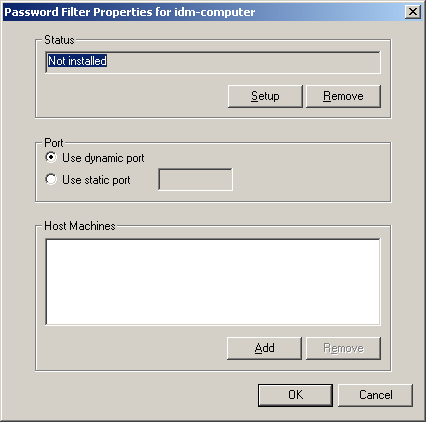
After you complete the configuration, you are not shown this prompt again unless you remove the password filter by using the Remove button in the Password Filter Properties dialog box.
After you click No, the Password Filter Properties dialog box appears, with a status message indicating that the password filter is not yet set up on this domain controller.
-
Click the button to install the password filter, pwfilter.dll.
-
For the Port setting, specify whether to use dynamic port or static port.
Use the static port option only if you have decided to configure your remote procedure call (RPC) for the domain controller differently than the default.
-
Specify the location of the Identity Manager driver, click the button, specify the Host Name of the machine that is running the Identity Manager driver in the Password Sync Filter - Add Host dialog box, then click .
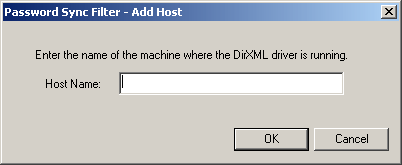
This step is necessary so that the password filter knows where to send the password changes. The password filter captures password changes, and must send them to the Identity Manager driver to update the Identity Manager data store.
-
In the Password Filter Properties dialog box, click .
-
Reboot the domain controller to complete the installation of the password filter.
You can choose to reboot at a time that makes sense for your environment. Just keep in mind that password synchronization won’t be fully functional until every domain controller has the password filter installed and has been rebooted.
After the installation is complete and the domain controller is rebooted, the password filter is loaded automatically whenever the domain controller starts up.
-
Check the status for the password filter again by clicking , and double-clicking the Identity Manager PassSync utility.
Confirm that the status says Running.
-
Repeat Step 2 through Step 11 for each domain controller that you want to participate in Password Synchronization.
-
When the status says Running for all the domain controllers, test Password Synchronization to confirm that it is working.