2.7 Deploying Provisioning Objects
The Provisioning view’s Deploy feature deploys your provisioning objects to the specified User Application driver. You must deploy any changes you’ve made to the provisioning objects in the design environment before you see them reflected in the Identity Manager User Application. The Provisioning view allows you to deploy a container and all its children (for example, all entities or all lists), or to deploy just a single provisioning object (such as a single list element). When you select an item to deploy, Designer compares it to the same item in the Identity Vault. If the items are equal, Designer prevents you from deploying. When there are differences, Designer displays them and allows you to proceed or to cancel the deployment.
NOTE:When you change the Identity Vault or driver set’s deploy context, you must save the project before performing a deploy. If you do not save the change, Designer continues to use the old deploy context for deploy operations.
Deployment and Versions
If you deploy a Version 3.5 User Application driver and the Identity Vault does not contain the necessary 3.5 schema changes, the provisioning objects are not deployed and Designer displays an error message in the Deploy Results dialog box. This is to prevent you from deploying a 3.5 driver to a 3.0.1 Identity Vault.
2.7.1 Deploying Provisioning Objects
-
Save any changes.
If the objects contain unsaved changes, Designer displays the unsaved definitions and prompts you to save them. If you do not, Designer still deploys the objects but does not deploy the unsaved changes. Choosing not to save the changes does not cancel the deployment.
-
Open the Provisioning view right-click the object to deploy and then select or .
To deploy a specific provisioning object, select that node in the Provisioning view. To deploy all of the objects of a specific type, select the root node representing that type.
Designer prompts you for Identity Vault credentials (if necessary), validates the objects, and writes any messages to the project checker view.
When you deploy a driver that contains provisioning objects that fail validation, Designer deploys the driver but not the invalid objects (regardless of the deployment preferences). Designer displays the errors in the deployment result dialog box.
When you deploy a provisioning object that contains validation errors, Designer performs the deployment based on the defined preferences and writes the errors to the Project Checker view.
Tips for Deploying Provisioning Request Definitions
-
If errors associated with activities are detected during deployment of a provisioning request definition, Designer identifies the activity in which the error occurred by activity ID. However, in the user interface, Designer by default displays activities by activity Name. To make it easier to identify the activity in an error message, turn on the display of activity IDs before you deploy the provisioning request definition. To turn on the display of activity IDs, right-click the Workflow canvas and select .
-
A common error occurs when you fail to replace a placeholder expression in an entitlement provisioning activity. If this is the case, correct the error, then deploy the provisioning request definition again.
-
Designer cannot evaluate expressions at design time, so it might display a warning when you use an expression for an entitlement that must be resolved at runtime. This is not a fatal error and the deployment will succeed.
-
Make sure that the is (in the tab).
-
If the provisioning request definition with the same CN already exists in the Identity Vault, the Deployment Summary displays the differences. You can review the differences before you decide to proceed.
Deploying Roles
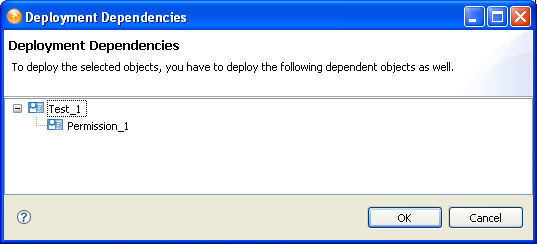
Because roles can be related through a role hierarchy, Designer notifies you, on deploy, if the role you are deploying contains any dependent roles. To ensure that roles in the Identity Vault are in a valid state, Designer requires that you deploy the role and any dependent roles at the same time by displaying them in the dialog box shown in Figure 2-3.
Figure 2-3 Deploying Dependent Roles
2.7.2 Testing the Deployed Changes
You can access the User Application from within Designer to view or test what you deploy. To access the User Application from Designer:
-
Select
-
Choose the project and User Application driver container associated with the User Application you want to view, then click .
Designer uses the driver configuration information, that you defined for the project, to make the connection. Designer uses the browser settings specified in