8.4 Using the Integration Activity Editor Interface
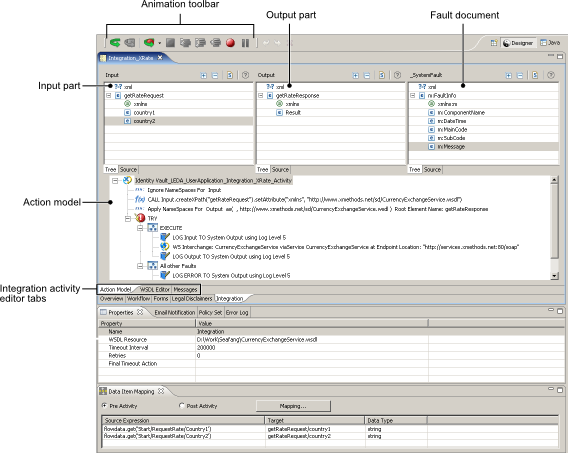
The Integration activity editor provides a working environment for the input, output, and actions of the Integration activity. The Integration activity editor is composed of three views: Action Model, WSDL Editor, and Messages.
Figure 8-1 Integration Activity Interface
8.4.1 XML Views
The Integration activity provides a number of XML views (for example, Input and Output messages, WSDL Editor, Messages) derived from the WSDL document. These views use a common interface.
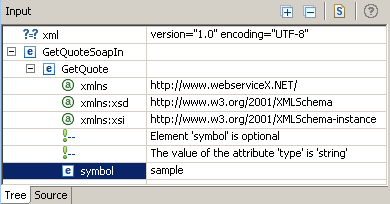
Tree View
You use the Tree view to work with a hierarchical view of an XML document. You display the Tree view by clicking the tab.
Figure 8-2 Tree View
Tree View Editing Features
The Tree view provides the following editing features:
-
You can edit attribute values, attribute name, namespace names and values, text, and comments.
-
You can insert new nodes by using the menu that is displayed when you right-click within the Tree view. The menu allows you to insert nodes as children before or after the selected node. If the node is an element, you can insert attributes. The submenus for , , and contain the node that can be legally added. If no schema or DTD is associated with the document, the submenus contain or .
-
You can delete a node by right-clicking a node and selecting .
-
You can drag and drop items between Tree views (for example, between views of the Input and Output messages) to create Map actions (see Section 8.5.8, Map for information about Map actions).
-
You can undo, redo, cut, copy, and paste.
Tree View Menu
When you right-click an item in the Tree view, a menu is displayed that you use to perform operations on the XML document. The menu is context-sensitive and only displays the commands that are appropriate for the item you clicked.
Table 8-1 Tree View Menu
Tree View Toolbar
Tree view toolbars provide the following features:
Table 8-2 Tree View Toolbar
|
Button |
Description |
|---|---|

|
Expands all nodes in the document. |

|
Collapses all nodes in the document. |

|
Attaches a schema or DTD (see Attaching a Schema or DTD). |

|
Displays online help. |
Attaching a Schema or DTD
You can attach a schema or DTD to the current XML document when you are using the Tree view.
-
Click
in the Tree view toolbar. The
dialog box is displayed.
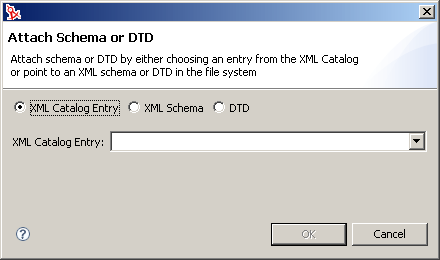
-
To choose from a list of entries in the XML catalog, choose an entry from list.
-
To specify an XML schema on disk, click .
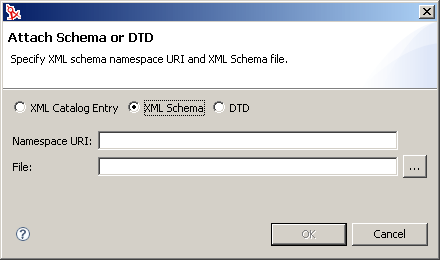
-
Type a , then use the browse button in the field to select an XML schema on disk.
-
To specify a DTD on disk, click .
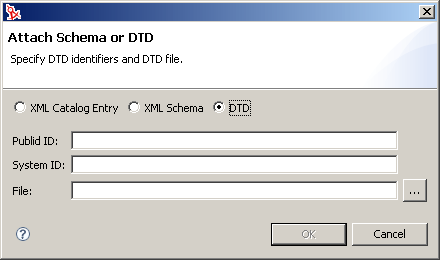
-
Type a and , then use the browse button in the field to select the DTD file on disk.
Source View
You use the Source view to view the XML source of the document. You display the Source view by clicking the tab.
Figure 8-3 Source View
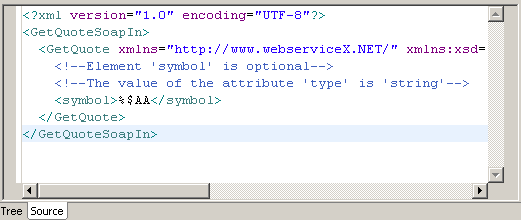
Source View Features
The source view supports the following features:
-
Syntax highlighting.
-
Context-sensitive code-completion based on DTD or XML Schema.
-
Validation as you type. If the XML is invalid (for example, the closing bracket is omitted from a tag), the editor indicates the error.
-
General text editing operations such as undo, redo, cut, copy, paste, and select all.
Source View Menu
When you right-click an item in the Source view, a menu is displayed that you use to perform operations on the XML document.
Table 8-3 Source View Menu
8.4.2 Action Model
The action model includes the Action Model view and views for displaying message parts. The Action Model view displays actions that operate on the contents of the message parts. The message parts display the XML for the Web service Input and Output messages.
About the Action Model Views
The action model views are used at design time to test the interaction with the Web service. You edit actions in the Action Model view. You can enter test data to be input to the Web service in the Input view, examine the response from the Web service in the Output view, and see any error messages returned from the Web service in the _SystemFault view. The Integration activity has the following message panes:
-
Input view
-
Output view
-
_SystemFault view
-
Action Model view
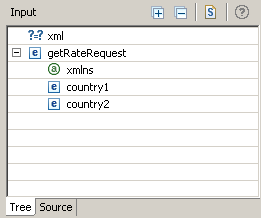
About the Input View
The Input view displays the input message derived from the WSDL document for the Web service. You can resize the view by dragging the right border.You can resize columns within the view by dragging the column border. You can specify a value to use in testing the action model directly in the Input part, in which case the value is discarded after executing the action model. You can also specify a value using the tab (see Section 8.4.4, Messages), in which case the value persists until you delete the value or you regenerate the action model (see Section 8.4.5, Regenerating Code for the Action Model).
Figure 8-4 Input View
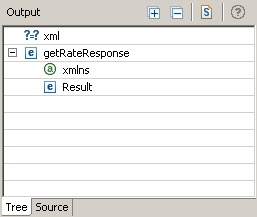
About the Output View
The Output view displays the output message derived from the WSDL document for the Web service. When you execute the action model, you use the Output view to view the values returned from the Web service.
You can resize the view by dragging the left border.You can resize columns within the view by dragging the column border. You can specify a value directly in the Output part for modeling purposes, in which case the value is discarded after executing the action model. You can also specify a value by using the tab (see Section 8.4.4, Messages), in which case the value persists until you delete the value.
Figure 8-5 Output View
About the _SystemFault View
The _SystemFault view displays any error messages produced when you execute the action model. The XML information contained in _SystemFault is also written to a global object called ERROR.
Figure 8-6 _SystemFault View
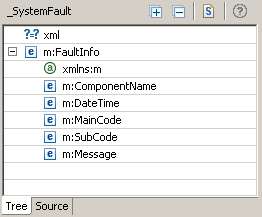
Beneath the FaultInfo root are the following elements:
-
contains the Date and Time at which the fault occurred.
-
contains the name of the component that threw the fault.
-
contains the main code number for the error.
-
contains a sub-code number for the error.
-
Message contains the error message defined when you set up a Throw Fault action (see Throw Fault). If you do not specify an error message in your Throw Fault action, the following message is displayed: “A user-defined Fault occurred!”. If the error occurred within a Try/On Fault action, and you did not specify a Fault, this element is populated with an Exception message.
About the Action Model Pane
The Integration activity has a single action model. The action model represents the mappings, transformations, and other actions that is performed on the Web service input and output messages. The Action Model view is resizable. Most of your activity that takes place in the Action Model view involves adding and editing actions.
Action Model Context Menu
If you right-click in the action model, a menu is displayed.
Figure 8-7 Action Model Menu
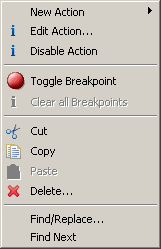
From this menu, you can add or edit actions (see Section 8.5, Actions), toggle breakpoints in the action model (see Animation) and perform other tasks.
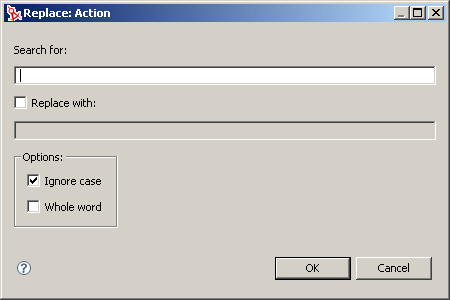
Finding and Replacing Text in the Action Model
You can replace a word or string by using the command on the action model menu.
-
Right-click in the action model, then select .
-
Specify the search text.
-
If you want to replace the search text, click , then type a string to replace the search string.
-
If you want to find the search text regardless of the capitalization of the text, click .
-
If you want to find the search text in whole words only, click .
-
Click
The Integration activity finds the first occurrence of the search text. If the operation is a find and replace operation, the Integration activity asks you to confirm the replacement. You can then replace the next or all occurrences of the search text.
Animation
The action model provides animation tools that you can use to test and troubleshoot actions interactively within the Integration activity. You can execute the action model step by step and watch the result of each action. Not only do you see any errors as they happen, but you can verify, in real time, that connections and data behaved as you planned.
The animation tools allow you to toggle one or more breakpoints. You can use this feature to concentrate on a particular section of an action model. When used in conjunction with the run-to-breakpoint tool, breakpoints allow you to quickly run through action model sections that work properly, coming to a stop at a particular action. From there, you can step through each action in sequence. You can also step over loops and other code blocks that would otherwise be tedious to execute step-by-step.
The Basic Animation Tools
The animation tools are available on the Designer toolbar.
Figure 8-8 Animation Toolbar

Table 8-4 Animation Tools


Starting Animation
When you first open an Integration activity, and are the only enabled buttons. When you click , the rest of the animation buttons are enabled. If you want to halt the animation temporarily, you can use the button. If you want to abort the animation, you can do so at any time by clicking .
Although Copy, Paste, and action editing operations (including adding new actions) are all available at animation time, we recommend that you do not edit the action model during animation. If you do, exceptions or unpredictable behavior can occur. If you need to edit the action model, use to stop the animation first. Then apply your edits and begin the animation again.
-
Open an Integration activity.
-
Click button in the Designer toolbar. All of the animation buttons become active except the Start Animation button, which is now dimmed.
-
Follow the instructions in the following sections to perform the desired Animation activity.
Toggling a Breakpoint
You use the Toggle Breakpoint tool to set a breakpoint in the action model where you want the animation process to stop. This is helpful if you have a lengthy action model with long sections that work properly. You can set the breakpoints for each action that is causing a problem and then step through the action to troubleshoot it.
-
In the Action pane, select the action for which you want to set a breakpoint. This is where the animation will stop.
-
Click on the Designer tool bar, or right-click the action and select . A dot appears in the left border of the action model to indicate the breakpoint.
-
If desired, repeat the previous steps to select additional breakpoints.
Stepping Into an Action
runs the selected action in the action model and then moves to the next action in the sequence. You can use the tool to step through each action in the entire action model, or you can use it in conjunction with the Run to Breakpoint tool. Execution stops at the next breakpoint or when the action model ends, whichever comes first.
A possible scenario for using a breakpoint would be if you have ten actions that you know work properly but have doubts about the eleventh. You could set the eleventh action as a breakpoint, execute the Run to Breakpoint tool, and then step through the eleventh (and subsequent) actions by executing the tool.
-
Start the animation (see Starting Animation).
-
Click . The first action in the action model is selected.
-
Click again. The selected action executes and the next action is selected.
-
Continue to work through the action model by clicking after each action executes and the subsequent action is selected.
Stepping Over an Action
You use when you don’t want to step into the details of the Repeat, Decision, or Try/On Fault actions. You can execute an entire block of code without stepping individually through each action.
You can use in conjunction with Run to Breakpoint. For example, you can toggle a Breakpoint, execute Run to Breakpoint, and then use to execute the action designated as the breakpoint. can save a great deal of time when testing lengthy action models, because you can avoid tediously stepping through individual actions.
-
Start the animation (see Starting Animation).
-
Step through the action model with until you reach a loop or other line of code that precedes an indented code block.
-
Click . The first action after the block of indented code is selected. All of the indented code executes normally and you are taken straight to the next block of actions, without stepping through the indented actions.
-
Continue to work through the action model by clicking as needed.
-
Continue to click and to execute all of the actions in the action model.
Pausing Animation
You use to pause the execution of an action in the action model. This is especially helpful in cases in which the action model contains lengthy loops.
-
During the execution of an action, click .
-
To resume the animation process, click , , or (if a breakpoint has been set).
Aborting Animation
You use to stop the animation process. After you stop the animation, you cannot restart from the place where you left off. You must restart from the beginning of the action model.
8.4.3 WSDL Editor
The WSDL Editor displays the WSDL document for the Web service. You can edit the WSDL by using the Tree view and Source view editing features (see Tree Viewand Source View).
8.4.4 Messages
The Messages view displays the messages derived from the WSDL document for the Web service. You can edit the messages using the Tree view and Source view editing features (see Tree View and Source View). You can use this feature for entering test data that is used when you execute the action model at design time. Data that you enter in the Messages view persists across executions of the action model.
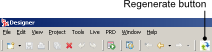
8.4.5 Regenerating Code for the Action Model
When working in the WSDL Editor view, you can regenerate all code for the action model and regenerate messages by clicking the button. When working in the Messages view, you can regenerate all actions in the action model. The button is located in the Designer toolbar:
Figure 8-9 Regenerate Button
8.4.6 Adding Actions to the Action Model
Actions are the processing steps that take place within the Integration activity. A collection of actions is referred to as an action model. An action in the action model is displayed as a line and contains an icon for the action type along with an abbreviated definition of the action. Some actions are subordinate to other actions. For example, you can create a Repeat action that controls loop processing, then add actions inside the loop. The actions inside the loop are subordinate to the Repeat action and appear indented beneath the Repeat action. Subordinate actions process as long as the Repeat action is True.
To add an action to the action model, click the line in the action model that is one line above the position in which you want to insert an action. Add an action by using any of following methods. The new action is inserted below the line you selected.
-
Drag and drop. You can add Map actions by dragging and dropping elements from the view to the view.
-
Copy and Paste. You can copy an action in the view and paste it somewhere else in the view.
-
Right-click the line in the action model that is one line above the position in which you want to add the action, then select the desired action from the menu.
NOTE:You can reorder actions in the action model by dragging actions to a new position within the action model.
After you have created the action model, and before you, you should test the action model. Perform testing by using the Animation tools. With the Animation tools, you can set breakpoints, start an animation, step into and over actions, and pause the animation. See Animation.