17.3 Configuring a Provisioning Request Definition
Before configuring a provisioning request definition, you need to select the Identity Manager User Application driver that contains the definition. Having selected the driver, you can create a new provisioning request definition or edit an existing definition. You can also delete provisioning request definitions, change the status of a request definition, or define rights for a request definition.
17.3.1 Selecting the Driver
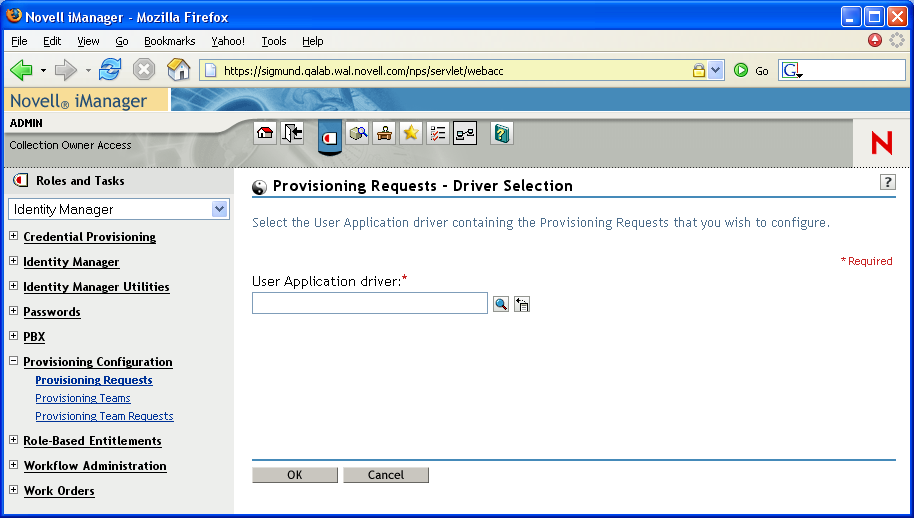
To select an Identity Manager User Application driver:
-
Select the category in iManager.
-
Open the role.
-
Click the task.
iManager displays the User Application Driver panel.
-
Specify the driver name in the field, then click .
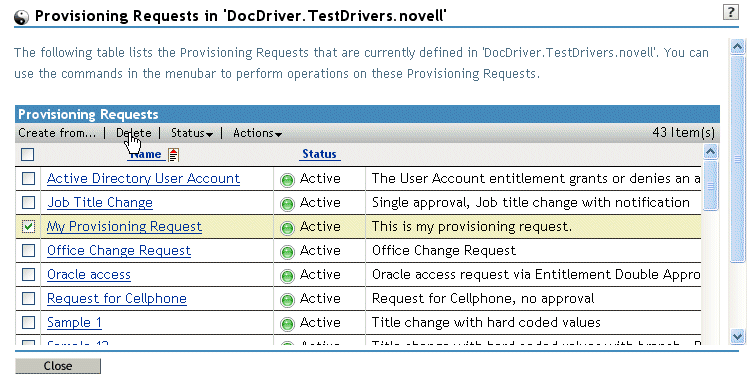
iManager displays the Provisioning Request Configuration panel. The Provisioning Request Configuration panel displays a list of available provisioning request definitions.
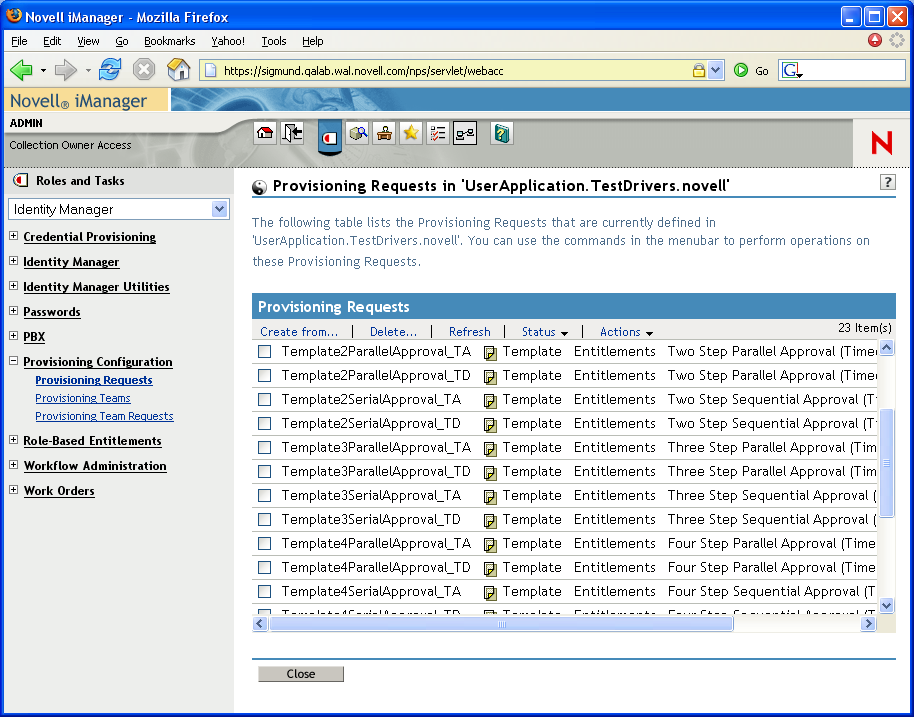
The installed templates appear in dark text with a status of . Request definitions that are templates do not display hypertext links because they are read only.
NOTE:If the request definitions were configured to use localized text, the names and descriptions for these definitions show text that is suitable for the current locale.
Changing the driver. When you have selected a driver, the driver selection remains in effect for the duration of your iManager session, unless you select a new driver. To select a new driver, click the command, then choose from the menu.
17.3.2 Creating or Editing a Provisioning Request
To create a new provisioning request:
-
Click the name of the provisioning request you want to use as a template in the Provisioning Request Configuration panel.
-
Click the command in the Provisioning Request Configuration panel.
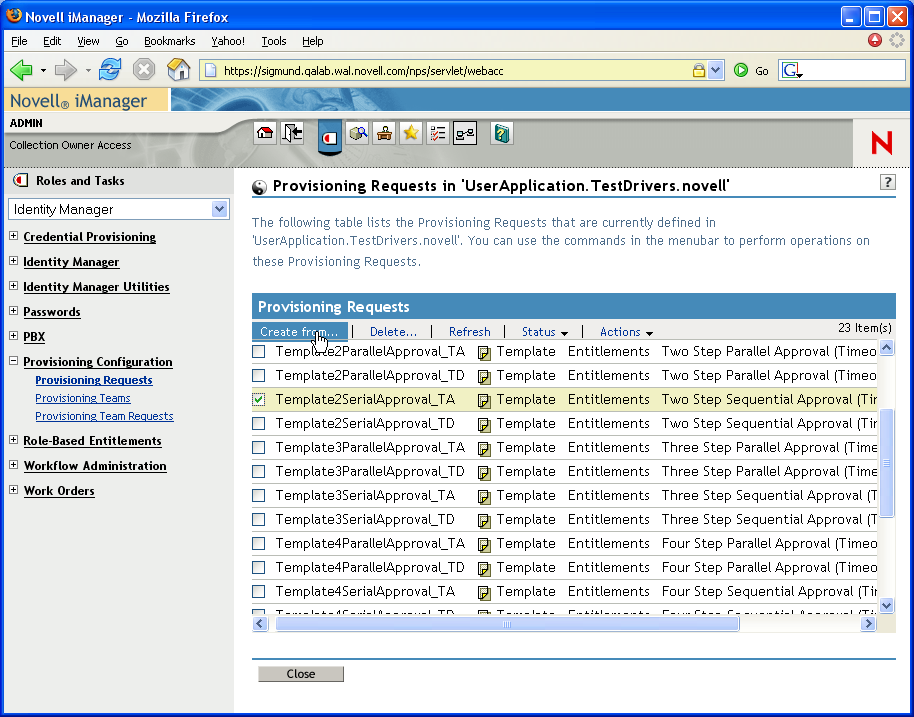
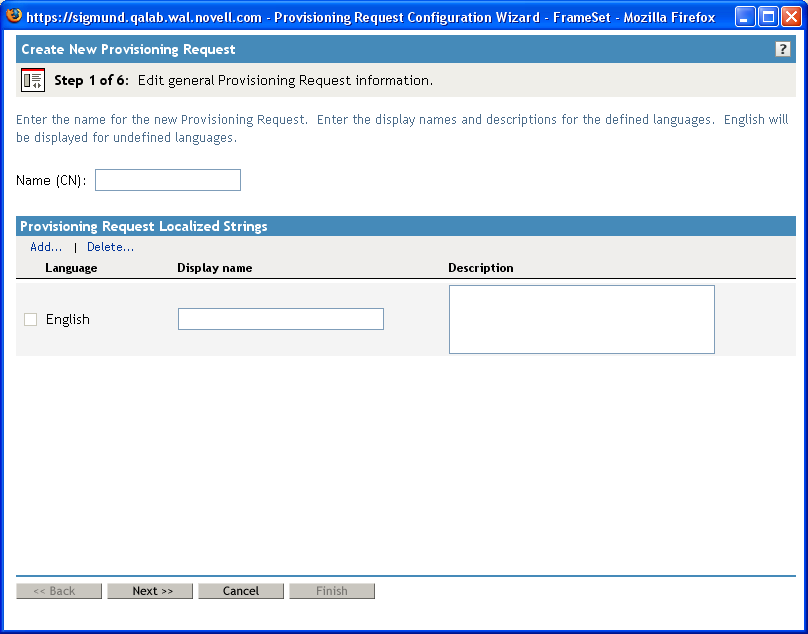
The first page of the Configure New Provisioning Request wizard displays.
-
Type a common name for the new object in the field.
-
For each language you want to support in your application, type the localized text in the and fields under . This text is used to identify the provisioning request throughout the User Application.
-
To add a new language to the list, click , then select the desired language.
By default, a newly created provisioning request supports only English.
-
Click .
-
Specify the provisioned resource for the request definition, as described in Specifying the Provisioned Resource.
-
Configure the activities for the workflow associated with the request definition, as described in Configuring the Workflow Activities.
-
Specify the access rights for the request definition, as described in Specifying the Access Rights for the Provisioning Request.
-
Specify the initial status for the request definition, as described in Specifying the Initial Status of the Provisioning Request.
-
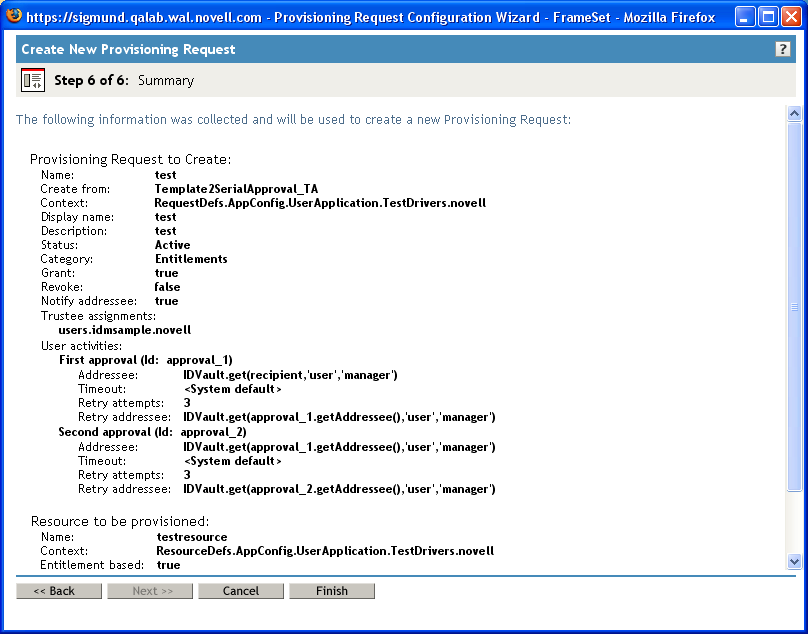
Review your settings, then click .
To edit an existing provisioning request:
-
Click the name of the provisioning request in the Provisioning Request Configuration panel.

You are not permitted to edit a provisioning request that is a template. Request definitions that have a status of Template do not display hypertext links because they are read only.
If you have a large number of request definitions, you might want to sort the list by a particular column, such as the or . To sort by a particular column, click the column heading.
-
For each language you want to support in your application, click the check box beside the language in the list under , then type the localized text in the and fields. This text is used to identify the provisioning request throughout the User Application.
-
To add a new language to the list, click , then select the desired language.
By default, a newly created provisioning request supports only English.
-
Click .
-
Specify the provisioned resource for the request definition, as described in Specifying the Provisioned Resource.
-
Configure the activities for the workflow associated with the request definition, as described in Configuring the Workflow Activities.
-
Specify the access rights for the request definition, as described in Specifying the Access Rights for the Provisioning Request.
-
Specify the initial status for the request definition, as described in Specifying the Initial Status of the Provisioning Request.
-
Review your settings, then click Finish.
Specifying the Provisioned Resource
This section provides instructions for specifying a provisioned resource that is based on an entitlement. It does not provide conceptual information about entitlements or instructions for creating and using entitlements.
For complete details on entitlements, see the Novell Identity Manager: Administration Guide.
To specify the provisioned resource:
-
To use the target that is currently associated with the request definition, select .
is selected by default if you’re editing a request definition that refers to a valid resource. If you’re defining a new provisioning request, this option is not selected.
-
To bind the request definition to another resource that was previously defined within the currently selected driver, select , then pick a target from the drop-down list.
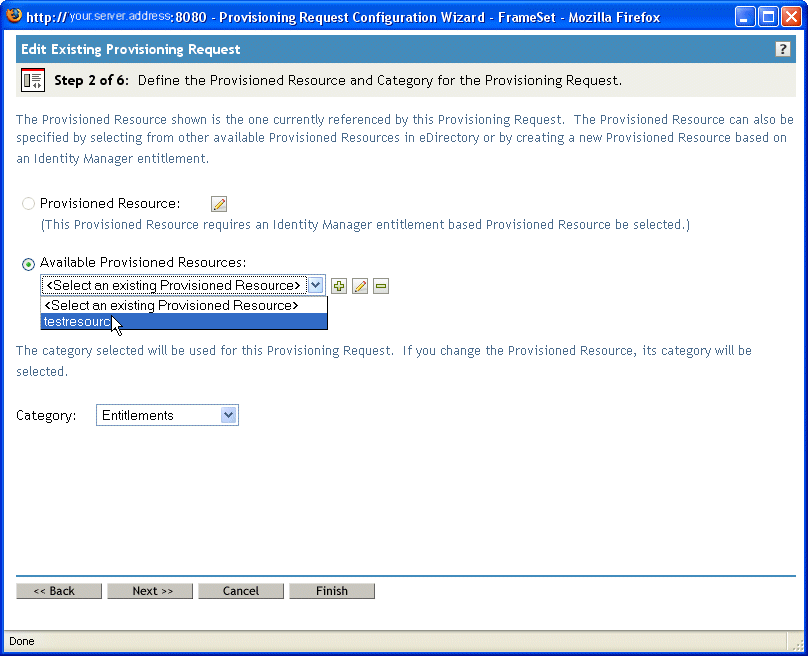
If the request definition was bound to a resource that is not an entitlement, you are not permitted to change the resource.
-
Select a category for the provisioned resource definition in the drop-down list.
The category defaults to the category for the currently selected provisioned resource. Whenever you change the provisioned resource, the category for the request definition is also changed to match the category for the resource. If you want to assign a different category to the request definition, select that category in the drop-down list.
-
To create a new resource based on an Identity Manager entitlement, click the icon.

To edit an existing resource, click the pen icon.

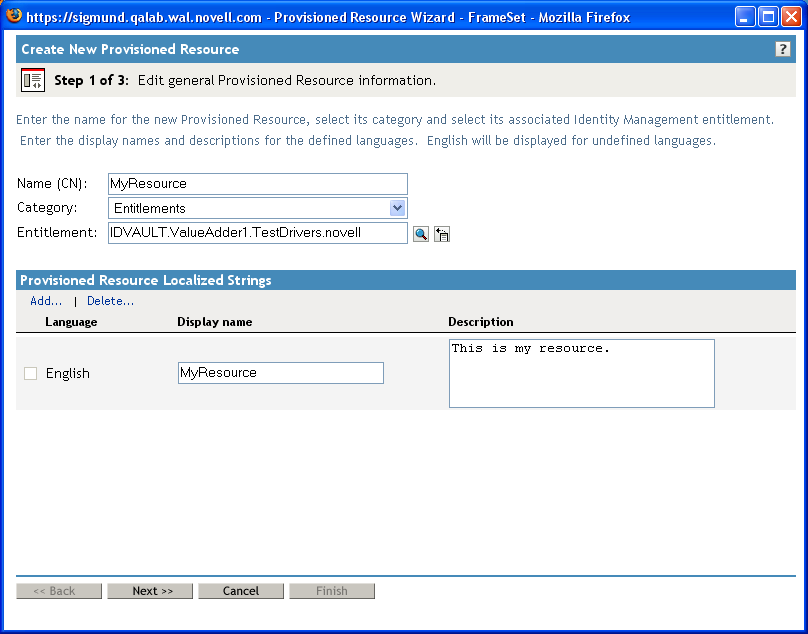
To define the characteristics of the resource:
-
Specify the name for the resource in the field.
-
Select a category for the resource in the drop-down list.
-
Specify the entitlement in the field.
-
For each language you want to support in your application, click the check box beside the language in the list under , then type the localized text in the and fields. This text is used to identify the provisioning resource throughout the User Application.
-
To add a new language to the list, click , then select the desired language.
By default, a newly created provisioning resource supports only English.
-
-
Click .
The Provisioned Resource wizard displays a page to allow you to provide data for any parameters required for the entitlement.

-
If the entitlement does not require any entitlement parameters, click .
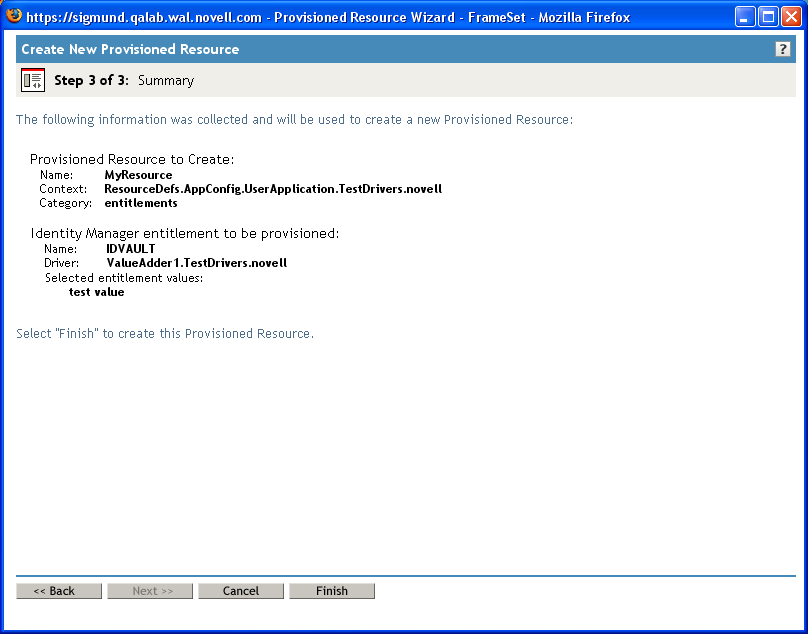
The Create New Provisioned Resource wizard displays the Summary page, which provides information about the resource you’re defining.
-
Click .
Configuring the Workflow Activities
To configure the activities for the associated workflow:
-
Specify whether you want to enable e-mail notifications for the workflow by selecting or deselecting the check box.
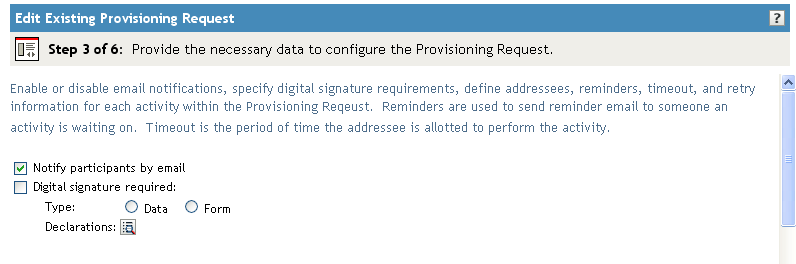
-
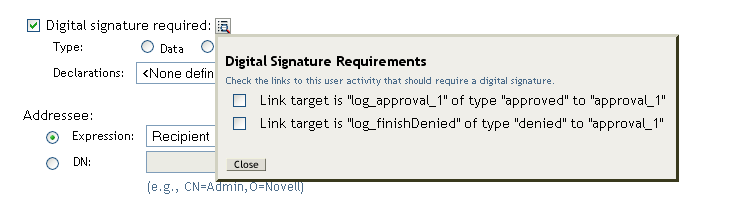
Specify whether a digital signature is required to initiate the provisioning request by selecting or deselecting the check box.
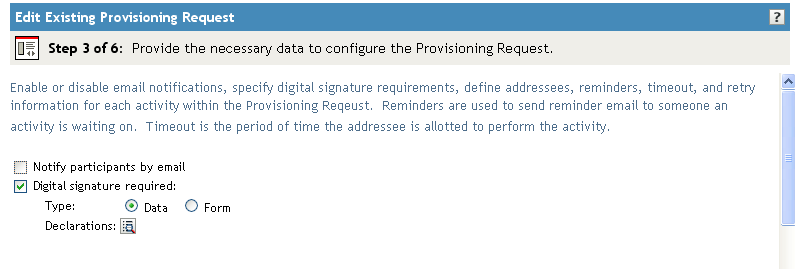
-
If you enable the check box, specify whether the digital signature will use data or form as its type:
-
specifies that the XML signature serve as the user agreement. When Data is selected, the XML data is written to the audit log.
-
specifies that a PDF document that includes the digital signature declaration be generated. This document serves as the user agreement. The user can preview the generated PDF document before submitting a request or approval. When Form is selected, the PDF document (encapsulated in XML) is written to the audit log.
WARNING:You must use Novell Audit (or Sentinel) to preserve documents that you digitally sign. Digital signature documents are not stored in the User Application database, but are stored in the logging database. You must enable logging to preserve these documents.
-
-
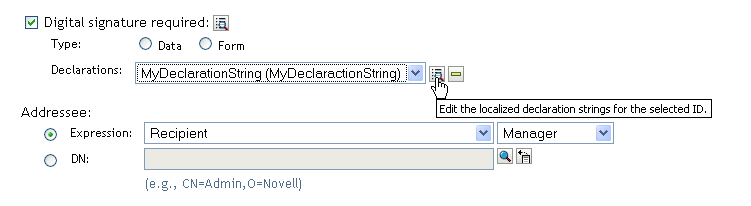
If you enable the check box, you also need to specify a digital signature confirmation string. To do this, click the icon.

Type the signature confirmation string, then click .
-
-
(Optional) For each workflow activity, change the display label by clicking the icon beside the name of the activity (in this case, ).
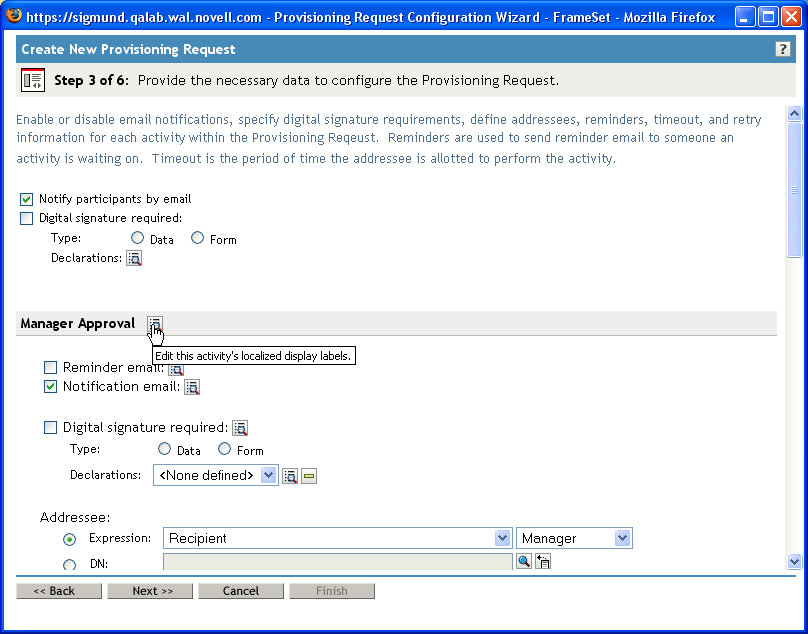
Type the display label in the field, then click .
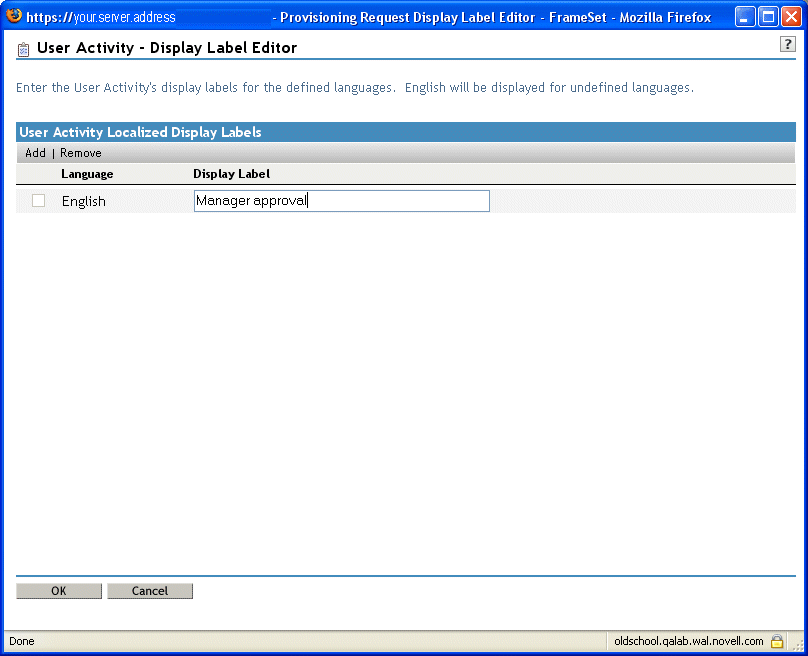
The default display labels (First approval, Second approval, and so on) suggest that approvals are processed sequentially. For parallel flows, you might want to specify labels that do not imply sequential processing. For example, you might want to assign labels such as One of Three Parallel Approvals, Two of Three Parallel Approvals, and so on.
-
(Optional) For each workflow activity that supports quorums or multiple addressees, add additional addressees by clicking the icon beside the name of the activity.
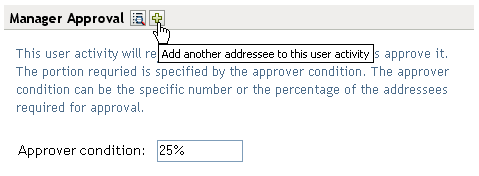
When you click this button, a new Addressee section is presented on the page. You can use the controls in this section to define an expression or DN for the addressee (as described in the next step in this procedure). To delete the addressee, you can click the minus sign next to the addressee:

-
For each workflow activity, also provide the following information:
-
When you finish configuring an activity, you might need to scroll down to see the other activities for the flow.
-
Click .
NOTE:The number of activities you can configure varies, depending on which provisioning request definition was used as the basis for creating this definition. The number and type of entitlement parameters varies, depending on the provisioned resource associated with the request.
Specifying the Access Rights for the Provisioning Request
To specify the access rights for a provisioning request:
-
To add a user, group, or other eDirectory™ object to the list of trustees for this request definition, click , then select the object.
After you have added an object, it is included in the list of trustees.
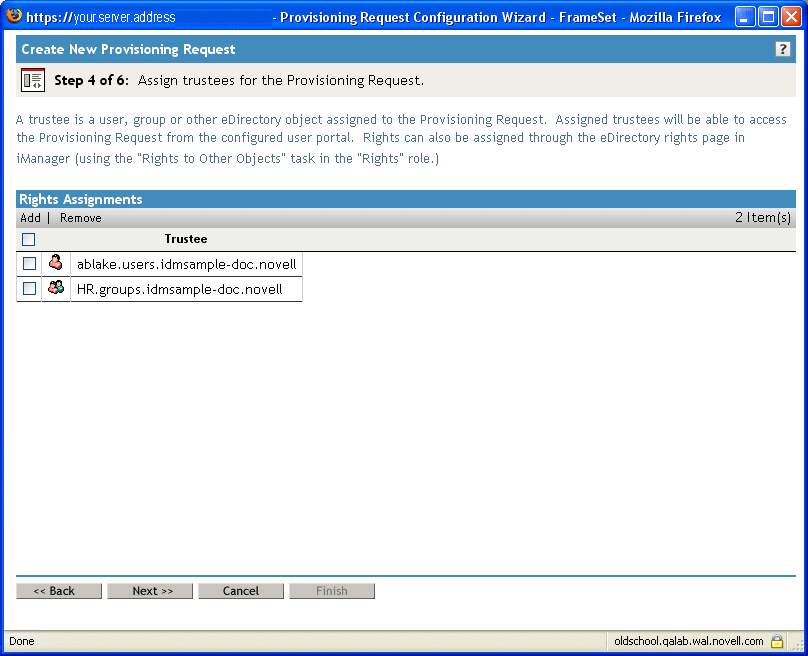
-
To remove a user, group, or other object, select the item in the Trustee list, then click .
-
Click .
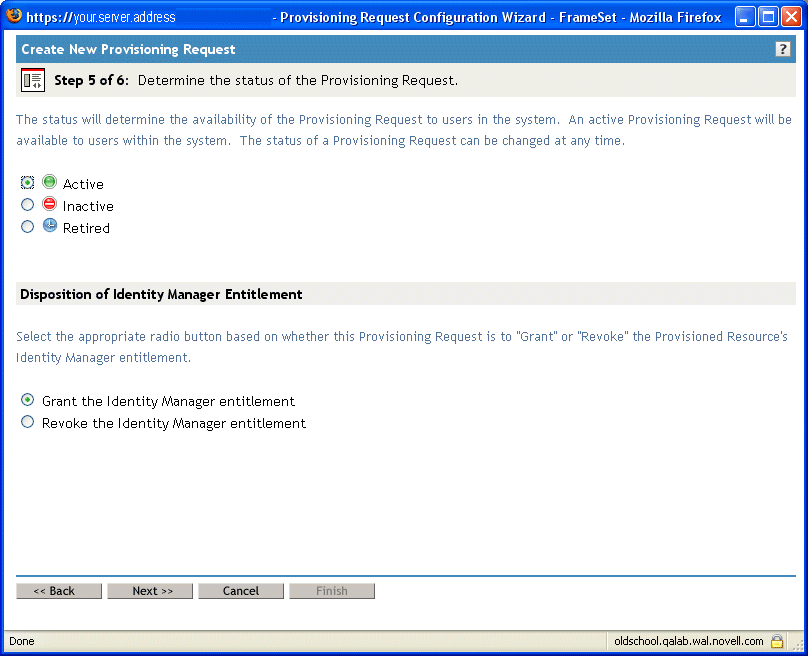
Specifying the Initial Status of the Provisioning Request
To set the initial status of the provisioning request:
17.3.3 Deleting a Provisioning Request
To delete a provisioning request:
-
Select the provisioning request you want to delete by clicking the check box next to the name.
You are not permitted to delete a provisioning request that is a template.
-
Click the command in the Provisioning Request Configuration panel.
17.3.4 Filtering the List of Requests
To filter the list of requests:
-
Click the command in the Provisioning Request Configuration panel.
-
Click the command on the menu.
Specify the filter characteristics:
17.3.5 Changing the Status of an Existing Provisioning Request
To change the status of an existing provisioning request:
-
Select the provisioning request for which you want to change status by clicking the check box beside the name.
-
Click the command in the Provisioning Request Configuration panel.
-
Click the command on the menu.
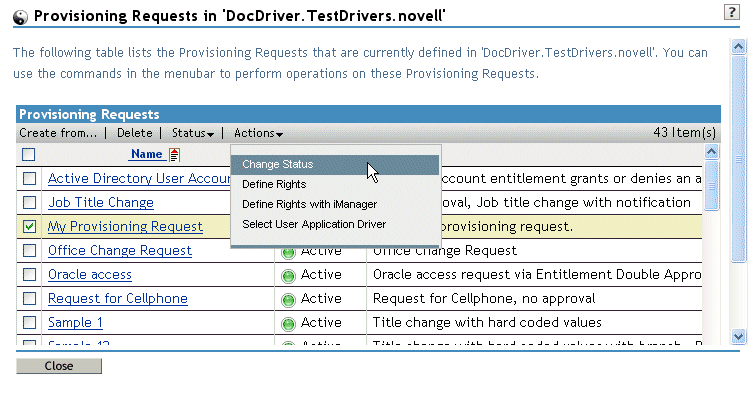
-
Click the status in the menu:
-
Click the button for the correct action ( or ).
-
Click .
17.3.6 Defining Rights on an Existing Provisioning Request
To define rights on an existing provisioning request:
-
Select the provisioning request for which you want to define rights by clicking the check box beside the name.
-
Click the command in the Provisioning Request Configuration panel.
-
Click the command on the menu.
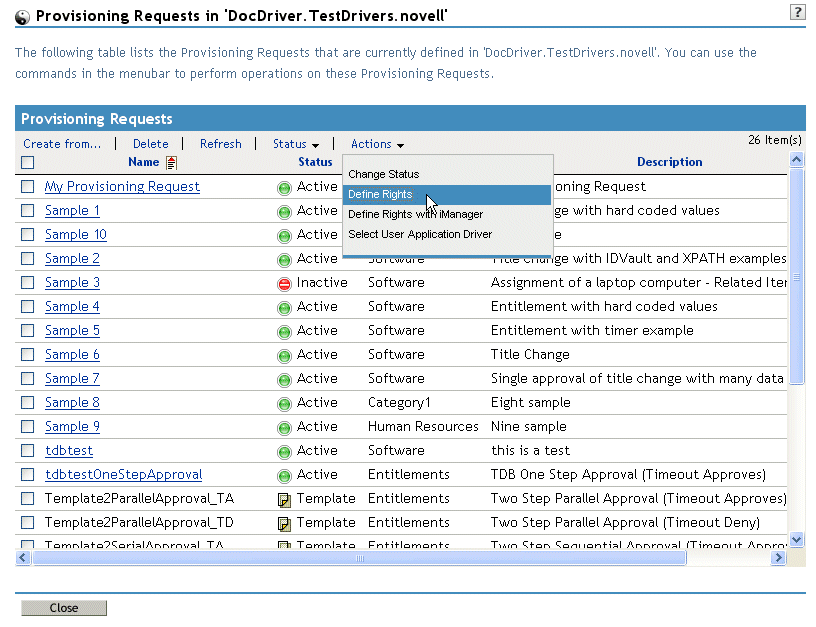
-
Follow the steps described in Specifying the Access Rights for the Provisioning Request.
To define rights on a provisioning request with iManager:
-
Select the provisioning request for which you want to define rights by clicking the check box beside the name.
-
Click the command in the Provisioning Request Configuration panel.
-
Click the command on the menu.