6.1 About the Workflow Tab
You use the tab to display the Workflow page. You use the Workflow page to define the behavior of the workflow for the provisioning request definition. The Workflow page consists of a canvas, a palette, and associated views.
Figure 6-1 Workflow Page
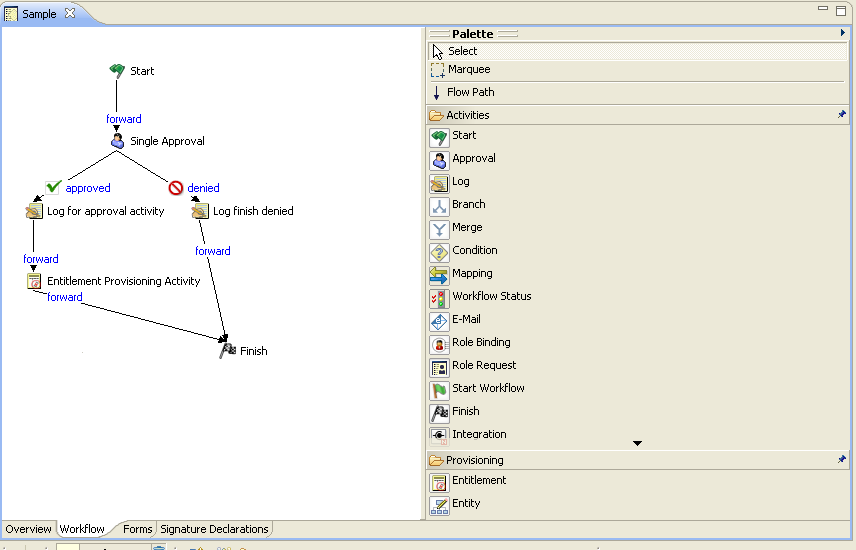
6.1.1 Canvas
The canvas provides a graphical view of the activities in the workflow. When you create a new provisioning request definition that is not based on a template, the canvas is blank except for a Start activity and Finish activity.
If you right-click anywhere on the canvas, a menu is displayed. The menu includes the following commands:
Table 6-1 Workflow Menu
You can use the and sliders on the toolbar to make it easier to view the workflow:
-
Zoom: Increases or decreases the magnification of the workflow display. You can make portions of the workflow display larger and view more detail, or make the workflow display smaller and view more of the workflow. Click the rectangle to the right of the slider to return to 100% magnification.
-
Scale: Increases or decreases the spacing between items in the workflow display. For example, if your workflow has items with many flowpaths between them, you can increase the scale to make it easier to see individual flow paths. Click the rectangle to the right of the slider to return to 100% scale.
6.1.2 Palette
The palette provides icons for activities that can be dragged onto the canvas to create the workflow. It also provides tools for manipulating the icons and for linking activities:
Figure 6-2 Workflow Palette

The palette includes the following tools:
Table 6-2 Workflow Palette
|
Tool |
Description |
|---|---|
|
Select |
Selects individual nodes or flow paths. To select a node, click the Select tool, then click a node. |
|
Marquee |
Selects multiple nodes or flow paths. Use this tool to move items as a group. To select multiple items, click the Marquee tool, then click in an area outside of the items that you want to select. Hold down the mouse button and drag over the items that you want to select, then release the mouse button. When multiple items are selected, only the properties for the first item selected are displayed in the Properties view (see Section 6.1.3, Views for information about Views). |
|
Flow Path |
Creates flow paths between nodes. Flow paths provide connection logic for connecting nodes. For information about connecting nodes, see Section 6.3, Adding Flow Paths. |
|
Activities (for example, Start, Approval, Log) |
Inserts the selected activity into the workflow. For information about adding activities, see Section 6.2, Adding Activities to a Workflow. For detailed descriptions of the activities, see Section 7.0, Workflow Activity Reference. |
6.1.3 Views
The Workflow page also includes the Properties, Data Item Mapping, and E-Mail Notification views:
Figure 6-3 Workflow Views
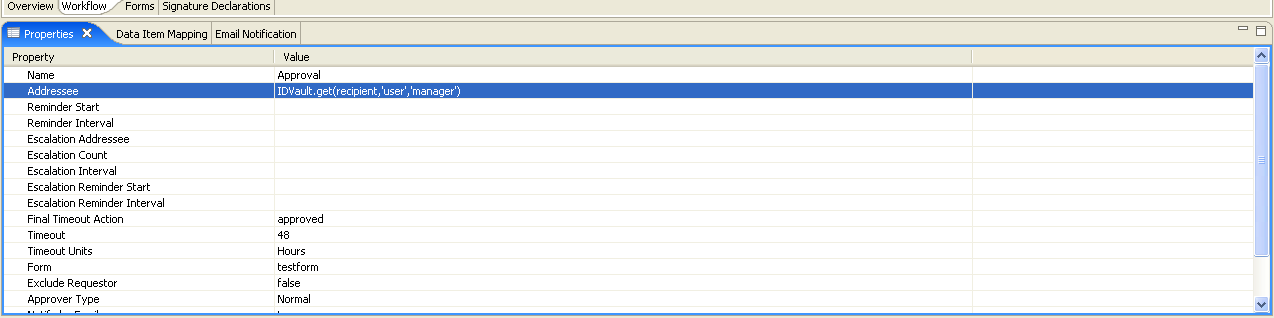
You can right-click the icon for an activity to select a view from a context menu. Not all activities utilize all views. The following table identifies the views and the activities that use them: