Go to the iFolder Management Console by opening a browser and entering
https://ifolderserverip/iFolderServer/Admin
IMPORTANT: The iFolder Management Console URL is case sensitive. If you specified different ports during the installation, append the IP address of the server with a colon followed by the port number (https://ifolderserverip:port/iFolderServer/Admin).
Figure 1 iFolder Management Console
Click Global Settings and then log in with your Admin username and password.
HINT: The initial login might take several minutes as the schema is extended, objects are created, and attributes are written. Server objects are created in the Admin context that you specified during the iFolder installation.
When you first log in to the iFolder Management Console, the Novell® eDirectoryTM schema is extended to include the following objects:
An iFolder Settings object (iFolder_Settings) with the following attributes:
iFolderAdminNames
iFolderDefaultServerName
iFolderClientXML
iFolderkey1
iFolderkey2
iFolderServerXML
An iFolder User LDAP object (iFolder_ldap01) with the following attributes:
iFolderLDAPCertificate
iFolderLDAPContexts
iFolderLDAPDNSorIP
iFolderLDAPPort
An iFolder Server object (iFolder_server01) with the following attributes:
iFolderServerDNSorIP
iFolderServerSecureDNSorIP
The schema extension and the newly created objects enable your iFolder server to run with the LDAP settings you specified during the installation. The LDAP settings you specified during the installation are used as your Global Settings LDAP. For more information, see LDAP Directories.
The iFolder_Settings object is created only once and it holds all the Global LDAP settings. However, for every additional LDAP server and iFolder server that you add through the iFolder Management Console, a new iFolder_ldap and iFolder_server object are created which correspond to the new LDAP or iFolder server.
IMPORTANT: These objects cannot be managed through ConsoleOne®. All iFolder management must be done through the iFolder Management Console.
During the iFolder installation, you specified the context of your Admin objects. For authentication purposes, you must now define the context where your users reside. When you define your user context, all the User objects that reside in the specified context will appear in the iFolder Management Console.
HINT: If you need to add a User object to your context, you can do so through ConsoleOne or through the User Management section of the iFolder Management Console.
To define your user context, do the following:
In the iFolder Management Console, click the Global Settings icon on the top of your screen.
Click User LDAPs and then your server name.
From the Context drop-down box, select the context where your users are located.
(Optional) If you want LDAP to search subcontainers below the specified context during user authentication, check the check box.
Before users can use iFolder on their local workstations, you must first enable their User objects in the iFolder Management Console.
After a User object is enabled, instruct your users to log in to the iFolder server to create an iFolder account. The iFolder account is created the first time a user logs in to the iFolder server via the iFolder client.
NOTE: The first login must be done through the iFolder client and not the Java applet.
To enable User objects to access iFolder, do the following:
Log in to the User Management section of the iFolder Management Console.
The first time you log in to the User Management portion of the iFolder Management Console, the User LDAP directory's schema is extended to include the LDAP User Object. An Aux Class of iFolderUser and the following attributes are also assigned to each User object: iFolderServerName and iFolderQuota.
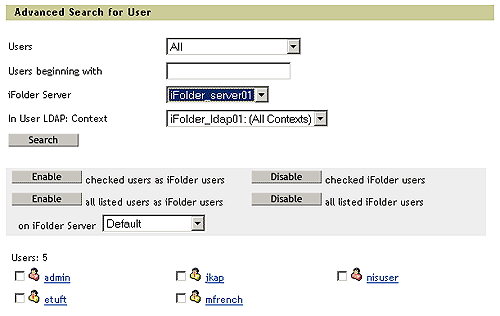
Do an Advanced Search for all users on the server that you just installed iFolder on. Make sure you also specify the appropriate User LDAP context.
IMPORTANT: If an Admin object resides on multiple LDAP servers, do not enable this object as an iFolder user. If you only have one LDAP server and one corresponding Admin user, you can enable this object; however, it's not recommended.
Check the check boxes next to all users that you want to have iFolder accounts and then click the Enable button next to Checked Users as iFolder Users. Or, if you want everyone to have iFolder accounts, just click the Enable button next to All Listed Users as iFolder Users.
Figure 2 Advanced Search Dialog Box
If your first iFolder server is also running LDAP, you are finished with the iFolder configuration. Once users have logged in, you can start managing their accounts. For instructions on specific iFolder management tasks, see Accessing the iFolder Web Sites.
If your first iFolder server is not running LDAP, continue with the next section, "Configuring Your LDAP Server."
Configuring Your LDAP Server
If LDAP and iFolder are not running on the same server, follow these steps:
Click the Global Settings icon at the top of the screen.
Click User LDAPs > Add.
Enter your LDAP server's configuration information and then click OK.
Once you have added your LDAP server to the iFolder Management Console, you are finished with the iFolder configuration. Users can now log in to the iFolder server via the Java applet or the iFolder client.