17.11 Deleting User Data on the Server
If a user forgets the password, you can delete the user data on the iFolder server and then have the user log in again. When the user logs in, iFolder prompts the user for a new password.
-
If you are not logged in, go to the iFolder Management Console, click Global Settings, enter your administrator username and password, then click login. For details, see Logging In to the iFolder Management Console.
-
Click User Management in the tool bar.
-
Search for a specific user if you know the unique user ID; if not, find the user by doing an advanced search.
-
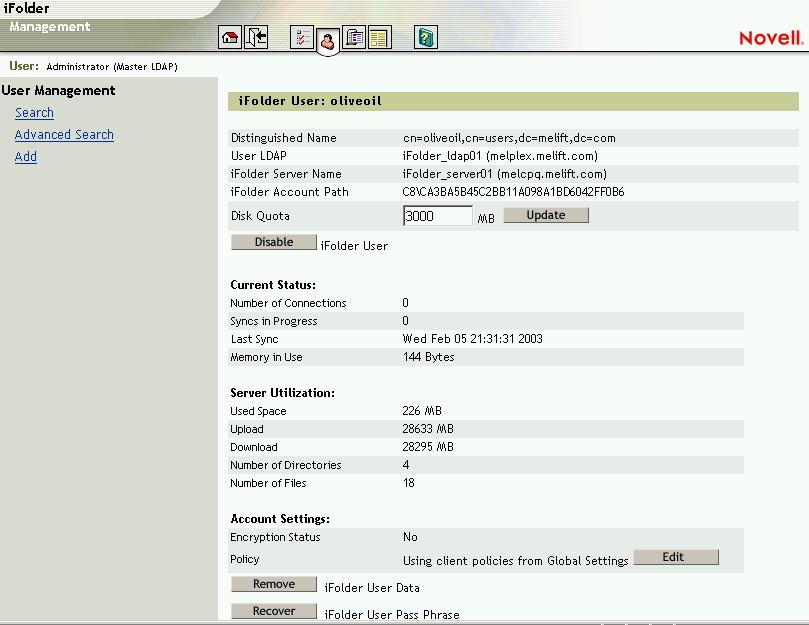
Click the username, scroll to the bottom of the page, then click Remove iFolder User Data.
-
Click OK to confirm the removal of the user data.
You can view user settings by clicking the iFolder Management Console > User Management > Search [or Advanced Search] > User_ID.
Figure 17-9 User Management > {Search or Advanced Search} > User_ID > Remove iFolder User Data
17.11.1 Preventing Data Loss When Resetting User Accounts
Before you delete the user account, the user must do the following to prevent data loss during an account reset:
-
Copy data from the current local iFolder directory to another local directory on the user workstation, then delete the local iFolder directory.
-
Uninstall the iFolder client from the user workstation.
-
Click Start > Settings > Control Panel > Add/Remove Programs > Change or Remove Programs.
-
Select Novell iFolder client, then click Change/Remove > Yes.
-
-
Go to the iFolder Web site to download the iFolder client software.
You can get the URL from your iFolder administrator. The iFolder Web site is typically located at the following URL:
http://nif1.your-domain-name.com/iFolderReplace nif1.your-domain-name.com with the actual DNS name or IP address of your iFolder server.
-
Follow the download and installation instructions to install the iFolder client.
-
If the user ID, password, or encryption passphrase have changed, enter the new values during the reinstallation of the iFolder client.
-
Move the user data to the newly created local iFolder directory.
-
Either wait for the files to synchronize automatically, or right-click the iFolder icon in the system tray, then click Sync Now.
17.11.2 Using the Conflict Bin
The iFolder client has a feature called the Conflict Bin. A user will rarely need to access this option; however, it is useful to understand this feature. The following scenario illustrates what the Conflict Bin is and how it works.
Suppose that Carla is one of your iFolder users. Carla has the iFolder client installed on two computers: computer A and computer B. At some point in the day, Carla disconnects both of these computers from the network and continues to work from both computers offline. While she is working, she makes a change to one of her iFolder files on computer A and then, later in the day, she makes a different change to the same file on computer B. She then reconnects computer A to the network in order to synchronize the changes to the iFolder server. Then, Carla reconnects computer B to the network to synchronize the new change.
When computer B reconnects to the network and synchronizes the change to the iFolder server, the change that Carla made on computer A would be overwritten with the change that Carla made to that same file from computer B. To prevent data loss, iFolder saves the overwritten file to the Conflict Bin. Carla can access the Conflict Bin by right-clicking the iFolder icon located in the system tray of the computer that originally contained the file that was overwritten.
NOTE:If the problem file is larger than the quota set for the Conflict Bin, the file will not be saved in the bin; it will be discarded.