16.2 Configuring Your First iFolder Server
This section describes how to configure your first Novell iFolder server by performing the following tasks:
16.2.1 Logging In to the iFolder Management Console
-
To open the iFolder Management Console, use one of the following methods, depending on your version of iFolder:
- For iFolder 2.1, open your Web browser
to the following URL:
https://nif1.your-domain-name.com/iFolderServer/AdminReplace nif1.your-domain-name.com with the actual DNS name or IP address of your iFolder server. If you specified different ports during the installation, append the IP address of the server with a colon followed by the port number. For example,
https://192.168.1.1:80/iFolderServer/AdminIMPORTANT:The iFolder Management Console URL is case sensitive.
- For iFolder 2.1.x, you
can also access the iFolder Management Console from Novell iManager.
Open your Web browser to iManager to the following URL:
https://nif1.your-domain-name.com/nps/iManager.htmlReplace nif1.your-domain-name.com with the actual DNS name or IP address of your iFolder server.
Log in to iManager, then click the iFolder role in the left navigator. For information about iManager, see the Novell iManager 2.0.x Administration Guide.
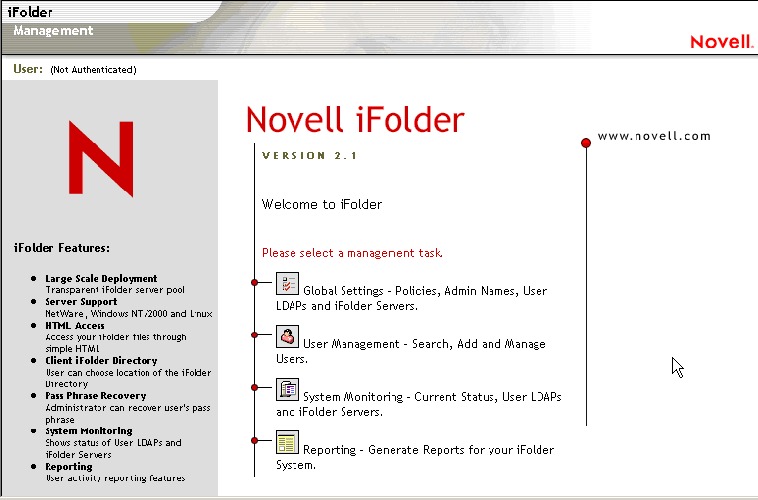
Figure 16-8 iFolder Management Console Home Page
- For iFolder 2.1, open your Web browser
to the following URL:
-
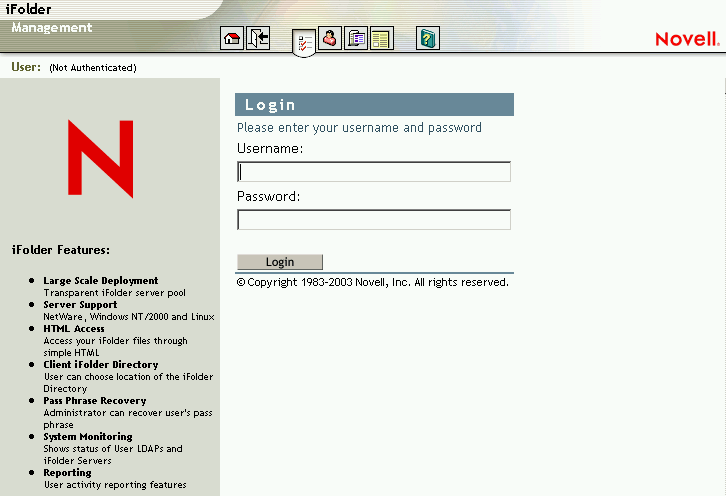
To log in to the iFolder Management Console, click Global Settings
 ,
then log in with your iFolder administrator username and password.
,
then log in with your iFolder administrator username and password. For Novell eDirectory™ environments, most installation scenarios require that you log in to the iFolder Management Console to extend the schema and complete the installation. However, in some installations scenarios, iFolder completes the schema extension during the installation process.
For example, the iFolder installation extends the schema as follows:
- Novell eDirectory configurations with iFolder 2.1.2 in Novell Nterprise™ Linux Services
- Microsoft Active Directory configurations with iFolder 2.1
- Novell eDirectory configurations with iFolder 2.1.5 in Open Enterprise Server on SLES. and iFolder 2.1.6 in Open Enterprise Server Support Pack 1 and iFolder 2.1.7 in Open Enterprise Server Support Pack 2
See your installation instructions to determine which case applies to you.
If applicable, the first time you log in to the iFolder Management Console after the installation, you must log in as a user that has schema extension privileges.The initial login might take 10 to 30 seconds while iFolder extends the schema, creates objects, and writes attributes. Server objects are created in the Admin LDAP context that you specified during the iFolder installation.
Figure 16-9 iFolder Management Console > Global Settings > Login
-
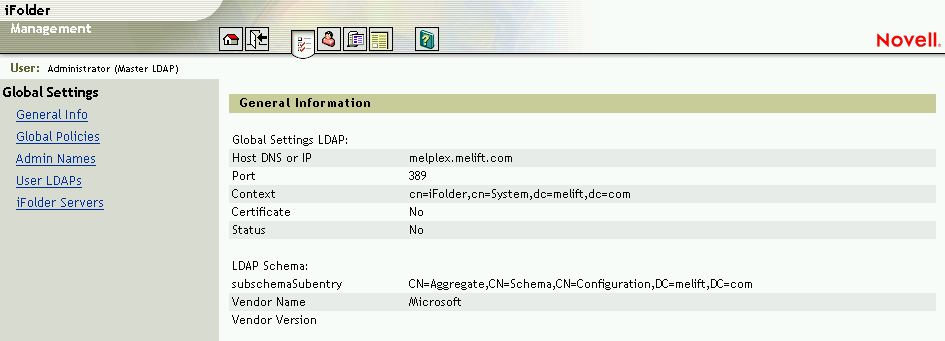
When the General Information page opens, your login is successful.
Successful login completes the server installation for your first server. The schema extension is not repeated on subsequent logins.
Figure 16-10 Global Settings > {Login} > General Information
Use this procedure to log in to the iFolder Management Console at any time to manage the iFolder server.
To optionally verify the schema extension, see Identifying the iFolder Objects in the Schema.
To continue configuring your first iFolder server, see Defining Your User Contexts.
16.2.2 Identifying the iFolder Objects in the Schema
The iFolder installation extends your LDAP schema to include the following objects:
- iFolder Settings object (iFolder_Settings)
with the following attributes:
- iFolderAdminNames
- iFolderClientXML
- iFolderDefaultServerName
- iFolderkey1
- iFolderkey2
- iFolderServerXML
- iFolder User LDAP object (iFolder_ldap01)
with the following attributes:
- iFolderLDAPCertificate
- iFolderLDAPContexts
- iFolderLDAPDNSorIP
- iFolderLDAPPort
- iFolder Server object (iFolder_server01)
with the following attributes:
- iFolderServerDNSorIP
- iFolderServerSecureDNSorIP
The schema extension and the newly created objects enable your iFolder server to run with the LDAP settings you specified during the installation. These settings are used as your Global Settings LDAP. For more information, see LDAP Directories.
The iFolder_Settings object is created only once and it holds all the Global LDAP settings. However, for every additional LDAP server and iFolder server that you add through the iFolder Management Console, a new iFolder_ldap and iFolder_server object are created that correspond to the new LDAP or iFolder server.
IMPORTANT:All iFolder management must be done through the iFolder Management Console.
To continue configuring an iFolder server, see Defining Your User Contexts.
16.2.3 Defining Your User Contexts
During the iFolder installation, you specified the LDAP context of your Admin objects. For authentication purposes, you must now define the context where your users reside. After you define your user context, all the User objects that reside in the specified context appear in the iFolder Management Console.
As you add iFolder servers to your iFolder system, you might define different or the same user contexts for each server.
HINT:If you need to add a User object to your context, you can use the User Management > Add Users option in the iFolder Management Console.
-
If you are not logged in, go to the iFolder Management Console, click Global Settings, enter your administrator username and password, then click login. For details, see Logging In to the iFolder Management Console.
-
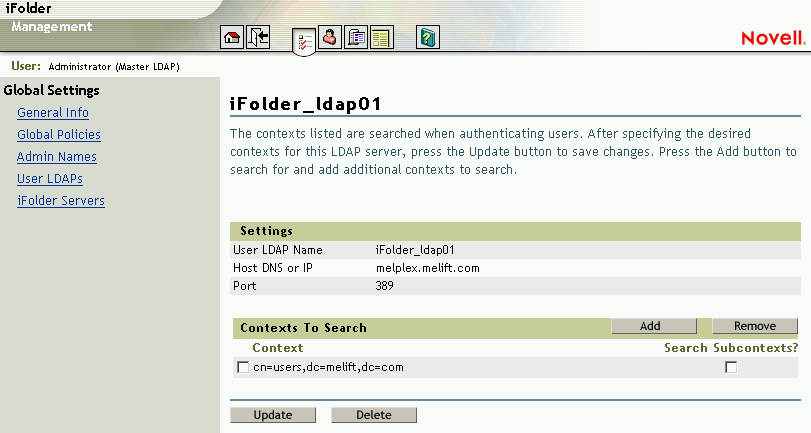
Click Global Settings > User LDAPs, then click the server name of the server you want to manage.
Figure 16-11 Global Settings > User LDAPs > {Server Name} > User Contexts for This Server
-
From the Contexts listed, select the context where your users are located.
iFolder searches the contexts you specify when authenticating users.
-
If you want LDAP to search subcontexts below the specified context during user authentication, check the Search Subcontexts check box.
-
If you want to add additional contexts to search, click Add.
-
Click Update to save these default user authentication settings.
To continue configuring an iFolder server, see Provisioning User Objects for iFolder Services.
16.2.4 Provisioning User Objects for iFolder Services
Before users can create and use iFolder accounts, you must first enable users' User objects on the LDAP server for iFolder services. Users can have only one account associated with a given user ID. However, any given user can have multiple accounts under different user IDs.
When you log in for the first time to the iFolder Management Console and click User Management, iFolder extends the User LDAP directory's schema to include the LDAP User Object. An Aux Class of iFolderUser and the following attributes are also assigned to each User object:
- iFolderServerName
- iFolderQuota
Only enable iFolder services for the usernames you want to give iFolder privileges. iFolder does not create and activate the associated iFolder account until the user first logs in to the iFolder server, using the iFolder client, the iFolder Java applet, NetStorage or NetDrive.
IMPORTANT:If your global client polices include any enforced or hidden settings, the users must log in with the iFolder client to create their iFolder user accounts.
After you provision the User objects, instruct your users to log in to the iFolder server to create an iFolder account.
To enable iFolder services for users:
-
If you are not logged in, go to the iFolder Management Console, click Global Settings, enter your administrator username and password, then click login. For details, see Logging In to the iFolder Management Console.
The first time you log in to User Management, iFolder extends the User LDAP's schema. You must log in as a user with schema extension rights for the User LDAP servers you want to use for authenticating iFolder users on the specified server.
-
Click User Management
 .
. -
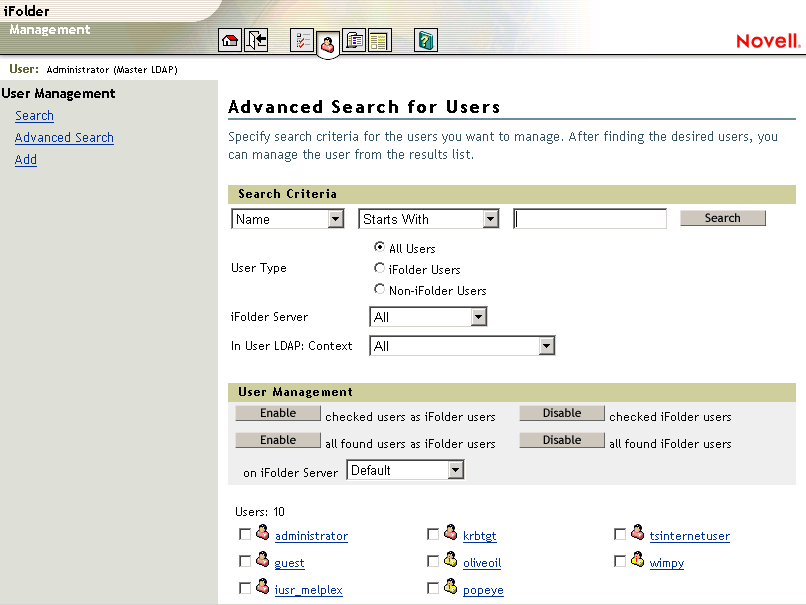
Use the Advanced Search for Users, as shown in Figure 16-12, to obtain a list of users whose accounts you want to manage.
IMPORTANT:If an Admin object resides on multiple LDAP servers, do not enable this object as an iFolder user. If you have only one LDAP server and one corresponding Admin user, you can enable this object; however, we do not recommend it.
Figure 16-12 Search Criteria for Advanced Searches

The iFolder Management Console provides an Advanced Search feature. You can use the following search criteria to narrow your search:
-
Enable or disable iFolder services for users, using one of these methods:
-
Single User: Click the username link, then click Enable or Disable to change the iFolder privileges for the selected user.
-
Multiple Users: From the Advanced Search results, click Enable or Disable iFolder services for all of the users found that met the search criteria.
-
Subset of Multiple Users: From the Advanced Search results, check the check box beside any user whose status you want to change, the click Enable or Disable. The provisioning status changes for only those specified users.
-
Subset of Multiple Users on a Specific iFolder Server: From the Advanced Search results, select the server from the iFolder Server drop-down list, then click Enable or Disable. The provisioning status changes for only those users assigned to the specified server.
Figure 16-13 User Management > Advanced Search > Search Results
-
If your first iFolder server is not also your LDAP server, continue with the next section, “Configuring Your User LDAP Server.”
If your first iFolder server is also your LDAP server, the basic configuration tasks are complete. See Section 16.2.6, What's Next.
16.2.5 Configuring Your User LDAP Server
Novell iFolder uses your user LDAP directory to authenticate users on the iFolder server. The User LDAP directory stores the iFolder Server Name and the Disk Quota attribute of User objects for user accounts enabled with iFolder services.
If LDAP and iFolder are not running on the same server, configure the LDAP server information for iFolder:
-
If you are not logged in, go to the iFolder Management Console, click Global Settings, enter your administrator username and password, then click log in. For details, see Logging In to the iFolder Management Console.
You must log in with an admin username that has write privileges to the LDAP server or servers you plan to modify or add.
-
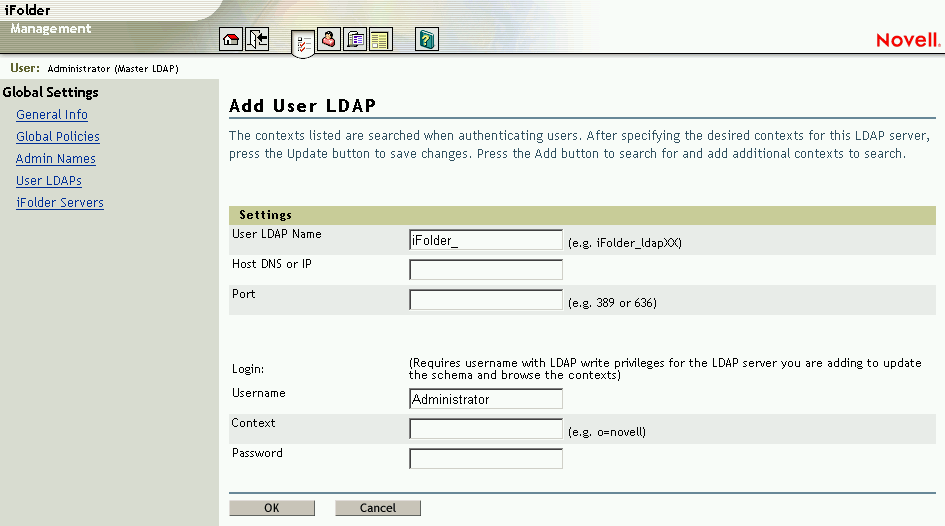
Click Global Settings > User LDAPs, then click Add.
This opens the Add User LDAP subtask.
Figure 16-14 Global Settings > User LDAPs > Add > Add User LDAP
-
Enter your LDAP server's configuration information.
-
User LDAP Name: The LDAP server host name.
-
Host DNS or IP: The LDAP server’s DNS name such as ldap1.your-domain-name.com or IP address such as 192.168.1.1.
-
Port: The port to use for communications between the iFolder server and the user LDAP server. Use Port 389 for clear text communications or use Port 636 for Secure Sockets Layer (SSL) communications.
-
Login Username: The admin username for the LDAP server. This username must have write privileges for the LDAP server to support extending the schema and browsing contexts.
-
Context: The context you want iFolder to search to authenticate users for the iFolder server.
-
Login Password: The password for the Login Username.
-
-
Click OK, or click Cancel to abandon the process.
After you add your LDAP server to iFolder system configuration, you are finished with the mandatory iFolder server configuration. See Section 16.2.6, What's Next.
16.2.6 What's Next
The iFolder installation and mandatory configuration sets default behaviors for the iFolder server and client. Use the following table to determine what next to do to configure and manage your iFolder system, according to your business needs.