8.5 Creating and Uploading an iFolder
You can create an iFolder by converting an existing folder that satisfies the following guidelines:
If the folder does not exist, you can browse to a location and create the new folder as part of the process.
IMPORTANT:You can share only the regular iFolders. Encrypted iFolders cannot be shared.
Within the iFolder, you can set up any subdirectory structure that suits your personal or corporate work habits. The subdirectory structure is constant across all member iFolders. Each workstation can specify a different parent directory for the shared iFolder.
When you exceeds the limit for number of iFolders an individual user can create, iFolder displays an error message. For example, if your administrator has set the policy for to 10 and you attempt to create the eleventh iFolder, iFolder notifies you about the policy violation.
8.5.1 Linux
You can create iFolders with a file manager or with the iFolder browser, which is available in the client application. Use the following methods to create an iFolder:
Creating iFolders in the iFolders Browser
-
In the notification area, use one of the following methods to open the iFolder browser:
-
Click the icon
 .
.
-
Right-click the icon
, then click .
-
-
Click .
-
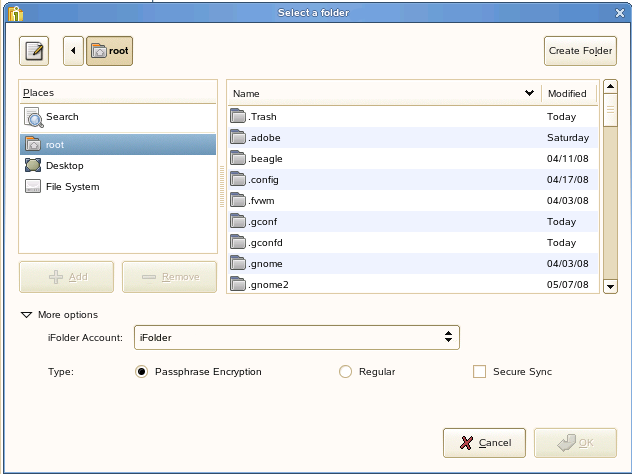
Under , specify the you want to use for this iFolder.
If you have multiple iFolder accounts, the default account is listed first. Use the drop-down list to select a different account.
-
In the browser, navigate to the directory where you want to create an iFolder.
-
Select the normal folder you want to make an iFolder, using one of these methods:
-
If the normal folder exists, select the folder, then click .
-
If the normal folder does not exist, click to create it, select the newly created folder, then click .
-
-
Select the iFolder from the given options. You can decide whether to create an encrypted iFolders or it to be shared with other users.
NOTE:You are permitted to create encrypted iFolders only if your iFolder administrator has set your encryption policy to . If not, you can create only regular iFolders, and this option is selected by default. In this case, both the options for are disabled.
-
Select to enable encryption for the selected iFolder.
If you have not set the passphrase during the login session, and you select , it prompts you to enter the passphrase. Specify the passphrase in the Passphrase dialog box.
-
Select to enable sharing for the selected iFolder.
iFolder announces the availability of shared iFolders with a pop-up message in the notification area. Shared users can click the message to set up the iFolder at that time, or close the message and download the iFolder later.
-
-
Select to enable secure synchronization of files in the iFolder you are creating.
For more information on , see Secure Sync in the Table 8-4, Synchronization Parameters for iFolders Stored Locally.
NOTE:You can also enable secure sync for a selected iFolder on your machine by using the right-click iFolder > Properties option in the iFolder main window. For that, right-click the iFolder and select . In the General tab of the iFolder properties window, select the check box.
-
Click .
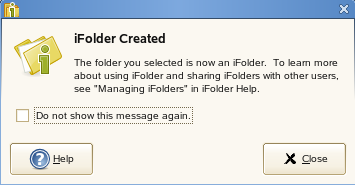
The iFolder appears in the list.
-
If the message appears, do one of the following:
-
Click to dismiss the message.
-
Select to disable future notifications, then click to dismiss the message.
If you later decide that you want to get confirmation messages, go to , select , then click .
-
Creating iFolders in a File Manager
-
Use the file manager to navigate to the folder you want to convert to an iFolder, then select the folder.
-
Use one of the following methods:
-
Right-click the folder icon, then click
-
On the toolbar, click .
The folder icon
 changes to a folder with an overlay of the iFolder emblem
  (green “i”).
-
-
If the message appears, do one of the following:
-
Click to dismiss the message.
-
Select to disable future notifications, then click to dismiss the message.
If you later decide that you want to get confirmation messages, go to iFolder Preferences, select , then click .
-
8.5.2 Windows
You can create iFolders with a file manager or with the iFolder browser, which is available in the client application. Use the following methods to create an iFolder:
Creating iFolders in the iFolders Browser
-
In the notification area, use one of the following methods to open the iFolder browser:
-
Click the
icon.
-
Right-click the
icon, then click .
-
-
Click .
-
From the drop-down list, select the iFolder account you want to use for this iFolder.
If you have multiple iFolder accounts, the default account is listed first. You can use the drop-down list to select a different account.
-
In the browser, navigate to the directory where you want to create an iFolder.
-
Select the normal folder you want to make an iFolder, using one of these methods:
-
If the normal folder exists, select the folder, then click .
-
If the normal folder does not exist, click to create it, and select the newly created folder.
-
-
Select the iFolder type from one of the following from the given options:
NOTE:You are permitted to create encrypted iFolders only if your iFolder Administrators has set your encryption policy to . If not, you can create only regular iFolders, and this option is selected by default. In this case, both the options for are disabled.
-
Select to enable encryption for the selected iFolder.
If you did not set the passphrase during the login session, and you select , it prompts you to enter the passphrase.
-
Select to enable sharing for the selected iFolder.
When you share your iFolder with other iFolder members, iFolder announces the availability of shared iFolders with a pop-up message in the notification area. Shared users can click the message to set up the iFolder at that time, or close the message to download the iFolder later.
-
-
Select to enable secure synchronization of files in the iFolder you are creating.
NOTE:You can also enable secure sync for a selected iFolder on your machine by using the right-click iFolder > Properties option in the iFolder main window. For that, right-click the iFolder and select . In the General tab of the iFolder properties window, select the check box.
For more information on , see Secure Sync in the Table 8-4, Synchronization Parameters for iFolders Stored Locally.
-
Click .
The iFolder appears in the list.
-
If the message appears, do one of the following:
-
Click to dismiss the message.
-
Select to disable future notifications, then click to dismiss the message.
If you later decide that you want to get confirmation messages, go to , select , then click .
-
Creating iFolders in a File Manager
-
Use the file manager to navigate to the folder you want to convert to an iFolder, then select the folder.
-
Use one of the following methods:
-
Right-click the folder icon, then click
-
On the toolbar, click .
The folder icon
 changes to a folder with an overlay of the iFolder emblem (green “i”).
-
-
If the message appears, do one of the following:
-
Click to dismiss the message.
-
Select to disable future notifications, then click to dismiss the message.
If you later decide that you want to get confirmation messages, go to iFolder Preferences, select , then click .
-