8.6 Sharing an iFolder

8.6.1 Understanding User Access Rights

The following table describes the capabilities associated with each level of access for users or LDAPGroup.

IMPORTANT:All the members of an LDAPGroup inherit the access rights set for that LDAPGroup.

Table 8-2 Capabilities of iFolder Owners and Members Based on Their User Access Rights

Capability

Owner

Member with Full Control

Member with Read/Write

Member with Read Only

With an enterprise server, the space consumed by the iFolder on the server is charged against the user’s quota

No

No

No

No

Transfer ownership to another member whose state is iFolder User

Yes

No

No

No

Set a quota for the iFolder

No

No

No

No

Make the iFolder available to other users (sharing)

Yes

Yes

No

No

Make the iFolder unavailable to other users (stop sharing)

Yes

Yes, except the owner

No

No

Assign iFolder access rights for other users

Yes

Yes, except the owner

No

No

Read directories and files in the iFolder

Yes

Yes

Yes

Yes

Add, modify, or delete directories and files in the iFolder

Yes

Yes

Yes

No

Rename directories and files in an iFolder

Yes

Yes

Yes

No

Rename the iFolder

No

No

No

No

Set up an iFolder on multiple computers

Yes

Yes

Yes

Yes

Revert an iFolder (do not participate on a local computer)

Yes

Yes

Yes

Yes

Delete an available iFolder to decline participating

Yes

Yes

Yes

Yes

Delete the iFolder and delete the iFolder and its files from the server (make it a normal folder again and no longer share it with others)

Yes

No

No

No

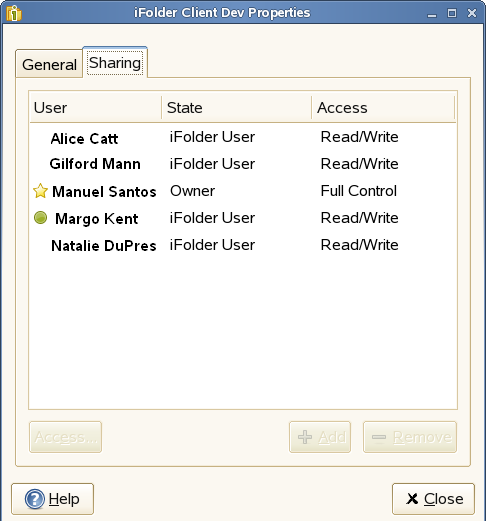
8.6.2 Accessing the Sharing Tab

You can manage membership for the iFolder from the Sharing tab in the iFolder Properties dialog box.

IMPORTANT:You can share iFolders only if the iFolder administrator has enabled the sharing policy for your account.

  1. If iFolder is not running, start iFolder.

  2. Do one of the following to open the iFolder Properties dialog box to the Sharing tab.

    • In a file manager, right-click the iFolder you want to share, then select Share with.

    • In the iFolder browser, select the iFolder, then select Share with.

8.6.3 Adding a User to an iFolder

  1. On the Sharing tab, click Add to open the Add Users dialog box.

  2. From the list of users, select one or more users or LDAPGroups and click Add to include your selection to the Users to add list, then click OK.

    It can take several seconds for the users to synchronize up to the server. Soon after the sync, a notification appears at the bottom right of the page.

  3. On the Sharing tab, select one or more users who you want to assign the same access right.
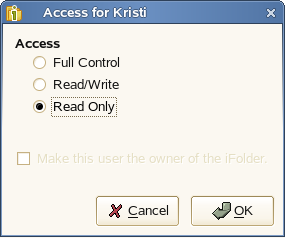
  4. Click Rights, select the Full Control, Read/Write, or Read Only access right, then click OK.

  5. Repeat the previous steps until you have invited all the desired users or LDAPGroups to share the iFolder and have set their access rights.

  6. Click Close to close the iFolder Properties window.

8.6.4 Modifying User Access Rights

As the working relationships and status of members of an iFolder change, you might need to change a user’s access right for the iFolder. For example, you might want to give a trusted user the Full Control right for the iFolder.

  1. On the Sharing tab, select one or more users who you want to have the same access right.

  2. Select Rights, then specify the Full Control, Read/Write, or Read Only right.

    When you first invite a user or LDAPGroup to participate, the Make this user the owner of the iFolder option is disabled (dimmed) in the Access dialog box. If you intend to make the new user the owner, you must wait until the user’s state changes from Invited User to iFolder User, then you can transfer ownership. When you transfer the ownership to an LDAPGroup, all the members of that LDAPGroup get the ownership rights.

  3. Click OK, then click Close to close the iFolder Properties window.

8.6.5 Removing a User from an iFolder

To unshare an iFolder, you must remove a user or an LDAPGroup as a member of an iFolder. The iFolder on the user’s or LDAPGroup member’s workstation becomes a normal folder. A copy of the data remains on the former member’s workstation, but the files are no longer synchronized with the shared iFolder.

  1. On the Sharing tab, select one or more users from the list.

  2. Click Remove, and then click Yes.

8.6.6 Transferring Ownership to an iFolder User

The owner of an iFolder can transfer ownership of the iFolder to another individual member or LDAPGroup whose state is iFolder User. After the transfer, the original owner becomes a member with the Read/Write right, and the space consumed by the iFolder is charged against the new owner. When an LDAPGroup becomes the owner of an iFolder, all the members of the group get the ownership rights.

  1. In a file manager or the iFolder browser, right-click the iFolder you want to transfer, then select Share With to open the iFolder’s Properties dialog box to the Sharing tab.

  2. From the list of users, select the iFolder User who is to be the new owner, then click Rights.

  3. Select Make this user the owner of this iFolder.

    The Make this user the owner of the iFolder option is disabled (dimmed) in the Access dialog box if the user’s state is Invited User. In this case, exit the dialog box, wait until the user’s state changes from Invited User to iFolder User, then repeat the preceding steps to transfer ownership.

  4. Click OK, then click Close to close the iFolder Properties window.