Integration Module for Enterprise User's Guide
CHAPTER 2
Getting Started

Enabling the Integration Module for Enterprise - Custom Edition Feature
The Integration Module for Enterprise - Custom Edition feature is enabled Manager by default. If for any reason the feature has been disabled, you can enable it by editing the Integration Manager configuration file, xconfig.xml.
 To enable the Integration Manager Integration Module for Enterprise - Custom Edition feature:
- If you haven't already done so, install Integration Manager (see the Installing Integration Manager manual).
- If Integration Manager is running, exit from Integration Manager before performing the following steps.
- Locate your xconfig.xml file in the /Composer/Designer/bin directory and open the file in a text editor.
- Locate the element named "IDM2_WIZARD ENABLED".
- Change the value of this element to TRUE (IDM2_WIZARD ENABLED="TRUE").
- Save your changes.
Creating an Integration Module for Enterprise - Custom Edition Project
To create a Integration Module for Enterprise - Custom Edition Project:
- Start Integration Manager.
- Select New Project from the File menu. The New Project dialog box is displayed:
-
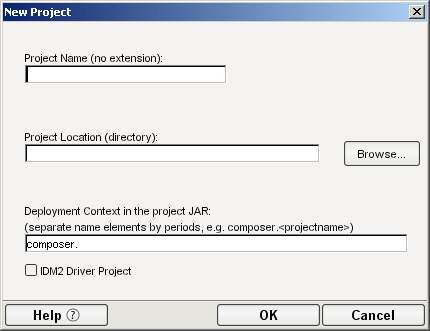
- Select the IDM2 Driver Project option (located in the lower left of the dialog box). This is the option that enables the Integration Module for Enterprise - Custom Edition feature.
- Type in a Project Name. This is a required field. Integration Manager adds the project name extension (.spf).
- Select Browse to locate the directory in which you want your project to reside. The Project Location dialog box is displayed.
- NOTE: If you have a project open, the Project Location dialog box shows the directory where the open project resides.
-
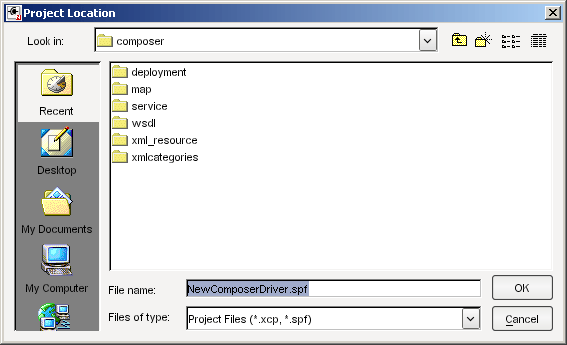
- Navigate to the directory in which you want your project to reside. If necessary, create a new directory for the project.
- NOTE: The File Name in the Project Location dialog defaults to the project name you designated in Step 4.
- Click OK. The New Project dialog appears with the Project Name and Project Location displayed.
- Enter a deployment context string in the Deployment Context in the project JAR field. The string should contain labels (no spaces) separated by periods, as in "com.server.apps."
- NOTE: The context string should not contain Java-language keywords, such as try, catch, finally, int, or for. For a complete list of Java keywords, see the "Reserved Words" appendix in the Novell Integration Manager User's Guide.
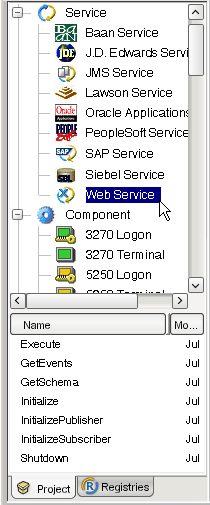
- Click OK. The Integration Manager window appears with the name of the project that you just created in the title bar. You can view the template artifacts that are included in the project by using the Project tab in the Navigator Frame. For example, to view the Web services that are included in the project, scroll down to the Services section of the Navigator Frame, then double-click on Web Services:
-
- The next step is to create a server profile for Identity Manager, which you will need when you deploy your project.
Creating a Server Profile
To create a server profile:
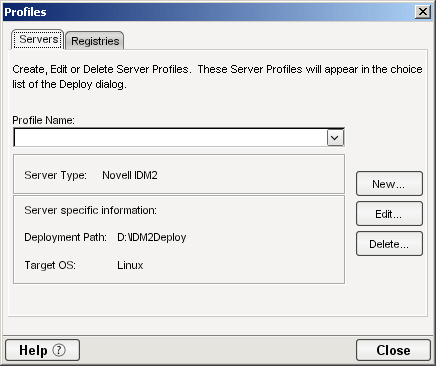
- Select Profiles from the Tools menu. The Profiles dialog box is displayed:
-
- Select New. The New Server Profile dialog box is displayed:
-
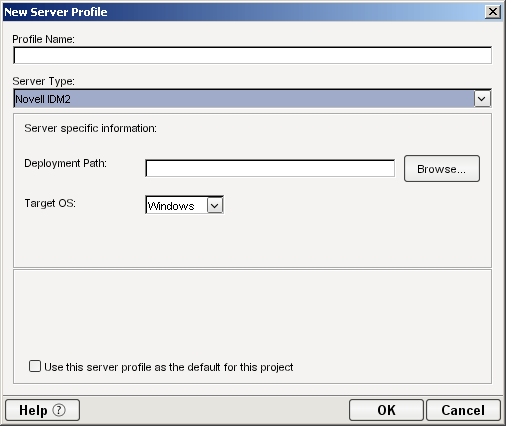
- Type a name for the profile in the Profile Name field.
- Select Novell IDM2 from the Server Type list.
- Use the browse button in the Deployment Path field to select the eDirectory "lib" directory (on Windows this is \NDS\lib; on Linux or UNIX this is /usr/lib/dirxml/classes).
-
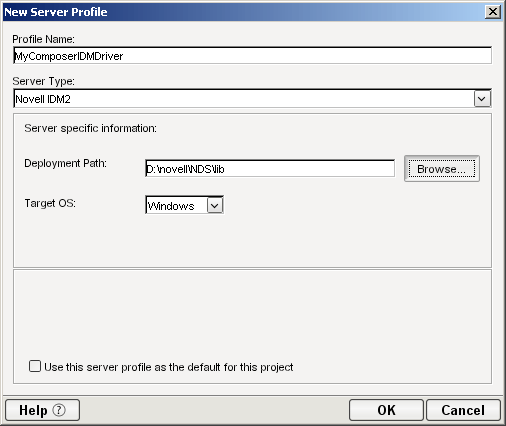
- Use the Target OS list to select the operating system to which you will deploy your driver.
- Select OK. Integration Manager returns you to the Profiles dialog box.
- Select Close.
What is Included in the Integration Module for Enterprise - Custom Edition
The Integration Module for Enterprise - Custom Edition includes a set of xObjects that need to be part of any driver development project. These xObjects include:
- Web services - provided as entry points into the Integration Manager action model
- XML Map Components
- XML Resources
- XML Templates
- Deployment xObject
The following sections describe these xObjects.

Web Services
The following table lists the Web service definitions supplied with the Integration Module for Enterprise - Custom Edition. These definitions are intended to serve as placeholders or stubs; you must customize them to work in your environment. The names of the Web services are very important (because they are used by the ComposerDriverShim.jar to call the services) and must not be changed.
|
|
|
|
|
Sets up connection information used by the other services. Declares and sets session variables. Checks for loopback condition and creates a session variable to hold status of loopback condition check (true, false). NOTE: Although the DirXML engine prevents loopbacks, it's a best practice for efficient operation to check for and prevent loopbacks in the driver.
|
|
|
Initializes the Publisher channel. Checks session variable for the type of input (for example, "memory", "file") and performs appropriate setup tasks. Creates session variables for publisher options.
|
|
|
Initializes the Subscriber channel. Creates session variables for subscriber options.
|
|
|
Checks input for type of command (add, delete, modify, query), and performs the appropriate actions.
|
|
|
Used by the publisher to get events from a vector session variable.
|
|
|
Called by the ComposerDriverShim.jar. Returns the schema from the external application.
|
|
|
Removes variables created for the driver and stops services.
|
XML Map Components
XML Map components manipulate and transfer data from one XML document to another. The XML Maps are used by the Web services.
|
|
|
|
|
Called by Execute. Uses an XML Interchange action to read data from an XML file into the DOM. Performs any necessary transformations, then uses another XML Interchange action to write the data to a file. In practice, the functionality in the component would probably be placed in an application-specific component (for example, a Siebel component). This component provides an example action model for adding a user to another system.
|
|
|
Called by GetEvents. Checks for loopback condition.
|
|
|
Called by GetEvents. Used to clean up stored events to remove loopback condition.
|
|
|
Called by Execute. Used to delete a user. Provides an example of using a Send Mail action to provide notification of the attempted deletion.
|
|
|
Called by Execute, Initialize, and Initialize Publisher. Used to map connection values to a Project Variable.
|
|
|
Called by Execute. Provides a placeholder for code to handle a Modify event. On the subscriber channel, this is a request to the external application to modify an entry. On the publisher channel, this is a notification to Identity Manager that an item in the external application has been modified.
|
|
|
Called by Execute. Provides a placeholder for code to handle a Query event.
|
|
|
Called by Execute. Used to store events.
|
XML Resources
The Integration Module for Enterprise - Custom Edition includes the following XML Resources. The XML Resources are provided as samples; they are not used in the project except where noted in the table.
|
|
|
|
|
|
|
|
|
|
|
|
|
|
|
|
|
|
|
|
|
|
|
|
|
|
|
|
|
|
|
|
|
|
|
|
|
|
|
|
|
|
|
|
|
|
|
AddUser, DeleteUser, Modify, Query, Execute, Initialize, InitializePublisher, InitializeSubscriber, Shutdown
|
|
|
|
|
|
|
|
|
|
|
|
|
|
|
|
|
|
|
XML Templates
XML templates contain sample documents, schemas, and stylesheets to assist you in designing and testing components. The following table lists the XML Templates included in the Integration Module for Enterprise - Custom Edition.
|
|
|
|
|
AddUser (XML Map), Check Stored events, Clean Stored events, Store Events, Execute
|
|
|
Initialize, InitializePublisher, InitializeSubscriber
|
|
|
|
|
|
|
|
|
|
|
|
|
|
|
|
|
|
|
|
|
|
|
|
|
|
|
|
Deployment xObject
The Integration Module for Enterprise - Custom Edition includes a deployment xObject named "Demo". The deployment xObject contains metadata about your deployment (information about which service triggers to create and which resources to deploy). You can view the deployment xObject by scrolling to the bottom of the Navigator frame and clicking on Deployment. The names of deployment xObjects that have been defined in the project are displayed below the Navigator frame. Right-click on "Demo" and select Properties to view the properties of the Demo deployment xObject.
What You Must Supply
- You must customize the artifacts supplied in the template (Web services, XML Maps, XML templates and resources, and deployment object) for your specific project.
- You must define Integration Manager connection resources for the external application. For example, if you are integrating with a Siebel application, you must define a Siebel connection resource. Refer to the Integration Manager Connect documentation for the external application with which you are integrating for information about creating a connection resource. For example, if you are integrating with a Siebel application, refer to the Novell Integration Manager 5.2.1 Connect for Siebel User's Guide.
- You must author the components that provide the application-specific logic for the external application that you want to integrate with Identity Manager. Refer to the Integration Manager Connect documentation for the external application with which you are integrating for information about creating an application-specific component. For example, if you are integrating with a Siebel application, refer to the Novell Integration Manager 5.2.1 Connect for Siebel User's Guide.
Copyright © 2004 Novell, Inc. All rights reserved. Copyright © 1997, 1998, 1999, 2000, 2001, 2002, 2003 SilverStream Software, LLC. All rights reserved. more ...