5.5 Configuring Printing Through Mobile Devices

5.5.1 Configuring for Mobile Printing

  1. On a Web browser, use either the DNS name or the IP Address to access the Management Console. For example, https://10.0.0.1:9443 or http://iprint.example.com/admin.

    Ignore the security certificate warning, and continue to the iPrint Appliance Management Console. If you add the certificate to the trusted certificates list, the security warning is not displayed.

  2. In the Novell iPrint Appliance Administration login page, enter the user name as vaadmin, enter the password that you specified for vaadmin, then click Log in.

  3. Click the iPrint Appliance Configuration icon.

  4. Under Administration, click Printers.

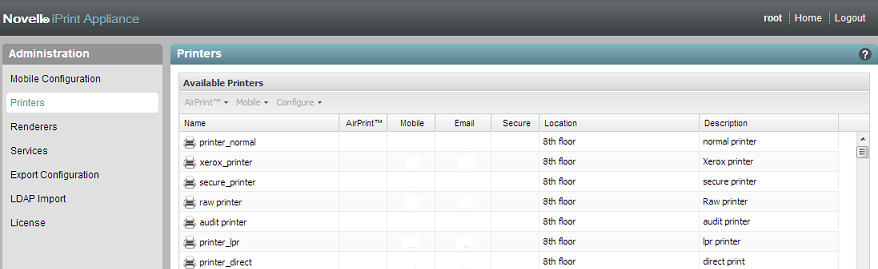
    The Printers screen lists all printers created with iManager that are currently managed by iPrint Appliance. You can enable the printers for Mobile, AirPrint, and Email printing for iPrint Appliance.

  5. Select the printer that you want to configure. You can choose multiple printers at a time by holding the Ctrl key.

    The AirPrint, Mobile and Configure drop-down menus are activated.

  6. To configure the printers for Mobile and Email printing, click the Mobile drop-down menu, then select Enable.

  7. The selected printer is enabled for Mobile printing.

5.5.2 Airprint Through iPrint Using mDNS

AirPrint is a framework that facilitates driverless printing. The framework was invented by Apple Inc. iOS applications (apps) that implement AirPrint technology allow users to send print jobs to AirPrint enabled printers. With iPrint Appliance, you can “AirPrint enable” any iPrint printer.

This section describes the benefits and key features of AirPrint through iPrint:

iOS Wireless Printer Discovery

iOS devices have an inherent service discovery mechanism called Bonjour. Bonjour has the wireless service identifying capability known as mDNS (multicast DNS). iPrint uses the Linux Avahi daemon service to advertise iPrint printers to the iOS devices on a wireless network.

Multicast DNS

Domain Name Service provides translation from a Web address (starting with www) to the Internet Protocol (IP) addresses. mDNS (Multicast DNS protocol) is a method of network neighborhood resource discovery. mDNS forwards the DNS message to many endpoints on a network. Each device connected to an mDNS enabled network sends out a message detailing its name, function, and capabilities. On the receiving device, the information is stored so that it can route requests when an application requests a service, such as printing.

mDNS is useful in wireless networks. By monitoring mDNS advertisements, clients can learn the location of the service, then connect to it in the same way as any other service. mDNS transforms the manual process of configuring IP addresses and port numbers that provides a zero configuration experience where a user references the service using human-friendly types and names.

AirPrint through iPrint

When iOS devices such as iPhone, iPad, and iPod touch connect to the wireless network, they are automatically assigned an IP address. This opens an opportunity to exploit the IP network service for printer discovery, and submit the print job. iOS devices convert Microsoft Office files, images, and Web pages into PDF; construct an IPP print request; and send the print request to the AirPrint enabled IPP printer. The AirPrint enabled IPP printer renders the PDF or image file into a printer-specific language such as post script. The printer consumes this data and the document is printed. This is called AirPrint.

Many printers are not compatible with AirPrint. iPrint hides the printer’s capabilities, and advertises the printer as an AirPrint enabled printer. This allows iPrint to extend the enterprise print service into the wireless network to exploit the iOS devices’ inherent print capability, and provides additional advantages to consume iPrint features.

Benefits

AirPrint through iPrint offers significant benefits over other printing models:

  • Any iPrint printer can be enabled for AirPrint regardless of the printer’s inherent AirPrint support.

  • AirPrint enabled printers are also listed in the iOS device.

  • AirPrint enabled printers can make use of the iPrint server’s features.

Supported iOS Devices

Supported iOS devices include iPhone, iPad, and iPod touch with iOS 5 and above.

NOTE:Secure printing to iPrint printers through AirPrint is supported only on iOS 6.x and later versions.

AirPrint Deployment Considerations in iPrint Appliance

The mDNS protocol operates on service announcements and queries, which allow devices to advertise specific applications, such as printing services. Each query or advertisement is sent to an mDNS multicast address for delivery to all clients on the subnet. Apple's Bonjour protocol relies on Multicast DNS (mDNS) operating at UDP port 5353. iOS devices listen for services on these reserved group addresses:

  • IPv4 Group address - 224.0.0.251

The addresses used by the mDNS protocol are link-local multicast addresses and are valid on the link local domain. Hence, routers might have to be enabled, in order to forward the multicast advertisement to various subnetworks.

AirPrint Deployment Scenario in iPrint

The deployment scenarios are confined to the wireless-based LAN network because iOS devices can only communicate over the wireless medium for the printer discovery and print services. The deployment scenario varies based on how wireless is configured in the organization. The preferred scenario is to deploy iPrint’s AirPrint mDNS services led by the router, which has the ability to route the mDNS packets (link local Bonjour advertisement) into the various wireless sub networks in the organization. See Figure 5-1.

Intra VLAN Configuration

Wireless routers span across multiple wired networks, and have hot spots on every network. The mDNS service advertises printers on the wireless network, and the iOS device builds a list of available print services by listening to these advertisements. AirPrint client's users can select a target printer from the received list of advertised printers.

Figure 5-1 Logical Network Segment Configuration

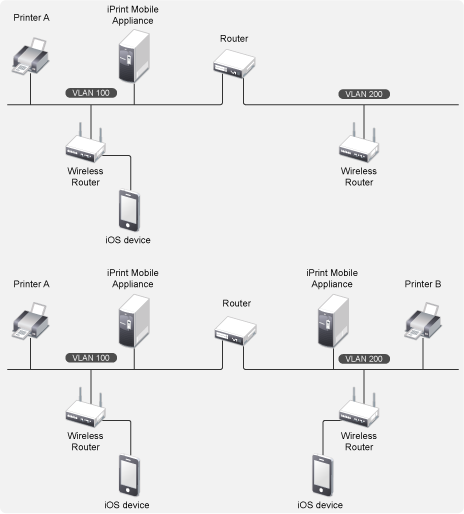
In this configuration, the mDNS advertisement is instantly injected into the network. In the above configuration, printer 'A' is visible to VLAN 100 wireless users, and printer 'B' is visible to VLAN200 wireless users. The printers are not visible across the VLANs.

Enabling AirPrint through iPrint

To enable AirPrint through iPrint:

  1. On a Web browser, use either the DNS name or the IP address to access the Management Console. For example, https://10.0.0.1:9443 or https://iprint.example.com:9443.

  2. Specify the user name and password, then click Log in.

  3. Click iPrint Appliance Configuration.

  4. Under Administration, click Printers.

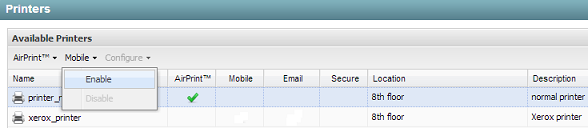
  5. Select a printer for which you want to enable AirPrint.

    The AirPrint and Mobile drop‐down menus are activated.

  6. Click the AirPrint drop-down menu, then click Enable Advertising.

iPrint AirPrint is now enabled on the iPrint printer. You can print to an iPrint AirPrint enabled printer from any iOS device.

Disabling AirPrint through iPrint

To disable AirPrint through iPrint:

  1. On a Web browser, use either the DNS name or the IP address to access the Management Console. For example, https://10.0.0.1:9443 or https://iprint.example.com:9443.

  2. Specify the user name and password, then click Log in.

  3. Click iPrint Appliance Configuration.

  4. Under Administration, click Printers.

  5. Select a printer for which you want to disable AirPrint.

    The AirPrint and Mobile drop‐down menus are activated.

  6. Click the AirPrint drop-down menu, then click Disable Advertising.

IMPORTANT:If a printer is shut down or redirected to another printer, you must disable AirPrint advertising. This ensures that users do not receive errors when trying to print to non-functional printers.

5.5.3 Configuring for Email Printing

iPrint Appliance contains an email printing feature. Using email printing, you can print documents from any device capable of sending emails. You can print emails by specifying email printing commands in the subject line of the email. You can also print documents by emailing them to your printer as attachments.

When you enable email printing, the email address you provide becomes the global print email address. You can also configure a printer for private email printing by providing a specific email address to each printer.

NOTE:To enable private email printing, you must first enable the email printing feature.

The difference between global email printing and private email printing is:

  • Global Email Printing: When you enable email printing, you are prompted to specify an email address. This email address is the global print email address. When configured for email printing, iPrint Appliance becomes a client to an email server. The global email account inbox is polled for incoming print jobs, which are then routed to the intended printer.

  • Private Email Printing: With private email printing, you can assign a specific email address to each printer. When a user sends an email printing request, the print job is sent directly to the printer. Users do not need to specify any print commands in the subject line of the email.

Email printing is not enabled by default. You can enable email printing through the Management Console. You must create a unique email address for iPrint Appliance to receive and process print requests.

IMPORTANT:If you enable auditing for email print jobs, the email address of the user is logged in the iPrint audit logs. If the same email address is populated for the user object in the LDAP source, then the user FDN is logged instead of email address. This is important if you are using an accounting software to ensure that jobs are tracked or accounted correctly.

Enabling Email Printing

  1. On a Web browser, use either the DNS name or the IP address of iPrint Appliance to access the Management Console. For example, https://10.0.0.1:9443 or https://iprint.example.com:9443.

  2. Specify the user name and password, then click Log in.

  3. Click iPrint Appliance Configuration.

  4. Under Administration, click Mobile Configuration.

  5. Choose Enable email-based printing.

    This email address is the global print email address.

  6. Specify the following information:

    Email address: Specify the full email address that is used to queue global print jobs. The global email address must be unique for each copy of iPrint Appliance that you deploy.

    WARNING:You must create an exclusive email account to be used for iPrint Appliance. If you provide an existing email address (for example, your official email address), the iPrint Appliance mobile server immediately starts processing all existing emails in the inbox, replies to every mail with a response, then deletes all the received emails.

    Account Username: Specify the user name for iPrint Appliance to log in to the email server to access the global email account. Account Username must be the user name of the email address that you specified in the Email address field.

    Account Password: Specify the password for iPrint Appliance to log in to the email server to access the global email account.

    Re-type Password: Specify the password again to confirm.

    Incoming Mail Server: Specify the address of the incoming email server for the email account. For example, imap.example.com.jobs. The default POP3 and IMAP protocol ports are listed below:

    Incoming Server Type: iPrint Appliance supports IMAP and POP for incoming print jobs. Select the protocol that your email server supports. For more information, see Section A.1, Incoming Mail Server Parameters.

    Outgoing (SMTP) Mail Server: Specify the address of the outgoing email server for the email account. For example, smtp.example.com. The iPrint Appliance uses SMTP protocols to send email back to users who submit email-based print jobs in order to report their job status. For more information, see Section A.2, Outgoing Mail Server Parameters.

    Enable Mail-body Printing: With email-based printing, attachments are always printed. This option allows the email message body to also be printed.

    Polling Interval: Configures the interval (in seconds) at which emails are fetched from mail servers.

  7. Click Save.

IMPORTANT:When using email printing, the print command in the subject line might trigger spam filters. To avoid this issue, configure your email system to allow print-specific emails. Include the approved print users in the spam filter of your email system to prevent unwanted print requests.

Enabling Private Email Printing

  1. On a Web browser, use either the DNS name or the IP address to access the Management Console. For example, https://10.0.0.1:9443 or https://iprint.example.com:9443.

  2. Click the iPrint Appliance Configuration icon.

  3. Under Administration, click Printers.

  4. Select a printer, click the Configure drop-down menu, then click Private Email Settings.

  5. Specify the following information, then click OK.

    Account

    • Email Address: Specify the full email address of the mailbox to be polled for the print jobs. When an email-based job arrives, the print job is processed to the printer. For example, print@example.com.

    • Username: Specify the user name to be used by iPrint Appliance to log in to the email server to access the private printer email account. For example, iprint.

    • Password: Specify the password for iPrint Appliance to log in to the email server to access the private printer email account.

    • Retype Password: Confirm the account password.

    Server

    • Incoming Mail Server: Specify the address of the incoming email server for the email account. For example, imap.example.com.

    • Outgoing Mail Server: Specify the address of the outgoing email server for the email account. For example, smtp.example.com.

    • Access Method: iPrint Appliance supports two different protocols to poll for incoming print jobs. Select POP or IMAP depending on the protocol that your email server supports.

Email Printing Commands

You can print the body of the email and the attachments by using a few simple print commands in the subject line of your email.

Basic Print Commands

help

Provides information on email printing commands.

list printers

To get the names of the available printers, send an email to the iPrint server address (for example, iprint@novell.com) with the subject line list printers.

print printer=<printer_name>

Prints your email and its attachments to the specified printer. For example, print printer=hp#Test Mail.

If you print to a specific printer by using the printer’s email address, the print printer command is ignored.

hold printer=<printer_name>

Queues your email along with its attachments and sends you the job ID as acknowledgement.

resume

Resumes the printing of a job that you put on hold. There are two ways to print a job on hold:

  • Send an email with subject resume followed by the job ID. For example, resume 10

  • Send an email with the original subject line prefixed with resume. For example, resume#Test Mail

cancel

Cancels a job that you put on hold. There are two ways to cancel a job on hold:

  • Send an email with subject cancel followed by the job ID. For example, cancel 10

  • Send an email with the original subject line prefixed with cancel. For example, cancel#Test Mail

status

Displays the status of a job. There are two ways to check the status of a job:

  • Send an email with subject status followed by the job ID. For example, status 10

  • Send an email with the original subject line prefixed with status. For example, status#Test Mail

move

Moves a job to a new printer. There are two ways to move a job to a new printer:

  • Send an email with subject move, the job ID, and the name of the new printer. For example, move 10 printer=<PrinterName>

  • Send an email with the original subject line prefixed with move, the name of the new printer, and #. For example, move printer=<PrinterName>#Test Mail

list jobs

Lists the details of the held jobs.

default printer

Displays the default printer.

default printer=<PrinterName>

Sets a particular printer as your default printer. After you set the default printer, you do not need to include the printer name while printing to the default printer. You only need to use the print command followed by the email subject. For example, print#Test Mail.

NOTE:If a printer name contains spaces, enclose the printer name within double (") or single (') quotes. For example, print printer='HP PRINTER'.

NOTE: To separate the email subject from the command, use #. For example, print printer=hp#Test Mail.

Additional Print Commands

In addition to the basic print commands listed above, you can use these commands to refine your printing:

portrait [portrait=yes/portrait=y (or) portrait=no/portrait=n]

Prints your email content in portrait orientation. For example, print printer=hp portrait=y#Test Mail

landscape [landscape=yes/landscape=y (or) landscape=no/landscape=n]

Prints your email content in landscape orientation. For example, print printer=hp landscape=y#Test Mail

color [color=yes/color=y (or) color=no/color=n]

Prints your email content in color. For example, print printer=hp landscape=y color=y#Test Mail.

pages

Prints a given range of pages in your email. For example, the command print printer=hp landscape=y color=y pages=1-3#Test Mail prints pages 1, 2, and 3.

copies

Prints the specified number of copies of your email and its attachments. For example, the command print printer=hp landscape=y color=y pages=1-3 copies=5#Test Mail prints 5 copies of pages 1, 2, and 3.

duplex [duplex=yes/duplex=y (or) duplex=no/duplex=n]

Prints your email and its attachments on both sides of the printing paper. For example, the command print printer=hp landscape=y color=y pages=1-3 copies=5 duplex=y#TestMail prints 5 copies of pages 1, 2, and 3 in duplex mode.

media

Prints your email and its attachments with the specified paper type. The default paper type is “LETTER.” You can change the default paper type by using the iPrint Appliance Management Console. The other available print paper types are A3, A4, and other common paper types. For example, the command print printer=hp landscape=y color=y pages=1-3 copies=5 duplex=y media=A3#Test Mail prints 5 copies of pages 1, 2, and 3 in duplex mode, on an A3 size paper.

mailbody [mailbody=yes/mailbody=y (or) mailbody=no/mailbody=n]

Prints either your email and its attachments or only the attachments from your email without the email body. For example, using the command print printer=hp landscape=y color=y mailbody=n#Test Mail prints only the email attachments in landscape mode.

NOTE:If you do not specify any of the additional commands, your print job is carried out according to the default preferences set by your administrator.

IMPORTANT:When printing to a specific printer using the printer’s private email address, you do not need to specify the printer’s name in the command. You can also leave the subject line empty. Printing is carried out according to the default print options set by the administrator.

However, you must specify the print command in the following scenarios:

  • The administrator changes the subject_optional_for_printer_specific_emails to False in the iPrint Appliance Server Configuration file located at /etc/opt/novell/iprintmobile/conf/iprintmobile.conf.

  • If you want to customize the print options, you must specify the print command, along with the required print options. For example, print landscape=y color=y pages=1-3 copies=5 duplex=y media=A3#Test Mail.

5.5.4 Generating QR Code for Printer

User can scan a QR code to select a specific printer on their mobile device. To generate the QR code for the printer, perform the following steps:

  1. Create a QR code using any QR code generator.

    The generator might include multiple formats, ensure to use Plain text format.

    The format to use is ipp://<server ip or dns>/ipp/<printer name>

    where the printer name is case-sensitive.

  2. Print the generated QR code and paste it on the printer.