3.1 Setting Up Integrated Login
The Novell® Client™ 2.0 for Linux provides a single, synchronized login to the SUSE® Linux desktop and your Novell network. Users enter their name and password only once to access all the resources they are authorized to use.
IMPORTANT:The integrated login feature is not available if you log in as the root user, and the integrated login feature does not work if a workstation is set up to not ask for a password in the display manager greeter.
For integrated login to work, the Novell Common Authentication Services Adapter (CASA) must be installed and enabled. CASA is a common authentication and security package that provides a set of libraries for application and service developers to enable single sign-on to an enterprise network.
3.1.1 Installing and Enabling CASA
CASA is installed by default with SLED 10 SP1, but it is not enabled. CASA is not installed or enabled by default with openSUSE 10.2.
Installing CASA
-
Launch the YaST Control Center.
GNOME: Click .
KDE: Click the menu button > .
-
If you are not logged in as root, type the root password, then click .
-
Click in the left column, then click in the right column.
-
Click in the drop-down list.
-
Type casa in the Search field, then click .
-
Select the casa packages for installation.
-
Click to install all of the selected packages.
YaST displays the progress of the package installation.
-
(Conditional) If a message informs you that other package selections have been made to resolve dependencies, click .
-
(Conditional) If a message prompts you to insert a CD, put the CD in the CD drive, then click .
-
After all the packages have been installed, click to close the YaST Control Center.
Enabling CASA
-
Launch the YaST Control Center.
GNOME: Click .
KDE: Click the menu button > .
-
Click in the left column, then click in the right column.
-
Click , then click .
-
Click to close the CASA Configuration Wizard.
3.1.2 Configuring Integrated Login
-
Use one of the following methods to open the Novell Login dialog box:
-
Click
 > .
> .
-
GNOME: Click .
-
KDE: Click the menu button > .
-
-
Enter your username and password, then click .
-
Specify the tree, context, and server information for the server you want to connect to.
-
Click the tab, then make sure is selected (it is selected by default).
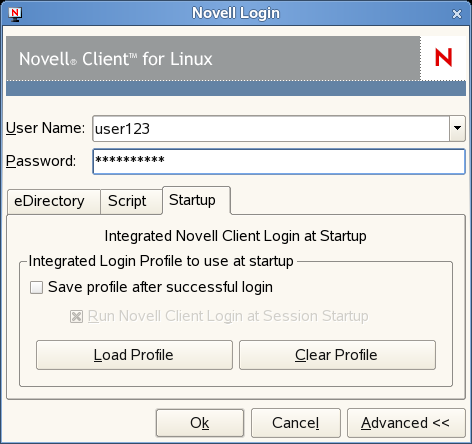
-
Select to save the Novell Login dialog settings to be used for all subsequent session logins.
You must have the and fields and the and fields on the eDirectory tab filled out for this to be saved.
IMPORTANT:An integrated login does not happen at the next session startup without a saved profile.
-
(Optional) Click to populate all fields in the dialog based on the saved settings.
-
(Optional) Click to remove the profile settings.
-
Click to log in to the server specified in Step 3.
The next time you log in to your SUSE Linux workstation, you will also automatically log into the Novell server specified in Step 3.
3.1.3 Managing System Wide Integrated Login Settings
-
Launch the Novell Client Configuration Wizard using either of the following methods:
-
Click
> .
-
In YaST, click .
-
-
Select , then click .
-
On the Login Settings page, select or deselect .
This enables or disables the integrated login feature for the entire system. This is set by the administrator and cannot be overridden by the user.
-
Select to display the Integrated Login Script Results window when the user desktop is launched.
If this option is disabled, all login scripts are run silently and the Integrated Login Script Results window is not displayed, but login scripts are still processed.
-
Select if you want remove the existing login profiles for all users on this workstation.
-
Click .