Because the default filters don't automatically allow certain packet types to cross the firewall, you may also need to enable filter exceptions to enable other services.
The system-defined packet types enable you to configure stateful packet filter exceptions for the following services:
DNS over UDP
DNS over TCP
FTP
Ping
POP3
Simple Mail Transfer Protocol (SMTP)
Telnet
HTTP
HTTPS
With stateful (dynamic) packet filtering, you only need to define the exceptions that allow specific types of outbound traffic going to specific destinations to be forwarded by the Novell BorderManager 3.7 server. Stateful packet filtering monitors each connection and creates a temporary (time-limited) filter exception for the inbound connection. This allows you to block incoming traffic originating from a particular port number and address, while still allowing return traffic from that same port number and address.
Stateful packet filters track the outgoing packets allowed to pass and allows only the corresponding response packets to return. When the first packet is transmitted to the public network (Internet), a reverse filter is dynamically created. To be counted as a response, the incoming packet must be from the same host and port to which the outbound packet was originally sent.
To configure stateful packet forwarding exceptions to forward outbound traffic through the Novell BorderManager 3.7 server:
At the server console prompt, enter
LOAD FILTCFG
From the Filter Configuration Available Options menu, select Configure Interface Options > press Enter.
Select an interface from the list press Tab to switch between Public and Private.
Any interface listed can be designated as either a public (external) interface or a private (internal) interface.
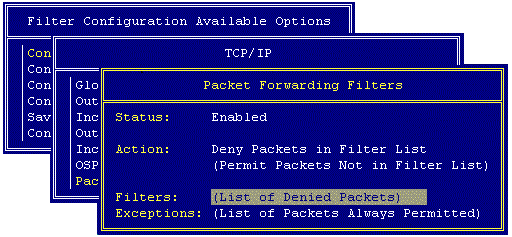
The screen displayed should appear similar to the following.
Figure 5 Packet forwarding filters screen
Do the following:
If the status is Disabled press Enter > select Enabled > press Enter again. Any TCP/IP filters previously configured become active immediately.
If the action is Permit Packets in Filter List > press Enter > select Deny Packets in Filter List > press Enter again. Packets matching the types listed in the filter list will not be forwarded by the Novell BorderManager 3.7 server.
Select Filters and press Enter to display the filter list.
A default filter set up during installation blocks all inbound IP packets coming from the public interface.
Press Esc.
Select Exceptions > press Enter to display the exceptions list.
A default filter exception that is set up during installation allows all outbound IP packets to be routed through the public interface.
Other filter exceptions permit the following inbound packet types through the public interface:
Secure Sockets Layer (SSL) authentication---TCP port 443.
Dynamic TCP---TCP ports 1024 to 65535.
Dynamic UDP---UDP ports 1024 to 65535.
VPN master/slave (IPX/TCP)---TCP port 213.
VPN client authentication---TCP port 353.
VPN keep-alive---UDP port 353.
VPN Simple Key Management for Internet Protocol (SKIP) Protocol 57.
Web proxy cache (WWW-HTTP)---TCP port 80.
NOTE: Although the default filter exceptions allow certain VPN-related packets to be forwarded, the default VPN exceptions do not allow encrypted packets to be routed from one VPN member to another. The filters for the VPN tunnels must be updated each time you configure a VPN server. For more information, refer to Completing Advanced Setup, Configuration, and Management Tasks, and Virtual Private Network Overview and Planning.
Press Ins to define a new outbound packet forwarding filter exception.
The Define Exception screen is displayed, similar to the following.
Figure 6 Define Exception screen
Select Source Interface Type > press Enter.
Select Interface or Interface Group > press Enter.
Select Source Interface > press Enter.
Select the Novell BorderManager 3.7 server's private interface or interface group > press Enter.
If you selected a WAN interface, select Source Circuit and press Enter to define the following circuit information that applies to the interface:
Local Frame Relay DLCI # (for frame relay)---The data-link connection identifier (DLCI) circuit number used for calls.
Remote System ID (for PPP, X.25, or ATM)---The name of the remote system server or remote peer associated with this circuit.
Circuit Parameter Type (for X.25 or ATM)---The type of virtual circuit used to establish a connection.
Remote DTE Address (for X.25)---The X.121 data terminal equipment (DTE) address assigned to the specific remote DTE.
Remote ATM Address (for ATM)---The address assigned to the specific remote Asynchronous Transfer Mode (ATM).
Select Destination Interface Type > press Enter.
Select Interface or Interface Group > press Enter.
Select Destination Interface > press Enter.
Select the Novell BorderManager 3.7 server's public interface or interface group > press Enter.
If you selected a WAN interface, select Destination Circuit > press Enter to define the following circuit information that applies to the interface:
Local Frame Relay DLCI # (for frame relay)---The DLCI circuit number used for calls.
Remote System ID (for PPP, X.25, or ATM)---The name of the remote system server or remote peer associated with this circuit.
Circuit Parameter Type (for X.25 or ATM)---The type of virtual circuit used to establish a connection.
Remote DTE Address (for X.25)---The X.121 DTE address assigned to the specific remote DTE.
Remote ATM Address (for ATM)---The address assigned to the specific remote ATM.
Select Packet Type > press Enter.
The Defined TCP/IP Packet Types window is displayed. You can select any of the following predefined stateful packet forwarding filters.
Name
Packet Type
Transport Type
Destination Port
Stateful Filtering
dns/tcp-st
DNS
TCP
53
Enabled
dns/udp-st
DNS
UDP
53
Enabled
ftp-pasv-st
FTP
TCP
21
FTP_PASV
ftp-port-st
FTP
TCP
21
FTP_PORT
ftp-port-pasv-st
FTP
TCP
21
Enabled
ping-st
PING
ICMP
N/A
Enabled
pop3-st
POP3 Mail
TCP
110
Disabled
smtp-st
SMTP
TCP
25
Enabled
telnet-st
Telnet
TCP
23
Enabled
www-http-st
HTTP
TCP
80
Enabled
www-https-st
HTTPS
TCP
443
Enabled
For Src Addr Type, select Any Address, Host, or Network.
You should select Any Address unless you want the exception to be valid only for a specific host or network on your private network.
If you selected Host or Network, select Src IP Address > enter the host or network address.
For Dest Addr Type, select Any Address, Host, or Network.
You should select Any Address unless you want the exception to be valid only for packets addressed to a specific host or network outside the private network.
If you selected Host or Network, select Dest IP Address > enter the host or network address.
(Optional) For Logging, press Enter and change the status from Disabled to Enabled.
(Optional) Enter a comment in the Comment field describing the purpose of the filter. Press Esc > select Yes to save the filter. Press Esc until you are prompted to exit FILTCFG.
IMPORTANT: If you enabled logging for a filter exception, you must also enable global logging for TCP/IP. Both global logging and logging for the specific filter exception must be enabled for logging to occur.
Setting Up Inbound Packet Filter Exceptions
If you elected to secure the Novell BorderManager 3.7 server's public interface and support Novell IP Gateway or SOCKS clients, you may be required to enable inbound packet filter exceptions to allow them to connect through the public interface. Novell IP Gateway clients connect through TCP port 8224 and port 8225, and SOCKS clients connect through TCP port 1080.
To configure packet forwarding exceptions to forward inbound Novell IP Gateway and SOCKS traffic go through the Novell BorderManager 3.7 server's public interface:
Select Exceptions > press Enter to display the exceptions list.
Press Ins to define a new inbound packet forwarding filter exception.
Configure the exception for Novell IP Gateway clients as follows:
Select Source Interface Type and press Enter.
Select Interface or Interface Group and press Enter.
Select Source Interface and press Enter.
Select the Novell BorderManager 3.7 server's public interface or interface group and press Enter.
Select Packet Type > press Enter.
Press Insert to define a new TCP/IP packet type.
Select Name and enter a name for the packet type.
Select Protocol and press Insert.
Select TCP from the list of commonly used Internet protocols.
Accept <All> for the Source Port(s).
Select Destination Port(s) and enter 8224-8225.
Select Comment and enter a description of the packet type, such as Novell IP Gateway Client or SOCKS client.
Press Esc to add the packet type to the top of the packet list.
Select the packet type you added.
Select Dest Addr Type and change the setting from Any Address to Host.
Select Dest IP Address and enter the IP address assigned to the Novell BorderManager 3.7's public interface.
(Optional) Select Comment and enter a description of the filter.
Press Esc to add the exception.
Configure the exception for SOCKS clients.
Press Esc until you are prompted to exit FILTCFG.
Defining Custom Stateful Packet Types
The Novell BorderManager 3.7 firewall has many static packet types defined in addition to the stateful packet types listed in Setting Up Outbound Packet Filter Exceptions . Static packet types are those without -st in their names. A static packet type is used to define a filter operating on traffic in one direction only. For example, instead of creating a stateful packet filter in one direction and relying on the system to enable the time-limited filter in the reverse direction, you can create two static packet filters, one for packets flowing in each direction. However, stateful packet filters provide more security than static packet filters.
If the stateful packet types already defined by the Novell BorderManager 3.7 server do not include a packet type you want to filter, and you are hesitant to use static packet filters, you can create a custom stateful packet type.
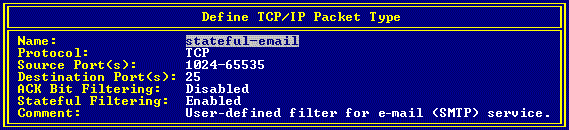
To define a custom stateful packet type, complete the following steps:
From the Defined TCP/IP Packet Types window, press Insert.
Enter the name of the new packet type in the Name field.
For the Protocol field, press Insert and select IP, ICMP, IGMP, TCP, or UDP.
If you selected TCP or UDP, enter the source and destination port number or range of port numbers.
Do not change the default setting of Disable for ACK Bit Filtering.
Because ACK bit filtering automatically occurs when stateful packet filtering is enabled, you don't need to enable ACK bit filtering separately. The software will not allow you to enable both ACK bit filtering and stateful packet filtering for the same filter.
Enable stateful filtering by selecting one of the following stateful filtering modes:
Enabled
Enabled for Active FTP only (PORT)
Enabled for Passive FTP only (PASV)
NOTE: The last two stateful filtering modes apply only to FTP packet types (port 21). If you want stateful filtering for both Active FTP and Passive FTP, select Enabled.
(Optional) Enter a comment to describe the packet type.
The TCP/IP packet type definition will look similar to the following.
Figure 7 Define TCP/IP Packet Type
Press Esc to add the packet to the Defined TCP/IP Packet Types list.
After the packet type has been added to the list, you can set up a stateful packet filter using this packet type definition.