3.2 Configuring Cache Parameters
The following sections describe how to configure advanced cache parameters for Novell BorderManager:
3.2.1 Configuring Cache Aging Parameters
This section includes configuration of HTTP, FTP, and Gopher revalidation times.
-
Log in to iManager.
-
Select
-
Browse to and select the BorderManager server or container that you want to configure, then click .
-
Select in the section.
-
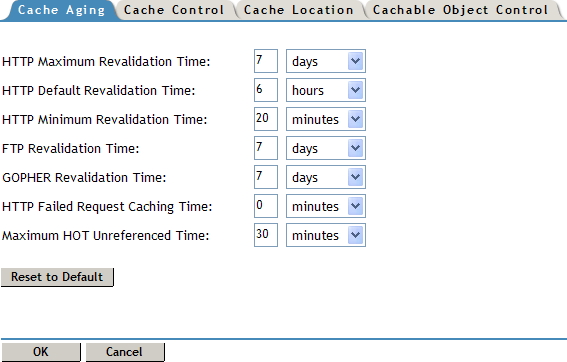
Select the tab, then specify the following HTTP cache aging values:
HTTP Maximum Revalidation Time: The maximum number of hours or days that HTTP data is cached before it is revalidated with the origin Web server. This overrides the Time to Expire specified by the origin Web server if it is greater than this value.
HTTP Default Revalidation Time: The number of hours or minutes that HTTP data is cached before it is revalidated with the origin Web server. The data is revalidated if the origin Web server does not specify the Time to Expire.
HTTP Minimum Revalidation Time: The minimum number of hours or minutes that HTTP data is cached by the server. This overrides the Time to Expire specified by the origin Web server if the time specified is less than this value.
This parameter does not override the No Cache or Must Revalidate directives from the origin Web server.
FTP Revalidation Time: The number of hours or days that FTP data is cached before it is revalidated with the origin Web server.
Gopher Revalidation Time: The number of hours or days that Gopher data is cached before it is revalidated with the origin Web server.
HTTP Failed Request Cache Time: The number of seconds or minutes after which HTTP will return a failure for the requested pages that the proxy server could not retrieve from the origin Web server.
Maximum Hot Unreferenced Time: How long a node (or page) stays hot, or in a state where it can be more quickly accessed by the browser again after it has accessed the node once. The default is 20 minutes, after which the node is closed and the information is removed from memory. It takes longer for the proxy to access a node in cold state.
This parameter works in conjunction with the Maximum Number of Hot Nodes parameter on the Cache Control tab. For more information, see Section 3.2.2, Configuring Cache Control Parameters.
-
(Optional) Click to reset values to the default.
-
Click .
-
Click to save the changes.
3.2.2 Configuring Cache Control Parameters
These parameters let you specify the maximum cached file size for each protocol, as well as the cache hash table size, number of hot nodes, and age ratio of the cache size to deleted files.
To configure cache control parameters:
-
Log in to iManager.
-
Select
-
Browse to and select the BorderManager server or container that you want to configure, then click .
-
Select in the section.
-
Select the tab.
Specify the following information:
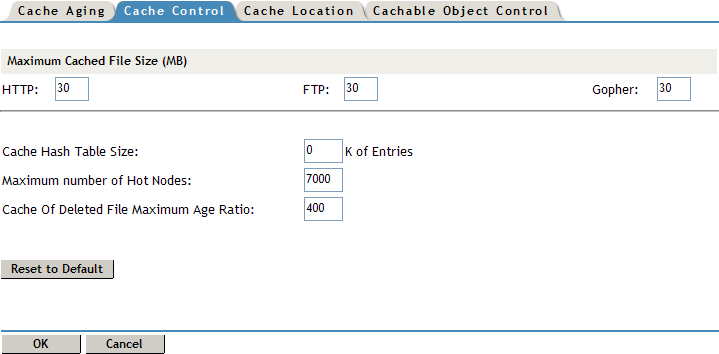
Maximum Cached File Size (MB): Specify the maximum size in megabytes of the file that is cached for each URL protocol request type. Any file larger than the specified size is not cached. You can specify different values for HTTP, FTP and Gopher. The default is 30 MB.
Cache Hash Table Size: The table is used by the proxy to locate a URL in its cache. Its size determines the speed of the information lookup. The default is 128,000 entries, or 51 KB of memory.
Increasing the maximum number of hot nodes might enhance performance more than increasing the size of the cache hash table.
Maximum Number of Hot Nodes: This is the number of nodes or pages that are hot, or in a state to be more quickly accessed by the browser again after it has accessed the node once. This parameter works in conjunction with the Maximum Hot Unreferenced Time parameter on the Cache Aging tab.
The maximum number of hot nodes must always be less than the maximum number of open files in NetWare®. If you increase the maximum number of hot nodes from the default, make sure you also increase the maximum number of open files, up to a maximum of 100,000.
Cache of Delete File Maximum Age Ratio: This value determines how much space on the volume is used for caching and how many deleted files remain on the volume.
-
Click .
-
Click to save the changes.
3.2.3 Configuring Cache Location Parameters
You can specify a different location for the cache.
-
Log in to iManager.
-
Select
-
Browse to and select the BorderManager server or container that you want to configure, then click .
-
Select in the section.
-
Select the tab.
Specify the following information:
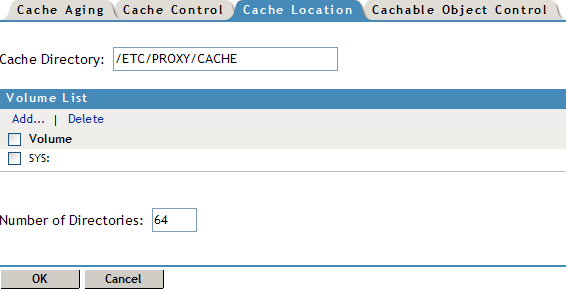
Cache Directory: Specify a server pathname as a cache storage directory. The default is \etc\proxy\cache.
The volume name is optional. If you do not specify a volume name, the default sys: is used. For improved stability and performance, we recommend that you set up a separate volume other than sys: for the proxy cache directory, with compression and suballocation disabled, no long namespace support, and block size set to 16K.
Volume List: This specifies a different cache location. To add a new volume name, click , then specify a name in the field. Make sure you include a colon at the end of the volume name. Click .
To delete a volume, select the check box next to the volume, then click .
Number of Directories: Specify the number of directories available per volume.
-
Click .
-
Click to save the changes.
3.2.4 Configuring Cachable Object Control Parameters
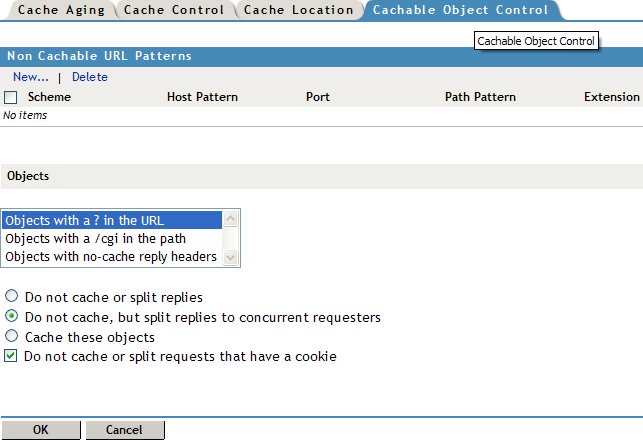
These parameters let you control which URL patterns are not cached, as well as what happens with objects that have a question mark (?) in the URL, /cgi in the pathname, or a no-cache reply header.
You can specify whether to cache URLs and objects with certain predefined patterns or access them directly without caching by the proxy server (be noncachable).
When no caching is specified, the proxy server simply forwards the request from the server to the requesting client. Objects with a question mark (?) in the URL, /cgi in the pathname, or a no-cache reply header are not cached by default unless you specify otherwise.
To configure cachable object control parameters:
-
Log in to iManager.
-
Select
-
Browse to and select the BorderManager server or container that you want to configure, then click .
-
Select in the section.
-
Select the tab.
-
Click to add a list of URL patterns that are not be cached.
-
Specify the following information:
Scheme Type: Specify a scheme type of HTTP, FTP, Gopher, or HTTPS.
Hostname: Specify any hostname or specify a specific hostname that must be matched. You can also select the check box to match any hostname that ends with the specified domain.
Port: Specify any port number or specify a specific port number.
Path: Specify any path or specify a specific pathname. You can also select the check box to match any path that begins with the specified name.
Extension: Specify any extension or specify a specific extension.
-
Click .
If you specify a long list of patterns, the proxy server performance is affected.
-
-
Specify the actions taken for the following objects:
-
Objects with a ? in their URL
-
Objects with /cgi in their paths
-
Objects with a no-cache reply header
These objects are not cached by default. Specify to cache these objects if you are setting up an accelerator. You can also specify to not cache and send replies to all browsers that request the information at the same time. This reduces how often the proxy must retrieve information from the origin Web server.
Specify to not cache or split requests that have a cookie to avoid sending different replies to different users for the same request.
-
-
Click .
-
Click to save the changes.