16.4 Client-to-Site Configuration
This utility helps you configure VPN client-to-site services on your network.
Prerequisites:
-
Trusted Root Container: The same as the server (on which you want to host the client-to-site service) trusted root container. Referred to as Trusted Root in the pages and in Novell eDirectory.
-
Server Trusted Root Object: Under the Trusted Root Container mentioned above.
16.4.1 Creating a New Client-to-Site Configuration
You can modify or delete the existing client-to-site services. You can also configure a new client-to-site service. To create a new client-to-site configuration, do the following:
-
Click > .
-
Provide a . With this, you have begun configuring a new client-to-site configuration. You can configure the client-to-site connection with the following parameters:
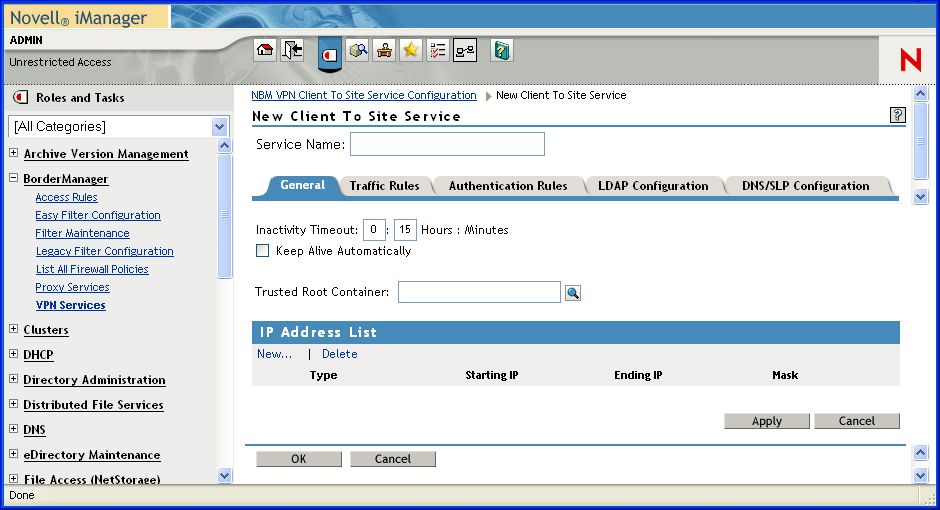
16.4.2 General
These are the general properties of the client-to-site service. Make sure to click button if you have made any modifications to the general parameters.
-
Provide the for your client-to-site configuration..
-
By default, the tab is selected. You can configure one or more of the following:
-
Inactivity Timeout: Specifies amount of time that a connection to a VPN client remains up if no encrypted data is received by the server from the client. The default value is 15 minutes.
-
Keep Alive Automatically: A connection from a VPN client remains up indefinitely even if no data is sent or received. The default is Disabled. Enable this if you want to keep the connection alive indefinitely.
-
IP Address List: This is to assign a private address to the VPN client. The administrator must assign an address pool in the client-to-site service and this address pool should not fall within any protected network behind this server, or the tunnel IP assigned to the server. This facility avoids an IP address conflict for two different clients having same IP address while residing two different NATs. During a session, after the IP address assignment is done, the client can access resources beyond VPN server if these resources have the VPN server's IP address as their default gateway. At least one address pool entry needs to be configured. The default client-to-site is associated with a network range 1.0.0.0 - 255.0.0.0. This does not work if the address pool is assigned on the same subnet as the VPN server interface.
Figure 16-3 Default Values for a New Client-to-Site Service.
-
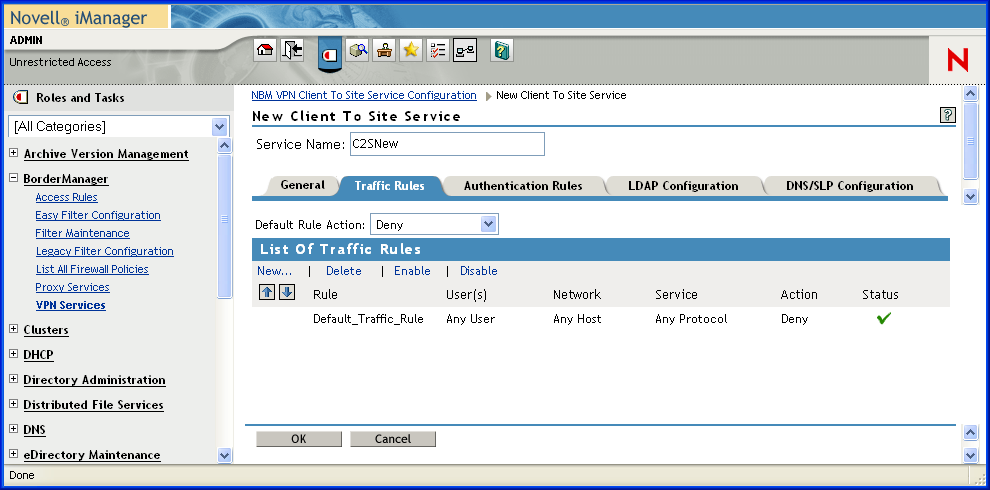
16.4.3 Traffic Rules
Traffic Rules are policies that govern accessibility for a user through a VPN connection. You can add, modify, or delete traffic rules for the client-to-site service. You can also change the priority of a traffic rule by moving it the up or down the list. The traffic rule at the top of the list has the highest priority.
HINT:A default traffic rule is automatically created. The default action of this traffic rule is to deny all packets. You need to modify the action of this default traffic rule.
Figure 16-4 Traffid Rule
-
Click to add a new traffic rule.
-
You can configure any one if the following in a traffic rule.
Use the
 icon to view the traffic rule parameters. On expanding each of the rules, the following can be configured.
-
HINT:The service provides the facility to configure and store your entries as profiles that can be used later when you log in to the service.
Figure 16-5 Rxpanded View of The Traffic Rules
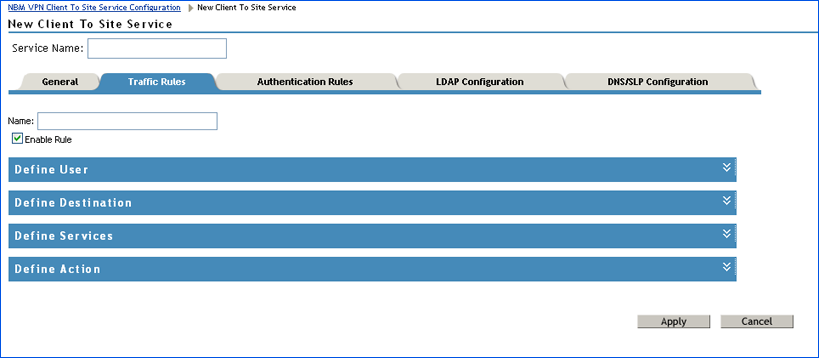
Define User
Use this page to define the users to whom this rule will apply. Click to see this page. The values shown on the page are the default values. You can modify them.
You can apply this rule to any user, or you can specify a list of users or certificate users.
If you want to select a user list to which you want to apply this rule, select the Only User List option button. You can create a list of users or certificate users. To add users, click . To add certificate users, click . This service also provides for selection of user groups or a group of users with a shared context.
The following two kinds of users can be selected here:
All Users
-
Click and select the user from the page.
-
Click
 to find the User. The User might be in a context. Click the Context down-arrow to search for a User within a context.
The page displays the user list after an Administrator user is selected from the list.
Only User List
-
Click to open the dialog box.
HINT:Specify the of the user. Subject can also be specified. Specify the same that you provided while creating User Certificates in ConsoleOne.
The certificate subject name should be in the format cn=admin. o=novell or o=novell. cn=admin. For exact subject name, view the certificate subject name from the user certificate.
To view the certificate subject name go to and right-click the > > > . Select the certificate from the list, then click Details.
Select the check box if you want to add another . Click . If you have selected the check box, the same dialog box will appear again; if not, the next page is displayed.
LDAP Remote User or Group name list
The LDAP Group or User name allows the administrator to specify the user or group identities that are allowed to use the LDAP form of authentication for VPN. When the user authenticates using the LDAP mode, the LDAP NMAS™ method associates one of the configured user or group names from this list as the user’s identity. If a user’s name as well as his group name is present in the list, that username is selected as the identity. This list is unordered. Otherwise, if a user belongs to any of the groups in the list, that group name is chosen as the user’s authenticating identity. Later, the authenticating identity will be compared against the traffic rules to match the policy to be applied for this client-to-site connection.
For example:
The client-to-site LDAP group or username list contains the following LDAP distinguished names:
cn= group1, o=xyz
cn= group2, o=xyz
cn= user1, o=xyz
The client-to-site traffic rules contains the following LDAP identity-based rules, in the following priority order:
Rule1: cn=group2, o=xyz - Encrypt
Rule2: cn=user1, o=xyz - Bypass
Rule3: cn=group1,o=xyz - Deny
If a user cn=user1, o=xyz (who is also a member of group1 and group2) authenticates, the identity is assigned as cn=user1, o=zyx, and the Rule2 is applied for traffic.
If a user cn=user2,o=novell (who is also a member of group1 and group2) authenticates, the identity is ascertained by comparing the user’s groups with the LDAP group or user list during authentication. The one that matches is assigned as the identity. The same identity (either group1 or group2) is later used to select the traffic rule to be applied. If a user belongs to multiple groups, the identity might match the traffic rules based on any one of the groups.
Define Destination
Use this page to define destinations to which the rule will apply. Click to see this page. The values shown on the page are the default values. You can modify them.
-
You can apply this rule to any host or you can specify a list of address ranges or networks.
-
If you want to select a destination IP Address List to apply this rule to, select the option. You can create a list of IP Address ranges or networks. Click to create a list.
-
If you want to add a network to the destination list, select the network in the drop-down list and specify the network number (IP address) and subnet mask. Click .
-
If you want to add a network to the destination list, select the network in the drop-down list and specify the start and end values for the range. Click .
NOTE:You can specify only one address range or network entry per rule.
Define Services
Use this page to define the services to which the rule is applied.
-
Click to see this page. The values shown on the page are the default values. You can modify them.
The default service is . You can select the protocol to which the traffic rule is applied. For TCP protocols less than 1024, you can also specify the service port.
NOTE:You can specify one port at a time. If you want to set up more ports, specify new traffic rules for each port.
Define Action
Use this page to define the action that has to be performed.
Click to see this page. The values shown on the page are the default values. You can modify them.
-
Select if you want to discard all packets that match this traffic rule. Select if you want to bypass the tunnel for the packets that match this traffic rule. Select Encrypt if you want to encrypt the packets matching this traffic rule according to the encryption options that you have configured as shown in the next page.
-
The default is with an IKE key lifetime of 120 minutes. Default encryption and authentication algorithms are 3DES/HMAC-MD5.
You can choose to discard, bypass (allow unencrypted), encrypt the packets that match this traffic rule. If the action is Encrypt, you can also configure the encryption and authentication algorithms and the IKE lifetime.
16.4.4 Authentication Rules
Authentication Rules are policies that govern authentication of a user to a VPN server.
You can add, modify, or delete authentication rules for the client-to-site service. You can also change the priority of an authentication rule by moving it up or down the list. The authentication rule at the top of the list has the highest priority.
HINT:A default authentication rule is automatically created. The default action of this authentication rule is to deny all users. The default authentication rule always has the lowest priority in the authentication rule list.
-
You can configure any of the following in an authentication rule:
-
Users to whom this rule will apply.
-
Type of authentication to be performed.
-
Allow/Deny Action: If the action is set to Deny, the user cannot authenticate.
HINT:The service provides the facility to configure and store your entries as profiles that can be used later when you log in to the service.
-
-
Specify the name of the traffic rule. The following are discussed here:
Define User
Use this page to define the users to whom this rule will apply. Click to see this page. The values shown on the page are the default values. You can modify them.
You can apply this rule to any user, or you can specify a list of users or certificate users. See Section 16.4.3, Traffic Rules Traffic Rules > Define User for details on this page.
Authentication Condition
To define an authentication type:
-
You can select either or . If you select , you must configure one or more trusted roots. For NMAS Authentication, you can also configure the clearance level (Minimum Allowed Authentication Grade). For more details refer to the NMAS documentation.
-
Select , then click Add to open the next page.
-
Select from the list.
-
If you selected , you can configure the clearance level as shown in the illustration above. In this page, Password has been selected as the clearance level.
NOTE:Unless you have already configured a default security clearance for the users to a clearance level other than the one available while logging in, keep the minimum allowed authentication as logged in (which is the default).
Allow/Deny Action
-
Click to see this page. Allow is the default action.
-
You can select either the or the action for this rule.
Example of a Default NMAS Configuration
-
Log in to the iManager.
-
Choose the configuration on the VPN server under .
-
Select the service on the service list.
-
Go to > Click .
-
Provide the .
-
Select , and select .
-
Select , the following screen will be displayed.
-
Select as shown in the figure.
-
Under select .
-
Click > .
16.4.5 Remote LDAP Configuration
Configure LDAP to enable a remote authoritative directory for NMAS authentication using LDAP methods.
IMPORTANT:LDAP authentication uses SSL connections for authenticating the user from the Novell BorderManager server to the LDAP server. This requires the administrator to specify the trusted root container containing the Trusted Root object of the LDAP server.
The LDAP trusted root container configured in this purpose should contain only valid LDAP trusted root certificates, because the LDAP SSL client will fail to read certificates that are not valid LDAP trusted root certificates. Sometimes the LDAP SSL client fails to read some third-party certificates. We recommend that you create a separate trusted root container for storing LDAP trusted root certificates, and use it in the client-to-site LDAP configuration.
-
Remote LDAP Server Name: The name or IP address of the remote LDAP server to which the VPN server will talk for LDAP authentication.
-
LDAP Port: The LDAP secured port used by the VPN server to establish an SSL connection. The default value is 636.
-
LDAP Trusted Root Container: This should contain the remote LDAP server's issuer certificate. The certificate can be created from the remote LDAP server certificate.
-
LDAP Remote User or Group Name: The User or Group name of the remote LDAP user from the local Novell eDirectory. The names should have complete information, such as cn=admin, o=novell.
16.4.6 DNS/SLP Configuration
Use this page to configure DNS/SLP to be applied on Windows workstation during a VPN session.
-
DNS Configuration Address List: The address list of the DNS servers applied in the client during the VPN session. After a connection ends, the client will get back its original DNS information.
-
SLP Configuration Address List: The address list of the directory agents applied in the client during the VPN session. This is applicable if Novell authentication is taking place during the VPN session. After a connection ends, the client will get back its original SLP information.
16.4.7 Final Client-to-Site Page
If all your configurations are correct, click on the bottom of the client-to-site service page to save the client-to-site service configuration.
-
To delete the client-to-site service, click .
-
Click the service link if you want to modify any of the service properties.