2.6 Configuring the SOCKS V4 or V5 Gateway
This feature enables a proxy to authenticate through a SOCKS 4 or SOCKS 5 firewall. SOCKS is a circuit-gateway type of protocol. With SOCKS, hosts behind a firewall can gain full access to the Internet without the full IP reach. When SOCKS support is enabled, all requests sent to the Internet are forwarded to a SOCKS 5 server and the proxy is used for caching only.
When the proxy receives a request, it checks its cache. If the requested object is not in the cache, the proxy makes a TCP connection to the SOCKS server and redirects the request from the intranet to the SOCKS server, allowing for more secure Internet access. The SOCKS server then connects to the origin server and retrieves the object. Null and username/password authentication are supported.
2.6.1 Configuring the SOCKS Server
To configure a SOCKS V4 or V5 gateway:
-
Log in to iManager.
-
Select
-
Browse to and select the BorderManager server or container that you want to configure, then click .
-
Select from the section.
-
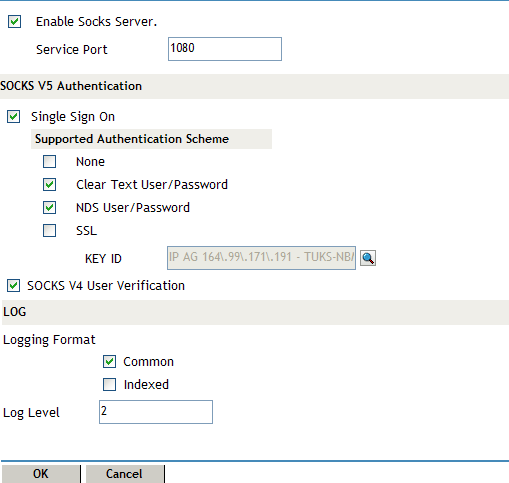
Select to enable SOCKS server.
-
(Optional) Specify the port number of the SOCKS server.
The default is 1080.
-
Select to enable single sign-on for SOCKS 5 clients.
When you select this option, if a user is already authenticated to NDS, the gateway performs its authentication in the background and the user is not required to supply a username and password before accessing resources through the gateway. If single sign-on authentication is not enabled, the gateway authenticates users by using any of the authentication schemes that have been selected.
-
Select the authentication scheme from the section. You can select more than one option for authentication and encryption for SOCKS 5 client and server. For the authentication options, the highest priority selection that can be used by both the client and the server as the type of authentication that is used. You have the following SOCKS 5 authentication schemes:
None: No authentication. However, data is encrypted if the Secure Sockets Layer (SSL) option is also selected.
Clear Text User/Password: During Novell IP Gateway user authentication, the user’s password is transmitted across the wire in clear text without encryption. The password is checked against the password stored in NDS, but this is not the same as NDS authentication. However, if SSL is also selected, the password is encrypted before being sent.
NDS User/Password: The user is authenticated using the NDS username and password with a scheme that protects the secrecy of the password. However, data is not encrypted unless the SSL option is also selected. This option works only if the SOCKS 5 client software supports NDS authentication.
SSL: The SSL option requires that an SSL connection between the client and the server be established before the Novell IP Gateway can authenticate a user by using any of the other authentication schemes. Enabling this option also ensures the encryption of all data transmitted between the client and the server.
Key ID: If you select the SSL authentication scheme, you must also select a Key ID from the drop-down list. At least one Key ID must be created for the server in NDS prior to the selection of SSL. Novell Public Key Infrastructure (PKI) Services must be installed on your server.
NOTE:If you enable both SSL and access control, you must also select either or as a SOCKS 5 authentication method. This is because SSL does not authenticate a user to NDS.
-
Select if clients on your network support SOCKS 4. With user verification, the username is verified, but the user is not authenticated with a password before being allowed access to resources through the gateway.
-
Select one of the following logging format options:
Common: The common log format records standard information including a time stamp, source address, destination address, and the TCP/IP service used.
Indexed: A Novell audit-log format. The information recorded depends on the Novell BorderManager component from which information is collected.
-
Specify a number between 0 and 3 to indicate the type of information logged by the server.
0: No information.
1: Internet access information. The server records the user’s fully distinguished NDS name; the access protocol, such as HTTP; and the destination such as www.novell.com.
2: Error codes, such as NDS errors. Level 2 information can help you determine why a user cannot access a particular service.
3: Debugging information and internal server communications, such as socket calls. Level 3 information is typically of interest only to software developers.
Each log level is additive, so, level 1 information is also logged at level 2.
-
Click .
-
Click to save changes.
2.6.2 Configuring the SOCKS Client
To configure HTTP or FTP proxy support through SOCKS:
-
Log in to iManager.
-
Select
-
Browse to and select the BorderManager server or container that you want to configure, then click .
-
Select from the section.

-
Select to enable socks client.
-
Specify the IP address of the SOCKS server in the field.
-
(Optional) Specify the port number of the SOCKS server in the field.
The default is 1080.
-
Specify whether you want to authenticate. If you want to authenticate, specify the username and password for authentication.
-
Click .
-
Click to save changes.