2.5 Configuring Session Failover
The Novell® BorderManager® 3.9 proxy provides session failover support for SSL authentication. This ensures that you can switch between two proxies, or transfer the connection request from one proxy to the other, when connection fails, without re-authenticating. If you have deployed more than one proxy server and the session failover feature is enabled, the authentication details are shared across the proxy servers.
This section provides the following information on Session Failover:
2.5.1 Overview of Session Failover
The session failover of proxy servers involves two components, the AuthAgent and the ProxyAgent. The AuthAgent collects authentication information from ProxyAgents, which run on individual Novell BorderManager server. The authentication information is then shared among all the proxies even if the user is authenticated to only one proxy. The users’ password is never shared during the process.
ProxyAgent
The ProxyAgent (authchk.nlm) is configured on each Novell BorderManager proxy server and shares information with the AuthAgent. The ProxyAgent keeps the central repository in sync with all the local proxies.
The following activities could trigger a communication between the ProxyAgent and the AuthAgent:
-
New user login
-
User logout
-
Inactivity timeout
AuthAgent
The AuthAgent is a Java application and acts as a central repository of authenticated user information, for all the proxies in the setup. It ensures sharing of authentication information among all the proxies that are configured, even if the user authenticates to only one proxy. The AuthAgent can run on NetWare, Windows, or Linux servers with a Java Virtual Machine (version 1.4).
For better reliability, the AuthAgent should run on a separate machine.
Requirements
-
All Novell BorderManager proxies should be in a single tree or identical trees with a common username for proxy authentication.
NOTE:A separate machine might be required for better reliability. For more information, see AuthAgent.
-
All proxies should be time synchronized.
-
The TCP port on which AuthAgent listens should be opened if a firewall exists between the proxy and the AuthAgent. The default port is 9023. For more information, see Overview of Session Failover.
Session Failover Process Using an L4 Switch
Figure 2-1 Session Failover Using L4 Switches
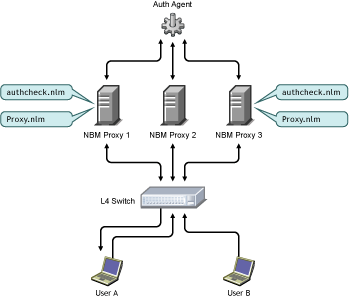
The session failover process among Novell BorderManager proxy servers using an L4 switch is shown in Figure 2-1.
-
The user attempts to access the Internet through a Web browser.
-
The L4 switch routes the request to NBM Proxy 1.
-
Proxy 1 requests for authentication (if authentication is enabled).
-
After receiving the credentials, Proxy 1 stores the details in the database and shares the information with the AuthAgent, if authentication is successful.
NOTE:The user password is not shared in this process.
-
The AuthAgent stores the authentication details and sends them to NBM Proxy 2 and NBM Proxy 3.
-
If NBM Proxy 1 goes down, the L4 switch routes all the connection requests to NBM Proxy 2 or NBM Proxy 3.
-
The user is allowed access without providing any authentication credentials, if the next access request comes within the maximum allowed idle time.
AuthAgent Failover
The session failover with a single AuthAgent works as long as the AuthAgent is up and functional. But if the AuthAgent goes down, the session failover solution becomes nonfunctional until the AuthAgent comes up again. To resolve this issue, you can use AuthAgent failover. With AuthAgent failover, a slave AuthAgent backs up the master AuthAgent.
Figure 2-2 AuthAgent Failover
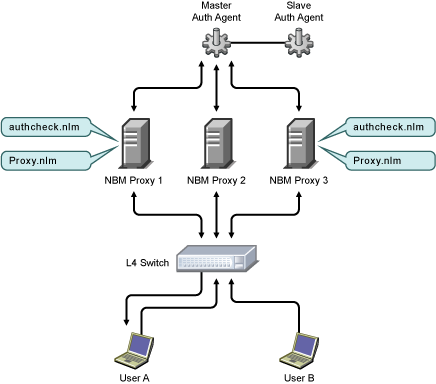
As shown in Figure 2-2, A1 is the Master AuthAgent and A2 is the Slave AuthAgent. AuthAgent failover between these two agents occurs as follows:
-
A1, which comes up first becomes the master AuthAgent and accepts connections and serves the ProxyAgents.
-
When A2 comes up, it tries to connect to A1 for a fixed number of times at a regular interval. This ensures that, even if A1 and A2 come up simultaneously, the probability of a race condition (when both A1 and A2 become primary AuthAgents at the same time) is minimized. If any attempt of A1 is successful, A2 becomes the slave AuthAgent served by A1. It does not accept any connections but keeps updating its cache as long as A1 is up.
-
If all the attempts of A2 to connect to A1 fail, A2 takes over as the master AuthAgent and starts serving the incoming requests. When ProxyAgents realize that their connection with A1 is down, they try connecting to A2. If the connection is successful, they start interacting with A2 as the master AuthAgent.
-
Meanwhile, if A1 comes up, it serves as the slave AuthAgent and takes over when A2 goes down. All the ProxyAgents are connected only to the master AuthAgent.
NOTE:The assumption is that both the AuthAgents do not go down at the same time. If both the AuthAgents go down, the solution is nonfunctional again.
Session Failover Solution Across a WAN
If the network is spread across multiple locations (WAN) and each location (LAN) has a few proxy servers with one AuthAgent serving all the proxies, the bandwidth of WAN is considerably used for sharing the session information.
Figure 2-3 Session Failover Across WAN
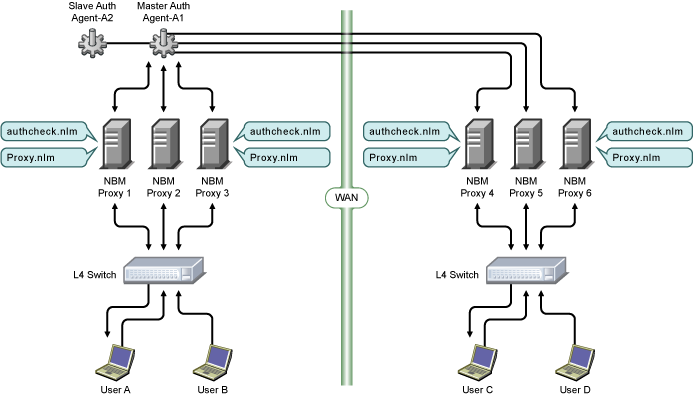
This can be minimized, by configuring AuthAgents at each location, which in turn can interact and share the session information across the WAN. Currently, Novell BorderManager supports communication between two such AuthAgents.
Consider a scenario where A1 and A2 are two AuthAgents supporting each other on one side of the WAN, and B1 and B2 are AuthAgents supporting each other on the other side of WAN. A1 considers A2, which runs either on the same machine or on a different machine in the same LAN, as a local AuthAgent. B1 considers B2 as a local AuthAgent. A1 and A2 consider B1 and B2 as remote AuthAgents, similarly, B1 and B2 consider A1 and A2 as remote AuthAgents as they are running on either side of the WAN.
Figure 2-4 AuthAgent Sending Session Information to Remote AuthAgent
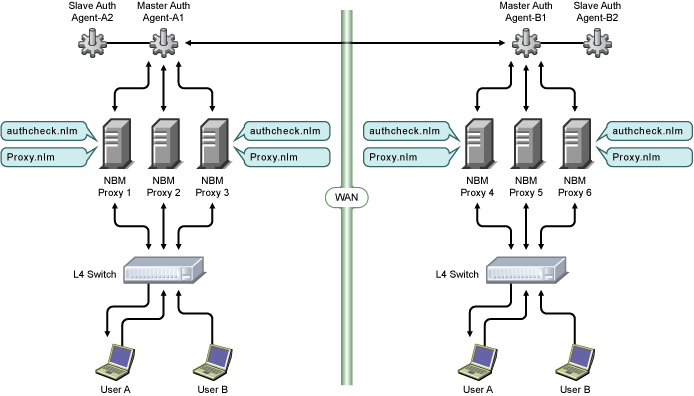
Session Failover across a WAN happens as follows:
-
Session failover at individual LAN locations occurs as explained in section Session Failover Process Using an L4 Switch.
-
A1 (or A2, which is the master at LAN-1) sends session information related to its LAN to its peer remote AuthAgent (B1 or B2, depending on which agent is the master at LAN-2), which in turn propagates that information to its ProxyAgents and slave AuthAgent. Similarly, B1 sends session information to A1.
-
If B1 goes down and B2 takes over as the master, the local proxies and the remote AuthAgent is connected to B2.
NOTE:If both B1 and B2 go down at the same time, the remote AuthAgent continues to try to connect to them.
2.5.2 Configuring Session Failover
-
Log in to iManager.
-
Select
-
Browse to and select the BorderManager server or container that you want to configure, then click .
-
Select HTTP from the section, then select the tab.
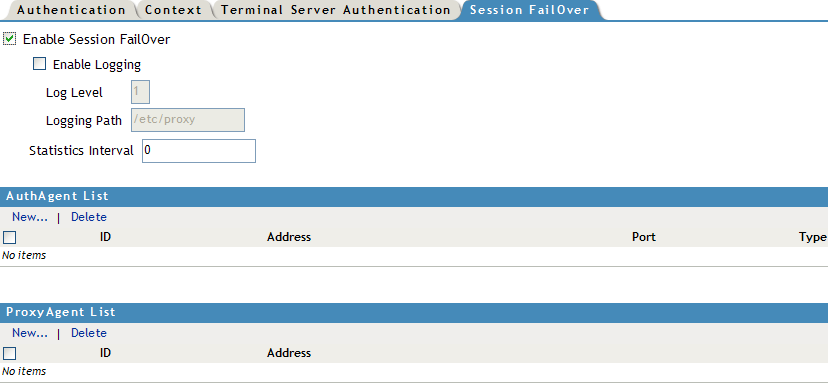
-
Select .
-
Select to enable logging and debugging information to be saved. Specify the following information:
Log Level: There are three log levels.
-
Level 0: The Log file contains minimum details such as the name of the application and the time started.
-
Level 1: In addition to the information contained in Level 0, the log file also contains information exchanged between the proxies and the AuthAgent.
-
Level 2: In addition to the information contained in Level 1, the log file also contains information such as hash key values, which are useful for developers for debugging.
Logging Path: Specify the directory to which the common or extended format log file is written.
Statistics Interval: Specify the interval between two successive log entries by the AuthAgent. The AuthAgent logs information, such as the number of users currently authenticated, and the number of session timeouts at regular intervals.
-
-
Click in the section to add a new AuthAgent. Specify the ID, IP address, and port number. Specify if the AuthAgent is a local agent or a remote agent, then click .
-
Specify a list of ProxyAgents that want to share authenticated session information. Click in the section to add a new ProxyAgent. Specify the ID and IP address, then click .
-
Click .
-
Click to save the changes.
Starting the AuthAgent
This section contains the following information:
Single AuthAgent
To start the AuthAgent, run the following command at a command prompt:
java -classpath full path of bmauth.jar com.novell.bordermanager.proxy.auth.AuthDB
Example:
java -classpath sys:\public\bmauth.jar com.novell.bordermanager.proxy.auth.AuthDB
AuthAgent Failover
To run the Master AuthAgent (indicated by the command line argument "1"), use the following command:
java -classpath <fully qualified name of bmauth.jar> com.novell.bordermanager.proxy.auth.AuthDB 1
For example:
java -classpath sys:/public/bmauth.jar com.novell.bordermanager.proxy.auth.AuthDB 1
To run the Slave AuthAgent, use the following command:
java -classpath <fully qualified name of bmauth.jar> com.novell.bordermanager.proxy.auth.AuthDB 2
For example:
java -classpath sys:/public/bmauth.jar com.novell.bordermanager.proxy.auth.AuthDB 2
NOTE:AuthAgent has been tested on Netware and Linux only.
Starting the ProxyAgent
-
Ensure that the AuthAgent is up and running.
-
Run the stopbrd and startbrd commands to restart Novell BorderManager Services.
The ProxyAgent supports the following command to initiate a sync request to AuthAgent:
authchk_send_sync_to_agent
This is useful when the ProxyAgent and AuthAgent are of sync because of network failures. Run the authchk_send_sync_to_agent command on the proxy machine, when the connection with the AuthAgent is established.
NOTE:Make sure that ProxyAgents and AuthAgents can communicate with each other [reachable] through the configured interfaces and IP addresses.