2.2 Configuring Proxy Acceleration
In proxy acceleration or reverse proxy, the server acts as the front end to your Web servers on your Internet or intranet. Heavily loaded servers benefit from off-loading frequent requests to the proxy server. Security is also increased when the IP addresses of your Web servers are hidden from the Internet.
This section contains the following information:
2.2.1 Configuring HTTP Acceleration
An HTTP Reverse Proxy is also known as an HTTP accelerator. The HTTP reverse proxy listens on interfaces identified as Public or Both, but not on interfaces identified as Private. The best security involves two interfaces.
To set up an HTTP Reverse Proxy:
-
Log in to iManager.
-
Select
-
Browse to and select the BorderManager server or container that you want to configure, then click .
-
Select in the section.
-
Select .
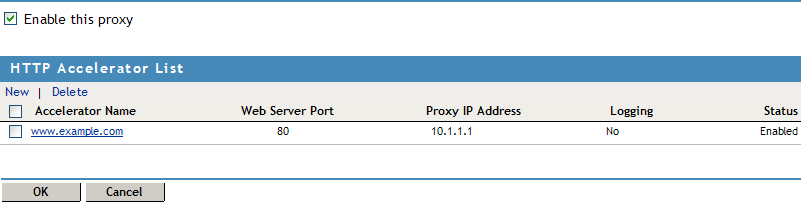
-
Click to add a server to the .
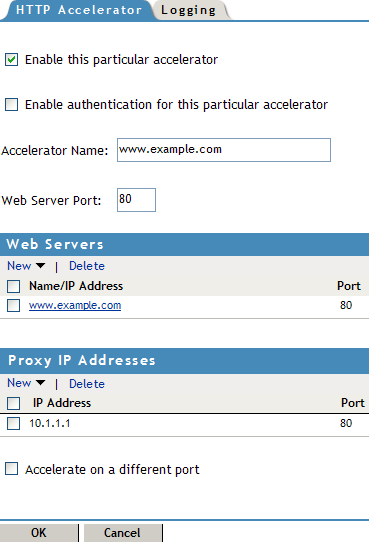
Specify the following information:
Enable This Particular Accelerator: Select this check box to enable the configured server. You can disable the server if you are configuring multiple accelerations.You can disable one or more servers without affecting the other accelerated sites.
Enable Authentication For This Particular Accelerator: Specify whether you want to enable the accelerator for authentication.
Accelerator Name: Specify the accelerator server name. If reverse proxy authentication is enabled, the accelerator server name must be the DNS domain name of the Web site that is being accelerated. The DNS domain name entry should be the same for both inbound and outbound configurations.
Web Server Port: Specify the port number the origin Web server is listening on for incoming connections. The default is 80 for HTTP.
Web Servers: To add a new Web server, click , specify either the Web server name or the IP Address, then click . To delete a Web Server, select the check box next to the Web server, then click .
Proxy IP Addresses: These are the addresses the accelerator will listen on for incoming connections from the Internet. To add a new proxy IP address, click , select the IP address that you want to add, then click .
You can associate one or several public IP addresses with a particular domain name, but the combination of the IP address and the port must be unique. For example, you have a Web server www1.myco.com and two proxy IP addresses (1.2.3.4 and 1.2.3.5), and the Web server is listening on port 80. You can configure an accelerator entry for www1.myco.com with port 80 and two proxy IP addresses (1.2.3.4 and 1.2.3.5). As another example, you have multiple Web servers and several proxy IP addresses. You can configure two entries, one for www1.myco.com with port 80 and IP address 1.2.3.4 and another for www2.myco.com with port 80 and IP address 1.2.3.5.
To delete an IP address, select the check box next to the Proxy IP address, then click .
Accelerate on a Different Port: Select this check box if you want to accelerate on a different port. Specify a different accelerator port number. All internal Web server links must be relative URLs.
-
Click to add the new server to the .
-
Click to save the changes.
2.2.2 Blocking Virus Requests in the HTTP Accelerator
Novell BorderManager has a Virus Pattern Recognition feature that can help protect the Web servers that are being accelerated by Novell BorderManager. This enhancement includes features to facilitate its configuration and monitoring.
Configuration of the Virus Pattern Recognition feature is accomplished using the console commands that are run from the system console. As with most console-based systems, responses to commands are written back to the system console and recorded in a log file (in this case, proxy.log).
This section has the following information:
Monitoring the Virus Pattern Recognition Feature
The Novell BorderManager Server includes a Virus Pattern Configuration screen. All virus pattern configuration and statistical information is tracked and displayed on this separate server console screen.
Effect on Performance
Enabling the Virus Pattern Recognition feature does not adversely affect Novell BorderManager Proxy Server performance.
To enable this feature, you must have the latest version of proxy.nlm.
You also need the following lines in the sys:\etc\proxy\ proxy.cfg file, which is used to initialize the Novell BorderManager Proxy Server at startup:
[Extra Configuration]ScanVirusPatterns=1[Virus Pattern Configuration]NoOfVirusPatterns=0PatternSize=16PatternStartOffset=1EnablePatternAutoUpdate=1
If you don’t have these lines in the proxy.cfg file when you start the Proxy Server, you will receive a virus command not found message on the system console when you try to specify any of the console commands.
NOTE:The command syntax in this section specified in BNF (Backus-Naur Format) notation, a formal system of notation developed in the 1960s to describe the syntax of a given command set or computer programming language.
Adding and Deleting Virus Request Patterns
After the Proxy Server is up and running with its initial pattern database loaded, you can add new patterns while the server is running. The console command syntax for adding a new virus pattern is as follows:
virus add -p pattern -o origLength
where pattern is a 16-byte character string located at offset 1 in the HTTP GET request, and origLength is the original size of the request in bytes. These are mandatory option-value pairs. The string value for pattern should be enclosed in quotation marks; the value for origLength is given as an integer.
For example:
virus add -p "default.ida?NNNN" -o 385
The Proxy Server looks at the specified offset in each incoming request and reads the next 16 bytes. If that string matches any of the patterns in the existing database, the request is considered a virus request and is blocked.
NOTE:The pattern size and start offset are set to 16 and 1, respectively, by default. You can change these values in the proxy.cfg file, but do so with caution. They are global parameters that apply to all entries in the pattern database.
To delete a pattern from the database, use the following syntax:
virus add -p pattern -o< origLength
For example:
virus del -p "default.ida?NNNN" -o 385
Enabling and Configuring Auto Update
Novell BorderManager provides an Auto Update feature that automatically detects virus requests and adds their patterns to the database. This feature’s heuristic (self-learning) request examination method is especially useful in detecting frequently changing virus request patterns.
The heuristics look at the incoming request distribution within a specified amount of time. For these heuristics to work, the following two parameters must be properly configured:
-
Threshold: This parameter defines the number of new requests that hash to the same value that is allowed within the time interval before those requests are considered suspect. The default value is 250; this can be changed via the virus -t threshold console command.
-
Refresh Time Interval: This parameter defines the amount of time, in seconds, after which identical requests received beyond the threshold value are checked for virus pattern content. The default value is 10 seconds; this can be changed via the virus -r time interval console command.
When more than the threshold number of identical requests are received within the specified time interval, that request is considered suspect and is scheduled for further analysis via a background process. In the meantime, the Proxy Server continues to receive all requests so that valid requests are never blocked.
The Virus Pattern Configuration screen provides information that can help you adjust these parameters for your particular system.
There are two ways to enable this Auto Update feature.
-
Enter the following command at the system console:
virus -e 1
NOTE:To disable the Auto Update feature, specify 0 (zero) in the command.
-
Add the following line to the proxy.cfg file:
[Virus Pattern Configuration]EnablePatternAutoUpdate=1
Adding New Virus Keywords
Virus request patterns of the same virus type contain keywords or character strings that can be used to identify the request.
Let us assume that all URLs with Code Red virus requests contain the string cmd.exe. Here, cmd.exe is a keyword, because the presence of this string identifies the URL as a virus request. If cmd.exe is added as a filter rule in routers, all requests containing this keyword are blocked.
To add a new keyword to the list of existing keywords, enter the following command at the system console:
virus add -k keyword
where keyword is a character string that determines whether a suspect request is a humble request or a virus request.
When a request is labeled as the suspect through the heuristics described above, the suspect request is checked for the presence of certain keywords. If a match is found, the request is labeled as a virus request and its pattern is added to the database. Any future requests containing that keyword are automatically blocked.
2.2.3 Configuring FTP Reverse Proxy
An FTP Reverse Proxy is also known as an FTP accelerator. The server acts as the front end to your FTP servers on your Internet or intranet. Frequent requests can be off-loaded from heavily loaded origin FTP servers to the proxy server. Security is increased when the IP addresses of your FTP servers are hidden from the Internet or intranet.
To configure an FTP Reverse Proxy server:
-
Log in to iManager.
-
Select
-
Browse to and select the BorderManager server or container that you want to configure, then click .
-
Select in the section.
-
Select .
-
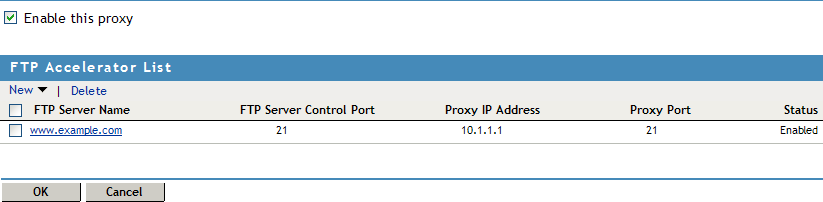
Click , then specify the following information:
Enable This Particular Accelerator: Select this check box to enable the accelerator.
FTP Server Hostname: Specify the hostname of the origin FTP server.
Proxy IP Addresses: These are the addresses the accelerator will listen on for incoming connections from the Internet. Select one or more public proxy IP addresses from the list.
You can associate one or several public IP addresses with a particular domain name, but the combination of the IP address and the port must be unique. For example, you have an FTP server ftp://ftp1.myco.com and two IP addresses (1.2.3.4 and 1.2.3.5), and the FTP server is listening on port 21. You can configure an accelerator entry for ftp1.myco.com with port 21 and two IP addresses (1.2.3.4 and 1.2.3.5).As another example, you have multiple FTP servers and several IP addresses. You can configure two entries: one for ftp1.myco.com with port 21 and IP address 1.2.3.4, and another for ftp2.myco.com with port 21 and IP address 1.2.3.5.
-
Click to add the new server to the .
-
Click to save changes.