Setting Up Remote Loaders
This section provides information on the following:
- Installing a Remote Loader on a Windows Server
- Configuring the Remote Loader on Windows
- Running the Remote Loader
- Stopping Remote Loaders
Installing a Remote Loader on a Windows Server
-
Insert CD 4 - Identity Manager 2 into the CD-ROM drive.
The installation program should auto-launch. If not, you can run install.exe from the \nt directory.
-
View the Welcome page, accept the license agreement, then view the two Overview pages.
-
In the DirXML Install dialog box, deselect all components except DirXML Connected System and then click Next.
-
Select a location for the connected system (the Remote Loader and remote driver shims), then click Next.
-
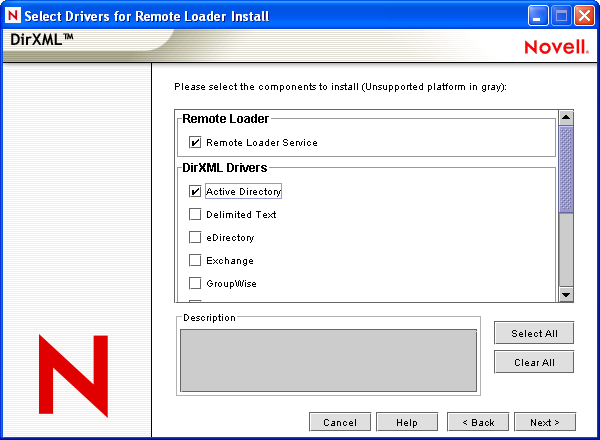
Select the DirXML Remote Loader Service and remote driver shims (drivers), then click Next.
For this implementation, select the Active Directory shim only.
-
Acknowledge the activation requirement, view products to be installed, then click Finish.
-
Select whether to place the Remote Loader Console icon on your desktop.
Configuring the Remote Loader on Windows
The Remote Loader Console is a new feature in Identity Manager 2. It runs only on Windows. The Console enables you to manage all DirXML drivers running under the Remote Loader on that computer:
- Add and configure new Remote Loader instances on the local computer
- Edit configuration settings
- Start and stop Remote Loader instances
- Start and stop the trace for each driver instance
To launch the Remote Loader Console, click the Remote Loader Console icon on your desktop. If you did not choose to place the Remote Loader Console icon on your desktop during installation, you can launch the Remote Loader Console from c:\remoteloader\rlconsole.exe. The following figure illustrates the Console.
If you type dirxml_remote at the command line, without any parameters, the Remote Loader Application Wizard is launched. To launch the wizard manually, double-click dirxml_remote.exe located in the c:\novell\remoteloader directory.
To configure a new Remote Loader instance, click Add, then provide the information outlined in the following sections.
Remote Driver Configuration
- Description: Specify a description to identify the Remote Loader instance. For example, AD Driver.
- Driver: Browse to and select the AD Driver shim.
By default, this shim (addriver.dll) is located in the c:\novell\remoteloader directory.
- Config File: Specify a name and location for the configuration file. For example, c:\novell\remoteloader\addriver-config.txt.
The Remote Loader Console places configuration parameters into this text file and uses these parameters when it runs.
Communication
- IP Address: Specify the IP address where the Remote Loader listens for connections from the DirXML server.
- Connection Port - DirXML Server: Specify the TCP port where the Remote Loader listens for connections from the DirXML server.
The default TCP/IP port for this connection is 8090. With each new instance you create, the default port number automatically increases by one.
- Command Port - Local Host Communication Only: Specify the TCP port where the Remote Loader listens for commands such as Stop and Change Trace Level.
Each instance of the Remote Loader that runs on a particular computer must have a different command port number. The default command port is 8000. With each new instance you create, the default port number automatically increases by one.
NOTE: By specifying different connection ports and command ports, you can run multiple instances of the Remote Loader on the same server hosting different driver instances.
Remote Loader Password
- Password: This password is used to control access to a Remote Loader instance for a driver.
The password must be the same case-sensitive password that you typed in the Enter the Remote Loader Password edit box in the Authentication section on the DirXML Configuration page, when you configured the driver.
- Confirm: Re-enter the password.
Driver Object Password
- Password: The Remote Loader uses this password to authenticate itself to the DirXML server.
This password must be the same password you typed in the Driver Object Password edit box on the Driver Configuration page when you configured the driver.
- Confirm: Retype the password.
Secure Socket Link (Secure Socket Layer)

- Use an SSL Connection: To specify an SSL connection, select this option.
- Trusted Root File: Browse to and select the certificate file that contains the appropriate trusted root certificate (in b64 format).
This is the exported self-signed certificate from the eDirectory tree's Organizational Certificate Authority. See the Certificate Server Administration Guide for more information on exporting a trusted root certificate.
Set up the remote loader to use the exported trusted root certificate by doing the following:
-
Launch iManager.
-
From the Roles and Task menu, click DirXML > DirXML Overview.
-
Click Search.
-
Click on the Yin-Yan sign in the Active Directory icon, then click Edit Properties.
-
In the Authentication section, you need to edit the Remote Loader Connection Parameters by adding kmo="trusted root certificate name" at the end of the host and port values.
The trusted root certificate name is the name of the exported file without the extension if the name wasn't changed or the name of the trusted root certificate in eDirectory.
For example, if the Remote Loader Connection Parameter reads hostname=123.45.678.99 port=8090, you need to add kmo="akranes-tree CA" (with quotation marks included). The final parameter should read hostname=123.45.678.99 port=8090 kmo="akranes-tree CA".
-
Click OK or Apply.
Trace File
- Trace Level: For the Remote Loader instance to display a trace window that contains informational messages from both the Remote Loader and the driver, set a trace level greater than zero (0).
IMPORTANT: If the trace level is set to 0, the trace window won't appear or display messages.
- Trace File: Specify a trace filename where trace messages are written.
Each Remote Loader instance running on a particular machine must use a different trace file. Trace messages are written to the trace file only if the trace level is greater than zero (0).
- Maximum Disk Space Allowed for All Trace Logs (MB): Specify the approximate maximum size that trace file data for this instance can occupy on disk.