Directory Trees before a Merge
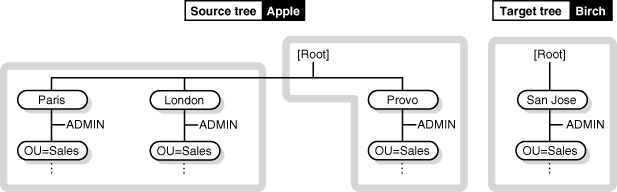
The DSMERGE utility allows you to merge the [Root] of two separate NDS trees. Only the [Root] objects are merged; container objects and their leaf objects maintain separate identities within the newly merged [Root].
The two trees you merge are called the source tree and the target tree. To merge two trees, you load DSMERGE on a server in the source tree.
DSMERGE does not change Directory names or contexts within the containers. Object and property rights for the merged objects are retained.
NOTE: You can't merge container or leaf objects with DSMERGE. To move leaf objects, use NetWare Administrator. To merge partitions, use NDS Manager.
When you merge the trees, the servers in the source tree become part of the target tree. (The target tree is the tree that the source tree will be merged into.)
The target [Root] object becomes the new [Root] for objects in the source tree, and the tree name of all servers in the source tree is changed to the target tree name.
After the merge, the target tree name is retained.
The objects that were subordinate to the source [Root] object become subordinate to the target [Root] object.
During the merge, all replicas of the [Root] partition are removed from servers in the source tree. The server that contained the master replica of the source tree receives a replica of the target tree's [Root] partition.
During the merge, DSMERGE splits the objects below the source [Root] object into separate partitions.
The following two figures illustrate the effect on partitions when you merge two trees.
Figure 2
Directory Trees before a Merge
Figure 3
Directory Tree after a Merge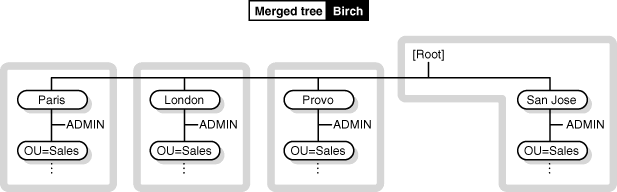
After you load DSMERGE, you can use the following options:
Before performing a merge operation, ensure that the state of synchronization for all servers affected by the operation is stable. The following table provides recommendations for preparing source and target trees for merging.
Because the merge operation is one single transaction, it is not subject to catastrophic failure caused by power outages or hardware failure. However, you should perform a regular backup of the Directory database before using DSMERGE.
IMPORTANT: Proper configuration of time synchronization is a very involved process. Make sure you allow enough time to synchronize both trees before you merge the trees.
NDS will not work properly if two external time sources are used, or if all servers in a tree are not synchronized.
Before you do the merge, make sure that all servers in both trees are synchronized, and use only one time source.
There should be a maximum of one reference or one single reference time server in a tree. Likewise, after the merge, the tree should contain only one reference or one single reference time server.
If each of the trees you are merging has either a reference or one single reference time server, you must reassign one of them to refer to the reference or single reference time server in the other tree so that the final tree contains only one reference or single reference time server (if any).
For more information on time synchronization, see Network Time Management.
To view time synchronization information, see Checking Time Synchronization (DSMERGE).
Before you rename or merge trees, use this option to contact all servers in the tree and verify that all servers have the same tree name.
After you rename or merge trees, use this option to verify that all servers have the new tree name.
Load DSMERGE on the server where a replica of the [Root] partition of the source tree is stored.
At the server console prompt, enter
LOAD DSMERGE
Choose Check Servers in This Tree.
Each server in the tree is listed in the Status of Servers in the Tree screen, with its corresponding status information. Any servers that have existing problems are flagged and then listed at the top of the server list.
You should confirm that each server's status is marked as Verified before completing a merge.
The following table describes the information provided in the Status of Servers in the Tree screen.
Use this procedure on both trees before merging them.
Load DSMERGE on the server that contains a master replica of the [Root] partition of the source tree.
At the server console prompt, enter
LOAD DSMERGE
If you don't know where the master replica is, load DSMERGE on any server in the source tree. You will be prompted with the name of the server that contains the master replica when it is required.
Choose Check Time Synchronization.
The Time Synchronization Information for Tree treename screen appears.
This option displays a list of all servers in the tree, along with information about their time sources and the server time.
Verify that all servers in the tree are synchronized and that they are using the same time source.
The following table describes the information provided in the Time Synchronization Information for Tree treename screen.
For complete functionality of all menu options in DSMERGE, load DSMERGE on a server that contains the master replica.
If you don't know where the master replica is stored, you will be prompted with the correct server name when you attempt an operation that requires the master replica.
To perform a merge operation, you must load DSMERGE on the source tree.
When merging large trees, it's significantly faster to designate the source tree as the tree with fewer objects immediately subordinate to the [Root]. By doing this, you create fewer partition splits during the merge, since all target tree objects result in new partitions.
IMPORTANT: Because the source tree name no longer exists after the merge, you may need to change your client workstation configurations. For Novell Client for DOS and Windows, check the Preferred Tree and Preferred Server statements in the net.cfg files. For Novell Client for Windows NT and Novell Client for Windows 95 check the Preferred Tree and Preferred Server statements on the client Property Page.
To minimize the number of client workstations you need to update, designate the tree with the most client workstations as the target tree, because the final tree retains the name of the target tree.
Or, rename the tree after the merge operation so that the final tree name corresponds to the tree with the greater number of client workstations attaching to it. See Renaming the Tree.
Load DSMERGE on the server where the master replica on the source tree is stored.
At the server console prompt, enter
LOAD DSMERGE
If you don't know where the master replica is stored, you will be prompted with the correct server name when you attempt to merge the trees.
Choose Merge Two Trees.
The Merge Tree Information screen appears.
Enter the administrator name and password to log in to the source tree.
Log in as a user who has the Supervisor object right to the [Root] object on the source tree. Enter the typeless or typeful distinguished name, such as admin.novell or cn=admin.o=novell. Entering only admin is invalid because it is not the complete name of the User object.
Choose Target Tree and select a target tree from the list of servers in the Available Trees window.
If the tree you want is not in the list, press Insert and enter the target tree's network address.
Enter the administrator name and password to log in to the target tree.
Press F10 to perform the merge.
A message stating that the trees have been merged successfully is displayed.
You must rename a tree if the two trees you want to merge have the same name.
You can rename only the source tree name. To rename the target tree, run DSMERGE from a server on the target tree.
After you change a tree's name, you may need to change your client workstation configurations. For Novell Client for DOS and Windows, check the Preferred Tree and Preferred Server statements in the net.cfg files. For Novell Client for Windows NT and Novell Client for Windows 95, check the Preferred Tree and Preferred Server statements on the client Property Page.
When you merge two trees, to minimize the number of client workstations that need to be updated, designate the tree with the most client workstations as the target tree because the final tree retains the name of the target tree.
Or, rename the tree after the merge so that the final tree name corresponds to the tree name with the majority of client workstations.
Another option is to rename the merged tree to the name of the original source tree. If you choose this option, then you must update the net.cfg files on the target tree client workstations.
Load DSMERGE on the server where a master replica of the [Root] partition is stored.
At the server console prompt, enter
LOAD DSMERGE
If you don't know where the master replica is, load DSMERGE on any server in the source tree. Then you will be prompted with the correct server name when you attempt to rename a tree.
Choose Rename This Tree.
Enter the administrator name and password to log in to the source tree.
Log in as a user who has the Supervisor object right to the [Root] object on the source tree. Enter your complete name, such as admin.novell or cn=admin.o=novell. Entering only admin is invalid since it is not a complete name.
Enter the new tree name.
Press F10 to perform the rename.
Following the merging of two trees, it might be necessary to complete the following tasks:
Merging trees might significantly change replica placement on the source tree. You should carefully evaluate and change the partitioning as needed.
Only the target tree name is retained after the merge.
HINT: To minimize the number of net.cfg files you need to update, designate the tree with the most client workstations as the target tree because the final tree retains the name of the target tree.
Or rename the tree after the merge operation so that the final tree name corresponds to the majority of the client workstations' net.cfg files. See Renaming the Tree.
The target [Root] object becomes the new [Root] for servers moved from the source tree. The Access Control List (ACL) for the [Root] object of the source tree is preserved. Therefore, the rights of the source tree's user admin to the [Root] object are still valid.
After the merge is complete, both admin users still exist and are uniquely identified by different container objects.
IMPORTANT: For security reasons, you might want to delete one of the two admin User objects or restrict the rights of the two objects.
| For more information about | See |
|---|---|
Object and property rights |
NDS Object Administration |
Partitions and replicas |
NDS Database Management |
[Root] object |
NDS Concepts and Planning |
Time synchronization |
|
DSMERGE |
DSMERGE in Utilities Reference |