A.2 The YaST Control Center
When you start YaST in the graphical mode, the YaST Control Center opens first.
Figure A-1 YaST Control Center
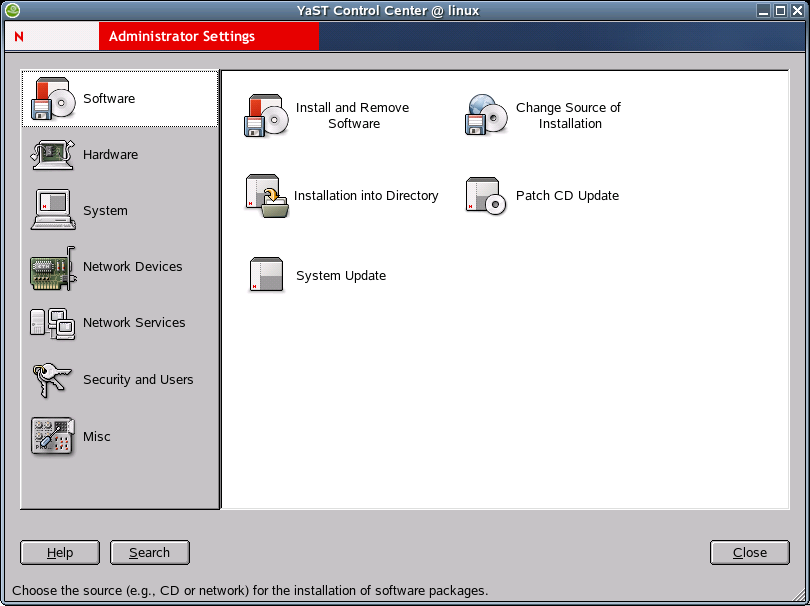
In the left frame, the following categories are displayed:
If you click one of the icons, the respective contents are listed on the right-hand side. For example, if you click , then click to the right, a configuration dialog opens for the sound card.
The configuration of the individual items usually involves several steps. Always click to proceed to the following step.
The left frame displays help text for the respective topic, explaining the entries required. After the necessary specifications have been made, complete the procedure by clicking Finish in the last configuration dialog. The configuration is then saved.
A.2.1 Software
You can use the Software option to perform the following tasks:
Changing the Installation Source
In the YaST Control Center, click .
The installation source is the medium containing the software to install. Install from CD or DVD (the usual approach), from a network server, or from the hard disk. Refer to the detailed YaST help text for more information.
When you exit with , the settings are saved and applied to the Install and Remove Software, Boot and Kernel Configuration, and System Update configuration module. However, this module also offers the possibility to continue with Install to install or remove packages.
Installing Patches from CD to Update Your Current Installation
In the YaST Control Center, click .
Patches are installed from a CD. Updating with the CD is pretty faster. When you insert the patch CD, all patches available on the CD are displayed in the dialog of this YaST module. Select packages for installation from the patch list. If an alert is displayed about a missing CD, insert the CD and restart the patch CD update.
Installing and Removing Software
In the YaST Control Center, click .
Use this module to install, update, or remove software. To install from CD, insert the first CD in the drive.
The Selection Filter
Using the Filter drop-down box at the top left of the main dialog, determine how packages are to be displayed. The default setting is to display according to Selections.
- With the selection filter, predefined selections of specific application areas can be installed or selected for installation by selecting the respective check boxes. You can also uninstall an entire group. For each selection, the packages of the selection and their current statuses are displayed to the right. Select or deselect individual packages as desired.
- Another option is to list according to package groups.
These package groups are displayed in a tree structure on the left-hand
side. If you click one of the main groups (for example, Development
or Documentation), all program packages belonging to this main group
are listed at the top of the right frame. If you click one of the
subgroups, the right frame displays the packages of only the subgroup.
NOTE:If desired, mark an installed package for deletion. Observe the alerts and do not delete any packages of the Linux base system (mostly located in the package group System).
- The easiest way to find a specific package is to use the search function, which can also be accessed here. Enter a search string and use the check boxes to set the search method (only in the name, in the description, in the package dependencies). For example, you can use this feature to determine which packages use a specific library.
The Package Window
The package window to the right features the following information (from left to right): status (see below), the package name, a short description, the size, and the version. The package status is displayed by means of various icons that are shown in the context menu reachable via the right mouse button.
Change the status of a package by clicking the icons to the left of the package name. Only relevant status settings are available. For example, a package that is not installed cannot have the status Uninstall. If you are not sure about what a specific status indicates, do not select it or do not change it if set automatically.
You can mark installed packages for deletion. Observe the alerts and do not delete any packages of the Linux base system, mostly located in the System package group.
The Information Window
At the bottom right, a window with several tabs provides access to various kinds of information about the selected package, such as a detailed description, the technical data, a list of files installed with this package, packages additionally required by this package, and any conflicts with other installed packages or packages marked for installation.
Checking Dependencies
Under the information window, locate Check Dependencies and Auto Check. If Auto Check is activated and you select a package for installation, other required programs are displayed automatically. If preferred, simply disable the automatic check and use Check Dependencies after selecting packages. If automatic checking is disabled and you do not check the dependencies manually, the package dependencies are checked when you click .
Consumption of Hard Disk Space
Monitor the space consumed on the hard disk partitions in the overview at the bottom left. If you select too many packages, an alert is displayed.
Installing the System into a Directory
In the YaST Control Center, click .
Use this option to install the Novell Linux Desktop system into a directory of your choice.
Updating the System
In the YaST Control Center, click .
This module let you update your system. The process consists of several steps. YaST checks which packages to update. If desired, decide individually for each package whether to perform an update. This approach cannot be used for the base system, which requires a boot from the installation medium, such as from CD.
IMPORTANT:The system update is a very complex procedure. For each program package, YaST must check which version is installed on the computer and what needs to be done to replace the old version with the new version correctly. YaST also tries to adopt any personal settings of the installed packages. However, some configurations might cause problems after the update if the old configuration is unable to handle the new program version as expected or if unexpected inconsistencies arise between various configurations.
The older the existing version is, and the more the configuration of the packages to update diverges from the standard, the more problematic the update is. Sometimes, the old configuration cannot be adopted correctly. In this case, an entirely new configuration must be made. Before starting the update, you should save the existing configuration.
A.2.2 Hardware
New hardware must first be installed or connected as specified by the vendor. Switch on external devices, such as the printer or the modem, and start the respective YaST module. Most devices are automatically detected by YaST and the technical data is displayed. If the automatic detection fails, YaST offers a list of devices (model, vendor, etc.) to select from. Consult the documentation enclosed with your hardware for more information.
IMPORTANT:Use caution with model designations. If your model is not included in the device list, try a model with a similar designation. However, in some cases, the model must match exactly, as similar designations do not always indicate compatibility.
You can use the Hardware option to perform the following tasks:
- Configuring the CD/DVD Drives in Your System
- Configuring the Graphics Card and Monitor
- Activating or Deactivating the DMA Mode for IDE Hard Disks and CD/DVE Drives
- Configuring Your Printer
- Changing the Mouse Model
- Configuring Disk Controllers
- Displaying Hardware Information
- Configuring a Joystick
- Configuring a Scanner
- Configuring Sound Cards
Configuring the CD/DVD Drives in Your System
In the YaST Control Center, click .
Within the scope of the installation, all detected CD-ROM drives are integrated in the installed system by means of entries in the /etc/fstab file. The respective subdirectories are created in /media. Use the Add and Remove buttons to change the state of integration for an entry in the list.
When the module is started, a list of all detected drives is displayed. Mark any new drives using the check boxes at the beginning of the lines and complete the integration by clicking Finish. The new drives are then integrated in the system.
Configuring the Graphics Card and Monitor
In the YaST Control Center, click r.
The graphical user interface or X server handles the communication between hardware and software. Desktops, like KDE and GNOME, use the X server for interaction with the user.
The graphical user interface is initially configured during installation. To change the settings later, run this YaST module. In the Desktop Settings dialog, choose between Text Mode Only (no graphical desktop) and Graphical Desktop Environment. The current settings are saved and you can restore them anytime. The current values are displayed and offered for modification, such as the screen resolution, the color depth, the refresh rate, and the vendor and type of your monitor (if it was autodetected). If you have just installed a new graphics card and you want to initialize it, a small dialog appears asking if you want to activate 3D acceleration for your graphics card.
Click to open SaX2, the configuration tool for input and display devices.
Figure A-2 SaX2 Main Window
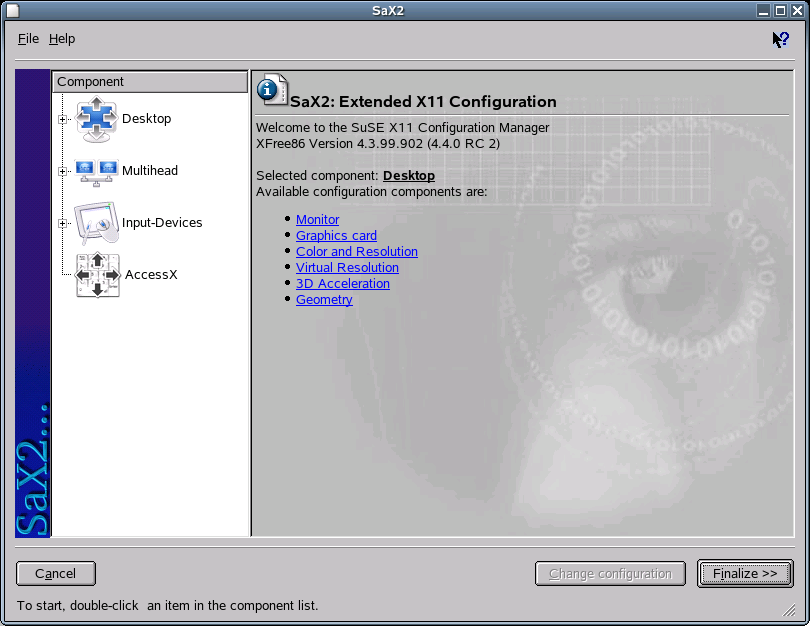
In the left frame, there are four components displayed:
- Desktop
- Configures your monitor, graphics card, color depth, resolution, and the position and size of the screen.
- Multihead
- Configures multiple screens.
- Input Devices
- Configures a keyboard, mouse, touchscreen monitor, and graphics tablet.
- AccessX
- Controls the mouse pointer with the number pad.
Select your monitor and graphics card. Usually, the monitor and graphics card are autodetected by the system. In this case, no manual settings are required. If your monitor is not autodetected, automatically proceed to the monitor selection dialog. Select your monitor from the extensive list of vendors and devices, or manually enter the monitor values specified in the monitor manual. Alternatively, select one of the preconfigured VESA modes.
Click in the main window following the completion of the settings for your monitor and your graphics card, then test your settings. This ensures that your configuration is suitable for your devices. If the image is not steady, terminate the test immediately by pressing Esc and reduce the refresh rate or the resolution and color depth. Regardless of whether you run a test, all modifications are activated only after you restart the X server.
Desktop
Use the Desktop dialogs to configure your monitor, graphics card, color depth, resolution, and the position and size of the screen.
Monitor
Click to configure your monitor. A dialog with Monitor-Model, Frequencies, and Expert tabs opens.
Figure A-3 Monitor Selection
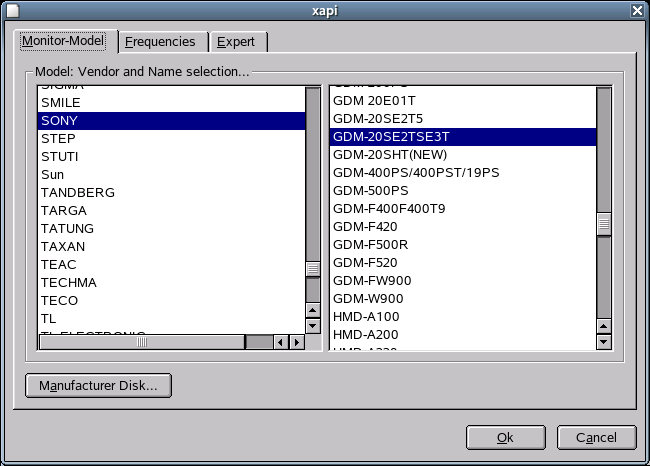
In the left part of the Monitor-Model tabbed page, select the vendor. In the right part, select your model. If you have floppy disks with Linux drivers for your monitor, click to install these.
On the Frequencies tabbed page, specify the horizontal and vertical frequencies for your screen. The vertical frequency is another designation for the image refresh rate. Normally, the acceptable value ranges are read from the model and noted here. Usually, they do not need to be changed.
WARNING:There are safety mechanisms, but you should still be very careful when manually changing the allowed frequencies. False values might destroy your monitor. If in doubt, refer to the manual for the monitor.
On the Expert tabbed page, specify options for your screen. In the upper selection field, define the method to use for the calculation of the screen resolution and screen geometry. Do not change anything unless the monitor is addressed incorrectly and the display is not stable. You can also change the size of the displayed image and activate the DPMS power saving mode.
Graphics Card
Click to add a new graphics card, or click to configure an existing graphics card. In both cases, a dialog with a General and an Expert tab opens.
Figure A-4 Graphics Card Selection Dialog

In the left part of the General tabbed page, select the vendor of your graphics card. In the right part, select your model.
On the Expert tabbed page, specify advanced configuration options for your screen. On the right side, you can turn your screen to the left or to a vertical position, which is useful for some turnable TFT screens. The entries for the BusID are relevant only if you operate several screens. Normally, nothing needs to be changed here. You should not modify the card options unless you have experience in this field and know what the options mean. If necessary, check the documentation for your graphics card.
Colors and Resolutions
Click to change the color depth and resolution displayed on your screen.
Figure A-5 Color and Resolution Dialog
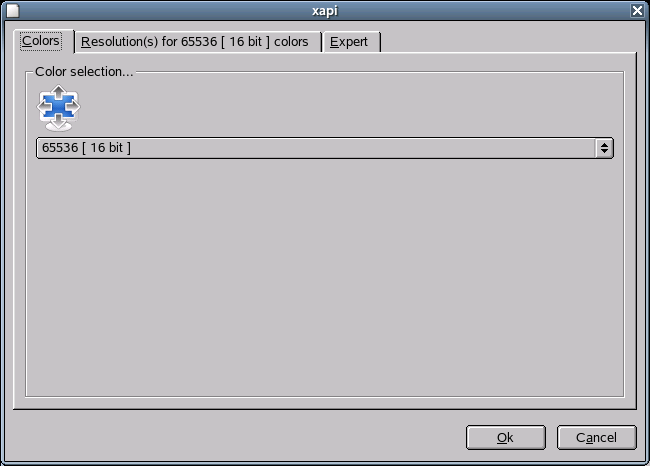
Depending on the hardware used, select a color depth of 16, 256, 32768, 65536, or 16.7 million colors (4, 8, 15, 16, or 24 bit). For a reasonable display quality, set at least 256 colors.
When the hardware is detected, the resolution is queried. Therefore, the module usually offers only resolution and color depth combinations that your hardware can display correctly. This keeps the danger of damaging your hardware with incorrect settings very low. If you change the resolution manually, consult the documentation for your hardware to make sure the value you set can be displayed.
The Expert tabbed page lets you add your own resolutions, which are subsequently included for selection on the Resolution tabbed page.
Virtual Resolution
Every desktop has a certain resolution that is displayed over the full screen of the monitor. However, it is possible to set the resolution larger than the visible area of the screen. If you move the mouse beyond the margins of the desktop, the virtual part of the desktop is displayed on screen. This increases the available work space.
Figure A-6 Virtual Resolution Dialog

The virtual resolution can be set in two ways:
- Move the mouse pointer over the monitor image so the pointer turns into crosshairs. While pressing the left mouse button, move the mouse to enlarge the raster image, which corresponds with the virtual resolution.This method is best if you are not quite sure how much virtual space you want on your desktop.
- The pop-up menu in the middle of the raster image displays the currently used virtual resolution. To use one of the default virtual resolutions, select one from the menu.
Geometry
You can use the Geometry option to precisely adjust the size and the position of the image with the arrows.
Figure A-7 Image Geometry Dialog
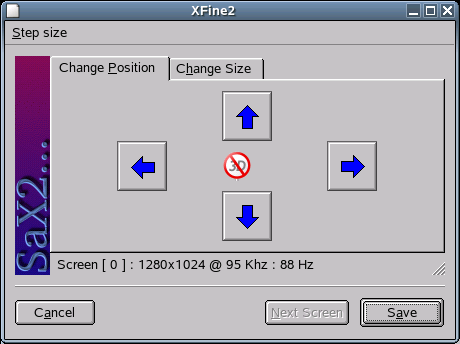
If you have a multihead environment (more than one screen), click to switch to the other monitors to adjust their size and position. Click to save your settings.
Multihead
If you have installed more than one graphics card in your computer or a graphics card with multiple outputs, you can connect more than one screen to your system. If you operate two screens, this is referred to as dualhead. More than two is referred to as multihead. SaX2 automatically detects multiple graphics cards in the system and prepares the configuration accordingly. Set the multihead mode and the arrangement of the screens in the Multihead dialog. The following three modes are offered:
- Traditional Multihead (default)
- Each monitor represents an individual unit. The mouse pointer can switch between the screens.
- Cloned Multihead
- All monitors display the same contents. The mouse is visible only on the main screen.
- Xinerama Multihead (one screen)
- All screens combine to form a single large screen. Program windows can be positioned freely on all screens or scaled to a size that fills more than one monitor.
The layout of a multihead environment describes the arrangement of and the relationship between the individual screens. By default, SaX2 configures a standard layout that follows the sequence of the detected graphics cards, arranging all screens in a row from left to right. In the Layout dialog of the Multihead tool, determine the way the monitors are arranged by using the mouse to move the screen symbols in the grid. When finished, click to verify the new configuration.
NOTE:Linux currently does not offer 3D support for Xinerama multihead environments. In this case, SaX2 deactivates the 3D support
Input Devices
- Mouse
- If the mouse already works, you do not need to do
anything. However, if the mouse does not work, control it with the
number pad of the keyboard as described in AccessX.
If the automatic detection fails, use this dialog to configure your mouse manually. Refer to the documentation for your mouse for a description of the model. Select your model from the list of supported mouse types and confirm by pressing 5 on the number pad.
- Keyboard
- Use the selection field at the top of this dialog
to specify the kind of keyboard you want to use. Then select the
language for the keyboard layout (the country-specific position
of the keys). Use the Test Field to see if special characters are
displayed correctly.
The status of the check box used for activating and deactivating the entry of accented letters depends on the respective language and does not need to be changed. Click to apply the new settings to your system.
- Tablet
- Currently, XFree86 supports only a limited number
of graphics tablets. SaX2 enables the configuration of graphics
tablets connected to the USB port or the serial port. From the configuration
perspective, a graphics tablet is another input device like a mouse.
Double-click a vendor in the Model list box to add a graphics tablet from the selection list. Select the check boxes to the right if you have connected a pen or eraser. If your tablet is connected to the serial port, verify the port. /dev/ttyS0 refers to the first serial port, and /dev/ttyS1 refers to the second; additional ports use similar notation. Click to save the configuration.
- Touchscreen
- Currently, XFree86 supports only Mutouch, Microtouch,
and Elo Touch-Systems touchscreens. SaX2 can only autodetect the
monitor, not the toucher. The toucher is treated as an input device.
To configure the toucher, click and then double-click the model. Save the configuration by clicking . You do not need to test the configuration.
Touchscreens feature a variety of options and usually must be calibrated first. Unfortunately, there is no general tool for this purpose in Linux. The standard configuration contains suitable default values for the dimensions of the touchscreen. Normally, no additional configuration is required.
AccessX
If you do not use a mouse on your computer, start SaX2 and activate AccessX to be able to control the mouse pointer with the following keys on the numeric keypad:
Table A-1 Keys Used to Control the Mouse Pointer
With the slider, set the speed of the mouse pointer movement when a key is pressed.
Activating or Deactivating the DMA Mode for IDE Hard Disks and CD/DVE Drives
In the YaST Control Center, click .
This module enables you to activate and deactivate the DMA mode for the IDE hard disks and IDE CD/DVD drives in the installed system. DMA (Direct Memory Access) enables drives to transmit data directly to the RAM without the detour through the processor control.
This module does not have any function for SCSI devices. DMA modes can substantially increase the performance and data transfer speed in your system. During the installation, the current SUSE® LINUX kernel automatically activates DMA for hard disks but not for CD drives, because default DMA activation for all drives often causes problems with CD drives. Use the DMA module to decide whether to activate DMA for your drives. If the drive supports the DMA mode smoothly, the data transfer rate of your CD drive can be increased by activating DMA.
Configuring Your Printer
This section covers printer configuration with YaST. For more information on printing in Linux, see “Chapter 13: Printer Operation” in the SUSE LINUX Enterprise Server 9 Administration Guide.
Configuration with YaST
To set up a printer:
-
In the YaST Control Center, click .
The main printer configuration window appears. In the upper pane, you can view the detected printers. The lower pane lists any configured queues.
-
(Conditional) If your printer was not autodetected, click to restart the detection process.
-
(Conditional) If it fails again, click to configure the printer manually.
Not every printer can be configured for both printing systems (CUPS and LPRng/lpdfilter). Certain configurations are supported only by either CUPS or LPRng/lpdfilter. YaST informs you about this when configuring the printer.
In Novell Linux Desktop, the default printing system is CUPS, but you can switch from CUPS to LPRng and back at any time:
-
In the YaST Control Center, click .
-
Click .
-
Select the printing system you want, then configure it.
Automatic Configuration
YaST configures the printer automatically if the following requirements are met:
- The parallel or USB port can be set up automatically in the correct way and the connected printer can be autodetected.
- The ID string of the printer, as supplied to YaST during hardware autodetection, is included in the printer database. Because this ID might be different from the actual name of the model, you might need to select the model manually.
- The printer database contains at least one configuration for the respective model that is known to work without problems. Depending on the printer, up to five queues are configured automatically.
To make sure everything works properly, each configuration should be checked with the print test function of YaST. The YaST test page also provides important information about the selected configuration.
Manual Configuration
If one of the requirements for automatic configuration is not met or if you want a custom setup, you can configure the printer manually.
Depending on how successful the autodetection is and how much information about the printer model is found in the database, YaST might be able to determine the right settings automatically, or at least make a reasonable preselection. The following parameters must be configured.
- Hardware Connection (Port)
- The configuration of the hardware connection depends
on whether YaST has been able to find the printer during hardware
autodetection.
- If YaST is able to detect the printer model automatically, you can assume that the printer connection works on the hardware level and no settings need to be changed in this respect.
- If YaST is unable to autodetect the printer model, this might indicate that the printer connection on the hardware level must be configured manually. See “Chapter 13: Printer Operation” in the SUSE LINUX Enterprise Server 9 Administration Guide for more information.
- Name of the Queue:
- The queue name is used when issuing print commands. The name should be relatively short and consist of lowercase letters and numbers only.
- Ghostscript Driver or Printer Language (Printer Model):
- The Ghostscript driver and the printer language depend on your printer model. YaST lets you select a predefined configuration suitable for the model. Selecting a manufacturer and a model basically means selecting a printer language and a Ghostscript driver suitable for this language with some default settings for the driver. These settings can be changed in an additional dialog as needed.
Figure A-8 Selecting the Printer

For non-PostScript* models, all printer-specific data is produced by the Ghostscript driver. The driver configuration (both the right driver and the correct options for it) is the single most important factor determining the output quality. The settings made at this point affect the printout on a queue-by-queue basis.
If your printer was autodetected (using the printer database) or if you selected the model manually, YaST presents a choice of suitable Ghostscript drivers, usually with a number of predefined configurations for each of them. For example:
- monochrome
- color 300 dpi
- photo 600 dpi
A predefined configuration includes a suitable Ghostscript driver and, if available, a set of options for the driver related to output quality. Not all selectable combinations of driver settings work with every printer model. This is especially true for higher resolutions.
Always check to make sure your settings work as expected by printing the test page. If the output is garbled, for example, with several almost empty pages, stop the printer by first removing all paper and then stopping the print test from YaST. However, in some cases the printer will refuse to resume work if you do so. It might then be better to stop the print test first and wait for the printer to eject all pages by itself.
If the printer model is not listed in the printer database, YaST offers a selection of standard drivers for the standard printer languages.
- Advanced Settings
- Includes the hardware-dependent (driver-specific) and hardware-independent settings. You can specify special settings for the queues and restrict the access to the printer. However, there is normally no need to modify these settings.
- Using the CUPS Printing System
- For information on printing with CUPS, see “Chapter 13: Printer Operation” in the SUSE LINUX Enterprise Server 9 Administration Guide.
Changing the Mouse Model
-
In the YaST Control Center, click .
-
Click the mouse type for the mouse attached to your computer.
You can also use the arrow keys to select a mouse. If the selection bar does not move, press the Tab key until it does.
-
Click to test the selected settings.
-
Click .
Configuring Disk Controllers
In the YaST Control Center, click .
Normally, YaST configures the hard disk controller of your system during the installation. If you add controllers, use this module to integrate these into the system. You can also modify the existing configuration, but this is generally not necessary.
The Disk Controller Configuration dialog presents a list of detected hard disk controllers and enables assignment of the suitable kernel module with specific parameters. Click to determine if the current settings work before they are saved permanently in the system.
WARNING:We recommend testing the setting before making it permanent in the system. Incorrect settings can prevent the system from booting.
Displaying Hardware Information
In the YaST Control Center, click .
YaST performs a hardware detection for the configuration of hardware components. The detected technical data is displayed in this screen. This is especially useful if, for example, you want to submit a support request for which you need information about your hardware.
Figure A-9 Hardware Information

Configuring a Joystick
In the YaST Control Center, click .
Use this module to configure your joystick by selecting the manufacturer and the model from the displayed list. Because joysticks are usually connected to the sound card, you can also access this module from the sound card configuration (see Configuring Sound Cards).
Configuring a Scanner
In the YaST Control Center, click .
If your scanner is connected and switched on, it should be detected automatically when this YaST module is started. In this case, the dialog for the installation of the scanner appears. If no scanner is detected, the Manual Scanner Configuration dialog appears. If you have already installed one or more scanners, a table listing existing scanners that can be modified or deleted appears. Click to configure a new device.
Next, an installation is performed with default settings. If the installation is successful, a corresponding message appears. Test your scanner by inserting a document and clicking .
Scanner Was Not Detected
Only supported scanners can be autodetected. Scanners connected to another network host are not detected. The manual configuration distinguishes the three following types of scanners:
- USB scanner
- Specify the vendor and model. YaST attempts to load USB modules. If your scanner is very new, the modules might not be loaded automatically. In this case, continue to a dialog in which you can load the USB module manually. See the YaST help text for more information.
- SCSI scanner
- Specify the device (such as /dev/sg0). SCSI scanners should not be connected or disconnected when the system is running; shut down the system first.
- Network scanner
- Specify the IP address or the hostname.
You can use a scanner that is connected to a host in your network and configured as a network scanner. To configure a network scanner, refer to the Support Database article “Scanning in Linux” in The SUSE Support Database, keyword “scanner”). When selecting a network scanner, specify the hostname or the IP address of the host that the scanner is connected to.
If your scanner is not detected, the device probably is not supported. However, sometimes even supported scanners are not detected. If that is the case, proceed with the manual scanner selection. If you can find your scanner in the list of vendors and models, select it. For information about scanners that work with Linux, see the SANE Web site.
WARNING:Assign the scanner manually only if you are absolutely sure of the model. An incorrect selection could damage your hardware.
Troubleshooting
Your scanner might not have been detected for one of the following reasons:
- The scanner is not supported
- Your SCSI controller was not installed correctly
- There are termination problems with your SCSI port
- Your SCSI cable is too long
- Your scanner has a SCSI Light Controller that is not supported by Linux
- Your scanner is defective
IMPORTANT:SCSI scanners should not be connected or disconnected when the system is running. Shut down the system first.
Configuring Sound Cards
In the YaST Control Center, click .
When the sound configuration tool is started, YaST tries to autodetect your sound cards. You can configure one or more sound cards. Click to save the current settings and complete the sound configuration. If YaST is unable to autodetect your sound card, click to open a dialog where you can select a sound card and module.
Setup
With Quick Automatic Setup, you are not required to go through any subsequent configuration steps and no sound test is performed. The sound card is configured automatically. With Normal Setup, you have the possibility of adjusting the output volume and playing a test sound. Advanced Setup lets you manually customize the sound card options.
Set up your joystick by selecting the respective check box. Select the joystick type in the following dialog, then click . The same dialog appears when you click Joystick in the YaST Control Center.
Sound Card Volume
Click to set the volume for each channel of the selected sound card. Click to save the volume settings, or click to restore the original settings. Click to test your sound configuration. If you cannot hear anything, increase the volume.
Sound Configuration
Click to remove a sound card. Existing entries of configured sound cards are deactivated in the /etc/modules.conf file. Click to open a dialog you can use to customize the sound module options manually. Click to configure additional sound cards.
If YaST autodetects another sound card, continue to Configuring a Sound Card . If YaST does not detect a sound card, you are directed to Manually Selecting a Sound Card automatically.
With Start ALSA, you can enable or disable the startup of ALSA (Advanced Linux Sound Architecture) when booting. For playback of MIDI files, activate Start Sequencer. This way, the sound modules required for sequencer support will be loaded along with the ALSA modules.
The volume and configuration of all installed sound cards installed is saved when you click . The ALSA configuration data is appended at the end of the /etc/modules.conf file.
Configuring a Sound Card
If multiple sound cards were detected, select your preferred card under List of Automatically Recognized. Continue to Setup by clicking . If the sound card was not autodetected, click and proceed to the next section, Manually Selecting a Sound Card .
Manually Selecting a Sound Card
If your sound card was not autodetected, a list of sound card drivers and models to choose from is displayed. Click to see the entire list of supported cards. Refer to your sound card documentation for the information required. A reference list of sound cards supported by the Advanced Linux Sound Architecture (ALSA) with their corresponding sound modules is available at the Advanced Linux Sound Architecture Web site. After making your selection, click to return to Setup.
A.2.3 System
Use the System option to perform the following tasks:
- Changing the Settings in the /etc/sysconfig File
- Changing the System's Language
- Changing the Date and Time
- Partitioning a Hard Disk
- Configuring Powertweak Settings
- Restoring Files from Backup Archives
- Selecting a Keyboard Layout
- Changing Boot Loader Settings
- Creating a Boot, Rescue, or Module Disk
- Creating and Configuring Volume Groups
- Configuring Power Management
- Configuring Profiles
- Configuring Runlevels
- Backing Up Files and System Areas
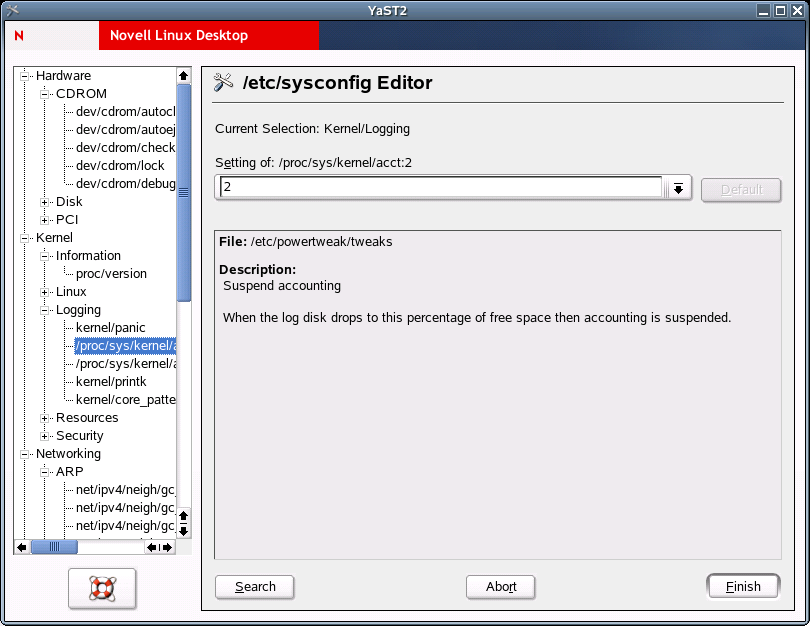
Changing the Settings in the /etc/sysconfig File
In the YaST Control Center, click .
The /etc/sysconfig directory contains the files with the most important settings for Novell Linux Desktop. The sysconfig editor displays all settings in a well arranged form. The values can be modified and saved to the individual configuration files. Generally, manual editing is not necessary, because the files are automatically adapted when a package is installed or a service is configured.
IMPORTANT:Do not edit the files in /etc/sysconfig if you do not know exactly what you are doing, because this could seriously inhibit the operability of your system.
For more information on /etc/sysconfig/, see “Section 11.6: SuSEconfig and /etc/sysconfig” in the SUSE LINUX Enterprise Server 9 Administration Guide.
Changing the System's Language
In the YaST Control Center, click .
Use this module to select the language for your Novell Linux Desktop system. The language can be changed at any time. The language selected in YaST applies to the entire system, including YaST and the desktop environment (GNOME or KDE).
Changing the Date and Time
In the YaST Control Center, click .
The time zone was already set during the installation, but you can make changes here. Select your country or region from the list on the left, then select Local Time or UTC (Universal Time Coordinated) from the Hardware Clock Set To drop-down list. Machines with additional operating systems, such as Microsoft Windows, mostly use local time. Machines that have only Linux installed should be set to UTC.
Partitioning a Hard Disk
In the YaST Control Center, click .
Although it is possible to modify the partitions in the installed system, this should be handled by experts who know exactly what they are doing, because the risk of losing data is very high. If you decide to use this tool, see Partitioning. The partitioning tool used during the installation is the same as in the installed system.
Configuring Powertweak Settings
In the YaST Control Center, click .
Use this module to tune the kernel, hardware, networking, VFS subsystem, and virtual memory options. Select the item you want to tune from the expandable list of the left, then make the changes you want in the panel on the right.
Figure A-10 Powertweak Configuration
Restoring Files from Backup Archives
In the YaST Control Center, click .
The restore module enables restoration of your system from a backup archive. Follow the instructions in YaST. Click to proceed to the individual dialogs. First, specify where the archives are located (removable media, local hard disks, or network file systems). A description and the contents of the individual archives are displayed, letting you decide what to restore from the archives.
Figure A-11 Start Window of the Restore Module
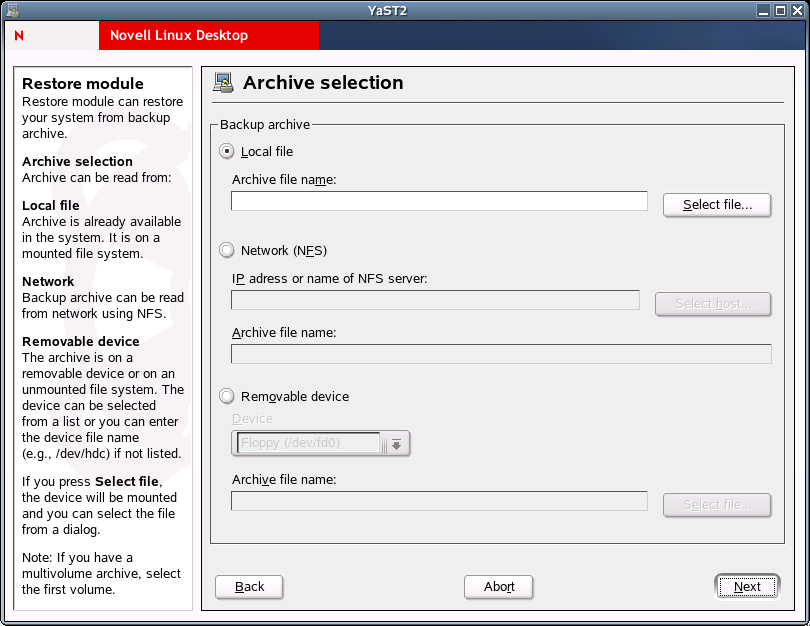
Additionally, there are two dialogs for uninstalling packages that were added since the last backup and for the reinstallation of packages that were deleted since the last backup. These two steps let you restore the exact system state at the time of the last backup.
IMPORTANT:Because this module normally installs, replaces, or uninstalls many packages and files, use it only if you have experience with backups, or else you might lose data.
Selecting a Keyboard Layout
In the YaST Control Center, click .
Use this module only if you work on a system without the X Window System and a graphical user interface. If you use a graphical system (such as GNOME or KDE), set up the keyboard with the Display and Input Devices module.The desired keyboard layout usually matches the selected language. Use the test field to see if special characters, such as the pipe symbol ( | ), are displayed correctly.
Changing Boot Loader Settings
In the YaST Control Center, click .
This YaST module simplifies the configuration of the boot loader, which is the first software program that runs when a computer starts. It is responsible for loading and transferring control to the operating system kernel software. The kernel, in turn, initializes the rest of the operating system. You should not experiment with this module unless you understand the concepts behind it. The following discussion mainly covers the default boot loader GRUB.
The Main Window
The current boot loader configuration of your system is displayed in the main window, where you can make any needed changes.
Figure A-12 Boot Loader Setup Main Window
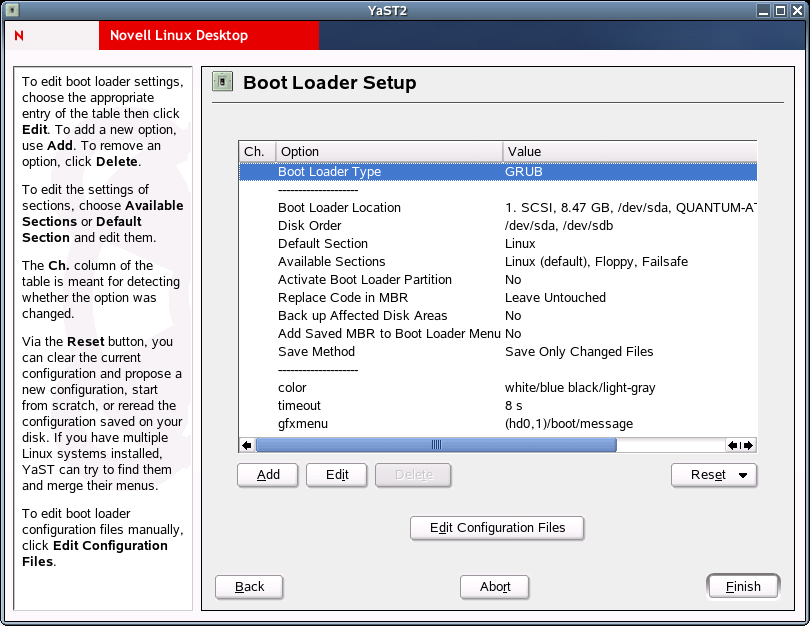
The table listing the configuration data consists of three columns. Under Ch. (Changed) on the left, flags mark the changed options listed in the Options column (in the center). To add an option, click . To change the value of an existing option, click . If you do not want to use an existing option at all, select it and then click .Click for the following options:
Table A-2 Boot Loader Reset Options
To edit the relevant configuration files in an editor, click . To edit a file, load it by means of the selection field and then click to save your changes. To exit the boot loader configuration, click . To return to the main window, click .
IMPORTANT:The sequence of the options or commands is very important in GRUB. If the specified sequence is not followed, the machine might not boot.
Boot Loader Configuration Options
For less experienced users, configuration with YaST is easier than editing the files directly. Select an option, then click to open a dialog where you can change the settings according to your needs. To confirm the changes and return to the main menu where you can edit other options, click . The available options depend on the boot loader used.
The following table introduces some options of the GRUB boot loader:
Table A-3 GRUB Boot Loader Options
Use Time-out to define how many seconds the boot loader should wait for keyboard input before the default system is booted. A number of other options can be specified with Add. However, the use of these options requires a deeper understanding and is not covered here. See the man pages for GRUB and LILO (man grub, man lilo, and man lilo.conf) for more information. A detailed online manual for GRUB is available at the GNU GRUB Web site.
Creating a Boot, Rescue, or Module Disk
In the YaST Control Center, click .
Use this module to create boot disks, rescue disks, and module disks. These floppy disks are helpful if the boot configuration of your system is damaged. The rescue disk is especially necessary if the file system of the root partition is damaged. In this case, you might also need the module disk with various drivers to be able to access the system (for example, to access a RAID system).
Figure A-13 Creating a Boot, Rescue, or Module Disk

You can create the following types of disks:
- Standard Boot Floppy 1, 2, or 3
- Use these options to create standard boot disks to boot an installed system with. These disks are also needed to start the rescue system.
- Rescue Floppy
- This disk contains a special environment that allows
you to perform maintenance tasks in your installed system, such
as checking and repairing the file system and updating the boot
loader.
To start the rescue system, boot with the standard boot disk and then select . You are then prompted to insert the rescue disk. If your system was configured to use special drivers (such as RAID or USB), you might need to load the respective modules from a module disk.
- Module Floppies
- Module disks contain additional system drivers.
The standard kernel supports only IDE drives. If the drives in your
system are connected to special controllers (such as SCSI), load
the needed drivers from a module disk. If you select this option
and click , you are taken to a dialog for
creating various module disks.
The following module disks are available:
- USB Modules
- This floppy disk contains the USB modules you might need if USB drives are connected.
- IDE, RAID, and SCSI Modules
- Because the standard kernel supports only normal IDE drives, you need this module disk if you use special IDE controllers. All RAID and SCSI modules are provided on this disk.
- Network Modules
- If you need access to a network, load the suitable driver module for your network card from this floppy disk.
- PCMCIA, CD-ROM (non-ATAPI), FireWire, and File Systems
- This floppy disk contains all PCMCIA modules used especially for laptop computers. The modules for FireWire and some less common file systems are also available here. Older CD-ROM drives that do not comply with the ATAPI standard can also be operated with drivers from this floppy disk.
To load drivers from a module disk to the rescue system, click and the desired module category (SCSI, ethernet, etc.). You are prompted to insert the respective module disk and the contained modules are then listed. Select the desired module. Watch the system messages carefully. Loading module modulename failed indicates that the hardware could not be recognized by the module. Some older drivers require specific parameters to be able to address the hardware correctly. In this case, refer to your hardware documentation.
- Custom Floppy
- Use this option to write any existing floppy disk image from the hard disk to a floppy disk.
- Download Floppy Image
- Using this option, specify a URL and authentication data to download a floppy disk image from the Internet.
To create one of these floppy disks, select the corresponding option and then click . Insert a blank floppy disk when prompted. If you click again, the floppy disk is created.
Creating and Configuring Volume Groups
In the YaST Control Center, click .
The Logical Volume Manager (LVM) is a tool for custom partitioning of hard disks into logical drives. For information about LVM, see “Section 3.10: LVM Configuration” in the SUSE LINUX Enterprise Server 9 Administration Guide.
Configuring Power Management
In the YaST Control Center, click .
Use this module to configure power management functions such as standby, suspend, hibernation, battery monitor, automatic power off, shutdown of system components, and processor speed control. When starting the module from the YaST Control Center, the first dialog of the module is displayed. Here you can select the schemes to use for battery operation and AC operation. To add or modify the schemes, click , which opens an overview of the existing schemes.
In the scheme overview, select the scheme to modify and then click . To create a new scheme, click . The dialog that opens is the same in both cases.
First, enter a suitable name and description for the new or edited scheme. For the hard disk, define a Standby Policy for maximum performance or for energy saving. The Acoustic Policy controls the noise level of the hard disk. Click to open the CPU and Cooling Policy dialog. CPU contains the CPU Frequency Scaling and Throttling options. Use these options to define if and to what extent the CPU frequency can be throttled. The Cooling Policy determines the cooling method. Complete all settings for the scheme, then click to return to the start dialog. In the start dialog, assign the custom scheme to one of the two operating modes. To activate your settings, click .
Global power management settings can also be made from the initial dialog using Battery Warnings or ACPI Settings. Click to view the battery charge level.
The BIOS of your system notifies the operating system whenever the charge level drops below certain configurable limits. In this dialog, there are three limits: Warning Capacity, Low Capacity, and Critical Capacity. Specific actions are triggered when the charge level drops below these limits. Usually, the first two levels merely trigger a notification to the user. The third critical level triggers a suspend, because the remaining energy is not sufficient for continued system operation. Select suitable charge levels and the respective actions, then click to return to the start dialog.
Click to access the dialog for configuring the ACPI buttons. These settings determine how the system should respond to the activation of certain switches. Configure the system response to pressing the Power button, pressing the Sleep button, and then closing the laptop lid. Click to complete the configuration and return to the start dialog. Click again to exit the module and confirm your power management settings.
For more information, see “Chapter 17: Power Management” in the SUSE LINUX Enterprise Server 9 Administration Guide.
Configuring Profiles
In the YaST Control Center, click .
The SCPM (System Configuration Profile Management) module enables creating, managing, and switching between system configurations. This is especially useful for mobile computers that are used in different locations (in different networks) and by different users. However, this feature is useful even for stationary machines, because it enables the use of various hardware components or test configurations. For more information about SCPM basics and handling, see “Chapter 16: Linux on Mobile Devices” in the SUSE LINUX Enterprise Server 9 Administration Guide.
Configuring Runlevels
In the YaST Control Center, click .
Novell Linux Desktop can be operated in several runlevels. By default, the system boots to runlevel 5, which offers multiuser mode, network access, and the graphical user interface (X Window System). The other runlevels offer multiuser mode with network but without X (runlevel 3) and multiuser mode without network (runlevel 2).
The various runlevels are useful if problems are encountered in connection with a particular service (X or network) in a higher runlevel. In this case, the system can be booted to a lower runlevel to repair the service. Many servers operate without a graphical user interface and must be booted in a runlevel without X, such as runlevel 3.
Usually you need only the standard runlevel (5). However, if the graphical user interface freezes at any time, you can restart the X Window system by switching to a text console by pressing Ctrl+Alt+F1, logging in as root, and switching to runlevel 3 with the init 3 command. This shuts down your X Window System, leaving you with a text console. To restart the graphical system, enter the init 5 command.
In a default installation, runlevel 5 is selected. To start a different runlevel when the system is booted, change the default runlevel here. Click to see which services are started in which runlevel.
WARNING:Incorrect settings for system services and runlevels can render your system useless. To retain the operability of your system, consider the possible consequences before modifying any of these settings.
For more information on runlevels, see “Section 11.2: Runlevels” in the SUSE LINUX Enterprise Server 9 Administration Guide.
Backing Up Files and System Areas
In the YaST Control Center, click .
The YaST backup module lets you create a backup of your system. The backup created by the module does not comprise the entire system, but only saves information about changed packages and copies of critical storage areas and configuration files.
Define the kind of data to save in the backup. By default, the backup includes information about any packages changed since the last installation. In addition, it can include data that does not belong to packages themselves, such as many of the configuration files in /etc or the directories under /home. Apart from that, the backup can include important storage areas on your hard disk that might be crucial when trying to restore a system, such as the partition table or the master boot record (MBR).
A.2.4 Network Devices
Use the Network Devices option to perform the following tasks:
Configuring a DSL Connection
In the YaST Control Center, click .
This module consists of several dialogs where you can set the parameters of DSL links based on one of the following protocols:
- PPP over Ethernet (PPPoE)
- PPP over ATM (PPPoATM)
- CAPI for ADSL (Fritz Cards)
- Point-to-Point Tunneling Protocol (PPTP) - Austria
The configuration of a DSL connection based on PPPoE or PPTP requires the corresponding network card to have already been set up in the correct way. If you have not done this, first configure the card by clicking in the YaST Control Center (see Configuring Network Cards for more information). In the case of a DSL link, addresses can be assigned automatically but not via DHCP, which is why you should not enable the Automatic Address Setup (via DHCP) option. Instead, type a static dummy address for the interface, such as 192.168.22.1. In Subnet Mask, specify 255.255.255.0. If you are configuring a standalone workstation, leave the Default Gateway field empty.
NOTE:Values in the IP Address and Subnet Mask fields are only placeholders. They are needed only to initialize the network card and do not represent the DSL link as such.
Figure A-14 DSL Configuration
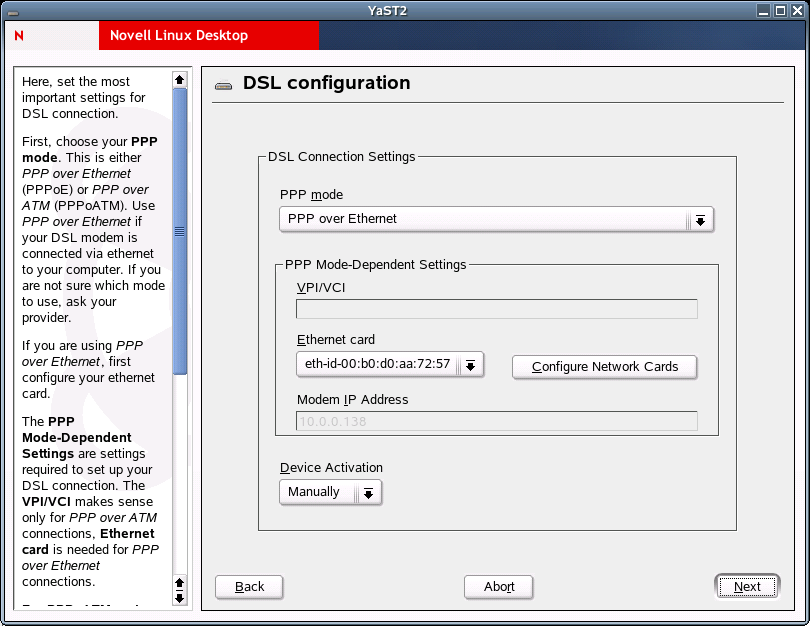
To begin the DSL configuration, select the PPP mode and the Ethernet card that the DSL modem is connected to (in most cases, this is eth0). Then use Device Activation to specify whether the DSL link should be established during the boot process. The dialog also lets you select your country and choose from a number of ISPs operating in it. The details of any subsequent dialogs of the DSL configuration depend on the options set so far. For details on the available options, read the detailed help available in the dialogs boxes.
To use Dial on Demand on a standalone workstation, specify the name server (DNS server). Most ISPs support dynamic DNS. The IP address of a name server is sent by the ISP each time you connect. For a single workstation, however, provide a placeholder address such as 192.168.22.99. If your ISP does not support dynamic DNS, specify the name server IP address provided by your ISP.
The Idle Time-out (seconds) option defines a period of network inactivity after which the connection is automatically terminated. A reasonable timeout value is between 60 and 300 seconds.
If you enable Dial on Demand in addition to the option mentioned above, the connection will not be completely terminated after the timeout. Instead, the connection remains in a standby mode and is re-established automatically as soon as a program requests some kind of data traffic. If Dial on Demand is disabled, the connection is completely terminated and must by re-established manually when needed. It might then be useful to set the timeout to zero to prevent automatic hang-up.
The configuration of T-DSL is very similar to the DSL setup. Simply select TOnline as your provider and YaST will open the T-DSL configuration dialog. Here you can provide some additional information required for T-DSL, such as the line ID, the T-Online number, the user code, and your password. All of these should be included in the information you received after subscribing to T-DSL.
Configuring an ISDN Card
In the YaST Control Center, click .
Use this module to configure one or more ISDN cards for your system. If YaST did not autodetect your ISDN card, manually select it. Multiple interfaces are possible, but several ISPs can be configured for one interface. In the subsequent dialogs, set the ISDN options necessary for the proper functioning of the card.
In the next dialog, shown below, select the protocol to use.
Figure A-15 ISDN Configuration
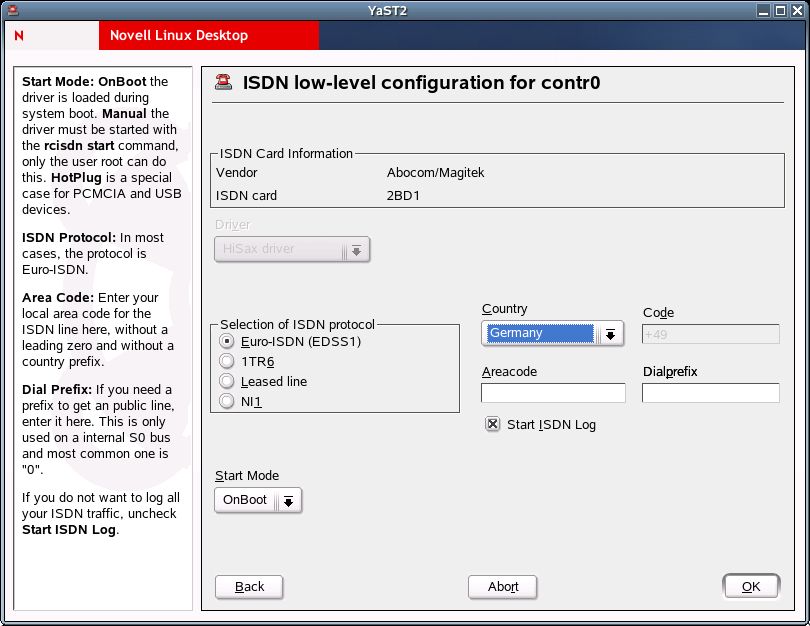
The default is Euro-ISDN (EDSS1), but for older or larger exchanges, select 1TR6. If you are in the US, select NI1. Select your country in the relevant field. The corresponding country code then appears in the field next to it. Finally, provide your area code and the dial prefix (if necessary).
Start Mode defines how the ISDN interface should be started. OnBoot causes the ISDN driver to be initialized each time during the boot process. Manual requires you to load the ISDN driver as root with the rcisdn start command. Hot Plug, used for PCMCIA or USB devices, loads the driver after the device is plugged in. When you are finished with all these settings, click .
In the next dialog, specify the interface type for your ISDN card and add ISPs to an existing interface. Interfaces can be either the SyncPPP or the RawIP type, but most ISP operate in the SyncPPP mode, which is described below.
The number to specify for My Phone Number varies depending on your particular setup, as described in the following sections.
ISDN Card Directly Connected to Phone Outlet
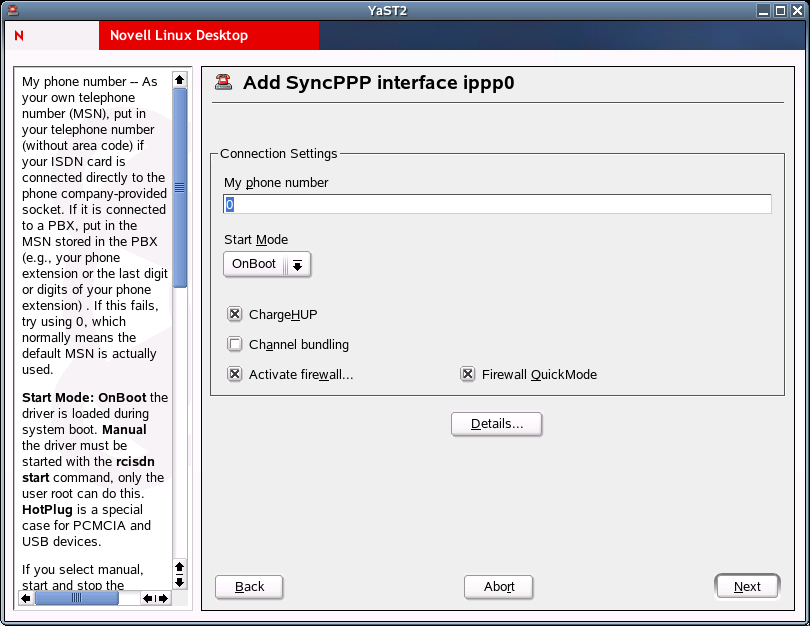
A standard ISDN line provides three phone numbers (called multiple subscriber numbers, or MSNs). If the subscriber asked for more, there can be up to 10. One of these MSNs must be specified here, but without your area code. If you specify the wrong number, your phone operator automatically falls back to the first MSN assigned to your ISDN line.
Figure A-16 ISDN Interface Configuration
ISDN Card Connected to a Phone Exchange
The configuration can vary depending on the equipment installed:
- Smaller phone exchanges built for
home purposes mostly use the Euro-ISDN (EDSS1) protocol for internal
calls. These exchanges have an internal S0 bus and use internal
numbers for the equipment connected to them.
Use one of the internal numbers as your MSN. You should be able to use at least one of the exchange’s MSNs that have been enabled for direct outward dialing. If this does not work, try a single 0. For further information, see the documentation that came with your phone exchange.
- Larger phone exchanges designed for businesses normally use the 1TR6 protocol for internal calls. Their MSN is called EAZ and usually corresponds to the direct-dial number. For the configuration under Linux, use the last digit of the EAZ. As a last resort, try each of the digits from 1 through 9.
For the connection to be terminated just before the next charge unit is due, enable ChargeHUP. However, this might not work with every ISP. You can also enable channel bundling (multilink PPP) by selecting the corresponding check box. Finally, you can enable SuSEfirewall2 for your link by clicking .
Details opens a dialog where you can implement more complex connection schemes and then click .
In the next dialog, specify IP address settings. If you have not been given a static IP by your provider, click . Otherwise, use the fields provided to specify your host’s local IP address and the remote IP address according to the specifications of your ISP. If the interface should be the default route to the Internet, click . Each host can have only one interface configured as the default route.
The next dialog let you set your country and select an ISP. The IPSs included in the list are call-by-call providers only. If your ISP is not in the list, click . This opens the Provider Parameters dialog where you can specify all the details for your ISP. When typing the phone number, make sure you do not include any blanks or commas among the digits. Finally, type your login name and the password as provided by the ISP.
To use Dial on Demand on a standalone workstation, also specify the name server (DNS server). Most ISPs support dynamic DNS, which means the IP address of a name server is sent by the ISP each time you connect. For a single workstation, however, you still need to provide a placeholder address such as 192.168.22.99. If your ISP does not support dynamic DNS, specify the name server IP addresses of the ISP. If you want, specify a timeout for the connection, or the period of network inactivity (in seconds) after which the connection should be automatically terminated.
Configuring Network Cards
In the YaST Control Center, click .
After starting the module, YaST displays a general network configuration dialog. The upper part shows a list with all the network cards yet to be configured. Any card properly autodetected during the boot procedure is listed with its name. Devices that could not be detected are listed as Other (not detected). The lower part displays a list of the devices configured so far, with their network types and addresses. You can now configure a new network card or change an existing configuration.
Manually Configuring a Network Card
The configuration of a network card that was not autodetected includes the following items:
- Device Type
- Specify the type of network device and the device number.
- Wireless Settings
- If you are within reach of a wireless network and your network card is designed for this connection type, use Wireless Settings to set the operating mode, the network name (ESSID), the network identifier (NWID), the encryption key, and a nickname.
- Kernel Module and Selection of Network Card
- If your network card is a PCMCIA or USB device, select the corresponding check boxes and click . Otherwise, click and then specify your network card. YaST automatically loads the appropriate driver for the selected card.
Setting the Network Address
This lets you specify how the address should be assigned to your network card:
- Automatic Address Setup (via DHCP)
- If your network includes a DHCP server, you can rely on it to set up your network address automatically. The option should also be used if you are using a DSL line but with no static IP assigned by the ISP. If you decide to use DHCP, configure the details after clicking . Specify whether the DHCP server should always honor broadcast requests and any identifier to use. By default, DHCP servers use the card’s hardware address to identify an interface. If you have a virtual host setup where different hosts communicate through the same interface, an identifier is necessary to distinguish them.
- Static Address Setup
- If your have a static address, select the corresponding check box and then specify the address and subnet mask for your network. The preset subnet mask should match the requirements of a typical home network.
Cable Modem
In some countries (such as Austria and the US), it is quite common to access the Internet through the TV cable network. The TV cable subscriber usually gets a modem that is connected to the TV cable outlet on one side and to a computer network card on the other (using a 10Base-TG twisted pair cable). The cable modem then provides a dedicated Internet connection with a fixed IP address.
Depending on the instructions provided by your ISP, when configuring the network card, either click or . Most providers today use DHCP. A static IP address often comes as part of a special business account.
Setting Up an ISDN Fax Device
This option sets up the fax system for one or more users. Each user must have at least one unique fax number configured.
-
In the YaST Control Center, click .
-
(For users behind a PBX) In the Prefix field, type the prefix number for getting a public line.
This number will be dialed before any destination number.
-
Click or to add or edit a user.
When adding or editing a user, a dialog appears with the following options:
-
Click .
Configuring a Modem
In the YaST Control Center, click .
If your modem was not automatically detected, click to open the dialog for manual configuration. Under Modem Device, specify the interface that the modem is connected to.
Figure A-17 Modem Configuration
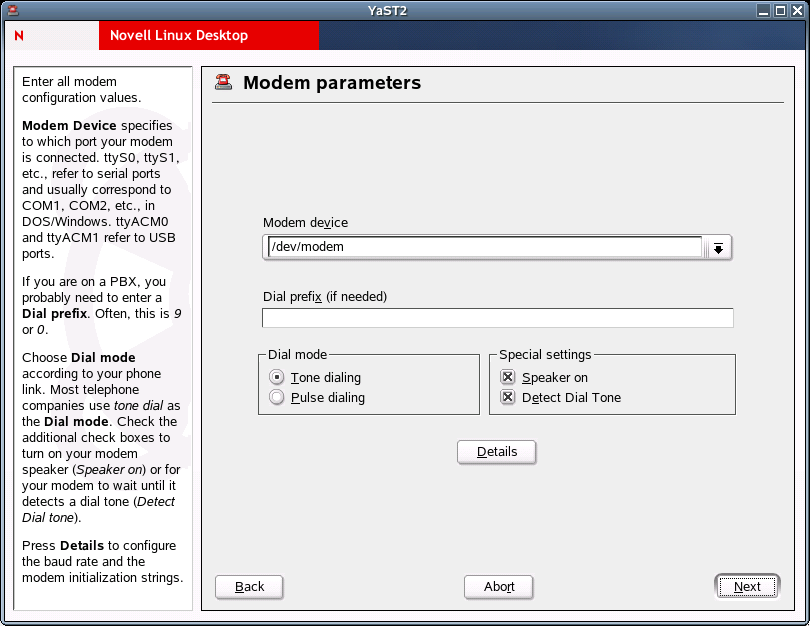
If you are behind a private branch exchange (PBX), you might need to specify a dial prefix. This is often a 0. Consult the instructions that came with the PBX to find out. Also select whether to use tone or pulse dialing, whether the speaker should be on, and whether the modem should wait until it detects a dial tone. The latter option should not be enabled if the modem is connected to an exchange.
Under Details, set the baud rate and the modem initialization strings. Change these settings only if your modem was not autodetected or if it requires special settings for data transmission to work. This is mainly the case with ISDN terminal adapters.
In the next dialog, select the ISP (Internet service provider). To select from a predefined list of ISPs operating in your country, click ; or click to open a dialog where you can provide the data for your own ISP. This includes a name for the dial-up connection and for the ISP and also the login and the password as provided by your ISP. Enable Always Ask for Password if you want to be prompted for the password each time you connect.
The final dialog allows specification of the following additional connection options:
Table A-4 Modem Connection Options
Click to return to the original dialog, which displays a summary of the modem configuration. Then click .
Setting Up a Phone Answering Machine
This option sets up an answering machine for one or more users. Each user must have at least one unique phone number configured.
-
In the YaST Control Center, click .
-
Click or to add or edit a user.
When adding or editing a user, a dialog appears with the following options:
-
Click .
A.2.5 Network Services
Use the Network Services option to perform the following tasks:
- Configuring Your Computers's Hostname and Domain Name
- Configuring a Kerberos Client
- Configuring Mail Settings
- Configuring a NIS Client
- Configuring Network Services (inetd)
- Setting Up Remote Administration
- SLP Browser
- Host Names
- Configuring a Machine As an LDAP Client
- Configuring an NFS Client
- Configuring the NTP Client
- Configuring Your Internet Proxy (Caching) Settings
- Configuring Routing
- Configuring a TFTP Server
Configuring Your Computers's Hostname and Domain Name
In the YaST Control Center, click .
Use this module to configure your computer's hostname and domain name if these settings were not already been made while configuring the network devices.
Insert the hostname and domain name for your computer. Name Server List and Domain Search List are optional. A name server is a computer that translates hostnames into IP addresses. This value must be specified as an IP address (for example,10.10.0.1), not as a hostname.
Search domain is the domain name where hostname searching starts. The primary search domain is usually the same as the domain name of your computer (for example, novell.com). There might be additional search domains (for example, novell.de).
If you are using DHCP to get an IP address, specify whether to get a hostname via DHCP or to set name servers and searched domains via DHCP.
If you plan to use a dial-up Internet connection and have set up your connection to use dynamic DNS assignment, these values are temporarily disabled during the connection.
Configuring a Kerberos Client
In the YaST Control Center, click .
Kerberos provides an authentication method that a user must register with once and is then trusted in the complete network for the rest of the session.
To configure a Kerberos client, you need the pam_krb5 and heimdal-lib packages, available from the Novell Linux Desktop CD 1.
When the Kerberos Client Configuration dialog opens, click . To set up a DNS-based client, it is sufficient to confirm the Basic Kerberos Settings as displayed. If your domain does not support this kind of configuration, provide the correct values for the Default Domain, the Default Realm, and the KDC Server Address. Clicking opens another YaST dialog where you can modify options related to tickets, OpenSSH support, and time synchronization.
The dialog opened with Advanced Settings includes all the settings related to ticket attributes. To forward your complete identity to use your tickets on other hosts, click . To enable the transfer of certain tickets only, click . Tickets can be kept available by a PAM module even after a session has ended by enabling Retain Tickets. The Default Ticket Lifetime can be specified in days, hours, or minutes (using the units of measurement d, h, and m, with no space between the value and the unit). To enable Kerberos authentication support for your OpenSSH client, select the corresponding check box. The client then uses Kerberos tickets to authenticate with the SSH server. You exclude a range of user accounts from using Kerberos authentication by providing a value for the Minimum UID that a user of this feature must have. For instance, you might want to exclude the system administrator (root). Lastly, use Clock Skew to set a value for the allowable difference between the time stamps and your host’s system time.
To keep the system time in sync with an NTP server, you can also set up the host as an NTP client by selecting NTP Configuration. After finishing the configuration, YaST performs all the necessary changes and the Kerberos client is ready for use.
For more information, see “Chapter 25: Network Authentication - Kerberos” and “Chapter 26: Installing and Administering Kerberos” in the SUSE LINUX Enterprise Server 9 Administration Guide.
Configuring Mail Settings
In the YaST Control Center, click .
This module lets you configure your mail settings if you send your e-mail with sendmail, postfix, or the SMTP server of your provider. You can retrieve mail via the fetchmail program, for which you can also specify the details of the POP3 server or IMAP server of your provider.
You can also use a mail program of your choice, such as KMail or Evolution, to set your POP and SMTP access data as usual (to receive mail with POP3 and send mail with SMTP). In this case, you do not need this module.
Connection Type
To configure your mail with YaST, specify the desired type of connection to the Internet from the following options in the first dialog of the e-mail configuration module:
- Permanent
- Select this option if you have a dedicated line to the Internet. Your machine is online permanently, so no dial-up is required. If your system is part of a local network with a central e-mail server, select this option to ensure permanent access to your e-mail messages.
- Dial-up
- This item is relevant for users who have a computer at home, are not located in a network, and occasionally connect to the Internet.
- No connection
- If you do not have access to the Internet and are not located in a network, you cannot send or receive e-mail.
You can activate virus scanning for your incoming and outgoing e-mail with AMaViS by selecting the respective check box. The package is installed automatically as soon as you activate the mail filtering feature. In the following dialogs, specify the outgoing mail server (usually the SMTP server of your provider) and the parameters for incoming mail. If you use a dial-up connection, specify diverse POP or IMAP servers for mail reception by various users. You can also assign aliases, use masquerading, or set up virtual domains.
Configuring a NIS Client
In the YaST Control Center, click .
This module lets you configure the Network Information Service (NIS) client. When multiple Linux systems in a network want to access common resources, it becomes important that all user and group identities are the same for all machines in that network. The network should be transparent to users so that whatever machine users use, they always finds themselves in exactly the same environment. This is made possible by means of NIS and NFS services.
NIS can be described as a database-like service that provides access to the contents of /etc/passwd, /etc/shadow, and /etc/group across networks. NIS can also be used for other purposes, such as to make available the contents of files like /etc/hosts or /etc/services.
After choosing to use NIS and, depending on the circumstances, the following dialog opens:
Figure A-18 Configuration of NIS Client

Select whether the host has a fixed IP address or receives one issued by DHCP. DHCP also provides the NIS domain and the NIS server. If a static IP address is used, specify the NIS domain (for example, foo.com) and the NIS server's address (for example, nis.foo.com or 10.20.1.1). Specify multiple servers by separating their addresses with spaces. The Broadcast option enables searching in the local network to find a server after the specified servers fail to respond. It is a security risk. Find makes YaST search for an active NIS server in your network.
If you are using DHCP and the server provides the NIS domain name or servers, you can enable their use here. DHCP itself can be set up in the network module. Automounter is a daemon that mounts directories (such as users’ home directories) automatically. It is assumed that its configuration files (auto.*) already exist, either locally or over NIS.
In addition, you can specify multiple domains with one default domain. Use Add to specify multiple servers including the broadcast function for the individual domains.
In the expert settings, click if you do not want other hosts to be able to query which server your client is using. By clicking , the client is enabled to receive replies from a server communicating through an unprivileged port. For more information, see man ypbind.
Configuring Network Services (inetd)
In the YaST Control Center, click .
This module lets you determine which network services (such as telnet, finger, talk, or ftp) should start when Novell Linux Desktop boots. These services enable external hosts to connect to your computer. You can also configure various parameters for each service. By default, the master service that manages the individual services (inetd or xinetd) is not started. When this module starts, choose which of the two services to configure. The selected daemon can be started with a standard selection of network services.You can add, delete, or edit services to compose your own selection of services.
Figure A-19 Network Services Configuration
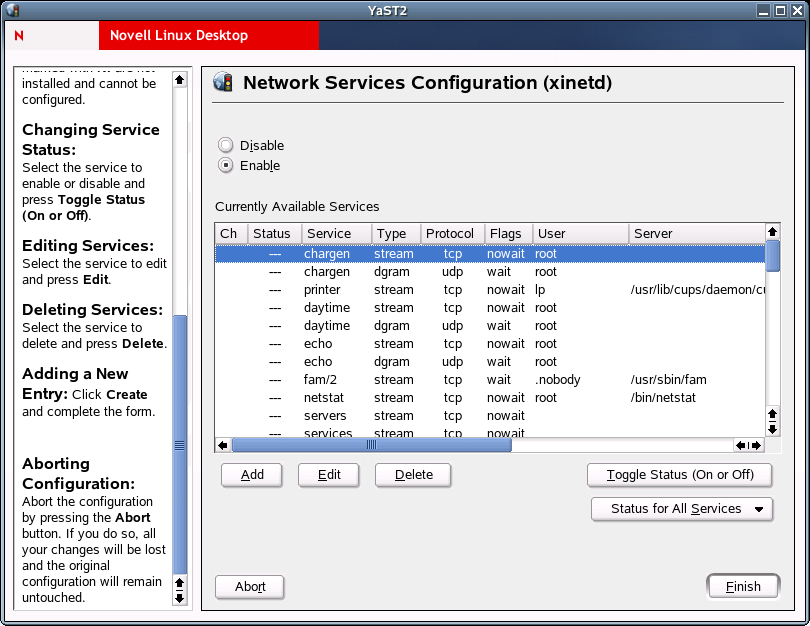
Network Services Configuration
Click to enable network services managed by a super-server (inetd or xinetd—it depends on what you have installed) configuration. To stop the super-server, click .
Service Status
All services marked with X in the Ch column were edited and will be changed in the system configuration. All services marked with a dash (—) are inactive (locked). All services marked with On are active (unlocked). All services marked with NI are not installed and cannot be configured.
To change the service status, select the service you want to enable or disable and then click .
Setting Up Remote Administration
In the YaST Control Center, click .
If this is enabled (Allow Remote Administration has been selected), you will be able to administer this machine remotely from another machine. You can use a VNC client, such as krdc (connect to hostname:5901), or a Java-capable Web browser (connect to http://hostname:5801/). This form of remote administration is less secure than using SSH (Secure Shell Server), which is enabled by default.
SLP Browser
The Service Location Protocol (SLP) is used to make the availability of a certain service known to all clients in the local network. Applications that support SLP can use the distributed information and can be configured automatically. Services that offer SLP support include cupsd, rsyncd, ypserv, openldap2, openwbem (CIM), ksysguardd, saned, kdm vnc login, smpppd, rpasswd, postfix, and sshd (via fish.). You can use SLP to provide networked clients with central functions, such as installation server, file server, or print server NLD Server.
The SLP Browser lists all services in the local network announced via SLP in a tree diagram.
Figure A-20 SLP Browser

To open the SLP Browser, click .
For more information, see “Section 21.6: SLP Services in the Network” in the SUSE LINUX Enterprise Server 9 Administration Guide.
Host Names
Use this option to set up hosts.
-
In the YaST Control Center, click .
-
Click or to add or edit a hostname.
-
Type a host IP address, a hostname, and optional host aliases, separated by spaces.
-
Click
Configuring a Machine As an LDAP Client
Use this option to set up a machine as an LDAP client. To configure and access LDAP services, the pam_ldap and nss_ldap packages must be installed. These packages are available on the Novell Linux Desktop CD 1.
-
In the YaST Control Center, click .
-
To authenticate your users with an OpenLDAP server, select .
NSS and PAM are then configured accordingly.
-
To deactivate LDAP services, select .
If you deactivate LDAP, the current LDAP entry for passwd in /etc/nsswitch.conf is removed. The PAM configuration is modified and the LDAP entry is removed.
-
Type the Distinguished Name of the search base (“base DN”, such as dc=example,dc=com) and the LDAP server’s address (for example, ldap.example.com or 10.20.0.2).
Specify multiple servers by separating their addresses with spaces. It must be possible to resolve the addresses without using LDAP. You can also specify the port where the server is running using the syntax server:port (for example, ldap.example.com:379).
-
(Conditional) If your LDAP server supports StartTLS and it is configured, click to encrypt your communication with the LDAP server.
-
(Conditional) If you have an LDAP server using protocol 2 (for example, OpenLDAP v1), click .
-
(Optional) To configure advanced LDAP settings, click .
Automounter is a daemon that automatically mounts directories, such as users’ home directories. It is assumed that its configuration files (auto.*) already exist, either locally or over LDAP. If Automounter is not installed and you want to use it, it will be installed automatically.
For more information, see “Section 21.8: LDAP — A Directory Service” in the SUSE LINUX Enterprise Server 9 Administration Guide.
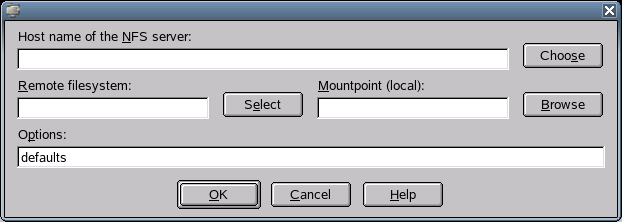
Configuring an NFS Client
The Network File System (NFS) let you operate a file server that can be accessed by members of your network. On this file server, you can make programs, files, or storage space available for users. It does not matter which terminal users are logged in at, because they will always find themselves in the same environment.
NFS is an asymmetric service, meaning that there are NFS servers and NFS clients. A machine can be both; it can supply file systems over the network (export) and mount file systems from other hosts (import). Generally, these are servers with a very large hard disk capacity, whose file systems are mounted by other clients.
Any user authorized to do so can mount NFS directories from an NFS server into their own file tree. This is accomplished using the NFS Client module to enter the hostname of the NFS server, the directory to import, and the mount point to mount this directory at locally.
-
In the YaST Control Center, click .
A table appears containing all NFS entries which will be written to /etc/fstab.
-
Click or to enter or edit the hostname of the NFS server, the directory to import, and the mount point to mount this directory to locally.
Figure A-21 Importing a File System
-
Click .
For more information on fstab, type man fstab in a terminal window. For more information on NFS, see “Section 21.10: NFS — Shared File Systems” in the SUSE LINUX Enterprise Server 9 Administration Guide.
Configuring the NTP Client
NTP (Network Time Protocol) is a protocol for synchronizing the clocks of network hosts.
-
In the YaST Control Center, click .
-
To start the NTP daemon when the system is booted, click .
The NTP daemon resolves hostnames when initializing. Your network connection must be started before the NTP daemon starts.
-
To select the address of the NTP server, click the drop-down list.
To find an NTP server, ask your Internet provider or see Public NTP Time Servers.
-
To find NTP servers in the local network using the Service Location Protocol (SLP), click .
-
To configure this host to synchronize against multiple remote hosts or against a locally connected clock, click .
-
Click .
For more information, see “Section 21.12: Time Synchronization with xntp” in the SUSE LINUX Enterprise Server 9 Administration Guide.
Configuring Your Internet Proxy (Caching) Settings
Use this option to configure your Internet proxy (caching) settings.
-
In the YaST Control Center, click .
-
Click , then complete the following:
-
(Conditional) If you are using a proxy server with authorization, fill in the Proxy User Name and Proxy Password fields.
-
Click .
Configuring Routing
In the YaST Control Center, click .
Use this option to set up routing. The Default Gateway matches every possible destination, but poorly. If any other entry exists that matches the required address, it is used instead of the default route. The idea of the default route is simply to let you say “and everything else should go here.”
Enable IP Forwarding if the system is a router.
The routing table is set up in Novell Linux Desktop via the /etc/sysconfig/network/routes and /etc/sysconfig/network/ifroute-* configuration files. All the static routes required by the various system tasks (routes to a host, routes to a host via a gateway, and routes to a network) can be entered in the /etc/sysconfig/network/routes file. For each interface that needs individual routing, define an additional configuration file: /etc/ sysconfig/network/ifroute-*. Replace * with the name of the interface. The entries in the routing configuration files look like this:
DESTINATION GATEWAY NETMASK    INTERFACE [ TYPE ] [ OPTIONS ]
DESTINATION GATEWAY PREFIXLEN  INTERFACE [ TYPE ] [ OPTIONS ]
DESTINATION/PREFIXLEN GATEWAY -          INTERFACE [ TYPE ] [ OPTIONS ]
To omit GATEWAY, NETMASK, PREFIXLEN, or INTERFACE, write - instead. The entries TYPE and OPTIONS can be omitted.
The route’s destination is in the first column. This column might contain the IP address of a network or host or, in the case of reachable name servers, the fully qualified network or hostname.
The second column contains the default gateway or a gateway that a host or a network can be accessed through.
The third column contains the netmask for networks or hosts behind a gateway. The mask is 255.255.255.255, for example, for a host behind a gateway.
The last column is relevant only for networks connected to the local host, such as loopback, Ethernet, ISDN, PPP, and dummy device. The device name must be specified here.
The following scripts in the /etc/sysconfig/network/scripts/ directory assist with the handling of routes:
Configuring a TFTP Server
Use this option to configure a server for TFTP (Trivial File Transfer Protocol). It is started using xinetd. To configure the TFTP server, the xinetd and tfpt packages must be installed. These packages are available on the Novell Linux Desktop CD 2.
-
In the YaST Control Center, click .
-
Click , then specify the directory where served files are located.
The usual value is /tftpboot. It is created if it does not already exist. The server uses it as its root directory (using the -s option).
-
Click .
A.2.6 Security and Users
A basic aspect of Linux is its multiuser capability. Consequently, several users can work independently on the same Linux system. Each user has a user account identified by a login name and a personal password for logging in to the system. All users have their own home directories where personal files and configurations are stored.
Use the Security and Users option to perform the following tasks:
Creating and Editing Users
In the YaST Control Center, click .
Figure A-22 User Administration Dialog
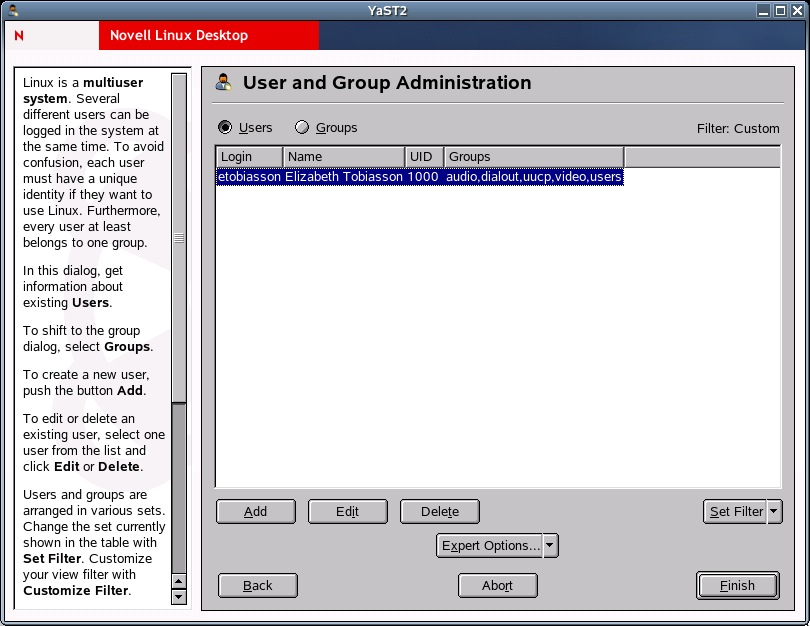
YaST provides an overview of all local users in the system. If you are part of an extensive network, click to list all system users (for example, root) or NIS users. You can also create user-defined filter settings. Instead of switching between individual user groups, combine them according to your needs. To add new users, fill in the required blanks in the screen that follows. Subsequently, the new user can log in to the host with the login name and password. The user profile can be fine-tuned with Details. You can manually set the user ID, the home directory, and the default login shell. And you can assign the new user to specific groups.
Configure the validity of the password in Password Settings. Click to change these settings whenever necessary. To delete a user, select the user from the list and click . For advanced network administration, use Expert Options to define the default settings for the creation of new users. Select the authentication method (NIS, LDAP, Kerberos, or Samba) and the algorithm for the password encryption. These settings are relevant for large (corporate) networks.
Creating and Editing Groups
In the YaST Control Center, click .
Figure A-23 Group Administration Dialog
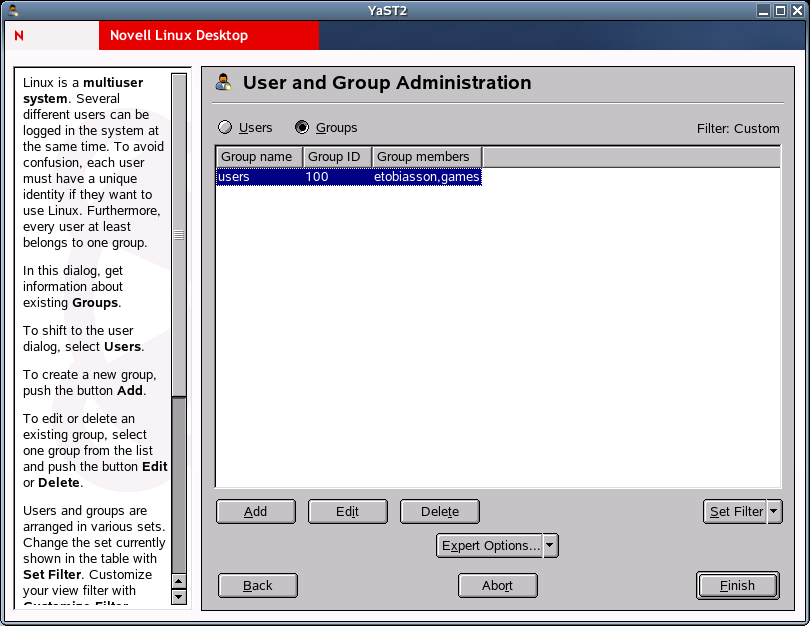
You can start the Group Administration dialog from the YaST Control Center or by clicking in the User Administration dialog. Both dialogs have the same functionality, allowing you to create, edit, or delete groups.
YaST provides a list of all groups. To delete a group, select it from the list (the line is highlighted dark blue) and click . Under and , specify the name, group ID (gid), and members of the group in the respective YaST screen. If you want, you can set a password for the change to this group. The filter settings are the same as in the User Administration dialog.
Configuring Local Security Settings
-
In the YaST Control Center, click .
-
In the Local Security Configuration dialog, select one of the following options:
- Level 1 (Home Workstation) is for standalone computers (preconfigured).
- Level 2 (Networked Workstations) is for workstations with a network (preconfigured).
- Level 3 (Network Server) is for a server with a network (preconfigured).
- Custom Settings is for your own configuration.
-
If you selected Level 1-3, incorporate one of the levels of preconfigured system security options by clicking , or click to access the individual settings that can be modified.
or
If you selected Custom Settings, click to proceed to the following dialogs, in the order listed:
- Password Settings
- For new passwords to be checked by the system before they are accepted, click and . Set the minimum and maximum length of passwords for newly created users. Define the period for which the password should be valid and how many days in advance an expiration alert should be issued when the user logs in to the text console.
- Boot Settings
- Specify how the Ctrl+Alt+Del key combination should be interpreted by selecting the action from the drop-down list. Usually this key combination causes the system to reboot. Do not modify this setting unless your machine or server is publicly accessible and you are afraid someone could carry out this action without authorization. If you select Stop, this key combination causes the system to shut down. Ignore causes this key combination to be ignored. Specify the Shutdown Behavior of KDM by granting permission to shut down the system from the KDE Display Manager, the graphical login of KDE. Give permission to Only Root (the system administrator), All Users, Nobody, or Local Users. If Nobody is selected, the system can be shut down only via the text console.
- Login Settings
- Typically, following a failed login attempt, there is a waiting period lasting a few seconds before another login is possible. This makes it more difficult for password sniffers to log in. You can also activate Record Failed Login Attempts and Record Successful Login Attempts. If you suspect someone is trying to discover your password, check the entries in the system log files in /var/log. With Allow Remote Graphical Login, other users are granted access to your graphical login screen via the network. However, this access possibility represents a potential security risk, so it is inactive by default.
- Adding Users
- Every user has a numerical and an alphabetical user ID. The correlation between these is established via the /etc/passwd file and should be as unique as possible.Using the data in this screen, define the range of numbers assigned to the numerical part of the user ID when a new user is added. A minimum of 500 is suitable for users. Proceed in the same way with the group ID settings.
- Miscellaneous Settings
- For Setting of File Permissions, there are three options: Easy, Secure, and Paranoid. The first one should be sufficient for most users. The YaST help text provides information about the three security levels.The Paranoid setting is extremely restrictive and can serve as the basic level of operation for system administrator settings. If you select Paranoid, remember that some programs might not work correctly or at all because users no longer have the permissions to access certain files. In this dialog, you can also define which user should start the updatedb program. This program, which automatically runs on a daily basis or after booting, generates a database (locatedb) where the location of each file on your computer is stored. If you select Nobody, any user can find only the paths in the database that can be seen by any other (unprivileged) user. If root is selected, all local files are indexed, because the user root, as superuser, can access all directories. Finally, make sure the Current Directory in Root’s Path option is deactivated (default).
-
Click to complete your security configuration.
Setting Up a Firewall
In the YaST Control Center, click .
Use this module to configure SuSEfirewall2 to protect your machine against attacks from the Internet. Detailed information about SuSEfirewall2 can be found in “Section 26.3: Masquerading and Firewalls” in the SUSE LINUX Enterprise Server 9 Administration Guide.
A.2.7 Misc
Use the Misc option to perform the following tasks:
Configuring the System for Autoinstallation
In the YaST Control Center, click .
See Section C.0, Automatic Linux Installation and Configuration Using AutoYaST for more information.
Viewing the System Log
In the YaST Control Center, click .
The system log logs the operations of your computer to /var/log/messages. Kernel messages are recorded here, sorted according to date and time.
Installing a Driver from a Vender-Specific CD
In the YaST Control Center, click .
Use this module to automatically install device drivers from a Linux driver CD that contains drivers for Novell Linux Desktop. When installing Novell Linux Desktop from scratch, use this YaST module to load the required drivers from the vendor CD after the installation.
Viewing the Startup Log
In the YaST Control Center, click .
The boot log contains the screen messages displayed when the computer is started. It is logged to /var/log/boot.msg. Use this YaST module to view the log to, for example, check if all services and functions were started as expected.