C.3 Configuration and Installation Options
This section introduces important parts of a control file for standard purposes. To get an idea of the other options available, use the configuration management system.
For some of the configuration options to work, additional packages must be installed, depending on the software selection you have configured. If you choose to install Minimal, some packages might be missing and they have to be added to the individual package selection.
YaST installs packages required by YaST modules in the second phase of the installation and before the post-installation phase of AutoYaST has started. However, if the YaST modules are not available in the system, this does not happen. For example, no security settings are configured if yast2-security is not installed.
C.3.1 General Options
This is a required section of the profile. General options include all the settings related to the installation process and the environment of the installed system. The following four properties which are required for almost any installation are also included: language, keyboard, clock, and mouse. If these are left out, their default values are used.
<install>
  <general>
    <clock>
      <hwclock>UTC</hwclock>
      <timezone>US/Eastern</timezone>
    </clock>
    <keyboard>
      <keymap>german</keymap>
    </keyboard>
    <language>de_DE</language>
    <mode>
      <confirm config:type=”boolean”>true</confirm>
      <forceboot config:type=”boolean”>false</forceboot>
    </mode>
    <mouse>
      <device>/dev/psaux</device>
      <id>ps0</id>
    </mouse>
  </general>
</install>
By default, the auto-installation process must be confirmed by the user (see the confirm property). The confirmation should be disabled if a fully unattended installation is desired. This option is used to view and change the settings on a target system before anything is committed and can be used for debugging. It is set to True by default to avoid recursive installs when the system schedules a reboot after initial system setup.
After initial installation, all systems must boot.
It is possible to halt the system after the initial installation phase by using the boolean halt property.
C.3.2 Reporting
The report resource manages three types of pop-ups that can appear during installation.
- messages (usually noncritical, informative messages)
- warning (if something might go wrong)
- error (in case of an error)
<install>
  <report>
    <messages>
      <show config:type=”boolean”>true</show>
      <timeout config:type=”integer”>10</timeout>
      <log config:type=”boolean”>true</log>
    </messages>
    <errors>
      <show config:type=”boolean”>true</show>
      <timeout config:type=”integer”>10</timeout>
      <log config:type=”boolean”>true</log>
    </errors>
    <warnings>
      <show config:type=”boolean”>true</show>
      <timeout config:type=”integer”>10</timeout>
      <log config:type=”boolean”>true</log>
    </warnings>
  </report>
</install>
You can skip, log, and show (with timeout) these messages. We recommend showing all messages with timeout. Warnings can be skipped in some places but should not be ignored.
By default, the settings in auto-installation mode show all messages without logging and with a timeout of 10 seconds.
All messages during installation are controlled by the report resource. Some critical messages concerning package installation and partitioning still show up, ignoring your settings in the report section. Those messages mostly have to be answered with Yes or No.
C.3.3 The Boot Loader
If the bootloader resource is not configured, the system proposes a configuration depending on the partitioning scheme. In some cases, you must decide where to install the bootloader (the Master Boot Record or the first sector of the /boot partition) and you must specify additional options for the bootloader to be installed correctly.
You can also configure special kernel and boot parameters. Kernel parameters can be configured using the kernel_parameters property.
  <?xml version="1.0"?>
<!DOCTYPE profile SYSTEM "/usr/share/autoinstall/dtd/profile.dtd">
<profile xmlns="http://www.mycompany.com/1.0/yast2ns" xmlns:config="http://
  www.mycompany.com/1.0/configns">
  <install>
    <bootloader>
      <global config:type="list">
        <global_entry>
          <key>prompt</key>
          <value config:type="boolean">false</value>
        </global_entry>
      </global>
      <loader_device></loader_device>
      <loader_type>lilo</loader_type>
      <location>mbr</location>
      <sections config:type="list"/>
    </bootloader>
  </install>
</profile>
The global resource is used to configure additional boot loader options. Bootloaders can have different configurable options. Consult the documentation for the specific bootloader you want to use before adding any options.
For example, to configure the serial console with GRUB, add the following options:
<bootloader>
  <global config:type=”list”>
    <global_entry>
      <key>serial</key>
      <value>--unit=1 --speed=115200</value>
    </global_entry>
    <global_entry>
      <key>terminal</key>
      <value>serial console</value>
    </global_entry>
  </global>
  <loader_type>grub</loader_type>
  <location></location>
</bootloader>
HINT:The bootloader configuration interface offers more configuration options than you might need for a regular setup. The options described in the example above should be sufficient for most cases.
In the current version, bootloader configuration also supports different architectures and boards. The configuration of the bootloader can be done offline using AutoYaST. For example, the bootloader configuration for PPC has the following additional options:
  <?xml version="1.0"?>
<!DOCTYPE profile SYSTEM "/usr/share/autoinstall/dtd/profile.dtd">
<profile xmlns="http://www.mycompany.com/1.0/yast2ns" xmlns:config="http:/
   /www.mycompany.com/1.0/configns">
  <install>
    <bootloader>
      <board_type>iseries</board_type>
      <global config:type="list"/>
      <iseries_streamfile>/boot/suse_linux_bootfile</iseries_streamfile>
      <iseries_write_prepboot config:type="boolean">true</
        iseries_write_prepboot>
       <iseries_write_slot_a config:type="boolean">true<
        /iseries_write_slot_a>
       <iseries_write_slot_b config:type="boolean">true<
        /iseries_write_slot_b>
      <iseries_write_streamfile config:type="boolean">true</
        iseries_write_streamfile>
      <loader_device>B</loader_device>
      <loader_type>ppc</loader_type>
      <location></location>
      <prep_boot_partition>/dev/hda1</prep_boot_partition>
    </bootloader>
  </install>
</profile>
The following bootloaders can be configured offline using the AutoYaST interface:
- LILO
- GRUB
- ELILO
- zipl
- yaboot
C.3.4 Partitioning
This section contains the following information:
Automated Partitioning
For the automated partitioning to be completed, only the sizes and mount points of partitions can be provided. All other data needed for successful partitioning can be calculated during installation if they were not provided in the control file.
If no partitions are defined and the specified drive is also the drive where the root partition should be created, the following partitions are created automatically:
- /boot
- Size of the /boot is determined by the architecture of the target system.
- swap
- Size of the swap partitions is determined by the amount of memory available in the system.
- / (root partition)
- Size of the / (root partition) is the space left after creating swap and /boot.
Depending on the initial status of the drive and how it was previously partitioned, it is possible to create the default partitioning in the following ways:
- Use free space
- If the drive is already partitioned, it is possible to create the new partitions using the available space on the hard drive. This requires the availability of enough space for all selected packages in addition to swap.
- Reuse all available space
- This option deleted all existing partitions (both Linux and non-Linux).
- Reuse all available Linux partitions
- This option deletes existing Linux partitions. All other partitions (such as Windows) are kept. This works only if the Linux partitions are at the end of the device.
- Reuse only specified partitions
- This option deletes the specified partitions. The selection of the partitions scheduled for deletion should be started from the last available partition.
Repartitioning using only some of the existing partitions can be accomplished only if the region selected to be partitioned exists at the end of the device and only with neighboring partitions. This means that you cannot repartition a region which contains a partition that should not be touched in the middle.
IMPORTANT:The value provided in the use property determines how existing data and partitions are treated. The all value means that all data on the disk will be erased. Make backups and use the confirm property if you are going to keep some partitions with important data. This is an automated installation and no pop-ups will notify you about partitions being deleted.
In case of the presence of multiple drives in the target system, all drives must be identified with their device names and how the partitioning should be performed.
Partition sizes can be given in gigabytes (GB) or megabytes (MB), or can be set to a flexible value using the keywords auto and max. Max is used to fill a partition to the maximal available space on a drive (which mean that the partition should be the last one on the drive). Auto can be used to determine the size of a swap or boot partition depending on the memory available and the type of the system.
A fixed size can be given as shown below:
- 1GB creates a partition with a 1 GB size.
- 1500MB creates a partition which is 1.5 GB big.
The following is an example of a single-drive system, which is not prepartitioned and should be automatically partitioned according to the described predefined partition plan:
<partitioning config:type=”list”>
  <drive>
    <device>/dev/hda</device>
    <use>all</use>
  </drive>
</partitioning>
A more detailed example shows how existing partitions and multiple drives are handled:
<partitioning config:type=”list”>
<drive>
<device>/dev/hda</device>
<partitions config:type=”list”>
<partition>
<mount>/</mount>
<size>5gb</size>
</partition>
<partition>
<mount>swap</mount>
<size>1gb</size>
</partition>
</partitions>
</drive>
<drive>
<device>/dev/hdb</device>
<use>all</use>
<partitions config:type=”list”>
<partition>
<filesystem config:type=”symbol”>reiser</filesystem>
<mount>/data1</mount>
<size>15gb</size>
</partition>
<partition>
<filesystem config:type=”symbol”>jfs</filesystem>
<mount>/data2</mount>
<size>auto</size>
</partition>
</partitions>
<use>free</use>
</drive>
</partitioning>
Advanced Partitioning Features
This section covers advanced partitioning including LVM and RAID configuration.
Mount Options
By default, a file system which is to be mounted is identified in /etc/fstab by the device name. This identification can be changed so the file system is found by searching for a UUID or a volume label. Not all file systems can be mounted by UUID or a volume label. To specify how a partition is to be mounted, use the mountby property, which has the symbol type.
Possible options:
- device (default)
- label
- UUID
If you choose to mount the partition using a label, the name specified in the label property is used as the volume label.
Add any legal mount option allowed in the fourth field of /etc/fstab. Multiple options are separated by commas (,). Possible fstab options include the following:
Table C-1 fstab Options
<partitions config:type=”list”>
  <partition>
    <filesystem config:type=”symbol”>reiser</filesystem>
    <format config:type=”boolean”>true</format>
    <fstopt>ro,noatime,user,data=ordered,acl,user_xattr</fstopt>
    <mount>/local</mount>
    <mountby config:type=”symbol”>uuid</mountby>
    <partition_id config:type=”integer”>131</partition_id>
    <size>10gb</size>
  </partition>
</partitions>
Creating Primary and Extended Partitions
By default, AutoYaST creates an extended partition and adds all other new partitions as logical devices. It is possible, however, to instruct AutoYaST to create a certain partition as a primary or extended partition. Additionally, it is possible to specify the size of a partition using sectors instead of the size in MB.
The partition_id and partition_type properties control this behavior. To specify the size in sectors, the list resource region can be used.
<partitioning config:type=”list”>
  <drive>
    <device>/dev/hdc</device>
    <partitions config:type=”list”>
      <partition>
        <partition_id config:type=”integer”>5</partition_id>
        <region config:type=”list”>
        <region_entry config:type=”integer”>0</region_entry>
        <region_entry config:type=”integer”>16858</region_entry>
       </region>
      </partition>
      <partition>
        <filesystem config:type=”symbol”>reiser</filesystem>
        <mount>/</mount>
        <partition_id config:type=”integer”>131</partition_id>
        <region config:type=”list”>
          <region_entry config:type=”integer”>0</region_entry>
          <region_entry config:type=”integer”>2081</region_entry>
        </region>
      </partition>
      <partition>
        <mount>swap</mount>
        <partition_id config:type=”integer”>130</partition_id>
        <region config:type=”list”>
          <region_entry config:type=”integer”>2081</region_entry>
          <region_entry config:type=”integer”>781</region_entry>
        </region>
      </partition>
    </partitions>
    <use>all</use>
  </drive>
</partitioning>
The above example makes sense only if you know the exact boundaries of the partitions and if you are creating an exact copy of a system (for example, when cloning). The first region entry in the list is the beginning of the region, and the second represents the length of the region.
The following example lets you create an extended partition with a custom size:
<partitioning config:type=”list”>
  <drive>
    <device>/dev/hdc</device>
    <partitions config:type=”list”>
      <partition>
        <filesystem config:type=”symbol”>ext2</filesystem>
        <mount>/boot</mount>
        <partition_id config:type=”integer”>131</partition_id>
        <partition_nr config:type=”integer”>2</partition_nr>
        <size>50mb</size>
      </partition>
      <partition>
        <mount>swap</mount>
        <partition_id config:type=”integer”>130</partition_id>
        <partition_nr config:type=”integer”>3</partition_nr>
        <size>100mb</size>
      </partition>
      <partition>
        <partition_id config:type=”integer”>15</partition_id>
        <partition_nr config:type=”integer”>4</partition_nr>
        <size>3000mb</size>
      </partition>
      <partition>
        <filesystem config:type=”symbol”>ext2</filesystem>
        <mount>/</mount>
        <partition_id config:type=”integer”>131</partition_id>
        <partition_nr config:type=”integer”>5</partition_nr>
        <size>1gb</size>
      </partition>
    </partitions>
    <use>free</use>
  </drive>
</partitioning>
</install>
Keeping Specific Partitions
In some cases, you might choose to keep some partitions untouched and format only specific target partitions, rather than creating them from scratch. This might be the case if Linux installations have to coexist with another operating system, or if certain partitions contain data that you want to keep untouched.
Such scenarios require a certain knowledge of the target systems and hard drives. Depending on the scenario, you might need to know the exact partition table of the target hard drive with partition IDs, sizes, and numbers. With this data, you can tell AutoYaST to keep certain partitions, format others, and create new partitions if needed.
The following example keeps partitions 1, 2, and 5 and deletes partition 6 to create two new partitions. Only all kept partitions are formatted.
<install>
  <partitioning config:type=”list”>
    <drive>
      <device>/dev/hdc</device>
      <partitions config:type=”list”>
      <partition>
        <create config:type=”boolean”>false</create>
        <format config:type=”boolean”>true</format>
        <mount>/</mount>
        <partition_nr config:type=”integer”>1</partition_nr>
      </partition>
      <partition>
        <create config:type=”boolean”>false</create>
        <format config:type=”boolean”>false</format>
        <partition_nr config:type=”integer”>2</partition_nr>
        <mount>/space</mount>
      </partition>
      <partition>
        <create config:type=”boolean”>false</create>
        <format config:type=”boolean”>true</format>
        <filesystem config:type=”symbol”>swap</filesystem>
        <partition_nr config:type=”integer”>5</partition_nr>
        <mount>swap</mount>
      </partition>
      <partition>
        <format config:type=”boolean”>true</format>
        <mount>/space2</mount>
        <size>50mb</size>
      </partition>
      <partition>
        <format config:type=”boolean”>true</format>
        <mount>/space3</mount>
        <size>max</size>
      </partition>
     </partitions>
     <use>6</use>
   </drive>
  </partitioning>
</install>
The above example requires exact knowledge of the existing partition table and about the partition numbers of those partitions that should be kept. In some cases, however, this data might be not available, especially in a mixed hardware environment with different hard drive types and configurations. The following scenario is for a system with a non-Linux operating system with a designated area for a Linux installation.
Figure C-2 Keeping Partitions
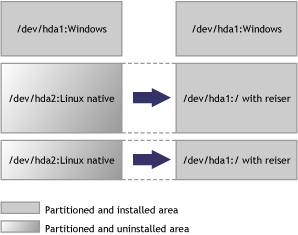
In this scenario, as shown in Keeping Partitions, AutoYaST should not in any case create new partitions. Instead, it should search for certain partition types on the system and use them according to the partitioning plan in the control file. No partition numbers are given in this case, only the mount points and the partition types. Additional configuration data can be provided (for example, file system options, encryption, and filesystem type).
<install>
  <partitioning config:type=”list”>
    <drive>
      <partitions config:type=”list”>
        <partition>
          <create config:type=”boolean”>false</create>
          <format config:type=”boolean”>true</format>
          <mount>/</mount>
          <partition_id config:type=”integer”>131</partition_id>
        </partition>
        <partition>
          <create config:type=”boolean”>false</create>
          <format config:type=”boolean”>true</format>
          <filesystem config:type=”symbol”>swap</filesystem>
          <partition_id config:type=”integer”>130</partition_id>
          <mount>swap</mount>
        </partition>
      </partitions>
    </drive>
  </partitioning>
</install>
Using Existing Mount Table (fstab)
This option lets AutoYaST use an existing /etc/fstab file and the partition data from a previous installation. All partitions are kept and no new partitions are created. The found partitions are formatted and mounted as specified in the /etc/fstab file found on a Linux root partition.
Although the default behavior is to format all partitions, it is also possible to leave some partitions (for example, data partitions) untouched and only mount them. If multiple installations are found on the system (multiple root partitions with different fstab files), the installation aborts unless the desired root partition is configured in the control file. The following example illustrates how this option can be used.
<install>
  <partitioning_advanced>
    <fstab>
      <!-- Read data from existing fstab. If multiple root partitions are
      found, use the one specified below. Otherwise the first root
      partition is taken -->
      <!-- <root_partition>/dev/hda5</root_partition> -->
      <use_existing_fstab config:type=”boolean”>true</use_existing_fstab>
      <!-- all partitions found in fstab will be formatted and mounted
      by default unless a partition is listed below with different
      settings -->
      <partitions config:type=”list”>
        <partition>
          <format config:type=”boolean”>false</format>
          <mount>/bootmirror</mount>
        </partition>
      </partitions>
    </fstab>
  </partitioning_advanced>
</install>
Logical Volume Manager (LVM)
To configure LVM, first you need to create a physical volume using the normal partitioning method described above.
The following example shows how to prepare for LVM in the partitioning resource:
<partitioning config:type=”list”>
  <drive>
    <device>/dev/sda</device>
    <partitions config:type=”list”>
      <partition>
        <lvm_group>system</lvm_group>
        <partition_type>primary</partition_type>
        <size>max</size>
      </partition>
    </partitions>
    <use>all</use>
  </drive>
</partitioning>
This above example creates a nonformatted partition on the /dev/sda1 device of the LVM type and with the system volume group. The partition created uses all available space on this drive.
In previous versions of Linux, LVM configuration was done in a separate resource. This method for configuring LVM is still supported, but a new and easier way is now possible which allows you to have the LVM configuration directly in the partitioning resource. Currently, it is not possible to configure LVM using the configuration system. You must add the resource manually, as shown in the following example.
<partitioning config:type=”list”>
  <drive>
    <device>/dev/sda</device>
    <partitions config:type=”list”>
      <partition>
        <lvm_group>system</lvm_group>
        <partition_type>primary</partition_type>
        <size>max</size>
      </partition>
    </partitions>
    <use>all</use>
  </drive>
</partitioning>
<lvm config:type=”list”>
  <lvm_group>
    <lvm_name>system</lvm_name>
    <logical_volumes config:type=”list”>
      <lv>
        <lv_fs>reiser</lv_fs>
        <lv_mount>/usr</lv_mount>
        <lv_name>usrlv</lv_name>
        <lv_size>500mb</lv_size>
      </lv>
      <lv>
        <lv_fs>reiser</lv_fs>
        <lv_mount>/opt</lv_mount>
        <lv_name>optlv</lv_name>
        <lv_size>1500mb</lv_size>
      </lv>
      <lv>
        <lv_fs>reiser</lv_fs>
        <lv_mount>/var</lv_mount>
        <lv_name>varlv</lv_name>
        <lv_size>200mb</lv_size>
      </lv>
    </logical_volumes>
    <pesize>4M</pesize>
  </lvm_group>
</lvm>
Using the new method, the above configuration has the following syntax:
<partitioning config:type=”list”>
  <drive>
    <device>/dev/sda</device>
    <partitions config:type=”list”>
      <partition>
        <lvm_group>system</lvm_group>
        <partition_type>primary</partition_type>
        <size>max</size>
        </partition>
      </partitions>
      <use>all</use>
    </drive>
  <drive>
    <device>/dev/system</device>
    <is_lvm_vg config:type=”boolean”>true</is_lvm_vg>
    <partitions config:type=”list”>
    <partition>
      <filesystem config:type=”symbol”>reiser</filesystem>
      <lv_name>user_lv</lv_name>
      <mount>/usr</mount>
      <size>500mb</size>
    </partition>
    <partition>
      <filesystem config:type=”symbol”>reiser</filesystem>
      <lv_name>opt_lv</lv_name>
      <mount>/opt</mount>
      <size>1500mb</size>
    </partition>
    <partition>
      <filesystem config:type=”symbol”>reiser</filesystem>
      <lv_name>var_lv</lv_name>
      <mount>/var</mount>
      <size>200mb</size>
    </partition>
   </partitions>
   <pesize>4M</pesize>
   <use>all</use>
  </drive>
</partitioning>
Software RAID
Using AutoYaST, you can create and assemble software RAID devices. The supported RAID levels are the following:
Table C-2 Supported RAID Levels
As with LVM, you need to create all RAID partitions first, then assign the partitions to the RAID device you want to create. You also need to specify whether a partition or a device should be configured in the RAID or if it should be configured as a Spare device.
In previous versions of Linux, RAID configuration was done in a separate resource. This method for configuring RAID devices is still supported, but a new and easier way is now possible which allows the user to have the RAID configuration directly in the partitioning resource.
The following example shows a simple RAID1 configuration:
<partitioning config:type=”list”>
  <drive>
    <device>/dev/sda</device>
    <partitions config:type=”list”>
      <partition>
        <format config:type=”boolean”>false</format>
        <partition_id config:type=”integer”>253</partition_id>
        <raid_name>/dev/md0</raid_name>
        <raid_type>raid</raid_type>
        <size>4gb</size>
      </partition>
      <!-- Here come the regular partitions, i.e. / and swap -->
    </partitions>
    <use>all</use>
   </drive>
  <drive>
    <device>/dev/sdb</device>
    <use>all</use>
    <partitions config:type=”list”>
      <partition>
        <format config:type=”boolean”>false</format>
        <partition_id config:type=”integer”>253</partition_id>
        <raid_name>/dev/md0</raid_name>
        <raid_type>raid</raid_type>
        <size>4gb</size>
      </partition>
    </partitions>
  </drive>
</partitioning>
<raid config:type=”list”>
  <raid_device>
    <chunk_size>4</chunk_size>
    <device_name>/dev/md0</device_name>
    <filesystem config:type=”symbol”>reiser</filesystem>
    <format config:type=”boolean”>true</format>
    <parity_algorithm>left-asymmetric</parity_algorithm>
    <partition_id config:type=”integer”>131</partition_id>
    <persistent_superblock config:type=”boolean”>true</
      persistent_superblock>
    <mount>/space</mount>
    <raid_type>raid1</raid_type>
  </raid_device>
</raid>
Using the new method, the above configuration has the following syntax:
<partitioning config:type=”list”>
  <drive>
    <device>/dev/sda</device>
    <partitions config:type=”list”>
      <partition>
        <partition_id config:type=”integer”>253</partition_id>
        <format config:type=”boolean”>false</format>
        <raid_name>/dev/md0</raid_name>
        <raid_type>raid</raid_type>
        <size>4gb</size>
      </partition>
      <!-- Here come the regular partitions, i.e. / and swap -->
    </partitions>
    <use>all</use>
  </drive>
  <drive>
    <device>/dev/sdb</device>
    <partitions config:type=”list”>
      <partition>
        <format config:type=”boolean”>false</format>
        <partition_id config:type=”integer”>253</partition_id>
        <raid_name>/dev/md0</raid_name>
        <raid_type>raid</raid_type>
        <size>4gb</size>
      </partition>
    </partitions>
    <use>all</use>
  </drive>
  <drive>
    <device>/dev/md</device>
    <partitions config:type=”list”>
      <partition>
        <filesystem config:type=”symbol”>reiser</filesystem>
        <format config:type=”boolean”>true</format>
        <mount>/space</mount>
        <partition_id config:type=”integer”>131</partition_id>
        <partition_nr config:type=”integer”>0</partition_nr>
        <raid_options>
          <chunk_size>4</chunk_size>
          <parity_algorithm>left-asymmetric</parity_algorithm>
          <raid_type>raid1</raid_type>
        </raid_options>
      </partition>
    </partitions>
    <use>all</use>
  </drive>
</partitioning>
The following must be taken into consideration when configuring RAID using the new syntax:
- The device for RAID is always /dev/md.
- The partition_nr property is used to determine the MD device number. If partition_nr=0, then /dev/md0 is configured.
- All RAID-specific options are contained in the raid_options resource.
C.3.5 Software
This section contains the following information:
Package Selections
You can install software on the new system using a predefined package base selection (Minimal, Minimal+X11, default, etc.) in addition to several add-on selections. Check the Novell Linux Desktop CD 1 for available selections in suse/setup/descr/.
In the control file, packages and package selections are described as follows:
<software>
  <addons config:type=”list”>
    <addon>Kde</addon>
  </addons>
  <base>Minimal</base>
  <packages config:type=”list”>
    <package>apache</package>
    <package>sendmail</package>
  </packages>
</software>
You can install one base selection and one or more add-on selections.
When installing from a CD-ROM, packages needed from other CD-ROMs are installed after the initial boot of the system in the second installation phase. If you are installing packages from multiple CD-ROMs, auto-installation has to be interrupted for switching the CD-ROMs. In the case of NFS installations, all packages are installed in the first stage of the installation only if the NFS repository is configured as a single medium.
Frequently a package must be installed in the second phase, especially custom packages which might contain scripts for configuring the system. This can be done using the post-packages resource.
Custom Package Selections
In addition to predefined selections, you can create custom selections by providing a selection file in the selection directory (suse/setup/descr). Selection files have a special format and any additional selection file must conform to this format, or YaST2 will not be able to read it.
For examples of a selection file, see the files available in the /suse/setup/descr/ directory on the Novell Linux Desktop CD1.
After creating a selection file, you can add it to the configuration as described earlier in this section. The selection name (for example, My.sel) has to be added to the index files selections and directory.yast to make it visible to the installer.
The My.sel file should have the following format:
# SuSE-Linux-Package-Selection 3.0 -- (c) 2004 SuSE Linux AG
# generated on Thu Apr 15 19:49:04 UTC 2004
=Ver: 3.0
=Sel: LSB
=Sum: LSB Runtime Environment
=Sum.de: LSB-Laufzeitumgebung
=Cat: addon
=Vis: true
=Ord: 108
+Ins:
XFree86-Mesa
XFree86-libs
expect
fontconfig
freetype2
gettext
glibc-i18ndata
libgcj
lsb
make
makedev
patch
pax
rsync
-Ins:
To use the above selection, add the following to the control file:
<install>
...
  <software>
    <base>My</base>
  </software>
...
</install>
Installing Additional and Customized Packages
In addition to the packages available for installation on the CD-ROMs, you can add external packages including customized kernels. Customized kernel packages must be compatible with the Novell Linux Desktop packages and must be installed to the same locations.
Unlike earlier versions of Linux, there is no need for a special resource in the control file to install custom and external packages. You just need to re-create the package database and update it with any new packages or new package versions in the source repository. A script is provided for this task which queries packages available in the repository and creates the required package database.
Creating a new package database is needed only if new RPMs (for example, update RPMs) were added. To re-create the database, use the /usr/bin/create_package_descr command. For example, use this command line to create the package database. When creating the database, all languages are reset to English.
cd /usr/local/CDs/LATEST/suse
create_package_descr -x PATH_TO_EXTRA_PROV -d /usr/local/CDs/LATEST/suse
To provide extra dependencies which cannot be extracted from the RPM files, an extra file with missing dependencies is available in the suse/setup/descr directory. The EXTRA_PROV file can be used when re-creating the package database using the -x option.
In the example above, the /usr/local/CDs/LATEST/suse directory contains the architecture dependent and independent packages (noarch and i586). This might look different on other architectures.
The advantage of this method is that you can keep an up-to-date repository with fixed and updated packages (for example, from the Novell FTP server). This method also makes the creation of custom CD-ROMs easier.
Kernel Packages
Kernel packages are not part of any selection. The required kernel is determined during installation. If the kernel package is added to any selection or to the individual package selection, installation will most likely fail due to conflicts.
To force the installation of a specific kernel, use the kernel property. The following is an example of forcing the installation of the default kernel. In this example, this kernel is installed in any case, even if an SMP or other kernel is required.
<software>
  <addons config:type=”list”>
    <addon>Kde</addon>
  </addons>
  <base>Minimal</base>
  <kernel>kernel-default</kernel>
  <packages config:type=”list”>
    <package>apache2</package>
  </packages>
</software>
Removing Automatically Selected Packages
Some packages are selected automatically either because of a dependency or because they are available in a selection.
Removing such packages might break the system consistency, and we do not recommend removing basic packages unless a replacement that provides the same services is provided. The best example of this are MTA packages. By default, postfix is selected and installed. If you want to use another MTA, like sendmail, then postfix can be removed from the list of selected packages using a list in the software resource. The following example shows how this can be done:
<software>
  <addons config:type=”list”>
    <addon>Kde</addon>
  </addons>
  <base>Minimal</base>
  <packages config:type=”list”>
    <package>sendmail</package>
  </packages>
  <remove-packages config:type=”list”>
    <package>postfix</package>
  </remove-packages>
</software>
C.3.6 Services and Runlevels
With the runlevel resource, you can set the default runlevel and specify in detail which system services you want to be started in which runlevel.
The default property specifies the default runlevel of the system. Changes to the default runlevel take effect the next time you boot the system. After installation is completed, the system has runlevel 5, which is Full multiuser with network and XDM. If you have configured a system with no X11, then we recommend rebooting the system after the first stage using the reboot property in the general resource.
A service should run using a space delimited list of the runlevels, as shown in the following example. An alternative to specifying the exact runlevels is to change the status of the service by either enabling or disabling it using the service_status property.
<configure>
....
  <runlevels>
    <default>3</default>
    <services config:type=”list” >
      <service>
        <service_name>at</service_name>
        <service_start>3 5</service_start>
      </service>
      <service>
        <service_name>portmap</service_name>
        <service_status>enable</service_status>
      </service>
      <service>
        <service_name>hwscan</service_name>
        <service_status>disable</service_status>
      </service>
    </services>
  </runlevels>
....
</configure>
C.3.7 Network Configuration
Network configuration is used to connect a single Novell Linux Desktop workstation to an Ethernet-based LAN or to configure dial-up connection. More complex configuration (multiple network cards, routing, etc.) is also provided. With this module, it’s possible to configure and set up Ethernet Controllers and Token-Ring Controllers.
Network Devices, DNS, and Routing
To configure network settings and activate networking automatically, one global resource is used to store the whole network configuration.
 <configure>
.....
    <networking>
      <dns>
        <dhcp_hostname config:type=”boolean”>true</dhcp_hostname>
        <dhcp_resolv config:type=”boolean”>true</dhcp_resolv>
        <domain>local</domain>
        <hostname>linux</hostname>
      </dns>
      <interfaces config:type=”list”>
        <interface>
          <bootproto>dhcp</bootproto>
          <device>eth0</device>
          <startmode>onboot</startmode>
        </interface>
      </interfaces>
      <routing>
        <ip_forward config:type=”boolean”>false</ip_forward>
        <routes config:type=”list”>
          <route>
            <destination>default</destination>
            <device>-</device>
            <gateway>192.168.1.240</gateway>
            <netmask>-</netmask>
          </route>
        </routes>
      </routing>
      <modules config:type=”list”>
        <module_entry>
          <device>eth0</device>
          <module>e100</module>
          <options></options>
        </module_entry>
      </modules>
  </networking>
....
 </configure>
Proxy
Use this resource to configure your Internet proxy (caching) settings.
http_proxy is the name of the proxy server for your access to the World Wide Web (WWW). ftp_proxy is the name of the proxy server for your access to the File Transfer Services (FTP). No proxy domains is a list of domains for which the requests should be done directly without caching.
If you are using a proxy server with authorization, specify the Proxy username and password.
<?xml version=”1.0”?>
<!DOCTYPE profile SYSTEM “/usr/share/autoinstall/dtd/profile.dtd”>
<profile xmlns=”http://www.suse.com/1.0/yast2ns” xmlns:config=”http://www.suse.com/1.0
  /configns”>
    <configure>
      <proxy>
        <enabled config:type=”boolean”>true</enabled>
        <ftp_proxy>http://192.168.1.240:3128</ftp_proxy>
        <http_proxy>http://192.168.1.240:3128</http_proxy>
        <no_proxy>localhost</no_proxy>
        <proxy_password>testpw</proxy_password>
        <proxy_user>testuser</proxy_user>
      </proxy>
    </configure>
</profile>
(X)Inetd
The profile has elements to specify which superserver should be used (netd_service), whether it should be enabled (netd_status), and how the services should be configured (netd_conf).
A service description element has conceptually two parts: key and nonkey. When writing the configuration, services are matched using the key fields, and the nonkey fields are applied to the matching service. If no service matches, it is created. If more services match, a warning is reported. The key fields are script, service, protocol, and server.
service and protocol are matched literally. script is the base name of the config file, usually a file in /etc/xinetd.d (for example, echo-udp or inetd.conf). server is matched more loosely: if it is /usr/sbin/tcpd, the real server name is taken from server_args. After that, the basename of the first whitespace-separated word is taken and these values are compared.
<profile>
  <configure>
    ...
    <inetd>
      <netd_service config:type=”symbol”>xinetd</netd_service>
      <netd_status config:type=”integer”>0</netd_status>
      <netd_conf config:type=”list”>
        <conf>
          <script>imap</script>
          <service>pop3</service>
          <enabled config:type=”boolean”>true</enabled>
        </conf>
        <conf>
          <server>in.ftpd</server>
          <server_args>-A</server_args>
          <enabled config:type=”boolean”>true</enabled>
        </conf>
        <conf>
          <service>daytime</service>
          <protocol>tcp</protocol>
        </conf>
        ....
        <conf>...</conf>
      </netd_conf>
    </inetd>
    ...
  </configure>
</profile>
NIS
Use the NIS resource to configure the target machine as a NIS client. The following example shows a detailed configuration using multiple domains.
<configure>
...
  <nis>
    <nis_broadcast config:type=”boolean”>true</nis_broadcast>
    <nis_broken_server config:type=”boolean”>true</nis_broken_server>
    <nis_by_dhcp config:type=”boolean”>false</nis_by_dhcp>
    <nis_domain>test.com</nis_domain>
    <nis_local_only config:type=”boolean”>true</nis_local_only>
    <nis_options></nis_options>
    <nis_other_domains config:type=”list”>
      <nis_other_domain>
        <nis_broadcast config:type=”boolean”>false</nis_broadcast>
        <nis_domain>domain.com</nis_domain>
        <nis_servers config:type=”list”>
          <nis_server>10.10.0.1</nis_server>
        </nis_servers>
      </nis_other_domain>
    </nis_other_domains>
    <nis_servers config:type=”list”>
      <nis_server>192.168.1.1</nis_server>
    </nis_servers>
    <start_autofs config:type=”boolean”>true</start_autofs>
    <start_nis config:type=”boolean”>true</start_nis>
  </nis>
...
</configure>
LDAP Client
The installed machine can be set up as an LDAP client to authenticate users with an OpenLDAP server. Required data include the name of the search base (base DN; for example, dc=mydomain,dc=com) and the IP address of the LDAP server (for example, 10.20.0.2).
If LDAP is activated, NSS and PAM are configured accordingly to use LDAP for user authentication.
<configure>
...
  <ldap>
    <ldap_domain> dc=mydomain,dc=com</ldap_domain>
    <ldap_server>10.10.0.1</ldap_server>
    <ldap_tls config:type=”boolean”>true</ldap_tls>
    <ldap_v2 config:type=”boolean”>true</ldap_v2>
    <pam_password>crypt</pam_password>
    <start_ldap config:type=”boolean”>true</start_ldap>
  </ldap>
...
</configure>
NFS Client and Server
You can configure a system as an NFS client or an NFS server by using the configuration system. The following examples show how both the NFS client and server can be configured.
NFC Client Configuration
  <configure>
...
    <nfs config:type="list">
      <nfs_entry>
        <mount_point>/home</mount_point>
        <nfs_options>defaults</nfs_options>
        <server_path>192.168.1.1:/home</server_path>
      </nfs_entry>
    </nfs>
...
</configure>
NFS Server Configuration
    <configure>
....
    <nfs_server>
      <nfs_exports config:type=”list”>
        <nfs_export>
          <allowed config:type=”list”>
            <allowed_clients>*(ro,root_squash,sync)</allowed_clients>
          </allowed>
           <mountpoint>/home</mountpoint>
        </nfs_export>
        <nfs_export>
          <allowed config:type=”list”>
            <allowed_clients>*(ro,root_squash,sync)</allowed_clients>
          </allowed>
           <mountpoint>/work</mountpoint>
        </nfs_export>
      </nfs_exports>
       <start_nfsserver config:type=”boolean”>true</start_nfsserver>
    </nfs_server>
....
  </configure>
NTP Client
You can choose to start the NTP daemon when booting the system. The NTP daemon resolves hostnames when initializing. The first synchronization of the clock is performed before the NTP daemon is started. To use this host for initial synchronization, configure the initial_sync property.
To run the NTP daemon in chroot jail, set start_in_chroot. Starting any daemon in a chroot jail is more secure and strongly recommended. To adjust NTP servers, peers, local clocks, and NTP broadcasting, add the appropriate entry to the control file. The following is an example of various configuration options.
   <?xml version=”1.0”?>
<!DOCTYPE profile SYSTEM “/usr/share/autoinstall/dtd/profile.dtd”>
<profile xmlns=”http://www.mycompany.com/1.0/yast2ns” xmlns:config=”http://www.mycompany.com/1.0/configns”>
  <configure>
    <ntp-client>
      <peers config:type=”list”>
        <peer>
         <address>10.10.0.1</address>
         <initial_sync config:type=”boolean”>true</initial_sync>
         <param></param>
         <type>server</type>
        </peer>
        <peer>
          <address>192.168.1.1</address>
          <initial_sync config:type=”boolean”>true</initial_sync>
          <param></param>
          <type>peer</type>
        </peer>
        <peer>
          <address>1.1.1.1</address>
          <type>broadcastclient</type>
        </peer>
        <peer>
          <address>127.127.2.3</address>
          <create_symlink config:type=”boolean”>true</create_symlink>
          <device>/dev/test</device>
          <param></param>
          <type>__clock</type>
        </peer>
        </peers>
        <start_at_boot config:type=”boolean”>true</start_at_boot>
        <start_in_chroot config:type=”boolean”>true</start_in_chroot>
     </ntp-client>
   </configure>
</profile>
C.3.8 Mail Configuration (Sendmail or Postfix)
This module lets you create a detailed mail configuration. The module contains various options and we recommend using it at least for the initial configuration.
  <configure>
...
    <mail>
      <aliases config:type=”list”>
        <alias>
          <alias>root</alias>
          <comment></comment>
          <destinations>foo</destinations>
        </alias>
        <alias>
          <alias>test</alias>
          <comment></comment>
          <destinations>foo</destinations>
        </alias>
        </aliases>
        <connection_type config:type=”symbol”>permanent</connection_type>
        <fetchmail config:type=”list”>
          <fetchmail_entry>
            local_user>foo</local_user>
            <password>bar</password>
            <protocol>POP3</protocol>
            <remote_user>foo</remote_user>
            <server>pop.foo.com</server>
          </fetchmail_entry>
          <fetchmail_entry>
            <local_user>test</local_user>
            <password>bar</password>
            <protocol>IMAP</protocol>
            <remote_user>test</remote_user>
            <server>blah.com</server>
          </fetchmail_entry>
        </fetchmail>
        <from_header>test.com</from_header>
        <listen_remote config:type=”boolean”>true</listen_remote>
        <local_domains config:type=”list”>
          <domains>test1.com</domains>
        </local_domains>
        <masquerade_other_domains config:type=”list”>
          <domain>blah.com</domain>
        </masquerade_other_domains>
        <masquerade_users config:type=”list”>
          <masquerade_user>
            <address>joe@test.com</address>
            <comment></comment>
            <user>joeuser</user>
          </masquerade_user>
          <masquerade_user>
            <address>bar@test.com</address>
            <comment></comment>
            <user>foo</user>
          </masquerade_user>
        </masquerade_users>
        <mta config:type=”symbol”>postfix</mta>
        <outgoing_mail_server>test.com</outgoing_mail_server>
        <postfix_mda config:type=”symbol”>local</postfix_mda>
        <smtp_auth config:type=”list”>
          <listentry>
            <password>bar</password>
            <server>test.com</server>
            <user>foo</user>
          </listentry>
        </smtp_auth>
        <use_amavis config:type=”boolean”>true</use_amavis>
        <virtual_users config:type=”list”>
          <virtual_user>
            <alias>test.com</alias>
            <comment></comment>
            <destinations>foo.com</destinations>
          </virtual_user>
          <virtual_user>
            <alias>geek.com</alias>
            <comment></comment>
            <destinations>bar.com</destinations>
          </virtual_user>
        </virtual_users>
      </mail>
...
</configure>
C.3.9 Security Settings
Use the features of this module to change the local security settings on the target system. These settings include boot configuration, login, password, user addition, and file permissions.
Configuring the security settings automatically corresponds to the Custom Settings in the security module available in the running system which lets you create your own, customized configuration.
See the reference for the meaning and the possible values of the settings in the following example.
<configure>
...
  <security>
    <console_shutdown>ignore</console_shutdown>
    <cwd_in_root_path>no</cwd_in_root_path>
    <displaymanager_remote_access>no</displaymanager_remote_access>
    <fail_delay>3</fail_delay>
    <faillog_enab>yes</faillog_enab>
    <gid_max>60000</gid_max>
    <gid_min>101</gid_min>
    <kdm_shutdown>root</kdm_shutdown>
    <lastlog_enab>yes</lastlog_enab>
    <encryption>md5</encryption>
    <obscure_checks_enab>no</obscure_checks_enab>
    <pass_max_days>99999</pass_max_days>
    <pass_max_len>8</pass_max_len>
    <pass_min_days>1</pass_min_days>
    <pass_min_len>6</pass_min_len>
    <pass_warn_age>14</pass_warn_age>
    <passwd_use_cracklib>yes</passwd_use_cracklib>
    <permission_security>secure</permission_security>
    <run_updatedb_as>nobody</run_updatedb_as>
    <uid_max>60000</uid_max>
    <uid_min>500</uid_min>
  </security>
...
</configure>
Password Settings Options
Use this resource to change various password settings stored in the /etc/login.defs file, and to activate one of the encryption methods currently supported. If this not set, then DES is configured.
DES, the Linux default method, works in all network environments, but it restricts you to passwords no longer than eight characters. MD5 allows longer passwords, thus providing more security; but some network protocols don’t support this, and you might have problems with NIS. Blowfish is also supported.
You can also set the system to check for password plausibility and length.
Boot Settings
Use the security resource to change the following boot settings:
- How to interpret Ctrl+Alt+Del
- When someone at the console presses Ctrl+Alt+Del, the system usually reboots. Sometimes it might be desirable to ignore this event (for example, when the system serves as both workstation and server).
- Shutdown behavior of KDM
- Set who is allowed to shut down the machine from KDM.
Login Settings
Use this option to change various login settings, which are stored in the /etc/login.defs file.
New User Settings (useradd Settings)
Set the minimum and maximum possible user ID as well as the minimum and maximum possible group ID.
C.3.10 Monitor and X11 Configuration
The following is a monitor and X11 configuration example:
<configure>
...
    <x11>
      <color_depth config:type=”integer”>16</color_depth>
      <configure_x11 config:type=”boolean”>true</configure_x11>
      <display_manager>gdm</display_manager>
      <enable_3d config:type=”boolean”>true</enable_3d>
      <monitor>
        <display>
          <max_hsync config:type=”integer”>48</max_hsync>
          <max_vsync config:type=”integer”>90</max_vsync>
          <min_hsync config:type=”integer”>30</min_hsync>
          <min_vsync config:type=”integer”>50</min_vsync>
        </display>
        <monitor_device>DT-1536A</monitor_device>
        <monitor_vendor>DAYTEK</monitor_vendor>
      </monitor>
      <resolution>1024x768</resolution>
      <start_x11 config:type=”boolean”>true</start_x11>
      <window_manager>gnome</window_manager>
    </x11>
...
</configure>
C.3.11 Users
The root user and at least one regular user can be added during install using data supplied in the control file. User data and passwords (encrypted or in clear text) are part of the configure resource in the control file.
At minimum, the root user should be configured during autoinstallation, which ensures that you can to log in after installation is finished and that nobody else can log in to the system (in case the password is not set).
The two users in the following example are added during system configuration.
<configure>
...
    <users config:type=”list”>
      <user>
        <username>root</username>
        <user_password>password</user_password>
        <encrypted config:type=”boolean”>true</encrypted>
        <forename/>
        <surname/>
      </user>
      <user>
        <username>nashif</username>
        <user_password>password</user_password>
        <encrypted config:type=”boolean”>true</encrypted>
        <forename>Anas</forename>
        <surname>Nashif</surname>
      </user>
    </users>
...
</configure>
This example shows the minimal information required for adding users. More options are available for a more customized user account management. The data in /etc/default/useradd is used to determine the home directory of the user to be created, in addition to other parameters.
C.3.12 Customer User Scripts
By adding scripts to the auto-installation process, you can customize the installation for your needs and take control in different stages of the installation.
In the auto-installation process, three types of scripts can be executed:
- Pre-install scripts
- Executed before YaST2 makes any real change to the
system (before partitioning and package installation).
Pre-install scripts with confirmation (pre-scripts) are executed at an early stage of the installation. This means that if you have requested to confirm the installation, the pre-scripts are executed before the confirmation screen shows up (profile/install/general/mode/confirm).
- Post-Install Scripts
- These scripts are executed after YaST2 has completed the installation and it has booted the system for the first time.
- Chroot environment post-install scripts
- Chroot scripts are executed after all packages have
been installed, before YaST2 boots for the first time, and before
the boot loader is installed. Although the name of this type of
scripts might imply that the scripts are executed in the chroot
environment, the scripts are actually executed in the system before
it is mounted. To make any changes to the system, the /mnt prefix
has to be used with any paths.
It is also possible to run the chroot scripts in the installed system by adding the boolean chrooted element.
It is possible to have scripts outside of the control file. The location of the control file can be specified using a URL similar to the syntax used for referencing the location of the control file. The location of the external script should be specified using the location element.
When manually added to the control file, scripts must be included in a CDATA element to avoid confusion with the file syntax and other tags defined in the control file.
    <?xml version=”1.0”?>
<!DOCTYPE profile SYSTEM “/usr/share/autoinstall/dtd/profile.dtd”>
<profile xmlns=”http://www.mycompany.com/1.0/yast2ns” xmlns:config=”http://www.mycompany.com/1.0/configns”>
  <configure>
    <scripts>
      <chroot-scripts config:type=”list”>
        <script>
          <chrooted config:type=”boolean”>true</chrooted>
          <filename>chroot.sh</filename>
          <interpreter>shell</interpreter>
          <source><![CDATA[
#!/bin/sh
echo “Testing chroot (chrooted) scripts”
ls
]]>
          </source>
        </script>
        <script>
          <filename>chroot.sh</filename>
          <interpreter>shell</interpreter>
          <source><![CDATA[
#!/bin/sh
echo “Testing chroot scripts”
df
cd /mnt
ls
]]>
          </source>
        </script>
      /chroot-scripts>
      <post-scripts config:type=”list”>
        <script>
          <filename>post.sh</filename>
          <interpreter>shell</interpreter>
          <source><![CDATA[
#!/bin/sh
echo “Running Post-install script”
/etc/init.d/portmap start
mount -a 192.168.1.1:/local /mnt
cp /mnt/test.sh /tmp
umount /mnt
]]>
        </source>
        </script>
        <script>
          <filename>post.pl</filename>
          <interpreter>perl</interpreter>
          <source><![CDATA[
#!/usr/bin/perl
print “Running Post-install script”;
]]>
          </source>
        </script>
      </post-scripts>
      <pre-scripts config:type=”list”>
        <script>
          <interpreter>shell</interpreter>
          <location>http://192.168.1.1/profiles/scripts/prescripts.sh</
            location>
        </script>
        <script>
          <filename>pre.sh</filename>
          <interpreter>shell</interpreter>
          <source><![CDATA[
#!/bin/sh
echo “Running pre-install script”
]]>
          </source>
        </script>
      </pre-scripts>
    </scripts>
  </configure>
</profile>
After the installation is finished, the scripts and the output logs can be found in the /var/adm/autoinstall directory. The scripts are located in the scripts directory and the output logs of the scripts are located in the log directory.
The log is the output resulting from executing the shell scripts using the following command:
/bin/sh -x script_name 2&> /var/adm/autoinstall/logs/script_name.log
C.3.13 System Variables (sysconfig)
Use the sysconfig resource to define configuration variables in the sysconfig repository (/etc/sysconfig) directly. The sysconfig variables let you fine-tune many system components and environment variables exactly to your needs.
The following example shows how a variable can be set using the sysconfig resource.
<sysconfig config:type=”list” >
  <sysconfig_entry>
    <sysconfig_key>XNTPD_INITIAL_NTPDATE</sysconfig_key>
    <sysconfig_path>/etc/sysconfig/xntp</sysconfig_path>
    <sysconfig_value>ntp.host.com</sysconfig_value>
  </sysconfig_entry>
  <sysconfig_entry>
    <sysconfig_key>HTTP_PROXY</sysconfig_key>
    <sysconfig_path>/etc/sysconfig/proxy</sysconfig_path>
    <sysconfig_value>proxy.host.com:3128</sysconfig_value>
  </sysconfig_entry>
  <sysconfig_entry>
    <sysconfig_key>FTP_PROXY</sysconfig_key>
    <sysconfig_path>/etc/sysconfig/proxy</sysconfig_path>
    <sysconfig_value>proxy.host.com:3128</sysconfig_value>
  </sysconfig_entry>
</sysconfig>
Both relative and absolute paths can be provided. If no absolute path is given, it is treated as a sysconfig file in the /etc/sysconfig directory.
C.3.14 Adding Complete Configurations
For many applications and services, you can prepared a configuration file which should be copied in a complete form to some location in the installed system—for example, if you are installing a Web server and have a ready-to-go server configuration file (httpd.conf).
Using this resource, you can embed the file into the control file by specifying the final path on the installed system. YaST2 copies this file to the specified location.
  <files config:type="list">
      <config_file>
        <file_path>/etc/httpd/httpd.conf</file_path>
        <file_contents>
<![CDATA[
some content
]]>
        </file_contents>
      </config_file>
    </files>
A more advanced example is shown below. This configuration creates a file using the content supplied in file_contents and changes the permissions and ownership of the file. After the file has been copied to the system, a script is executed which can be used to manipulate the file and prepare it for the environment of the client.
  <files config:type="list">
      <config_file>
        <file_path>/etc/someconf.conf</file_path>
        <file_contents>
<![CDATA[
some content
]]>
        </file_contents>
         <file_owner>nashif.users</file_owner>
         <file_permissions>444</file_permissions>
         <file_script>
           <interpreter>shell</interpreter>
           <source>
<![CDATA[
#!/bin/sh
echo "Testing file scripts" >> /etc/someconf.conf
df
cd /mnt
ls
]]>
           </source>
         </file_script>
       </config_file>
     </files>
C.3.15 Miscellaneous Hardware and System Components
In addition to the core component configuration, like network authentication and security, AutoYaST2 offers a wide range of hardware and system configuration available by default on any system installed manually and in an interactive way. For example, it is possible to configure printers, sound devices, TV cards, and any other hardware components that have a module within YaST2.
Any new configuration options added to YaST2 are automatically available as an auto-installation resource.
Printer
Although printer configuration, like other configurations, can be done manually, we recommend using the Configuration System to create a printer configuration because of the complexity and the range of options offered by the modules.
Using the Configuration System guarantees that the options provided are consistent. The following is an example of a printer configuration section created using the Configuration System.
  <configure>
....
    <printer>
      <default>lp</default>
      <printcap config:type="list">
        <printcap_entry>
          <cups-state>void</cups-state>
          <ff config:type="boolean">true</ff>
          <info></info>
          <location></location>
          <lprng-state>changed</lprng-state>
          <name>lp</name>
          <options>
            <job-sheets>none,none</job-sheets>
          </options>
          <raw config:type="boolean">true</raw>
          <type>yast2</type>
          <uri>parallel:/dev/lp0</uri>
        </printcap_entry>
      </printcap>
    </printer>
....
  </configure>
Sound Devices
The following is an example of sound device configuration created using the Configuration System.
  <configure>
....
    <sound>
      <autoinstall config:type="boolean">true</autoinstall>
      <modules_conf config:type="list">
        <module_conf>
          <alias>snd-card-0</alias>
          <model>M5451, ALI</model>
          <module>snd-ali5451</module>
          <options>
            <snd_enable>1</snd_enable>
            <snd_index>0</snd_index>
            <snd_pcm_channels>32</snd_pcm_channels>
          </options>
        </module_conf>
      </modules_conf>
      <volume_settings config:type="list">
        <listentry>
          <Master config:type="integer">75</Master>
        </listentry>
      </volume_settings>
    </sound>
....
  </configure>