3.2 Appearance
Appearance settings include the following:
3.2.1 Changing the Desktop Background
Click .
The desktop background is the image or color that is applied to your desktop. You can customize the desktop background in the following ways:
- Select an image for the desktop background. The image is superimposed on the desktop background color. The desktop background color is visible if you select a transparent image or if the image does not cover the entire desktop.
- Select a color for the desktop background. You can select a solid color or create a gradient effect with two colors. A gradient effect is a visual effect where one color blends gradually into another color.
You can also change the appearance of your desktop background from within the Nautilus file manager. To use an image file as a background picture, drag it from the file manager and drop it into Desktop Wallpaper.
If you do not want any background picture, click and select a desktop color instead.
The following table lists the background preferences that you can modify:
Table 6 Background Preferences
3.2.2 Configuring Fonts
Click .
Use the Font Preferences dialog to select the fonts to use in your applications, windows, terminals, and desktop.
Figure 23 Font Preferences Dialog
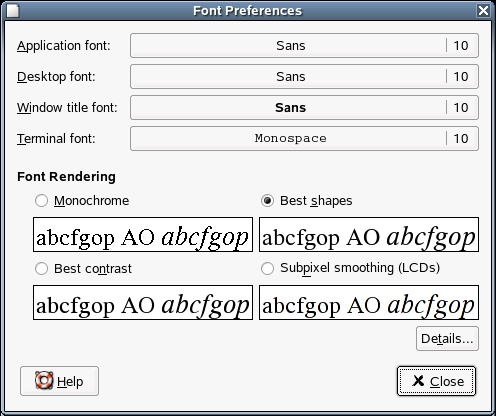
The upper part of the dialog shows the fonts selected for the application, desktop, window title, and terminal. Click one of the buttons to open a selection dialog where you can set the font family, style, and size.
To specify how to render fonts on your screen, select one of the following options:
-
Monochrome:Renders fonts in black and white only. The edges of characters might appear jagged in some cases because the characters are not antialiased. Antialiasing is an effect that is applied to the edges of characters to make the characters look smoother.
-
Best Shapes:Antialiases fonts where possible. Use this option for standard Cathode Ray Tube (CRT) monitors.
-
Best Contrast:Adjusts fonts to give the sharpest possible contrast and antialiases fonts so that characters have smooth edges. This option might enhance the accessibility of the GNOME Desktop to users with visual impairments.
-
Subpixel Smoothing (LCDs):Uses techniques that exploit the shape of individual Liquid Crystal Display (LCD) pixels to render fonts smoothly. Use this option for LCD or flat-screen displays.
Click to specify further details of how to render fonts on your screen:
-
Resolution (Dots Per Inch):Use the spin box to specify the resolution to use when your screen renders fonts.
-
Smoothing:Select one of the options to specify how to antialias fonts.
-
Hinting:Select one of the options to specify how to apply hinting to improves the quality of fonts at small sizes and at low screen resolutions.
-
Subpixel Order:Select one of the options to specify the subpixel color order for your fonts. Use this option for LCD or flat-screen displays.
Previewing a Font
You can use the File Manager to preview a font:
-
Open a File Manager window.
To open a file manager in browser mode, right-click a folder then click . See Managing Folders and Files with File Manager for more information.
-
Enter the following URI in the location bar:
fonts:///
The fonts are displayed as icons in the view pane.
-
Double-click an icon to display a preview of the font.
Adding a TrueType Font
You can use the File Manager to add a TrueType font:
-
Open a File Manager window, then select the TrueType font you want to add.
-
Open another file browser window, then enter the following URI in the location bar:
fonts:///
The fonts are displayed as icons in the view pane.
-
Copy the TrueType font file that you want to add to the fonts:/// location.
3.2.3 Configuring the Screen Saver
Click .
The module for configuring the screen saver is subdivided into two tabbed pages: and . Select the screen saver on the Display Modes page; the Advanced page contains a few special options that normally do not need to be modified.
Figure 24 Screensaver Preferences Dialog
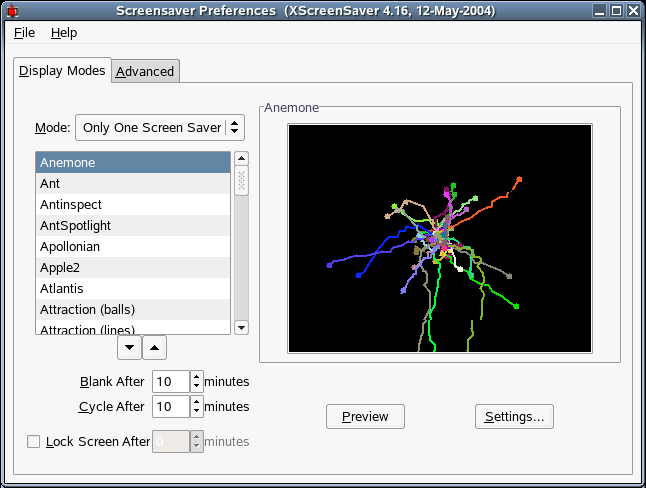
You can select from (random selection of screen savers from a custom-defined list), , , or .
Select one or more screen savers from the list for the either the Only One Screen Saver or Random Screen Saver operating mode. The currently selected screen saver is displayed in the small preview window. The button launches a full screen preview of that screen saver, which can be closed by pressing any key. Select the previous or following screen saver for preview by clicking the corresponding triangles below the selection list.
Finally, determine after how long the screen should be made completely blank (), the screen saver module should be changed (), or the screen should be locked (). All time references are in minutes.
You can use the Advanced page to display a directory of graphics as your screen saver by selecting and then selecting a directory containing images.
3.2.4 Choosing a Theme
Click .
A theme is a group of coordinated settings that specifies the visual appearance of a part of the desktop. You can choose themes to change the appearance of the desktop. Use the Theme Preferences tool to select from a list of preinstalled themes. The list of available themes includes several themes for users with accessibility requirements.
A theme contains settings that affect different parts of the desktop, as follows:
- Controls
The controls setting for a theme determines the visual appearance of windows, panels, and applets. It also determines the visual appearance of the GNOME-compliant interface items that appear on windows, panels, and applets, such as menus, icons, and buttons. Some of the controls setting options that are available are designed for special accessibility needs. You can select an option for the controls setting in the Controls tabbed page of the Theme Details tool.
- Window frame
The window frame setting for a theme determines the appearance of the frames around windows only. You can select an option for the window frame setting in the Window Border tabbed page of the Theme Details tool.
- Icon
The icon setting for a theme determines the appearance of the icons on panels and the desktop background. You can select an option for the icon setting in the Icons tabbed page of the Theme Details tool.
The color settings for the desktop and applications are controlled using themes. You can choose from a variety of preinstalled themes. Selecting a style from the list overview applies it automatically. opens another dialog where you can customize the style of single desktop elements, like window content, window borders, and icons. Making changes and leaving the dialog by clicking switches the theme to Custom Theme. Click to save your modified theme under a custom name. The Internet and other sources provide many additional themes for GNOME as .tar.gz files. Install these with the Install theme.
Creating a Custom Theme
The themes that are listed in the Theme Preferences tool are different combinations of controls options, window frame options, and icon options. You can create a custom theme that uses different combinations of options.
-
Click .
-
Select a theme from the list of themes, then click .
-
Select the controls option that you want to use in the custom theme from the list in the Controls tabbed page.
-
Click the tab, then select the window frame option that you want to use in the custom theme.
-
Click the tab, then select the icons option that you want to use in the custom theme.
-
Click .
A Save Theme to Disk dialog is displayed.
-
Type a name and a short description for the custom theme in the dialog, then click .
The custom theme now appears in your list of available themes.
Installing a New Theme
You can add a theme to the list of available themes. The new theme must be an archive file that is tarred and zipped (a .tar.gz file).
-
Click .
-
Click .
-
Specify the location of the theme archive file in the field, then click .
You can also click to browse for the file.
-
Click to install the new theme.
Installing a New Theme Option
You can install new controls options, window frame options, or icons options. You can find many controls options on the Internet.
-
Click .
-
Click , then click the tab for the type of theme you want to install.
For example, to install an icons option, click the tab.
-
Click .
-
Specify the location of the theme archive file in the field, then click .
-
Click to install the new theme option.
Deleting a Theme Option
You can delete controls options, window frame options, or icons options.
-
Click .
-
Click , then click the tab for the type of option you want to delete.
-
Click .
A File Manager window opens on the default option folder.
-
Use the File Manager window to delete the option.
Previewing Themes
You can use the File Manager to preview and change themes.
-
Open a file manager window.
To open a File Manager in browser mode, right-click a folder and then click . See Managing Folders and Files with File Manager for more information.
-
Enter the following URI in the location bar:
themes:///
The themes are displayed in the view pane.
-
Double-click a theme to change it.
3.2.5 Customizing Window Behavior
Click .
Use the Window Preferences tool to customize window behavior for the desktop. You can determine how a window reacts to contact with the mouse pointer or to double-clicks on its titlebar, and you can define which key to hold for moving an application window.
Figure 25 Window Preferences Dialog
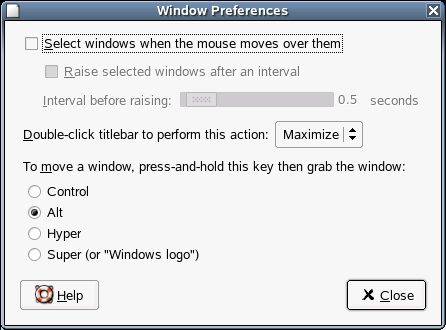
When several application windows populate the desktop, the active one by default is the one last clicked. Change this behavior by activating . If desired, activate and adjust the latency time with the slider. This raises a windows a short time after the window receives focus.
Application windows can be shaded (rolled up) by double-clicking the title bar, leaving only the title bar visible. This saves space on the desktop and is the default behavior. It is also possible to set windows to maximize when the title bar is double-clicked.
Using the radio buttons, select a modifier key to press for moving a window (Ctrl, Alt, Hyper, or the Windows logo key).