2.3 Desktop Basics
As with other common desktop products, the main components of the NLD desktop are icons that link to files, folders, or programs, as well as the panels at both the top and bottom of the screen (similar to the Task Bar in Windows). Double-click an icon to start its associated program. Right-click an icon to access additional menus and options. You can also right-click any empty space on the desktop to access additional menus for configuring or managing the desktop itself.
By default, the desktop features three key icons: your personal folder, Computer, and a trash can for deleted items. Other icons representing devices on your computer might also be present on the desktop. If you double-click your personal folder, File Manager starts and displays the contents of your home directory. For more information about using File Manager, see Managing Folders and Files with File Manager.
Right-clicking an icon displays a menu offering file operations, like copying, cutting, or renaming. Selecting from the menu displays a configuration dialog. The title of an icon as well as the icon itself can be changed with . The Emblems tabbed page lets you add graphical descriptive symbols to the icon. The Permissions tabbed page provides access to the access, read, and write permission settings for this file for the user, the group, or others. The Notes tabbed page lets you manage comments. The menu for the trash can additionally features the option, which deletes its contents.
A link is a special type of file that points to another file or folder. When you perform an action on a link, the action is performed on the file or folder the link points to. When you delete a link, you delete only the link file, not the file that the link points to.
To create a link on the desktop to a folder or a file, access the object in question in File Manager by right-clicking the object and then clicking . Drag the link from the File Manager window and drop it onto the desktop.
2.3.1 Default Desktop Icons
To remove an icon from the desktop, simply drag it onto the trash can. However, be careful with this option—if you move folder or file icons to the trash can, the actual data is deleted. If the icons only represent links to a file or to a directory, only the links are deleted.
2.3.3 Panel
The desktop includes two panels: the top and the bottom.
2.3.3 Top Panel
The left side of the top panel (as shown in the following figure) consists of the , , and menus, and quick start icons for the Web browser, Evolution™, OpenOffice.org Writer, and the network connection monitor. The right side of the top panel consists of a volume manager, a time and date program, and a task switcher.
Figure 12 Top Panel

You can add quick start icons to the top panel by right-clicking the panel and then clicking . Browse to and select the program you want to add from the menu list.
2.3.3 Bottom Panel
The bottom panel contains the icons of all applications currently running. If you click the name of a program in the taskbar, the program's window is moved to the foreground. If the program is already in the foreground, a mouse click minimizes it. Clicking a minimized application reopens the respective window.
On the right side of the bottom panel are two icons: the icon which minimizes all program windows and displays the desktop, and the icon.


Workspace Switcher provides access to additional work areas through virtual desktops. These virtual desktops, called workspaces, provide extra space in which to arrange open applications and windows. For example, you can put an editor on one workspace, some shells on another, and your e-mail application and Web browser on a third workspace. Using Workspace Switcher, you can quickly access the programs running in the selected space and avoid windows piled on top of each other on one desktop.
If you right-click an empty spot in the panel, a menu opens, offering the options listed in the following table:
Table 1 Panel Menu Options
2.3.4 Adding Applets and Applications to the Panel
You can add applications and applets to a panel for quick access. An applet is a small program that has limited access to your system resources. An application is usually a more robust stand-alone program, and access to your system resources is not as strict.
Right-click any vacant space on the panel, click , then click the applet that you want to add from one of the submenus. Some useful programs to add to your panel include the following:
Table 2 Programs You Can Add to Your Panel
Mousing over a program in the list displays a brief overview of the program. For more information about a program, see the program's Help which is available by right-clicking on the icon in the panel and then clicking .
2.3.5 Main Menu
Open the main menu by clicking on the far left of the top panel. The applications are listed in categories, except for more commonly used applications, which can be added to the main menu. The menu includes tasks and applications that affect the entire system, like , , and . There is also the option, which lets you enter a command to start a program instead of navigating through the various program menus.
Figure 13 Novell Linux Desktop Programs Menu
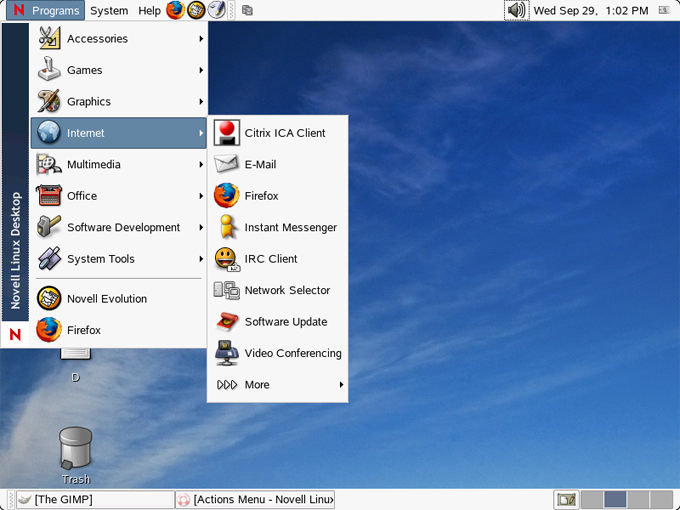
For information on editing the main menu, see Modifying the Contents of the Programs Menu.
2.3.6 Handling Floppy Disks, CDs, or DVDs
To access floppy disks, CDs, or DVDs, insert the medium into the appropriate drive. Double-click the drive in to view the contents. Copy files to your personal home directory by dragging-and-dropping.
WARNING: Do not simply remove floppy disks from the drive after using them. Floppy disks, CDs, and DVDs must always be unmounted from the system first. Close all File Manager sessions still accessing the medium, then right-click the icon for the medium and select from the menu. Then safely remove the floppy disk or CD when the tray opens automatically.
Floppy disks can also be formatted by clicking . In the Floppy Formatter dialog, select the density of the floppy disk and the file system settings: Linux native (ext2), the file system for Linux, or DOS (FAT) to use the floppy with Windows systems.