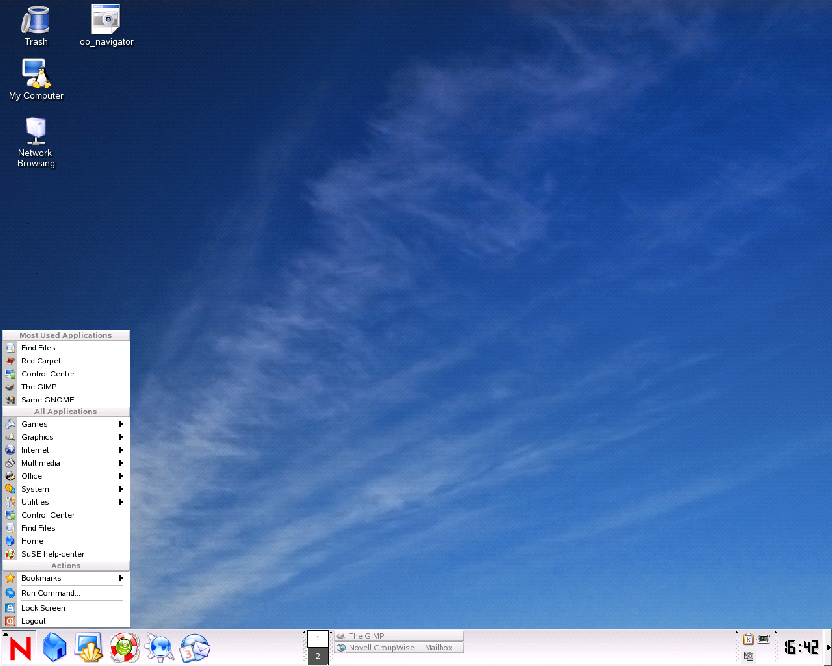
2.3 Desktop Components
The graphical desktop environment should not pose any problems for former Windows or Macintosh users. The main components are the icons on the desktop and the panel at the bottom of the screen. Click a symbol or an icon once to start the associated program or the file manager Konqueror.
Figure 12 KDE Desktop

The desktop has the following icons by default:
-
Trash: Contains files and folders that have been deleted. See Managing the Trash Bin for more information.
-
My Computer: Displays the devices such as hard drives and CD drives that are attached to your computer.
-
Network Browsing: Displays network services that you can access. Some of the services might require you to authenticate to that service.
-
Printer: Displays print jobs you have sent to printers. See Managing Printers for more information.
-
Novell: Opens the Novell Web site.
-
Office: Opens a new OpenOffice.org Write document. See The OpenOffice.org Office Suite for more information.
2.3.2 Managing the Trash Bin
The trash bin is a directory for files marked for deletion. Drag icons from the file manager or the desktop to the trash bin icon by keeping the left mouse button pressed, then release to drop them there. Alternatively, right-click an icon and select from the menu. Click the trash bin icon to view its contents. You can retrieve an item from the trash if desired.
Files removed with Delete are not moved to the trash bin, but deleted completely. To delete the files in the trash bin completely, right-click the trash bin icon, then click .
2.3.3 Accessing CD-ROM, DVD-ROM, and Floppy Disks
Click My Computer on the desktop, then click the drive you want.
Figure 13 My Computer
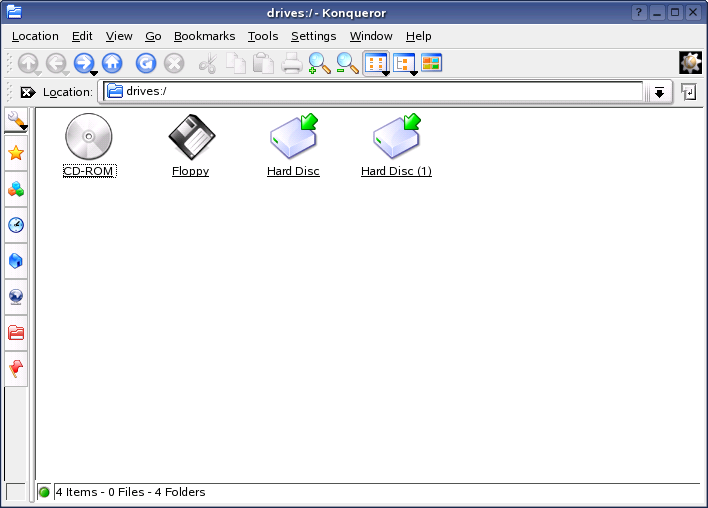
If you click the Floppy icon when a floppy disk is inserted (or the CD-ROM icon when a CD is inserted), the file manager starts and displays the content of the disk. Display a menu with various options by right-clicking the individual icons on the disk. It is also possible to move the icon to a different location, such as to the desktop or your home directory, by simply keeping the left mouse button pressed and dragging it to the appropriate location. You are asked whether you want to move or copy the file or create a link. You can also copy or move files from your home directory to a floppy disk.
2.3.4 Using the Bottom Panel
The panel at the bottom of the screen (also called the system tray) consists of several areas. By default, the icon for the main menu is located at the far left. Other icons are lined up next to it. The House icon provides quick access to your home directory with all subdirectories. The other icons start applications, such as a terminal window and the Konqueror Web browser.
Figure 14 Bottom Panel (System Tray)

Next to these icons are the numbered buttons that you use to switch desktops. These multiple desktops enable you to organize your work. If you use many programs simultaneously you might want to run some programs in one desktop and other programs in the other desktop. To switch between your work, click the desktop in the panel.
The taskbar is located next to the virtual desktops. All started applications are displayed in the taskbar. If you click a window title in the taskbar, the application is moved to the foreground. If it is already in the foreground, clicking minimizes the application; if you click it again, it reopens. To the right of the taskbar are applets, such as the clipboard Klipper, and any other applets you have started. The clock helps you keep track of the time.
If you right-click an empty space in the panel, a menu providing the usual help and configuration options for the panel is displayed. Use the menu to change the size of the panel and to add and remove applications. To add an application, right-click an empty space, click , then select the application you want to add from the menu. To remove applications or applets, right-click the corresponding icon, then click in the displayed menu.
2.3.5 Accessing the Main Menu
Access the main menu using the N icon to the far left of the panel.
Figure 15 KDE Desktop Main Menu
By default, this menu contains entries for logging out from the system, locking the screen, and executing commands. Use the Home item to display your home directory, or start the Control Center to customize the desktop. The other menu entries let you start a variety of programs sorted by subjects:
-
Logout User: You can log out from the system using this menu item. However, you are first asked what should happen after the logout. If you select Login As Different User, the login screen is displayed, allowing you or another user to log in to the system. You can also turn off or restart the computer. Confirm your selection with OK, or remain logged in by clicking Cancel.
-
Lock Screen: If you leave your workstation, you can blank your screen or start a screen saver. To restore the session view, enter your normal login password. This is a security so no one can access your documents or e-mail messages.
-
Switch User: To start a second session with a graphical user interface on your machine, select Switch User from the main menu. Your current session remains active while you are taken to the login screen where you can log in as a different user Access the first session by pressing Ctrl+Alt+F7. Press Ctrl+Alt+F8 to access the new session. Additional sessions can be accessed by pressing Ctrl+Alt+F9 to F12.
-
Run Command: To easily start an application whose name you know without navigating through the menus, enter its command in the dialog that opens.
-
Bookmarks: Use Edit Bookmarks to start the bookmark editor and to manage your bookmarks. If you select a bookmark from the menu, the browser starts and loads the desired URL.
-
Find Files: Starts the program KFind. If you forget where a certain file is, enter its name in the Named field and start a search in your home directory. If you are not sure what the exact file name is, use wildcards. Use Help to access the KFind manual, which provides detailed information about the program.
Additional search criteria can be specified in the Properties dialog. You can limit your search to files that were modified or created recently or to files that belong to a specific user or group.
Detailed information about the Control Center is available in Customizing Your Settings.
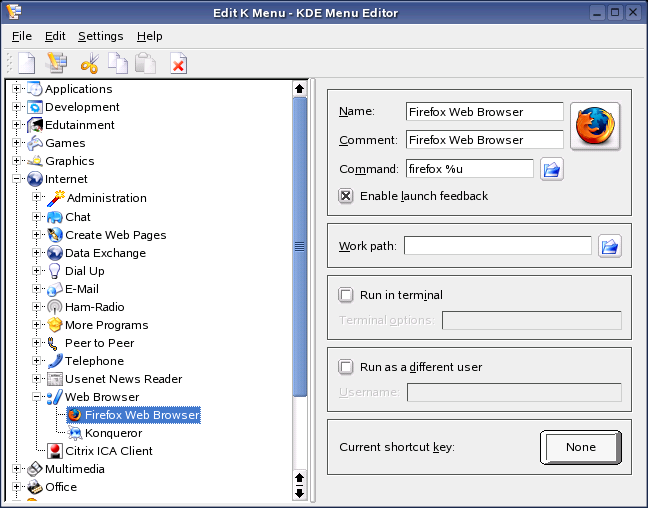
2.3.6 Managing the Main Menu
You can use the KDE Menu Editor to add new programs to the main menu, remove a menu item for an application, or change the location of an item on the menu.
Figure 16 KDE Menu Editor
-
Click to open the KDE Control Center.
-
Click .
-
Click the tab, then click .
-
Choose from the following options:
-
To edit a selected menu item, select the item in the left frame, then choose from the following options:
-
Click to exit the KDE Menu Editor.