2.12 Important Utilities
The following sections introduce a number of small KDE utilities intended to assist in daily work. These applications perform various tasks, such as managing your keys for encrypting and signing files and e-mail messages, managing your Clipboard, formatting floppy disks, compressing and decompressing diverse file archive types, and sharing your desktop with other users. You might find other applications that are not mentioned in this user guide. For more information on those programs, see the application help or search for the application on the Internet.
2.12.1 Managing Internet Connections
To surf the Internet or send and receive e-mail messages, connect a modem or an ISDN or Ethernet card to your machine and configure it. This can be done with the help of the YaST system assistant.
On startup, KDE loads KInternet. The program checks whether an Internet connection can be established. If this is possible, the application icon, a plug, automatically appears in the right section of the KDE panel.
Right-click to access a menu for configuring KInternet. To configure your access, click . After you enter the root password, YaST starts. Depending on the access type, start the modem, ISDN, network, or DSL configuration of YaST to select a provider from a list.
KInternet can do even more. If the Channel Bundling option is activated in YaST, a second ISDN channel can be added to an existing connection with . This doubles the transfer rate (although at a higher price). Activate channel bundling if you need to download large files. Activated channel bundling is indicated by a red plus sign (+) at the top left corner of the KInternet icon.
Users who want to automatically establish Internet connections can use Dial on Demand (DoD). If this mode is selected, KInternet automatically connects to your Internet service provider (ISP) as soon as a request is submitted. After a certain timeout, the connection is terminated. A DoD connection is evident from the blue D at the bottom-right corner of the KInternet icon. DoD makes sense only if you have a flat-rate Internet account; otherwise, the repeated establishment and termination of the connection can be quite costly.
2.12.2 Using the KGet Download Manager
KGet is the download manager for KDE. It manages your transfers in a window. You can stop, resume, delete, queue transfers, and add new transfers.
Launch KGet by clicking . You can also press Alt+F2, then type kget.
When KGet is started for the first time, you can choose to
have it integrated with Konqueror. If you integrate KGet with Konqueror,
KGet is added to the system tray as an icon with a downward arrow (![]() ).
Click this arrow to view KGet transfers.
).
Click this arrow to view KGet transfers.
Figure 23 KGet

Adding Transfers to the List
-
Click
 to
open the dialog displaying your transfers.
to
open the dialog displaying your transfers.If the KGet icon is not in your system tray, click .
-
Click .
-
Specify a URL, then click .
-
Specify where you want the downloaded file saved.
The entry for the transfer is added to the main window of KGet and the download is initiated.
Another way to add a transfer is to simply drag a file (for example, from an FTP server) from Konqueror and drop it in to the main KGet window.
You can modify the preferences for your downloads by clicking .
Timer-Controller Transfers
You can configure KGet to perform transfers at a specific time.
-
Click
to
open KGet.If the KGet icon is not in your system tray, click .
-
Click .
All transfers inserted from this point are not started immediately but are queued.
-
To start the clock, double-click the entry, then click .
-
Enter the day, month, year, and time you want to start the transfer, click the icon, then close the dialog.
-
After making the settings you want for all your transfers, click to set KGet back to the online mode.
The transfers should start at the specified times.
2.12.3 Using the Clipboard Klipper
The KDE program Klipper serves as a clipboard for selected text, normally marked by keeping the left mouse button pressed. This text can be transferred to another application by moving the mouse pointer to the target location then pressing the middle mouse button (on a two-button mouse, press both buttons simultaneously). The text is copied to the selected location from the clipboard.
By default, Klipper is started when KDE is loaded, appearing
as a Clipboard icon in the panel (![]() ).
You can view the contents of the clipboard by clicking this icon.
The Klipper context menu and the last seven entries, also referred
to as the history, are displayed. If a long section of text was
copied to Klipper, only the first line of the text is displayed.
The most recent entry is listed on top and is marked as active with
a black check mark. To copy an older text fragment from Klipper
to an application, select it by clicking it in the list, move the
mouse pointer to the target application, and then middle-click.
).
You can view the contents of the clipboard by clicking this icon.
The Klipper context menu and the last seven entries, also referred
to as the history, are displayed. If a long section of text was
copied to Klipper, only the first line of the text is displayed.
The most recent entry is listed on top and is marked as active with
a black check mark. To copy an older text fragment from Klipper
to an application, select it by clicking it in the list, move the
mouse pointer to the target application, and then middle-click.
Figure 24 The Clipboard Klipper
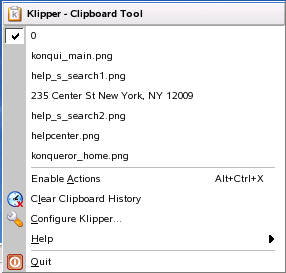
In addition to the clipboard, the context menu also contains the following menu items:
-
Enable Actions: If you click this, it’s marked with a black check mark. For example, if you mark a URL with the mouse when actions are enabled, a window opens, letting you select a browser for displaying this URL. Click Actions Enabled to disable this function.
-
Clear Clipboard History: Deletes all entries from the clipboard.
-
Configure Klipper: Opens the Klipper configuration dialog. Klipper can be customized in many ways. You can control the program with keyboard shortcuts or use regular expressions (see the Klipper handbook for details). Former Windows users can use an option to activate the keyboard shortcuts Ctrl+C for copying, Ctrl+X for cutting, and Ctrl+V for pasting under the General tab. To use this feature, activate Synchronize Contents of the Clipboard and the Selection. Then use the mouse or the keyboard shortcuts you are accustomed to using.
-
Help: Opens a submenu that accesses the Klipper handbook and other information about Klipper and KDE.
-
Quit: Displays a dialog asking whether Klipper should be started automatically the next time you log in. If you click No, start the program from the main menu the next time you want to use it. If you click Cancel, the program is not terminated.
2.12.4 Formatting Floppy Disks with KFloppy
KFloppy is a floppy disk formatter. To launch KFloppy, click . From the Floppy Drive drop-down list, select or (if your machine has two floppy disk drives). The default setting for the size is 3.5” 1.44 MB. The setting for the file system is very important. Choose between the Linux format and . If you select MS-DOS, you can read and write the floppy disk on a Windows machine.
Figure 25 KFloppy
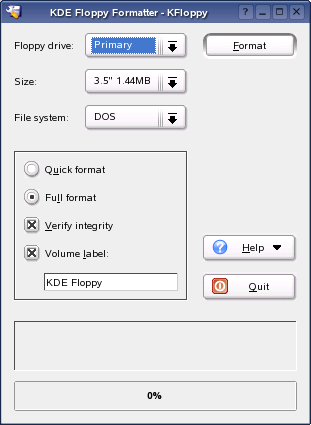
Select Quick Format or Full Format. The quick format procedure merely rewrites the file system and deletes all data. The full format procedure rewrites all tracks and sectors and is able to detect and mark bad sectors. Sectors marked as bad are not used for writing data. Select Verify Integrity to have the formatting checked and verified upon completion. If you select Volume Label, you must also specify a name for the floppy disk in its input field.
After making all settings, click . You are warned that all data on the disk will be lost and prompted to confirm. KFloppy informs you if any problems occur during the formatting procedure, including information about any bad sectors.
Click to access a short menu that offers the KFloppy handbook. Additionally, you can use it to send a bug report or other concerns to the developers of KFloppy. Selecting About KFloppy from the menu accesses information about the version, authors, translation, and license.
To exit KFloppy, click .
2.12.5 Displaying, Decompressing, and Creating Archives
To save space on the hard disk, use a packer that compresses files and directories to a fraction of their original size. The application Ark can be used to manage such archives. It supports common formats, such as ZIP, TAR.GZ, TAR.BZ2, LHA, RAR, and ZOO.
Start Ark by clicking , or type ark in a terminal window. If you already have some compressed files, move these from an open Konqueror window to the Ark window to view the contents of the archive. To view an integrated preview of the archive in Konqueror, right-click the archive in Konqueror and select . Alternatively, select to open the file directly.
Figure 26 Ark: File Archive Preview
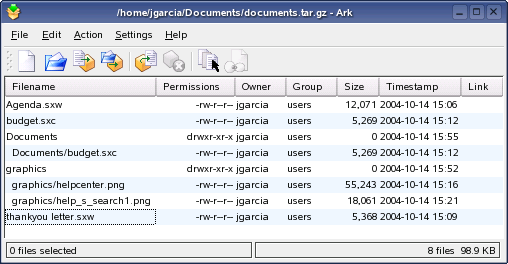
In the archive window, the Action menu offers options such as Add File, Add Directory, Delete, Extract, View, Edit With, and Open With.
To create a new archive, click . Type the name of the new archive in the dialog that opens. If you use a file extension, an archive with the specified format is generated. If you omit the extension, .zip is used as the default.
After you have specified the archive name, an empty window is displayed. Move files or directories into this window from Konqueror. Ark compresses and lists the files. For more information about Ark, click .
2.12.6 Desktop Sharing
You can share your desktop for use by other users on their hosts. Desktop sharing makes use of the remote framebuffer (RFB) protocol, more commonly referred to as Virtual Network Computing (VNC). This feature enables a Linux desktop to be made available for clients using other operating systems, provided they support VNC.
To share your desktop, click . Choose between and . If you click , an invitation indicating the IP address of the host, password, and expiry of the invitation is generated. Send this data manually to the person you want to invite. If you click , all required data is transmitted by e-mail. KMail starts automatically and generates an e-mail message with the needed data (host, password, and expiry). At the end of the e-mail, a link, which the recipient of the message can click to view your desktop in a browser, is provided. Simply type the e-mail address of the recipient and modify the standard text, if necessary. Then send the message.
Use to view the status of existing invitations. Use to revoke all invitations. To delete an individual invitation, select it and then click .
If an invited person requests a connection, KDE informs you about this request. Decide to accept or deny the connection. If you accept the connection, also use the check box to release the keyboard and mouse control. For security reasons, the maximum duration for a connection is one hour.
2.12.7 Taking Screen Shots with KSnapshot
With KSnapshot, you can create snapshots of your screen or special applications. Start the program by clicking . The KSnapshot dialog consists of two parts. The upper area (Current Snapshot) contains a preview of the current screen and three buttons for creating and saving the screen shots. The lower area contains further options for the actual creation of the screen shot.
Figure 27 KSnapshot
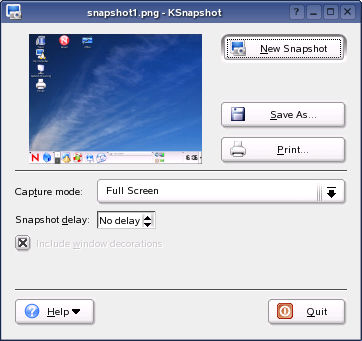
To take a screen shot, use to determine the time (in seconds) to wait between clicking New Snapshot and the actual creation of the screen shot. If is selected, only the window containing the pointer is saved. To save the screen shot, click and designate the directory and filename for the image in the subsequent dialog. Click to print the screen shot.
You can also use the GIMP to take screen shots. To open the GIMP, click . When you run the GIMP for the first time, it installs some files in your home directory and displays dialogs that give you the opportunity to adapt it to your environment. For information on using the GIMP, see The GIMP User Manual.
2.12.8 Managing Fonts with KFontinst
By default, NLD provides various fonts commonly available in different file formats (bitmap, TrueType*, etc.). These are commonly known as system fonts. You can also install your own fonts from various collections on CD. Such user-installed fonts are, however, visible and available only to the user who installed them.
The KDE control center provides an easy tool for administering system and user fonts. To check which fonts are currently available, type fonts:/ in the Address field of a Konqueror file manager window. This displays two icons: Personal and System. User-installed fonts are installed to the Personal folder. Only root can install to the System folder.
To install fonts as a user:
-
Click .
-
Right-click the list window, then click .
-
Browse to and select one or more fonts for installation.
Select a font to see a preview of it. The marked fonts are installed to your personal font folder.
To update system fonts, select the System Administration mode, enter the root password, and then proceed as described above for user font installation.
The feature for deactivating installed fonts is very useful. The fonts are not removed but are made unavailable to the system. Click the icon. This makes the green check mark disappear. The new settings become active after you click . The deactivated fonts are no longer available to applications, which reduces the size of font lists displayed in applications.
2.12.9 Managing Passwords with KWallet Manager
Remembering all the passwords for protected resources that you need to log in to can be tedious and time consuming. KWallet can collect all your passwords and store them in an encrypted file (called a wallet file), accessible by all applications, and protected with a master password. This password lets you open your wallet and view, search, delete, or create new entries. You don’t normally need to insert an entry manually; KDE recognizes if a resource requires authentication, and starts KWallet automatically.
IMPORTANT: Anyone who knows your password has access to all information contained in the wallet. If you forget your KWallet password, it cannot be recovered.
Starting KWallet
When KWallet starts for the first time (for example, when you access a Web site where you must enter a password to log in), a dialog appears with the welcome screen.
Figure 28 KDE Wallet Wizard
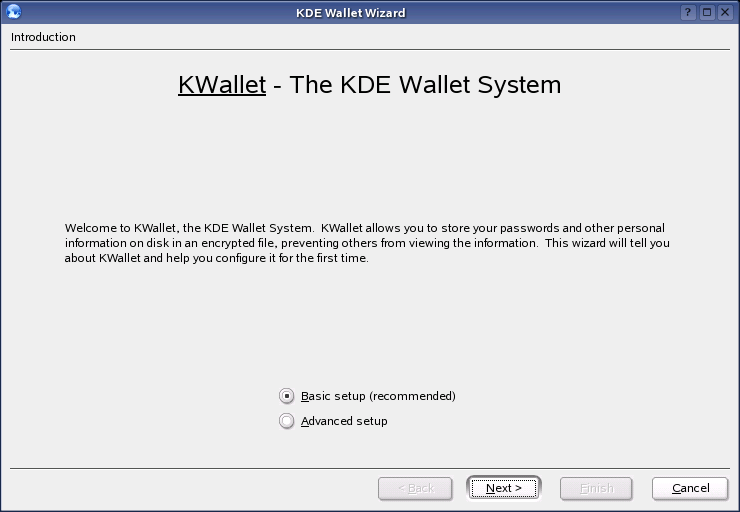
You can choose between Basic Setup (recommended) and Advanced Setup. If you choose Basic Setup, you can choose whether or not you want to store personal information. Some KDE applications, such as Konqueror or KMail, can use the wallet system to store Web form data and cookies. Click , enter a new password, then click Finish.
If you choose Advanced Setup, you have an additional security screen. The default settings are generally acceptable for most users, but you might want to change them. The option closes wallets after a period of inactivity. The option separates your network passwords and local passwords. The default setting is to store all passwords in one wallet.
Using the KWallet Manager
KWallet Manager lets you see if any wallets are open and which applications are using each wallet. You can also disconnect an application’s access to a wallet, and manage the wallets installed on your system (creating and deleting wallets and manipulating their contents).
When a wallet is opened, the KWallet Manager application is
automatically launched. A panel icon indicates that a wallet is
open ( ).
When all wallets are closed, the icon reflects this by showing a
closed wallet (
).
When all wallets are closed, the icon reflects this by showing a
closed wallet (![]() ).
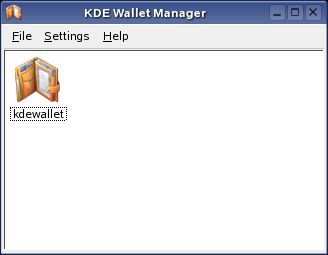
Click the wallet icon to display a window showing all available
wallets as icons that reflect their current status, either open
or closed.
).
Click the wallet icon to display a window showing all available
wallets as icons that reflect their current status, either open
or closed.
Figure 29 KWallet Manager
Right-clicking a wallet offers the following options:
-
New Wallet:Creates a new wallet. A dialog opens requesting a name for the new wallet.
-
Open:Opens the wallet. The contents of the wallet display in a new window.
-
Change Password:Changes the master password for the wallet.
-
Disconnect:Disconnects an application from the wallet. Currently connected applications appear in a submenu.
-
Close:Forces the wallet to close.
-
Delete:Deletes the wallet
The kdewallet folder is the default folder for your passwords. Click to see the main window. It is divided into four different parts: the top left displays a summary, the top right displays subfolders, the lower left shows a list with folder entries, and the lower right shows the contents of a selected folder entry.
Figure 30 The KWallet Manager Window
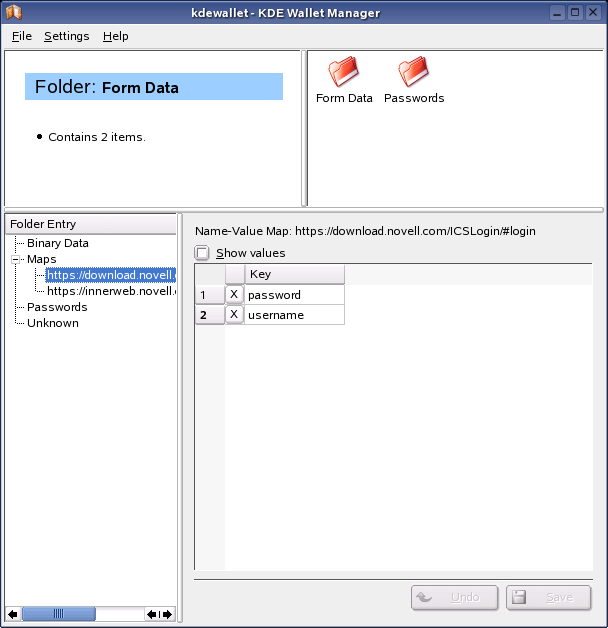
You can add or delete folders, and selecting a folder updates the folder entry list and the summary display. Selecting a folder entry updates the entry contents pane, and allows you to edit that entry. Entries can also be created or deleted using the context menu for the folder contents.
To add a new entry:
-
Right-click the folder entry.
You can add a new entry only to Maps or Passwords. Use Maps if you have key and value pairs. Passwords can contain multiline entries.
-
Specify a name for the new entry, then click .
Your new entry is sorted under your folder entry.
-
Click the new entry to display it on the right side (the folder is initially empty).
-
Right-click the bottom right panel, then click .
-
Specify a new key, click to view the value field, then enter a value.
All entries are shown in a table view.
-
Click .
Copying Your Wallet to Another Computer
For the most part, KWallet resides silently in the panel and is automatically activated if needed. However, you can copy your wallet files to another computer (for example, your laptop). To simplify this task, wallets can be dragged from the manager window to a file browser window. This let you easily package a new wallet for transfer to another environment. For example, a new wallet could be created and copied onto a removable flash memory device. Important passwords could be transferred there, so you have them available in other locations.