YaST VPN Module --- Overview
VPN (virtual private network) refers to a technology used to implement secure data connections via the insecure medium of the Internet. Communication is not with the Internet, but via the Internet. The data packages are encrypted here for authentication and confidentiality and are packed into a new package (tunneling). This is an economical way to produce a secure network between geographically far-flung computers. The standard for this kind of data traffic is IPSEC (Internet protocol security), which is implemented under Linux (among others) by means of the FreeS/WAN program.
The establishment of a VPN connection requires the availability of digital certificates from all participating parties, which are used to verify the validity of the connection. Such certificates can be created with YaST then used for VPN. X.509 Certification with YaST contains a brief explanation of the background of digital certification and outlines how to create and manage certificates yourself. The next sections explain how to set up a VPN server and VPN clients under Linux and Windows using YaST.
A Road Warrior server is a VPN server configuration that accepts connections from any clients with valid and signed CA certificates. Three steps to set up a Road Warrior server and these are explained below.
Create a server certificate on the CA management computer
Import a certificate on the server computer
Set up a connection on the server.
Create the server certificate with the YaST CA Management module (see Creating or Revoking User Certificates). Then save the certificate together with the key and all participating CAs in a PKCS12 file (see Exporting CA Objects as a File).
NOTE: If certificates should be created for IPsec applications with Windows XP, client certificates must be used. The "KeyUsage" extension there contains the values expected by Windows.
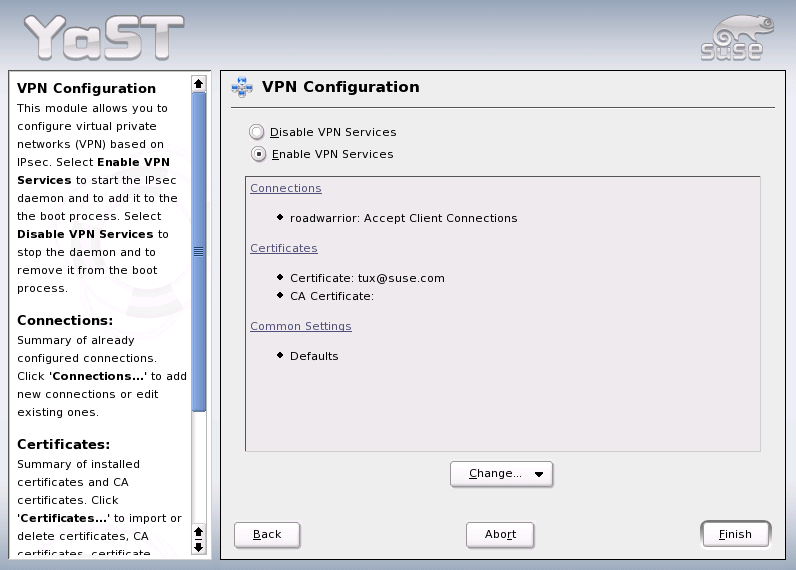
Start the VPN YaST module on the server in the YaST control center under Security and Users. In the overview, shown in Figure 127, click CertificatesImport then select your saved PKCS12 file. Enter the PKCS12 password for the import. After this, the certificate is displayed in the certificate list. Clicking Next returns to the overview.
Figure 127
YaST VPN Module --- Overview
IMPORTANT: You should not use the general server certificate of the YaST CA Management module here because IPsec manages its own certificates.
Another connection must be set up to ensure that the certificate can be used for IPsec- In the overview (Figure 127), click Connections then select Add in the connection overview. After you have selected Road Warrior Server a configuration is created that accepts connections from any client if it has a valid certificate signed by the CA.
Select the connection settings in the next dialog (Figure 128). Enter your own IP address in Local IP Address. In the case of Internet dial-up access, this is not usually known prior to the dial-up. However, in the case of Internet access, there is usually a default route. The %defaultroute setting instructs the server to use the interface to which the default route points.
If the connection should be set up and cleared dynamically when a network interface without a default route is activated and deactivated, enter %dynamic instead. The IP addresses of the relevant interface are then used.
Figure 128
YaST VPN Module --- Connection Settings
If the server should act as a gateway and permit access to a network, Function as Gateway should be activated. Then enter this network in the input field, for example, 10.10.0.0/24. You can also select the required certificate here. The first certificate is preselected.
NOTE: Either the first Subject Alternative Name (if any) or the Distinguished Name from the certificate is used in this simplified Road Warrior configuration workflow.
After you click Next, choose how the connection should be handled at system start-up in the next dialog. A connection can either be "prepared" or "ignored". In the case of a prepared connection, the server waits for connection inquiries from clients.
This is only possible if the local IP address is already known. This means, in the case of %defaultroute, that the default route must already be set and the computer must already have connected to the Internet. If the connection to the Internet is not already established when the system is started, you can also specify that the connection should be set up and cleared dynamically with a network interface, for example, with a DSL interface. If the interface selected here is not the interface of the default route, it makes no sense to enter %defaultroute as the local IP address either. When you click OK once, see the new connection in the connection overview list. Click OK again then Exit to conclude the configuration.
Three key steps are required to set up a VPN Linux client.
The client certificate is created with the YaST CA Management module (see Creating or Revoking User Certificates). The finished certificate is then saved together with the key and all participating CAs in a PKCS12 file (see Exporting CA Objects as a File).
On the server, start the VPN YaST module in the YaST control center under Security and Users. In the overview (Figure 127), click Connections then select the required server connection in the connection overview. After you select Experts...ExportFreeS/WAN, select the storage location for the freeswan_ipsec-conf file, which must be transferred to the Linux client. This file is a suggestion for a FreeS/WAN client and its details may need to be adapted. The file is tailored to FreeS/WAN Version 2. Older versions require additional parameters.
Next, the certificates and the configuration file must be transferred to the client by means of a secure medium. The IPsec configuration file must be saved on the client as /etc/ipsec-conf.
To import the certificate, start the VPN YaST module in the YaST control center under Security and Users on the client. In the overview (Figure 127), click CertificatesImport then select your saved client certificate. For import purposes, enter the password for the certificate. The certificate is then displayed in the certificate list and clicking Next returns to the overview.
NOTE: The connection may need to be adapted to local circumstances (e.g., change certificate and ID).
If the client computer does not have a YaST VPN module, import the certificates manually:
Copy the client certificate to /etc/ipsec-d/certs.
Copy the CA certificate to /etc/ipsec-d/cacerts.
Copy the key to /etc/ipsec-d/private. Only the root user should have access to this file. Adjust the permissions accordingly.
Enter the password for the key in /etc/ipsec-secrets. This file should also only be accessible as root.
The openssl command line program can be used to extract the certificate from the PKCS12 file:
openssl pkcs12 -clcerts -nokeys -in DATEI.p12 -out \
          /etc/ipsec-d/certs/cert_01.pem
The same applies to the CA certificate:
openssl pkcs12 -cacerts -nokeys -in DATEI.p12 -out \
          /etc/ipsec-d/cacerts/cacert_01.pem
and also to the keys:
openssl pkcs12 -nocerts -nodes -in USER.p12 -out \
          /etc/ipsec-d/private/key_01.pem

chmod 600 /etc/ipsec-d/private/key_01.pem
The -nodes option ensures that the key is stored without a password. That is no harm in this case because the file can only be read by root in any case. Another entry is required in /etc/ipsec-secrets so FreeS/WAN recognizes the key. Add it with:
echo ': RSA /etc/ipsec-d/private/key_01.pem ""' \
         >> /etc/ipsec-secrets

chmod 600 /etc/ipsec-secrets
The configuration file can now be copied to /etc/ipsec-conf. Under certain circumstances, the file name at leftcert may need to be adapted. However, /etc/ipsec-d/certs/cert_01.pem is normally already entered. The value following right must be identical with the DNS host name or IP address of the server.
rcipsec start starts IPsec and establishes the connection (if auto=start has been configured). ipsec auto --status or setkey-D and an inspection of /var/log/messages enable you to check that everything has worked. rcipsec stop ends IPsec and all connections are cleared.
You can also set up IPsec connections to SUSE LINUX from Windows XP and Windows 2000 clients. The various steps are described below.
Create the client certificate on the CA management computer.
Export the Windows configuration file.
Prepare Windows.
Configure the Windows snap-ins.
Import a client certificate.
Make a note of important certificate data.
Configure the IPsec connection.
Create desktop links.
Create the client certificate using the YaST CA Management module (see Creating or Revoking User Certificates). The completed certificate should then be saved together with the key and all associated CAs in a PKCS12 file (see Exporting CA Objects as a File).
On the server, start the VPN YaST module in the YaST control center under the heading Security and Users. In the overview (Figure 127), click Connections then select the required server connection in the connection overview. After you select Experts...ExportWindows, select the storage location for the windows_ipsec-conf file, which must be transferred to the Windows client. This file is a suggestion for a Windows client and its details may need to be adapted.
You can set up the IPsec connection manually, which requires ipseccmd.exe (Windows XP) or ipsecpol.exe (Windows 2000). These should be included in your Windows installation. In the case of Windows XP, execute support\tools\setup.exe on the installation CD (complete installation). However, these programs are command line-based, making them quite difficult to use. You can also configure the connection by means of MMC (Microsoft Management Console), however, this is not particularly intuitive. Instead, it is recommended to use the ipsec-exe tool, which does the main work of configuring the IPsec connection under Windows XP or Windows 2000 for you.
Download this tool onto your computer from http://vpn.ebootis.de/package.zip and decompress the contents, for example, under C:\Programs\IPsec\. At this point, our thanks go to the author, marcus@ebootis.de.
If you use Windows 2000, first load at least ServicePack2, so Windows 2000 can also handle 3DES encryption. Otherwise, a connection to Windows 2000 cannot be made. ServicePack2 is available at http://www.microsoft.com/windows2000/downloads/servicepacks/sp2/sp2lang.asp. In the case of Windows 2000, you also need ipsecpol.exe, which can be found in the resource kit at http://agent.microsoft.com/windows2000/techinfo/reskit/tools/existing/ipsecpol-o.asp.
IMPORTANT: This program normally installs to C:/Programs/Resource Kit. However, it is not much use at this point because it is a command line-based program and therefore needs to be copied into a directory in which executable files are stored. We recommend copying ipsecpol.exe to C:/WINNT and the corresponding DLLs to C:/WINNT/System. ipsecpol must be executed as administrator.
Open MMC on the Windows client. In the start menu, go to RunMMC. In MMC, click FileAdd/Remove Snap-In. A dialog opens in which you may see active snap-ins. Click Add. A selection window opens to display all available snap-ins. CertificatesAdd takes you to the configuration wizard. Here, select Computer Account and click Next. Select Local ComputerFinish then IP Security Guidelines ManagementAdd. A configuration wizard opens in which to select Local ComputerFinish. Click Close then OK.
The two snap-ins that have been added can be seen in the MMC. Open the Certificates directory. Right-click Own Certificates. In the drop-down menu, select All TasksImport. The certificate wizard opens. Select NextSearch. Under File Type, enter Private Information Exchange (*.pfx,*.p12). Select the exported PKCS12 file and click Next. Enter the password used in the YaST CA Management module to export the certificates. Click Next. Now select Save All Certificates in Following Storageauto then NextFinish. A dialog indicates if the import procedure has succeeded. Click OK.
The prepared IPsec sample configuration normally already contains the correct DN of the CA (Issuer). In MMC, click FileSave. Save your configuration with the suggested name at the suggested location. To establish whether the certificate data is correct, open the Own Certificates directory in MMC again and open Certificates. Right-click the certificate and select Open from the drop-down menu then the Details tab.
When you click Issuer, see entries similar to those below, of which you should take note:
        E=bsupport@suse.de
        CN=mainca
        OU=bu
        O=SuSE
        L=Nuremberg
        S=Franconia
        C=DE
Close the certificate view with OK and MMC with FileExitSaveYes.
Install the ipsec-exe tool by decompressing package.zip to C:\Programs\IPsec\. In the next step, replace the standard version of the ipsec-conf file contained there with the exported windows_ipsec-conf from the VPN server (rename). Then change to the C:\Programs\IPsec directory and open the file with an editor to check the configuration data. The following shows the standard values:
conn <Name of the connection>
        left=%any
        right=<IP of the SuSE Linux standard server>
        rightca=<the previously noted values in reverse order,
        separated by commas>
        network=auto
        auto=start
        pfs=yes
The first line must be left-justified. All other lines must be indented. Here is a specific example for ipsec-conf:
conn me_to_servername
        left=%any
        right=10.10.254.181
        rightca="C=DE,S=Franconia,L=Nuremberg,O=SuSE,OU=bu,
                 CN=mainca,E=bsupport@suse.de"
        network=auto
        auto=start
        pfs=yes
Finally, create a link to the C:\Programs\IPsec\IPsec-exe file on the desktop. Now establish the connection to the Internet and click the first link. A window opens and the IPsec filters are configured for your current connection. The best way to test the tunnel is with ping <client IP behind the tunnel>. The message "Negotiating IP Security" appears once or twice, after which you will see the normal ping responses. The tunnel is active. In the case of Windows 2000, this takes two ping commands, so start ping again.
To deactivate the IPsec filter and the tunnel, first call IPsec-exe -off then IPsec-exe -delete. It is best to create a desktop link for this too.